
Popular categories
Looking for a yarn?


Comments / Questions (10)
![]() Shez Wills wrote:
Shez Wills wrote:
Found the pattern very basic. Adapted it a bit by knitting both the back and sleeves in A1 up to armhole level. This gave it a bit more of an interesting texture. Knitted the neck edge in A1 as well to maintain consistency of the pattern.
06.10.2022 - 11:58
![]() Shez Wills wrote:
Shez Wills wrote:
Found the pattern very basic. Adapted it a bit by knitting both the back and sleeves in A1 up to armhole level. This gave it a bit more of an interesting texture. Knitted the neck edge in A1 as well to maintain consistency of the pattern.
06.10.2022 - 11:55
![]() Monica Citroni wrote:
Monica Citroni wrote:
Que significa la 'x' en los diagramas. Gracias
11.07.2022 - 02:27DROPS Design answered:
Hola Monica, parece que hay una errata en los diagramas. Las X son lo que en las explicaciones se indica con el símbolo -, es decir: revés por el lado derecho y derecho por el lado revés. Trataremos de corregir la errata lo antes posible. Gracias.
12.07.2022 - 17:28
![]() Miriam wrote:
Miriam wrote:
Hei, jeg har strikket ferdig forstykke og bakstykke, og har nå begynt med ermer. Men problemet er at jeg slite rmed å forstå oppskriften på dette området. Skal ermene virkelig strikkes frem og tilbake og ikke rundt på pinnen? Og hva skjer egentlig med de merkene som nevnes i siste setning? Jeg har prøvd å rødføre meg hos flere strikkere, men de kunne ikke helt få fatt i det de heller. Takk for en ellers fin oppskrift:)
28.09.2020 - 21:50DROPS Design answered:
Hej Miriam, Ja vi har skrevet opskriften på ærmet så det strikkes frem og tilbage, men selvfølgelig må du strikke rundt om du hellere vil det :) Da skal du så bare tage ud på hver side af midterste maske under ærmet. Mærket markerer hvor du skal starte med at sy ærmet i ærmegabet, men det kan du læse mere om under montering. God fornøjelse!
30.09.2020 - 12:16
![]() Michèle wrote:
Michèle wrote:
Bonjour Comme Marie je ne trouve pas les explications des augmentations très claires il y a peut etre un problème de traduction car dans les explications du devant une fois les augmentations terminées on dit de continuer en point fantaisie mais sur la photo on voit que le devant est terminé en jersey endroit ceci dit le modèle est très joli et je l'ai réalisé en tenant davantage compte de la photo que des explications (il y a aussi une erreur dans la grille X au lieu de -)
01.01.2020 - 14:42
![]() Marie wrote:
Marie wrote:
Je n'arrive pas à faire les augmentation-1. Je fais une jetée sur l'endroit, tricote cette jetée à l'envers sur l'envers mais quand je suis rendue au rang endroit suivant je ne comprends pas comment je fais pour piquer dans la jetée et tricoter en même temps la maille endroit sur l'aiguille gauche
29.12.2019 - 06:36DROPS Design answered:
Bonjour Marie, cette vidéo montre (time code 02:22) comment tricoter cette maille en piquant sous le jeté, et en même temps, comment augmenter et diminuer. Bon tricot!
09.01.2020 - 13:58
![]() Roseline Ornon wrote:
Roseline Ornon wrote:
Comme Nathalie précédemment, j’ai très envie de réaliser ce modèle. Quand aurons nous accès aux explications ? Merci !
14.11.2019 - 14:21
![]() Nathalie wrote:
Nathalie wrote:
Quand sera til possible d'avoir les explications?
07.10.2019 - 09:01
![]() Patrizia wrote:
Patrizia wrote:
Bellissimo modello! spero di trovare presto la traduzione delle spiegazioni in italiano!
03.10.2019 - 16:45
![]() Ellis wrote:
Ellis wrote:
Again quick nit for schoolgirls
09.06.2019 - 21:45
|
|||||||||||||
Fun with Friends#funwithfriendssweater |
|||||||||||||
|
|
|||||||||||||
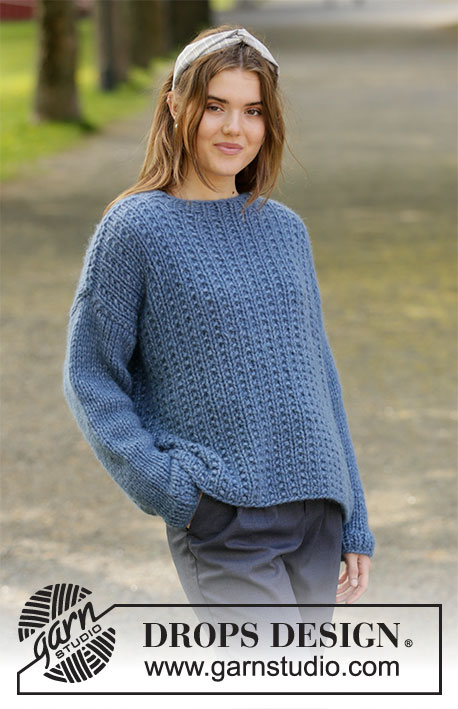
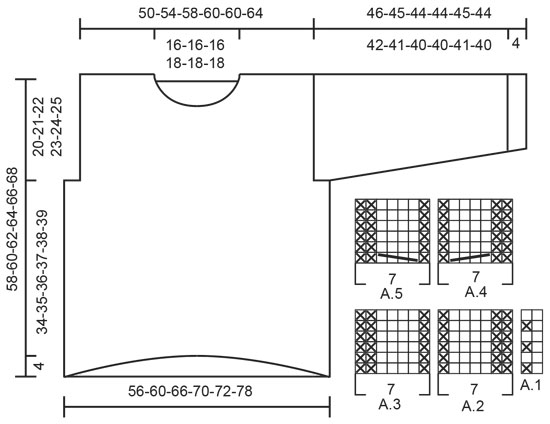
Knitted jumper in 2 strands DROPS Air. Piece is knitted with cables, displacement and textured pattern. Size: S - XXXL
DROPS 205-41 |
|||||||||||||
|
---------------------------------------------------------- EXPLANATION FOR THE PATTERN: ---------------------------------------------------------- GARTER STITCH (back and forth): Knit all rows. 1 ridge vertically = knit 2 rows. PATTERN: See diagrams A.1 to A.5. Diagrams show all rows in pattern seen from the right side. INCREASE TIP-1: All increases are done from the right side. Increase 1 stitch after A.4 and 1 stitch before A.5. Increase 1 stitch by making a yarn over. On next row purl yarn overs to make holes. Then work the new stitches in stocking stitch, but on the next row from right side knit 1 stitch through yarn over and the stitch above. I.e. work as follows: Work until stitch directly above yarn over made on previous row from right side, insert needle through hole (yarn over), pick up the thread as if to knit 1 through the hole, and slip the outermost stitch on left needle. INCREASE TIP-2: Increase 1 stitch by making 1 yarn over. On next row purl yarn over twisted to avoid hole. Then work the new stitches in stocking stitch. DECREASE TIP: All decreases are done from the right side! Decrease as follows after 1 edge stitch in garter stitch: Slip 1 stitch knitwise, knit 1, pass slipped stitch over Decrease as follows before 1 edge stitch in garter stitch: Work until 3 stitches remain on needle (= 2 stitches pattern A.1 + 1 edge stitch in garter stitch): Knit 2 together, 1 edge stitch in garter stitch. MEASURING TIP: Because of the weight of the yarn the shoulder width will stretched when worn. Length measurements on sleeves on chart is shorter than the finished garment when worn. Measure parts when they lie flat. ---------------------------------------------------------- START THE PIECE HERE: ---------------------------------------------------------- JUMPER - SHORT OVERVIEW OF THE PIECE: Worked back and forth on circular needle in parts and sewn together when finished. Work sleeves back and forth on circular needle. READ MEASURING TIP! FRONT PIECE: Cast on 62-66-72-78-80-86 stitches on circular needle size 9 mm with 2 strands Air. Purl 1 row from wrong side. Then work pattern as follows: 1 edge stitch in GARTER STITCH - read explanation above, A.1 over the first 18-20-22-24-24-26 stitches, knit 1, A.2 over the next 7 stitches, knit 8-8-10-12-14-16, A.3 over the next 7 stitches, A.1 over the next 18-20-22-24-24-26 stitches, knit 1, 1 edge stitch in garter stitch. Continue back and forth like this until A.2 and A.3 have been worked vertically. Now work pattern as follows: 1 edge stitch in garter stitch, slip 1 stitch knitwise, knit 1, pass slipped stitch over (= 1 stitch decreased), continue with A.1 as before until A.2, work A.4 (= 7 stitches) over A.2, make 1 yarn over (= 1 stitch increased), 8-8-10-12-14-16 stitches in stocking stitch, make 1 yarn over (= 1 stitch increased), work A.5 (= 7 stitches) over A.3, work A.1 as before until 3 stitches remain on needle, knit 2 together (= 1 stitch decreased), 1 edge stitch in garter stitch. 1 stitch has been increased after A.4 and 1 stitch before A.5 (= 2 stitches increased) and decrease 1 stitch of pattern in each side (= 2 stitches decreased) - read INCREASE TIP-1 AND DECREASE TIP. NOTE! Number of stitches on needle is the same, but there are fewer stitch in pattern A.1 and more stitches in stocking stitch towards mid front on jumper. REMEMBER THE KNITTING TENSION! Continue back and forth like this and continue decrease and increase every other row (= every row from right side) until increases and decreases have been done 24-24-25-26-26-27 times in total. Piece measures approx. 38-39-40-41-42-43 cm along edge stitch in the side of piece (piece will curve upwards in the middle of front piece because of displacement in pattern). If the piece is shorter than this, continue with pattern without increasing and decreasing until piece have the correct measurements. At the beginning of the next 2 rows cast off 3-3-4-5-6-7 stitches for armholes = 56-60-64-68-68-72 stitches. Now work in stocking stitch with 1 edge stitch in garter stitch in each side. When piece measures 52-54-55-57-58-60 cm slip the middle 8-8-8-10-10-10 stitches on needle on a stitch holder for neck and finish each shoulder separately. Then cast off on every row from neck as follows: Cast off 2 stitches 1 time and 1 stitch 2 times = 20-22-24-25-25-27 stitches. When piece measures 57-59-61-63-65-67 cm, work 1 ridge over all stitches, at the same time on first row decrease 2-2-2-3-3-3 stitches evenly = 18-20-22-22-22-24 stitches. Cast off. Work the other shoulder the same way. Piece measures approx. 58-60-62-64-66-68 cm from shoulder and down (on the longest, i.e. along side of piece). BACK PIECE: Cast on 59-63-69-73-75-81 stitches on circular needle size 9 mm with 2 strands Air. Purl 1 row from wrong side. Then work an edge as follows: 1 edge stitch in garter stitch, A.1 until 2 stitches remain on needle, work first stitch in A.1, finish with 1 edge stitch in garter stitch. Continue back and forth like this until piece measures 4 cm. Now knit 1 row from right side while decreasing 1 stitch in all sizes = 58-62-68-72-74-80 stitches. Continue back and forth with stocking and 1 edge stitch in garter stitch in each side. When piece measures 38-39-40-41-42-43 cm, cast off 3-3-4-5-6-7 stitches at the beginning of the next 2 rows for armholes = 52-56-60-62-62-66 stitches. Continue in stocking stitch with 1 edge stitch in garter stitch in each side. When piece measures 55-57-59-61-63-65 cm, cast off the middle 14-14-14-16-16-16 stitches for neck and finish each shoulder separately. Then cast off 1 stitch on next row from neck = 18-20-22-22-22-24 stitches for shoulder. When piece measures 57-59-61-63-65-67 cm work 1 ridge over all stitches. Cast off. Work the other shoulder the same way. Piece measures 58-60-62-64-66-68 cm from shoulder and down. SLEEVE: Cast on 22-22-24-24-26-26 stitches on circular needle size 8 mm with 2 strands Air. Purl 1 row from wrong side. Then work rib (knit 1/purl 1) with 1 edge stitch in garter stitch in each side for 4 cm. Switch to circular needle size 9 mm. Work in stocking stitch back and forth. When piece measures 8-9-7-8-8-5 cm, increase 1 stitch on each side – read INCREASE TIP-2. Increase like this every 3½-3-3-2½-2½-2 cm 10-11-11-12-12-13 times in total = 42-44-46-48-50-52 stitches. Continue to work until piece measures 44-43-41-40-41-39 cm. Insert a marker in each side of piece (used for assembly later). When sleeve measures 46-45-44-44-45-44 cm, cast off all stitches. Work the other sleeve the same way. ASSEMBLY: Sew shoulder seams with grafting/kitchener stitches inside cast-off edge. Sew sleeves into body, marker on sleeve shows side seam on front and back piece and the rows knitted after marker are sewn to the 3-3-4-5-6-7 stitches cast off for armhole in the side of body. Sew seam under sleeves and then down the side seam. NECK EDGE: Begin mid on top of one shoulder with 2 strands Air and a short circular needle size 8 mm. Pick up 40-46 stitches around the neck (including stitches on stitch holder). Work rib (knit 1/purl 1) in the round for 4 cm. Cast off stitches with knit over knit and purl over purl. Cut and fasten the yarn. |
|||||||||||||
Diagram explanations |
|||||||||||||
|
|||||||||||||
 |
|||||||||||||
Have you finished this pattern?Tag your pictures with #dropspattern #funwithfriendssweater or submit them to the #dropsfan gallery. Do you need help with this pattern?You'll find 28 tutorial videos, a Comments/Questions area and more by visiting the pattern on garnstudio.com. © 1982-2026 DROPS Design A/S. We reserve all rights. This document, including all its sub-sections, has copyrights. Read more about what you can do with our patterns at the bottom of each pattern on our site. |
|||||||||||||


With over 40 years in knitting and crochet design, DROPS Design offers one of the most extensive collections of free patterns on the internet - translated to 17 languages. As of today we count 324 catalogues and 12290 patterns translated into English (UK/cm). 12290
We work hard to bring you the best knitting and crochet have to offer, inspiration and advice as well as great quality yarns at incredible prices! Would you like to use our patterns for other than personal use? You can read what you are allowed to do in the Copyright text at the bottom of all our patterns. Happy crafting!
Post a comment to pattern DROPS 205-41
We would love to hear what you have to say about this pattern!
If you want to leave a question, please make sure you select the correct category in the form below, to speed up the answering process. Required fields are marked *.