
Popular categories
Looking for a yarn?


Comments / Questions (35)
![]() Aline wrote:
Aline wrote:
Hallo, Eine schöne Anleitung, nur die Mengenangaben für die Wolle passen nicht. Für Größe L/XL werden 500 g Drops Lima (Lauflänge etwa 100m/50g = 1.000m) und 100 g Drops Kid Silk (Lauflänge etwa 210m/25g = 840m) benötigt. Da für alles je 1 Faden verwendet wird, geht das nicht auf. Es fehlt 1 Knäuel Drops Kid Silk. Den muss ich jetzt leider nachbestellen. Viele Grüße Aline
20.09.2025 - 17:45
![]() Gaby wrote:
Gaby wrote:
Hallo Eure Anleitung ist wirklich schwer zu verstehen. Ich möchte die Größe L stricken. Muss ich dann gleich mit A2 Muster stricken? HAbe ich da Zunahme Tipp 1und 2 danach? Oder fange ich gleich mit Zunahme 2 an?
05.03.2025 - 18:31DROPS Design answered:
Liebe Gaby, am Anfang der Anleitung finden Sie Hinweise, dh Erklärungen wie man (z.B. hier) Krausrippe, Muster, und beide Zunahmen strickt; dann etwas unter finden Sie die Anleitung selbst, die unter DIE ARBEIT BEGINNT HIER: beginnt, und nach einer Beschreibung der Arbeit finden Sie unter BOLERO die Anleitung mit der Maschenanzahl anzuschlagen, usw. Kann das Ihnen helfen? Viel Spaß beim Stricken!
06.03.2025 - 09:22
![]() Tanja wrote:
Tanja wrote:
Hallo liebes Drops-Team. Könnt ihr mir verraten, wo oben und wo unten ist bei dem Seelenwärmer? Ist unten das, wo man das A2 Muster gestrickt hat? Also 5 rechts, 5 links?
26.01.2025 - 16:07DROPS Design answered:
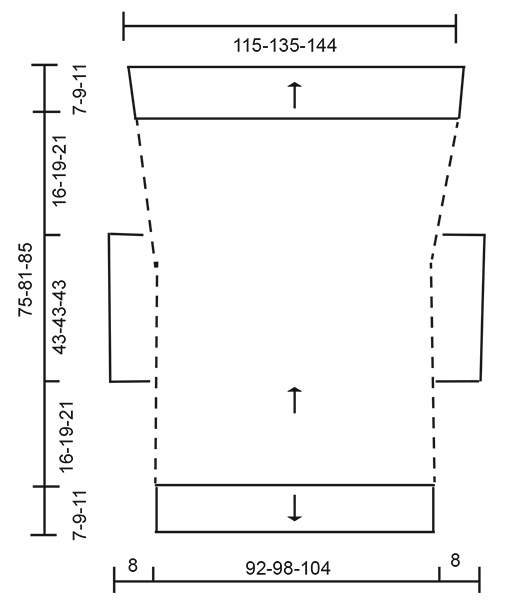
Liebe Tanja, die Arbeit wird von oben nach unten gestrickt - siehe Pfeil im Hauptteil in der Skizze = untere/schmallere Seite ist oben und obere/breitere ist unten. Viel Spaß beim Stricken!
27.01.2025 - 09:39
![]() Jutta wrote:
Jutta wrote:
Hallo, ich möchte das Modell gerne stricken, bin aber hochallergisch gegen Mohairwolle, daher wüsste ich gerne, was ich statt Drops Kid-Silk nehmen kann. Schafswolle, Alpaka und Merino oder ähnliches sind kein Problem. Und wird das ganze Modell mit kombinierter Wolle, also zweifädig gestrickt? Die Anleitung ist teilweise etwas verwirrend. Freue mich auf eine Antwort, vielen Dank!
04.01.2025 - 17:00DROPS Design answered:
Liebe Jutta, benutzen Sie den Garnumrechner um Alternative sowie neue passende Garnmenge zu finden. Gerne kann Ihnen Ihr DROPS Händler (auch per Telefon oder per E-Mail) die beste passende Garne empfehlen. Viel Spaß beim Stricken!
06.01.2025 - 09:11
![]() Pat wrote:
Pat wrote:
To make the seam as invisible as possible do you recommend a provisionable cast on?
27.11.2024 - 20:22DROPS Design answered:
Dear Pat, the seams are made on each side for sleeves, so you will sew sides together and cannot avoid seams there, but you can start with a provisionnel cast on that will be then used for the edge around whole piece. Happy knitting!
28.11.2024 - 10:01
![]() Anne Mongeon wrote:
Anne Mongeon wrote:
Bonjour, Est-ce possible de faire ce modèle avec seulement la laine Drops Lima. Merci et bonne journée! Anne
04.10.2024 - 19:30DROPS Design answered:
Bonjour Mme Mongeon, avec Lima seule vous n'auriez pas la bonne tension, mais vous pouvez remplacer Kid-Silk par une autre laine du groupe de fils A, utilisez notre convertisseur pour voir la liste des alternatives et la quantité correspondante. Bon tricot!
07.10.2024 - 07:15
![]() Helga Metzger wrote:
Helga Metzger wrote:
Ich trage den Seelenwärmer schon das 2.Jahr, er ist wirklich wunderschön. Danke für die tolle Anleitung. Viele Grüße Helga Metzger
15.09.2024 - 17:36
![]() Ulrike wrote:
Ulrike wrote:
Zitat:"daran angepasst, dass eine gerade Anzahl an Quadraten in der Höhe gestrickt wurde" Bedeutet das, eine gerade Anzahl an Quadraten ab Armmarkierung? Oder ab Beginn? LG Ulrike
08.03.2024 - 16:15DROPS Design answered:
Liebe Ulrike, zählen Sie ab Anfang. Viel Spaß beim Stricken!
11.03.2024 - 07:37
![]() Carolina wrote:
Carolina wrote:
Hallo, Mit welcher Nadelstärke soll die Maschenprobe gestrickt werden? Und was ist mit „glatt rechts/ im Strukturmuster“ gemeint? Sollen es also je 1 maschenprobe in glatt rechts und eine mit dem Karomuster werden?oder einfach nur eine Maschenprobe glatt rechts? Vielen Dank für die Hilfe!
28.07.2022 - 08:39DROPS Design answered:
Liebe Carolina, die Maschenprobe wird mit 7 mm Nadeln gestrickt. Sie machen die Maschenprobe sowohl glatt rechts als auch im Muster; sie sollten beide gleich messen.
31.07.2022 - 19:48
![]() Nina wrote:
Nina wrote:
Wird das Muster in der Anleitung sofort in der passenden Größe gestrickt? Lt Anleitung wird der Rapport am Anfang nach A1 gestrickt? Passt aber nicht für meine Größe und die Anzahl der Rapporte auch nicht. Wird der Rapport bei den Zunahmen dann A2 ergeben? Ich verstehe das nicht, finde die Anleitung teilweise sehr verwirrend.
08.02.2022 - 20:01DROPS Design answered:
Liebe Nina, ganz am Anfang schlagen Sie 122-130-138 Maschen an, dann stricken Sie: 1 Randmasche, A.1 wiederholen Sie dann 15-16-17 Mal, und 1 Randmasche (= 1+120-128-136)+1=122-130-138 M. Dann nehmen Sie zuerst in jede Quadrat mit linken Maschen und dann bei der nächsten Quadrat mit linken Maschen im nächsten Rapport, (und noch einmal in die 2 grösseren Größen) so können Sie A.2 stricken. Viel Spaß beim stricken!
09.02.2022 - 08:49
|
|||||||||||||
Winter Cocoon#wintercocoonjacket |
|||||||||||||
 |
 |
||||||||||||
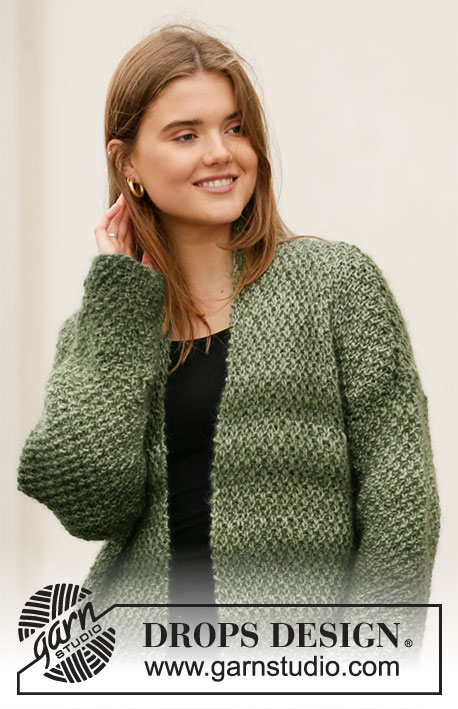
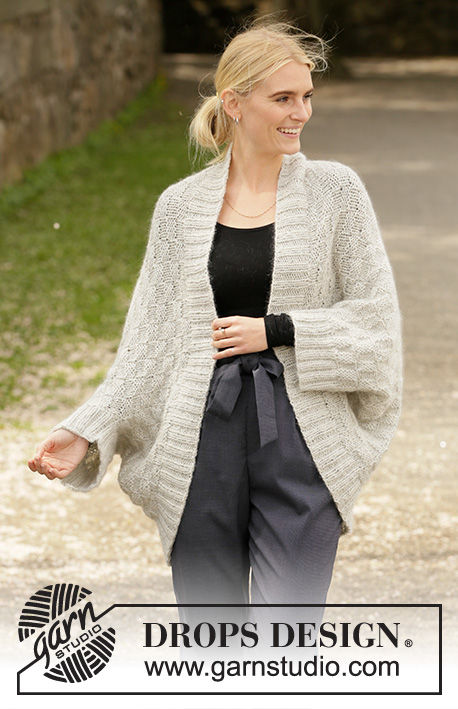
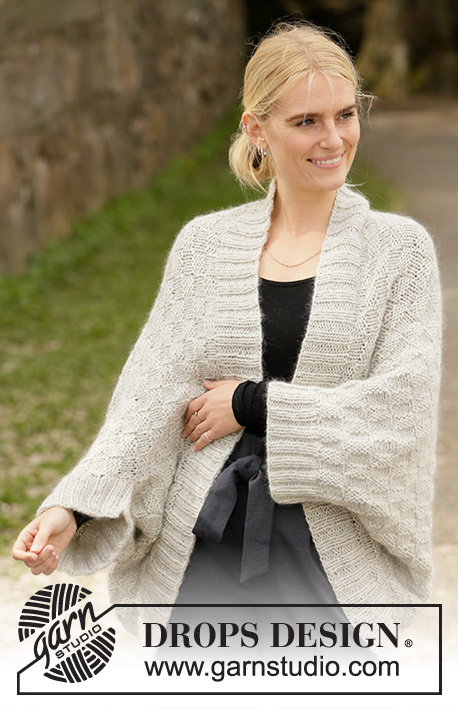
Knitted shoulder piece in DROPS Lima and DROPS Kid-Silk. The piece is worked with textured pattern and rib. Sizes S - XXXL.
DROPS 207-32 |
|||||||||||||
|
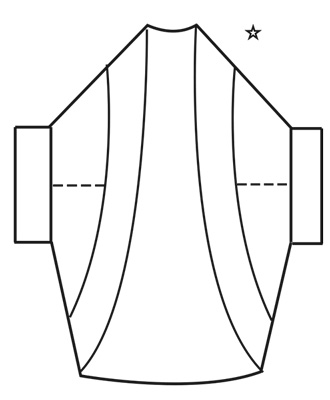
------------------------------------------------------- EXPLANATIONS FOR THE PATTERN: ------------------------------------------------------- RIDGE/GARTER STITCH (worked back and forth): Knit all rows. 1 ridge in height = Knit 2 rows. PATTERN: See diagrams A.1 and A.2 – choose diagram for your size. The diagrams show all the rows in the pattern seen from the right side. INCREASE TIP-1: All increases are worked from the right side! Increase 2-3-3 times in the piece, increasing 15-16-17 stitches each time. First increase: Work up to the first section with 4 purled stitches, purl 1, 1 yarn over, purl 3 (= 1 stitch increased). Repeat at each purled section. On the next row work the yarn overs twisted to avoid holes. Then work the new stitches into the pattern. Second increase: Work up to the first section with 4 purled stitches, purl 3, 1 yarn over, purl 1. Repeat at each purled section. On the next row work the yarn overs twisted to avoid holes. Then work the new stitches into the pattern. Increases in size S/M have finished. In sizes L/XL and XXL/XXXL increase 1 more time as follows: Third increase: Work up to the first section with 5 purled stitches, purl 1, 1 yarn over, purl 4 (= 1 stitch increased). Repeat at each purled section. On the next row work the yarn overs twisted to avoid holes. Then work the new stitches into the pattern. INCREASE TIP-2: To work out how to increase evenly, count the total number of stitches on needle (e.g. 152 stitches) and divide by number of increases to be made (e.g. 34) = 4.8. In this example, increase by making 1 yarn over after approx. each 5th stitch. On the next row knit the yarn overs twisted to avoid holes. ------------------------------------------------------- START THE PIECE HERE: ------------------------------------------------------- SHOULDER PIECE – SHORT OVERVIEW OF THE PIECE: The piece is worked back and forth with circular needle and then the sides are sewn together. Finally the edges are worked in rib, in the round with circular needle. SHOULDER PIECE: Cast on 122-130-138 stitches with circular needle size 7 mm and 1 strand Lima + 1 strand Kid-Silk (= 2 strands). Work pattern as follows: 1 edge stitch in GARTER STITCH – read description above, A.1 until there is 1 stitch left (= 15-16-17 repeats), 1 edge stitch in garter stitch. REMEMBER THE KNITTING TENSION! When the piece measures 16-19-21 cm – adjust so you finish after row 4 or 8 in the diagram, insert a marker in each side of the piece (= marks the beginning of the armholes). Continue with A.1 until the piece measures approx. 43-43-43 cm from the markers – adjust so you have an even number of squares in height (1 square = 4 rows of pattern A.1 in height). NOTE: This is important so the pattern is neat when assembling later on. Insert a new marker in each side of the piece. The 43 cm between the 2 markers on each side are the armholes. Continue with pattern as before. AT THE SAME TIME on the first row, increase 1 stitch in each purled section – read INCREASE TIP-1 (= 15-16-17 stitches increased) = 137-146-155 stitches. Continue with pattern as before, but now knit 4 and purl 5 stitches. The next time you begin a new square (with purl over knit and knit over purl), increase again in each purled section – remember INCREASE TIP-1 (= 15-16-17 stitches increased) = 152-162-172 stitches. Now the increases in size S/M are finished. In sizes L/XL and XXL/XXXL increase in the same way (in each purled section) the next time you start a new square in height = 152-178-189 stitches. Continue with pattern as before; i.e. work 4 rows in height with knit over knit and purl over purl, before switching to purl over knit and knit over purl as shown in A.2 – see diagram for your size. When the piece measures approx. 16-19-21 cm from the last marker – adjust so you have worked the same number of squares in height as are at the beginning of the piece (before the first markers were inserted for the armholes); the piece is now finished. and measures approx. 75-81-85 cm. Keep the 152-178-189 stitches on the needle. ASSEMBLY: Fold the piece in the middle so the cast-on edge lies along the 152-178-189 stitches on the needle. The 2 markers, which mark the armhole, should now lie above each other. Sew the side seams on each side; i.e. sew inside the 1 edge stitch in garter stitch on each side from the cast on/stitches on needle and as far as the 2 markers on the one side. Repeat on the other side. EDGE AROUND OPENING: Now work an edge with rib in the round as follows: Change to circular needle size 6 mm and 1 strand of each quality (= 2 strands) starting from the right side as follows: Knit the 152-178-189 stitches on the needle and increase at the same time 34-38-41 stitches evenly spaced – read INCREASE TIP-2, (= 186-216-230 stitches), then knit up 146-156-166 stitches evenly spaced over the cast-on edge = 332-372-396 stitches on the round. Now work rib (= knit 2 / purl 2) around the whole opening. When the rib measures 7-9-11 cm, cast off with knit over knit and purl over purl. SLEEVE: Knit up, from the right side around the armhole, 76-76-76 stitches inside the 1 edge stitch in garter stitch with short circular needle size 6 mm and 1 strand Lima + 1 strand Kid-Silk (= 2 strands). Work rib (= knit 2 / purl 2) in the round for 8 cm. Cast off with knit over knit and purl over purl. Work rib around the other armhole in the same way. |
|||||||||||||
Diagram explanations |
|||||||||||||
|
|||||||||||||
 |
|||||||||||||
 |
|||||||||||||
 |
|||||||||||||
Have you finished this pattern?Tag your pictures with #dropspattern #wintercocoonjacket or submit them to the #dropsfan gallery. Do you need help with this pattern?You'll find 21 tutorial videos, a Comments/Questions area and more by visiting the pattern on garnstudio.com. © 1982-2026 DROPS Design A/S. We reserve all rights. This document, including all its sub-sections, has copyrights. Read more about what you can do with our patterns at the bottom of each pattern on our site. |
|||||||||||||


With over 40 years in knitting and crochet design, DROPS Design offers one of the most extensive collections of free patterns on the internet - translated to 17 languages. As of today we count 324 catalogues and 12290 patterns translated into English (UK/cm). 12290
We work hard to bring you the best knitting and crochet have to offer, inspiration and advice as well as great quality yarns at incredible prices! Would you like to use our patterns for other than personal use? You can read what you are allowed to do in the Copyright text at the bottom of all our patterns. Happy crafting!
Post a comment to pattern DROPS 207-32
We would love to hear what you have to say about this pattern!
If you want to leave a question, please make sure you select the correct category in the form below, to speed up the answering process. Required fields are marked *.