DROPS Lima
DROPS Lima
65% Wool, 35% Alpaca
from 3.30 $ /50g
DROPS Kid-Silk
DROPS Kid-Silk
75% Mohair, 25% Silk
from 6.75 $ /25g
Get the yarn to make this pattern from 56.70$.

The yarn cost is calculated from the pattern’s smallest size and the yarn’s cheapest product type. Looking for an even better price? You might find it on the DROPS Deals!

DROPS SS24

Winter Cocoon

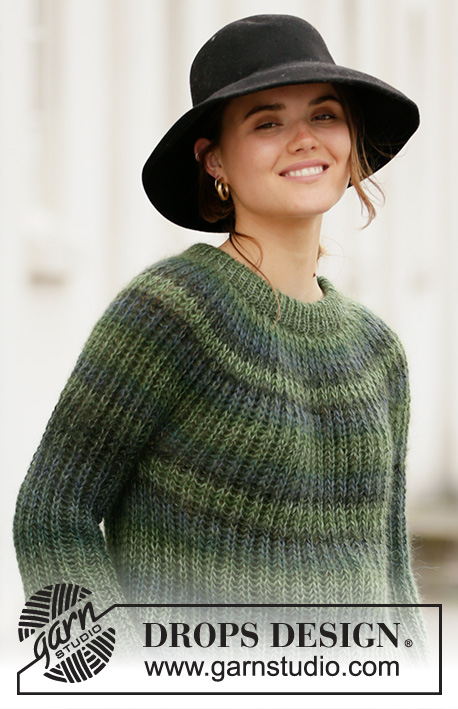
Knitted shoulder piece in DROPS Lima and DROPS Kid-Silk. The piece is worked with textured pattern and rib. Sizes S - XXXL.

DROPS 207-32
DROPS Design: Pattern no li-108
Yarn group B + A
-------------------------------------------------------

SIZES:
S/M – L/XL – XXL/XXXL

MATERIALS:
DROPS LIMA from Garnstudio (belongs to yarn group B)
450-500-550 g color 9020, pearl grey
And use:
DROPS KID-SILK from Garnstudio (belongs to yarn group A)
100-100-125 g color 01, off white

KNITTING GAUGE:
13 stitches in width and 15 rows in height with stockinette stitch/textured pattern and 1 strand of each quality = 10 x 10 cm = 4" x 4".

NEEDLES:
DROPS CIRCULAR NEEDLE SIZE 7 MM = US 10,75: Length 80 cm = 32".
DROPS CIRCULAR NEEDLE SIZE 6 MM = US 10: Length 40 cm = 16" and 80 cm = 32" for rib.
Needle size is only a guide. If you get too many stitches on 10 cm = 4", change to a larger needle size. If you get too few stitches on 10 cm = 4", change to a smaller needle size.

-------------------------------------------------------

Alternative Yarn – See how to change yarns here
Yarn Groups A to F – Use the same pattern and change the yarn here
Yarn usage using an alternative yarn – Use our yarn converter here

-------------------------------------------------------

More like this:
Womenbottom up relief
DROPS Lima
DROPS Lima
65% Wool, 35% Alpaca
from 3.30 $ /50g
DROPS Kid-Silk
DROPS Kid-Silk
75% Mohair, 25% Silk
from 6.75 $ /25g
Get the yarn to make this pattern from 56.70$.

The yarn cost is calculated from the pattern’s smallest size and the yarn’s cheapest product type. Looking for an even better price? You might find it on the DROPS Deals!

Pattern instructions

NOTE: This pattern is written in American English. All measurements in charts are in cm. For conversion from inches to cm - click here. There are different terms for crocheting in American and British English. If this pattern includes crochet, click for "crochet terms" here. For this pattern in British English, please click here.
-------------------------------------------------------

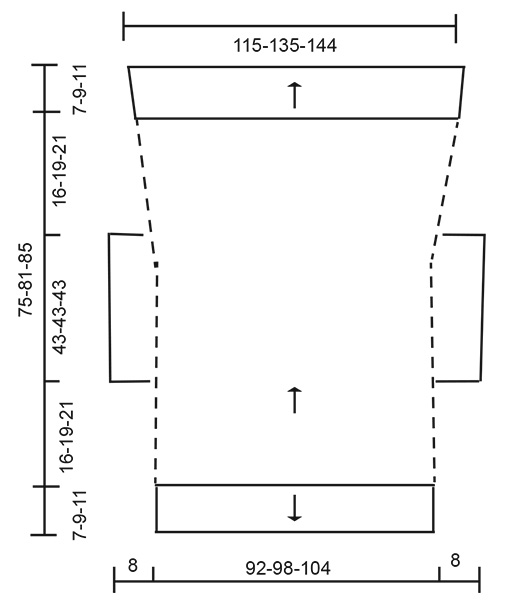
EXPLANATIONS FOR THE PATTERN:

-------------------------------------------------------

RIDGE/GARTER STITCH (worked back and forth):
Knit all rows.
1 ridge in height = Knit 2 rows.

PATTERN:
See diagrams A.1 and A.2 – choose diagram for your size. The diagrams show all the rows in the pattern seen from the right side.

INCREASE TIP-1:
All increases are worked from the right side!
Increase 2-3-3 times in the piece, increasing 15-16-17 stitches each time.
First increase:
Work up to the first section with 4 purled stitches, purl 1, 1 yarn over, purl 3 (= 1 stitch increased). Repeat at each purled section. On the next row work the yarn overs twisted to avoid holes. Then work the new stitches into the pattern.
Second increase:
Work up to the first section with 4 purled stitches, purl 3, 1 yarn over, purl 1. Repeat at each purled section. On the next row work the yarn overs twisted to avoid holes. Then work the new stitches into the pattern.
Increases in size S/M have finished. In sizes L/XL and XXL/XXXL increase 1 more time as follows:
Third increase:
Work up to the first section with 5 purled stitches, purl 1, 1 yarn over, purl 4 (= 1 stitch increased). Repeat at each purled section. On the next row work the yarn overs twisted to avoid holes. Then work the new stitches into the pattern.

INCREASE TIP-2:
To work out how to increase evenly, count the total number of stitches on needle (e.g. 152 stitches) and divide by number of increases to be made (e.g. 34) = 4.8. In this example, increase by making 1 yarn over after approx. each 5th stitch. On the next row knit the yarn overs twisted to avoid holes.


-------------------------------------------------------

START THE PIECE HERE:

-------------------------------------------------------

SHOULDER PIECE – SHORT OVERVIEW OF THE PIECE:
The piece is worked back and forth with circular needle and then the sides are sewn together. Finally the edges are worked in rib, in the round with circular needle.

SHOULDER PIECE:
Cast on 122-130-138 stitches with circular needle size 7 mm = US 10,75 and 1 strand Lima + 1 strand Kid-Silk (= 2 strands). Work pattern as follows: 1 edge stitch in GARTER STITCH – read description above, A.1 until there is 1 stitch left (= 15-16-17 repeats), 1 edge stitch in garter stitch. REMEMBER THE KNITTING GAUGE! When the piece measures 16-19-21 cm = 6¼"-7½"-8¼" – adjust so you finish after row 4 or 8 in the diagram, insert a marker in each side of the piece (= marks the beginning of the armholes). Continue with A.1 until the piece measures approx. 43-43-43 cm = 17"-17"-17" from the markers – adjust so you have an even number of squares in height (1 square = 4 rows of pattern A.1 in height). NOTE: This is important so the pattern is neat when assembling later on. Insert a new marker in each side of the piece. The 43 cm = 17" between the 2 markers on each side are the armholes. Continue with pattern as before. AT THE SAME TIME on the first row, increase 1 stitch in each purled section – read INCREASE TIP-1 (= 15-16-17 stitches increased) = 137-146-155 stitches. Continue with pattern as before, but now knit 4 and purl 5 stitches. The next time you begin a new square (with purl over knit and knit over purl), increase again in each purled section – remember INCREASE TIP-1 (= 15-16-17 stitches increased) = 152-162-172 stitches. Now the increases in size S/M are finished. In sizes L/XL and XXL/XXXL increase in the same way (in each purled section) the next time you start a new square in height = 152-178-189 stitches. Continue with pattern as before; i.e. work 4 rows in height with knit over knit and purl over purl, before switching to purl over knit and knit over purl as shown in A.2 – see diagram for your size. When the piece measures approx. 16-19-21 cm = 6¼"-7½"-8¼" from the last marker – adjust so you have worked the same number of squares in height as are at the beginning of the piece (before the first markers were inserted for the armholes); the piece is now finished. and measures approx. 75-81-85 cm = 29½"-32"-33½". Keep the 152-178-189 stitches on the needle.

ASSEMBLY:
Fold the piece in the middle so the cast-on edge lies along the 152-178-189 stitches on the needle. The 2 markers, which mark the armhole, should now lie above each other. Sew the side seams on each side; i.e. sew inside the 1 edge stitch in garter stitch on each side from the cast-on/stitches on needle and as far as the 2 markers on the one side. Repeat on the other side.

EDGE AROUND OPENING:
Now work an edge with rib in the round as follows: Change to circular needle size 6 mm = US 10 and 1 strand of each quality (= 2 strands) starting from the right side as follows: Knit the 152-178-189 stitches on the needle and increase at the same time 34-38-41 stitches evenly spaced – read INCREASE TIP-2, (= 186-216-230 stitches), then knit up 146-156-166 stitches evenly spaced over the cast-on edge = 332-372-396 stitches on the round. Now work rib (= knit 2 / purl 2) around the whole opening. When the rib measures 7-9-11 cm = 2¾"-3½"-4⅜", bind off with knit over knit and purl over purl.

SLEEVE:
Knit up, from the right side around the armhole, 76-76-76 stitches inside the 1 edge stitch in garter stitch with short circular needle size 6 mm = US 10 and 1 strand Lima + 1 strand Kid-Silk (= 2 strands). Work rib (= knit 2 / purl 2) in the round for 8 cm = 3⅛". Bind off with knit over knit and purl over purl. Work rib around the other armhole in the same way.

Diagram

All measurements in charts are in cm.

symbols = knit from right side, purl from wrong side
symbols = purl from right side, knit from wrong side
symbols = the sketch shows the piece after assembly
symbols = knitting direction
diagram
diagram
diagram
Do you have a question? See a list of frequently asked questions (FAQ)

Knitting tension is what determines the final measurements of your work, and is usually measured per 10 x 10 cm. It is provided like so: number of stitches in width x number of rows in height - eg: 19 stitches x 26 rows = 10 x 10 cm.

The knitting tension is very individual; some people knit/crochet loosely while others work tightly. You adjust the knitting tension with the needle size, which is why the suggested needle size only serve as a guide! You need to adjust this (up or down) to ensure that YOUR knitting tension matches the knitting tension provided in the pattern. If you work with a different knitting tension than provided you will have a different yarn consumption, and your work will have different measurements than what the pattern suggests.

The knitting tension also determines which yarns can replace each other. As long as you achieve the same knitting tension you can replace one yarn with another.

See DROPS lesson: How to measure your tension/gauge

See DROPS video: How to make a gauge tension swatch

The required amount of yarn is provided in grams, eg: 450 g. To calculate how many balls you’ll need you first need to know how many grams are in 1 ball (25g, 50g or 100g). This information is available if you click on the individual yarn quality on our pages. Divide the amount required with the amount of each ball. For example, if each ball is 50g (the most common amount), the calculation will be as follows: 450 / 50 = 9 balls.

The important thing when changing from one yarn to another is that the knitting/crochet tension remains the same. This is so that the measurements of the finished piece will be the same as on the sketch provided. It is easier to achieve the same knitting tension using yarns from the same yarn group. It is also possible to work with multiple strands of a thinner yarn to achieve the knitting tension of a thicker one. Please try our yarn converter. We recommend you to always work a test swatch.

Please NOTE: when changing yarn the garment might have a different look and feel to the garment in the photo, due to individual properties and qualities of each yarn.

See DROPS lesson: Can I use a different yarn than the one mentioned in the pattern?

All our yarns are categorised into yarn groups (from A to F) according to thickness and knitting tension – group A contains the thinnest yarns and group F the thickest. This makes it easier for you to find alternative yarns to our patterns, should you wish to switch yarn. All yarns within the same group have a similar knitting tension and can easily replace each other. However, different yarn qualities have different structures and properties which will give the finished work a unique look and feel.

Click here for an overview of the yarns in each yarn group

At the top of all our patterns you’ll find a link to our yarn converter, which is a helpful tool should you wish to use a different yarn than suggested. By filling in the yarn quality you wish to replace, the amount (in your size) and number of strands, the converter will present good alternative yarns with the same knitting tension. Additionally it will tell you how much you’ll require in the new qualities and whether you’ll need to work with multiple strands. Most skeins are 50g (some are 25g or 100g).

If the pattern is worked with multiple colours, every colour will have to be converted separately. Similarly, if the pattern is worked with several strands of different yarns (for example 1 strand Alpaca and 1 strand Kid-Silk) you will have to find alternatives for each, individually.

Click here to see our yarn converter

Since different yarns have different qualities and textures we have chosen to keep the original yarn in our patterns. However, you can easily find options among our available qualities by using our yarn converter, or simply pick a yarn from the same yarn group.

It is possible that some retailers still have discontinued yarns in stock, or that someone has a few skeins at home that they would like to find patterns for.

The yarn converter will provide both alternative yarn as well as required amount in the new quality.

If you think it's hard to decide what size to make, it can be a good idea to measure a garment you own already and like the size of. Then you can pick the size by comparing those measures with the ones available in the pattern's size chart.

You'll find the size chart at the bottom of the pattern.

See DROPS lesson: How to read size chart

The needle size provided in the pattern serves only as a guide, the important thing is to follow the knitting tension. And since knitting tension is very individual, you will have to adjust the needle size to ensure that YOUR tension is the same as in the pattern – maybe you’ll have to adjust 1, or even 2 needle sizes, up or down to achieve the correct tension. For this, we recommend that you work test swatches.

Should you work with a different knitting tension than the one provided, the measurements of the finished garment might deviate from the measurement sketch.

See DROPS lesson: How to measure your tension/gauge

See DROPS video: How to make a gauge tension swatch

Working a garment top-down provides more flexibility and room for personal adjustment. For example it is easier to try the garment on while working, as well as making adjustments to length of yoke and shoulder caps.

The instructions are carefully explaining every step, in the correct order. Diagrams are adjusted to the knitting direction and are worked as usual.

The diagram depicts all rows/rounds, and every stitch seen from the right side. It is read from bottom to top, from right to left. 1 square = 1 stitch.

When working back and forth, every other row is worked from the right side and every other row is worked from the wrong side. When working from the wrong side, the diagram will have to be worked reversed: from left to right, knit stitches are purled, purl stitches are knit etc.

When working in the round every round is worked from the right side and the diagram are worked from right to left on all rounds.

See DROPS lesson: How to read knitting diagrams

The diagram depicts all rows/rounds, and every stitch seen from the right side. It is worked from bottom to top, from right to left.

When working back and forth every other row is worked from the right side: from right to left and every other row is worked from the wrong side: from left to right.

When working in the round, every row in the diagram are worked from the right side, from right to left.

When working a circular diagram you start in the middle and work your way outwards, counter clockwise, row by row.

The rows usually start with a given number of chain stitches (equivalent to the height of the following stitch), this will either be depicted in the diagram or explained in the pattern.

See DROPS lesson: How to read crochet diagrams

Instructions for working several diagrams after each other on the same row/round, will often be written like so: “work A.1, A.2, A.3 a total of 0-0-2-3-4 times". This means you work A.1 once, then A.2 is worked once, and A.3 is repeated (in width) the number of times provided for your size – in this case like so: S = 0 times, M = 0 times, L=2 times, XL= 3 times and XXL = 4 times.

The diagrams are worked as usual: begin with the first row in A.1, then work the first row in A.2 etc.

See DROPS lesson: How to read knitting diagrams

See DROPS lesson: How to read crochet diagrams

The total width of the garment (from wrist-to-wrist) will be larger in the larger sizes, despite the actual sleeves being shorter. The larger sizes have longer sleeve caps and wider shoulders, so there will be a good fit in all sizes.

The measurement sketch/schematic drawing provides information regarding the full length of the garment. If it’s a jumper or a jacket the length is measured from the highest point on the shoulder (usually closest to the neckline), and straight down to the bottom of the garment. It is NOT measured from the tip of shoulder. Similarly, the length of yoke is measured from the highest point on the shoulder and down to where yoke is split into body and sleeves.

See DROPS lesson: How to read a schematic drawing

Diagrams are often repeated on the round or in height. 1 repeat is the diagram the way it appears in the pattern. If it says to work 5 repeats of A.1 in the round, then you work A.1 a total of 5 times after/next to each other in the round. If it says to work 2 repeats of A.1 vertically/in height you work the entire diagram once, then begin again at the start and work the entire diagram one more time.

Chain stitches are slightly narrower than other stitches and to avoid working the cast-on edge too tight, we simply chain more stitches to begin with. The stitch count will be adjusted on the following row to fit the pattern and measurement sketch.

The rib edge is more elastic and will contract slightly compared to, for example, stocking stitch. By increasing before the rib edge, you avoid a visible difference in width between the rib edge and the rest of the body.

It’s very easy to cast off too tightly, and by making yarn overs while casting off (and simultaneously casting these off) you avoid a too tight cast off edge.

See DROPS video: How to bind off with yarn overs (yo)

To achieve an even increase (or decrease) you can increase on, for example: every 3rd and 4th row alternately, like so: work 2 rows and increase on the 3rd row, work 3 rows and increase on the 4th. Repeat this until the increase is complete.

See DROPS lesson: Increase or decrease 1 st on every 3rd and 4th row alternately

Should you prefer to work in the round instead of back and forth, you may of course adjust the pattern. You’ll need to add steeks mid-front (usually 5 stitches), and follow the instructions. When you would normally turn and work from the wrong side, simply work across the steek and continue in the round. At the end you’ll cut the piece open, pick up stitches to work bands, and cover the cut edges.

See DROPS video: How to knit steeks and cut open

Should you prefer to work back and forth instead of in the round, you may of course adjust the pattern so you work the pieces separately and then assemble them at the end. Divide the stitches for the body in 2, add 1 edge stitch in each side (for sewing) and work the front and back pieces separately.

See DROPS lesson: Can I adapt a pattern for circular needles into straight needles?

Pattern repeats can vary slightly in the different sizes, in order to get the correct proportions. If you’re not working the exact same size as the garment in the photo, yours might deviate slightly. This has been carefully developed and adjusted so that the complete impression of the garment is the same in all sizes.

Make sure to follow instructions and diagrams for your size!

If you have found a pattern you like which is available in women’s size it’s not very difficult to convert it to men’s size. The biggest difference will be the length of sleeves and body. Start working on the women size that you think would fit across the chest. The additional length will be worked right before you cast off for the armhole/sleeve cap. If the pattern is worked top-down you can add the length right after the armhole or before the first decrease on sleeve.

Regarding additional yarn amount, this will depend on how much length you add, but it is better with a skein too many than too few.

All yarns will have excess fibres (from production) that might come off as lint or shedding. Brushed yarns (ie hairier yarns) have more of these loose, excess fibres, causing more shedding.

Shedding also depends on what is worn under or over the garment, and whether this pulls at the yarn fibres. It’s therefore not possible to guarantee that there will be no shedding

Below are some tips on how to get the best result when working with hairier yarns:

1. When the garment is finished (before you wash it) shake it vigorously so the looser hairs come off. NOTE: do NOT use a lint roller, brush or any method that pulls at the yarn.

2. Place the garment in a plastic bag and put it in your freezer - the temperature will cause the fibres to become less attached to each other, and excess fibres will come off easier.

3. Leave in the freezer for a few hours before taking it out and shaking it again.

4. Wash the garment according to the instructions on the yarn label.

Pilling is a natural process that happens to even the most exclusive of fibers. It's a natural sign of wear and tear that is hard to avoid, and that is most visible in high friction areas of your garment like a sweater's arms and cuffs.

You can make your garment look as new by removing the pilling, using a fabric comb or a pill/lint remover.

Still can't find the answer you need? Then scroll down and leave your question so one of our experts can try to help you. This will be done normally within 5 to 10 working days.
In the meantime, you can read the questions and answers that others have left to this pattern or join the DROPS Workshop on Facebook to get help from fellow knitters/crocheters!

You might also like...

Post a comment to pattern DROPS 207-32

We would love to hear what you have to say about this pattern!

If you want to leave a question, please make sure you select the correct category in the form below, to speed up the answering process. Required fields are marked *.

Comments / Questions (28)

country flag Ulrike wrote:

Zitat:"daran angepasst, dass eine gerade Anzahl an Quadraten in der Höhe gestrickt wurde" Bedeutet das, eine gerade Anzahl an Quadraten ab Armmarkierung? Oder ab Beginn? LG Ulrike

08.03.2024 - 16:15

DROPS Design answered:

Liebe Ulrike, zählen Sie ab Anfang. Viel Spaß beim Stricken!

11.03.2024 - 07:37

country flag Carolina wrote:

Hallo, Mit welcher Nadelstärke soll die Maschenprobe gestrickt werden? Und was ist mit „glatt rechts/ im Strukturmuster“ gemeint? Sollen es also je 1 maschenprobe in glatt rechts und eine mit dem Karomuster werden?oder einfach nur eine Maschenprobe glatt rechts? Vielen Dank für die Hilfe!

28.07.2022 - 08:39

DROPS Design answered:

Liebe Carolina, die Maschenprobe wird mit 7 mm Nadeln gestrickt. Sie machen die Maschenprobe sowohl glatt rechts als auch im Muster; sie sollten beide gleich messen.

31.07.2022 - 19:48

country flag Nina wrote:

Wird das Muster in der Anleitung sofort in der passenden Größe gestrickt? Lt Anleitung wird der Rapport am Anfang nach A1 gestrickt? Passt aber nicht für meine Größe und die Anzahl der Rapporte auch nicht. Wird der Rapport bei den Zunahmen dann A2 ergeben? Ich verstehe das nicht, finde die Anleitung teilweise sehr verwirrend.

08.02.2022 - 20:01

DROPS Design answered:

Liebe Nina, ganz am Anfang schlagen Sie 122-130-138 Maschen an, dann stricken Sie: 1 Randmasche, A.1 wiederholen Sie dann 15-16-17 Mal, und 1 Randmasche (= 1+120-128-136)+1=122-130-138 M. Dann nehmen Sie zuerst in jede Quadrat mit linken Maschen und dann bei der nächsten Quadrat mit linken Maschen im nächsten Rapport, (und noch einmal in die 2 grösseren Größen) so können Sie A.2 stricken. Viel Spaß beim stricken!

09.02.2022 - 08:49

country flag Sharon Wilson wrote:

Could I use a ten ply with 6mm needles for this pattern?

17.01.2022 - 01:50

DROPS Design answered:

Dear Mrs Wilson, this pattern has been written for a tension of 13 stitches x 15 rows = 10 x 10 cm. To get the same measurements, you should get and keep this gauge; read more here. Happy knitting!

17.01.2022 - 09:24

country flag Trixi wrote:

Was heißt genau z.B. 175- 135- 129.?Ich verstehe das an der Anleitung nicht.

15.01.2022 - 05:29

DROPS Design answered:

Liebe Trixi, dieses Modell ist in 3 Größen geschrieben: S/M – L/XL und XXL/XXXL. Wenn Sie: 122-130-138 Maschen lesen, arbeiten Sie so: in die 1. Größe schlagen Sie 122 Maschen an, in die 2. Größe schlagen Sie 130 Maschen an und in die 3. Größe 138 Maschen. War das Ihre Frage? Oder habe ich misverstanden?

19.01.2022 - 10:23

country flag Maria wrote:

Jeg kan ikke tåle mohair - kan den strikkes uden Kid-Silk? Det vil sige, kun i Lima? Eller kan kombinationen erstattes af et tykkere garn end Lima?

29.12.2021 - 20:45

DROPS Design answered:

Hej Maria, ja for at få strikkefastheden ifølge opskriften, kan du erstatte DROPS Kid-Silk med et andet garn fra garngruppe A :)

03.01.2022 - 16:06

country flag Linda wrote:

I want to use DROPS Lima - Mix 0705 only for this pattern? Do I need to also use the Kid - Silk or not? Also, how much yarn do I need?

07.12.2021 - 03:40

DROPS Design answered:

Dear Linda, this pattern has been worked with 1 strand Lima + 1 strand Kid-Silk worked together - you will find amount of yarn required for each size under the header. If you need help choosing the best matching colour Kid-Silk, your DROPS store will help you even per mail or telephone. Happy knitting!

07.12.2021 - 07:27

country flag Minna wrote:

I chose Drops Soft Tweed instead of Drops Lima. In the instruction needle size is No. 7 and density 13 sts and 15 rows. I can’t knit with No. 7 needles because the knit is so loose that I can put my fingers through the knit. When I change to suitable No. 5 needles, then the density is 16-17 sts per 10 cm. Did I understood the instruction correctly to use 1x Lima and 1 x Kid Silk together? Do you have any ideas what I could do? Is the only way to recalculate stitches and rows for own density?

08.09.2021 - 18:55

DROPS Design answered:

Dear Minna, that's right; this pattern is worked with 1 strand Lima (or Soft Tweed = same yarn group) together with 1 strand Kid-Silk with a tension of 13 sts x 15 rows stocking stitch/textured pattern = 10 x 10 cm, we used needle size 7 mm, but tension is individual, you might require another needle size - Read more about tension here, you can also try to find another pattern with a tension that suits you better. Happy knitting!

09.09.2021 - 08:37

country flag Minna wrote:

Valitsin Drops Lima langan tilalle Drops Soft Tweedin. Ohjeessa puikot nro 7, joilla pitäisi päästä 13 s ja 15 krs. En voi neuloa nro 7 puikoilla, koska neuleesta menee sormet läpi, kun on niin harvaa. Kun vaihdan sopiviin nro 5 puikkoihin, niin silloin silmukoita on 16-17 10 cm:llä. Olenhan ymmärtänyt oikein, että ohjeessa on 1x Lima ja 1 x Kid Silk? Mitä voisin tehdä? Onko ainoa keino laskea silmukat ja kerrokset uudelleen omalla silmukantiheydellä?

16.08.2021 - 17:53

country flag Karen Grove wrote:

Are you using two weights of yarn? lace and worsted, do you hold them together as one?

15.07.2021 - 16:27

DROPS Design answered:

Dear Karen, yes, the piece combines the two yarns on purpouse to keep the loft and the warmth of the Lima, and add the softness and halo effect of the Kid Silk. The yarns are held together. Happy Stitching!

15.07.2021 - 21:05