
Popular categories
Looking for a yarn?


Comments / Questions (9)
![]() Yuvia Cruz wrote:
Yuvia Cruz wrote:
Buen día! Me encuentro tejiendo el patrón en talla S. Tengo 109 puntos de inicio, con separadores 26-59-26 para iniciar disminuciones. Luego de 11 disminuciones tengo 15-35-15 pero el patrón de calados A.2,dice que debo tener 39 puntos para aplicarlo. Me he equivocado? cómo mantengo esos 39 puntos? De antemano, gracias :)
12.06.2025 - 19:52DROPS Design answered:
Hola Yuvia, en el patrón indican que comenzarás a trabajar A.2 antes de la última disminución. Si tienes que tener 61 puntos después de todas las disminuciones, en la penúltima disminución tendrás 65 pts. Trabajas sobre estos pts como sigue: 13 pts en pt musgo/jersey-39 pts de A.2 - 13 pts en pt musgo/pt jersey. = 65 pts. Los marcapuntos no importan a la hora de trabajar A.2.
15.06.2025 - 22:52
![]() ClaireH wrote:
ClaireH wrote:
Pourquoi ne pas tricoter la partie basse en rond puis séparer aux emmanchures ?
18.05.2025 - 10:25DROPS Design answered:
Bonjour ClaireH, nos stylistes essaient de faire des modèles pour convenir au plus large public, certaines n'étant pas à l'aise avec le tricot en rond, certains modèles se tricotent en différentes pièces assemblées entre elles ensuite. Vous pouvez volontiers faire les ajustements nécessaires pour tricoter en rond jusqu'aux emmanchures. Bon tricot!
19.05.2025 - 08:23
![]() Nafula wrote:
Nafula wrote:
This looks beautiful I would love ❤️ it in different lengths short ,as a top ,normal,length,midi and maxi but I only have 2 hands and 24hrs a day.🏃🏾♀️🏃🏿♀️🏃🏽♀️🤦🏾♀️🤪🤪🧐🙃
09.07.2023 - 16:59
![]() E Vd Linden wrote:
E Vd Linden wrote:
Ik heb het patroon a2 klaar op de voorkant. Gaat a5 gelijk er achteraan of eerst tussen de 2 patronen de ribbels aan de zijkant en die pennen verder tricosteek? Ik zie het niet goed op de afbeelding
06.04.2023 - 10:28DROPS Design answered:
Dag E Vd Linden,
Op de voorkant brei je eerst A.2 en dan A.3 er gelijk achteraan, dus geen naalden ertussen.
12.04.2023 - 20:37
![]() Lillian wrote:
Lillian wrote:
Tænker at strikke denne, men jeg har 2 spørgsmål. Kan jeg strikke den nederste del rundt og dele arbejdet lige inden mønster?. Kan jeg sætte et lille ærme i fra anden opskrift, og evt hvilken? på forhånd tak
12.04.2021 - 12:18DROPS Design answered:
Hej Lillian, ja det kan du godt, bare du sørger for at indtagningerne ikke kommer til at trække arbejdet til den ene side. Under billedet finder du tunikaen med ærmer, den opskrift kan du med fordel bruge :)
12.04.2021 - 13:48
![]() Nicole Preuss wrote:
Nicole Preuss wrote:
Bytt til rundpinne 5 når A.1 er strikket ferdig. Strikk glattstrikk videre med 1 kantmaske i RILLE i hver side – les forklaring over. HUSK PÅ STRIKKEFASTHETEN! glattstrikk eller rille??? har strikket rille nå men ser ikke ut 😪
30.06.2019 - 21:10DROPS Design answered:
Hej. Du ska nu sticka vidare i glattstrikk, det är kun 1 kantmaske i hver sida som ska stickas i rille. Lycka till!
01.07.2019 - 10:41
![]() Renate wrote:
Renate wrote:
Super.auf jeden Fall werde ich dieses nacharbeiten.Meine Nadel sind bereit
20.12.2018 - 15:40
![]() Beti wrote:
Beti wrote:
Dieses Modell ist traumhaft, würde es gern nacharbeiten.
20.12.2018 - 13:25
![]() Karen wrote:
Karen wrote:
I'm looking forward to making this one!
11.12.2018 - 18:38
|
|||||||||||||||||||
White Pearl#whitepearltop |
|||||||||||||||||||
 |
 |
||||||||||||||||||
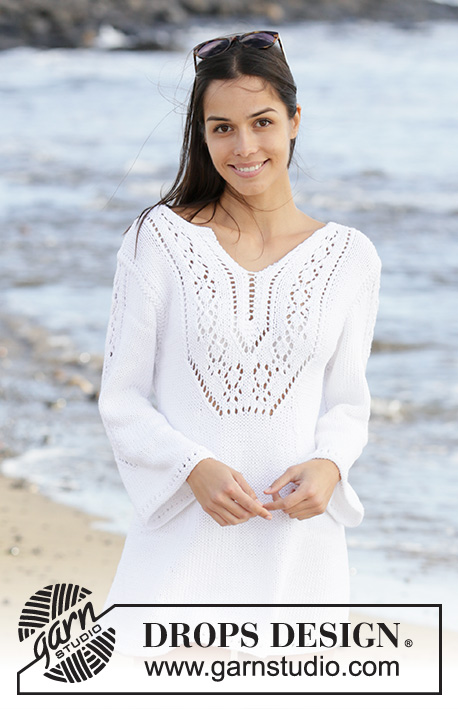
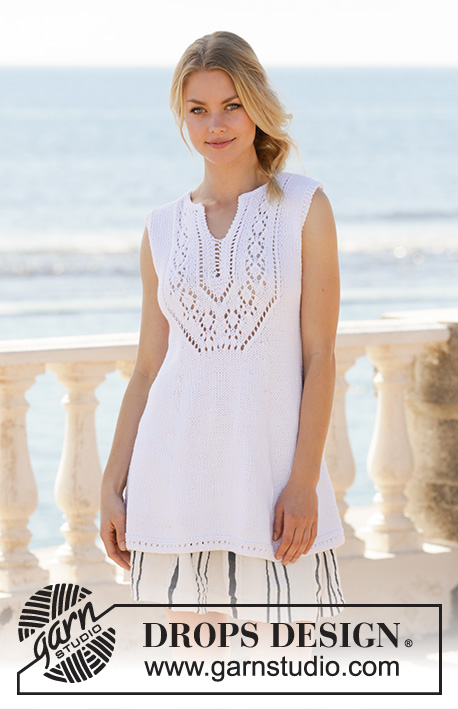
Knitted tunic in DROPS Paris. Piece is knitted with lace pattern and vent in the neck at the front. Size: S - XXXL
DROPS 199-20 |
|||||||||||||||||||
|
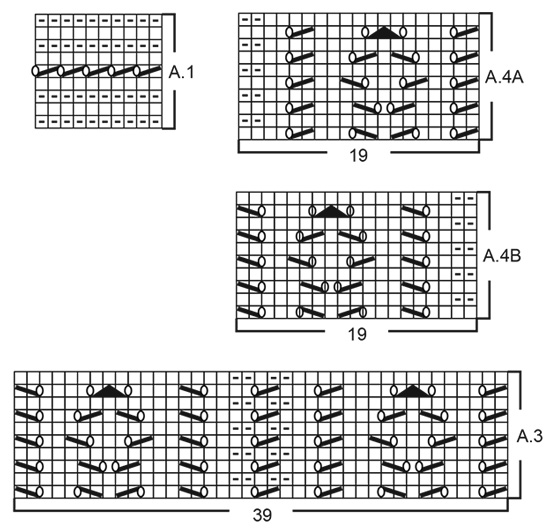
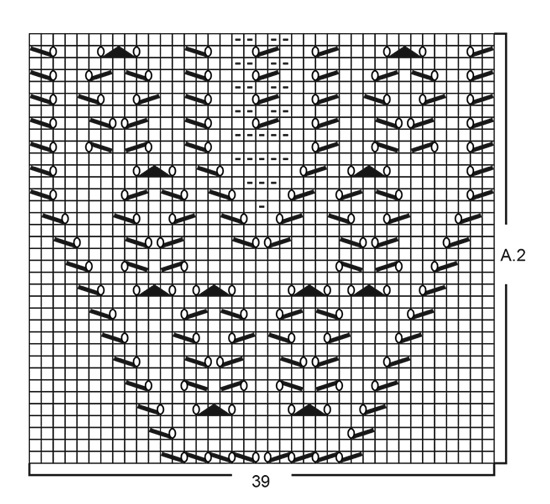
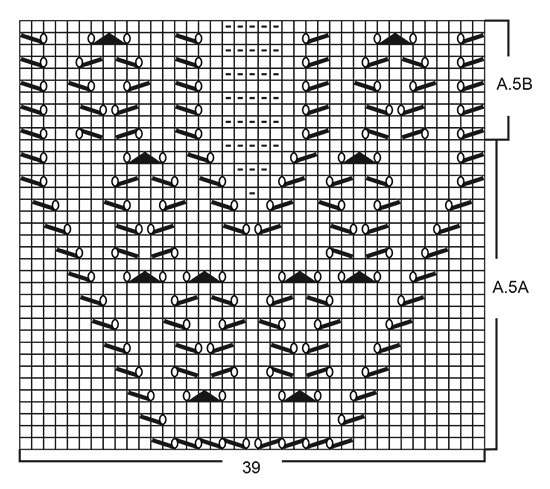
---------------------------------------------------------- EXPLANATION FOR THE PATTERN: ---------------------------------------------------------- GARTER STITCH (back and forth): Knit all rows. 1 ridge vertically = knit 2 rows. PATTERN: See diagrams A.1 to A.5. Diagrams show all rows in pattern seen from the right side. DECREASE TIP-1 (applies to skirt part on tunic): All decreases are done from the right side! Decrease as follows on each side of marker thread: Begin 2 stitches before marker thread and knit 2 together, marker thread, slip 1 stitch knitwise, knit 1, pass slipped stitch over stitch worked (= 2 stitches decreased at the marker thread and 4 stitches decreased on row). DECREASE TIP-2 (applies to armholes): Decrease inside 3 edge stitches in garter stitch. All decreases are done from the right side! Decrease after 3 edge stitches as follows: Slip 1 stitch knitwise, knit 1, pass slipped stitch over stitch worked (= 1 stitch decreased). Decrease before 3 edge stitches as follows: Begin 2 stitches before the 3 edge stitches and knit 2 together (= 1 stitch decreased). INCREASE TIP (applies to each side of body): All increases are done from the right side. Increase inside 1 edge stitch in garter stitch towards the side by making 1 yarn over. On next row (wrong side) purl yarn over twisted to avoid holes. Then work the new stitches in stocking stitch. ---------------------------------------------------------- START THE PIECE HERE: ---------------------------------------------------------- TUNIC - SHORT OVERVIEW OF THE PIECE: Worked back and forth on circular needle in parts, bottom up. Sew together when finished. Work lace pattern on back piece the same way as on front piece but without eyelet row and vent. If you do not want a lace pattern on back piece, work in stocking stitch over these stitches. FRONT PIECE: Cast on 109-117-123-133-143-153 stitches on circular needle size 4 mm with Paris. Work A.1 back and forth over all stitches (work 1st row from wrong side and on 5th row in A.1 symbol knit 2 together also applies from the wrong side. NOTE: Knit last stitch on 5th row). Switch to circular needle size 5 mm when A.1 is done. Work in stocking stitch with 1 edge stitch in GARTER STITCH in each side - read explanation above. REMEMBER THE KNITTING TENSION! When piece measures 5-5-5-5-6-6 cm, insert 2 marker threads in piece as follows: Count 26-29-31-35-39-43 stitches, insert 1 marker thread, count 57-59-61-63-65-67 stitches, insert 1 marker thread (26-29-31-35-39-43 stitches remain on row after last marker thread). READ ALL OF THE FOLLOWING SECTION BEFORE CONTINUING! DECREASE AT THE MARKER THREADS: On next row from right side decrease 1 stitch on both each side of both marker threads – read DECREASE TIP-1 (= 4 stitches decreased). Decrease like this every 4 cm 12 times in total = 61-69-75-85-95-105 stitches. LACE PATTERN: At the same time when piece measures 46-47-48-46-47-49 cm, begin lace pattern mid front. Last decrease at marker threads remains in all sizes when A.2 begins and row is worked as follows: Work 13-17-20-25-30-35 stitches in garter stitch and stocking stitch, work A.2 (= 39 stitches), then work the remaining 13-17-20-25-30-35 stitches in stocking stitch and garter stitch as before. Continue the pattern like this (remember last decrease at the marker threads). INCREASE IN THE SIDES: At the same time when piece measures 55-55-55-55-56-56 cm, increase 1 stitch on each side – read INCREASE TIP. Increase like this every 3-3-3-4-4-4 cm 3 times in total in each side = 67-75-81-91-101-111 stitches. ARMHOLE: At the same time when piece measures 64-65-66-67-68-69 cm, work 2 ridges vertically over the outermost 6-6-7-9-11-13 stitches in each side (work the other stitches in stocking stitch and lace pattern as before). After the 2 ridges in each side, cast off 3-3-4-6-8-10 stitches at beginning of the next 2 rows for armholes. On next row from right side, decrease 1 stitch in each side for armholes - read DECREASE TIP-2! Decrease like this every other row (i.e. on every row from right side) 1-4-5-7-9-11 times in total. LACE PATTERN CONTINUES: At the same time, when A.2 as been worked, work A.3 1-1-1-2-2-2 times in total vertically over the same 39 stitches, but on last row in last repetitions of A.3 (wrong side) cast off the middle stitch on row for vent mid front, and finish each part separately. LEFT FRONT PIECE: Begin from right side and work as before with 3 edge stitches in garter stitch towards the armhole, continue decrease for armhole if this is not done, work in stocking stitch and then A.4A over the outermost 19 stitches towards mid front. When piece measures 77-78-79-81-82-84 cm (adjust so that next row is worked from wrong side), slip the first 7-7-8-8-9-9 stitches towards mid front on 1 stitch holder for neck but to avoid cutting the yarn worked with work stitches before slipping them on stitch holder. Continue and cast off for neck at the beginning of every row from wrong side as follows: Cast off 2 stitches 2 times and then 1 stitch 3 times = 15-16-16-17-17-18 stitches remain on shoulder. Work until 1 row remain before piece measures 82-84-86-88-90-92 cm. Knit 1 row from wrong side and cast off by knitting from right side. Tunic measures approx. 82-84-86-88-90-92 cm from shoulder and down. RIGHT FRONT PIECE: Begin from right side and work as follows: Work A.4B over the first 19 stitches towards mid front, work in stocking stitch as before, continue decrease for armhole if it is not done, and continue with 3 edge stitches in garter stitch towards armhole. When piece measures 77-78-79-81-82-84 cm (adjust so that next row is worked from right side), slip the first 7-7-8-8-9-9 stitches towards mid front on 1 stitch holder for neck but to avoid cutting the yarn worked with work stitches before slipping them on stitch holder. Continue and cast off for neck at the beginning of every row from right side as follows: Cast off 2 stitches 2 times and then 1 stitch 3 times = 15-16-16-17-17-18 stitches remain on shoulder. Work until 1 row remain before piece measures 82-84-86-88-90-92 cm. Knit 1 row from wrong side and cast off by knitting from right side. BACK PIECE: Cast on 109-117-123-133-143-153 stitches on circular needle size 4 mm with Paris. Work A.1 back and forth over all stitches the same way as on front piece. Switch to circular needle size 5 mm when A.1 is done. Work in stocking stitch with 1 stitch in garter stitch in each side. When piece measures 5-5-5-5-6-6 cm, insert 2 marker threads in piece as follows: Count 26-29-31-35-39-43 stitches, insert 1 marker thread, count 57-59-61-63-65-67 stitches, insert 1 marker thread (26-29-31-35-39-43 stitches remain on row after last marker thread). READ ALL OF THE FOLLOWING SECTION BEFORE CONTINUING! DECREASE AT THE MARKER THREADS: On next row from right side decrease 1 stitch on both each side of both marker threads – read DECREASE TIP-1 (= 4 stitches decreased). Decrease like this every 4 cm 12 times in total = 61-69-75-85-95-105 stitches. LACE PATTERN: At the same time when piece measures 46-47-48-46-47-49 cm, begin lace pattern mid back. Last decrease at marker threads remains in all sizes when A.5A begins and row is worked as follows: Work 13-17-20-25-30-35 stitches in garter stitch and stocking stitch, work A.5A (= 39 stitches), then work the remaining 13-17-20-25-30-35 stitches in stocking stitch and garter stitch as before. Continue the pattern like this (remember last decrease at the marker threads). INCREASE IN THE SIDES: At the same time when piece measures 55-55-55-55-56-56 cm, increase 1 stitch on each side – read INCREASE TIP. Increase like this every 3-3-3-4-4-4 cm 3 times in total in each side = 67-75-81-91-101-111 stitches. ARMHOLE: At the same time when piece measures 64-65-66-67-68-69 cm, work 2 ridges vertically over the outermost 6-6-7-9-11-13 stitches in each side (work the other stitches in stocking stitch and lace pattern as before). After the 2 ridges in each side, cast off 3-3-4-6-8-10 stitches at beginning of the next 2 rows for armholes. On next row from right side, decrease 1 stitch in each side for armholes - read DECREASE TIP-2! Decrease like this every other row (i.e. on every row from right side) 1-4-5-7-9-11 times in total. LACE PATTERN CONTINUES: At the same time when A.5A has been worked, repeat A.5B vertically over the same 39 stitches until finished measurements. NECK LINE: At the same time when piece measures 80-82-84-86-88-90 cm, cast off the middle 27-27-29-29-31-31 stitches for neck and finish each shoulder separately. Continue pattern as before but work the stitches that do not fit the lace pattern when decreasing for neck, in stocking stitch. Cast off 1 stitch for neck at beginning of next row from neck = 15-16-16-17-17-18 stitches remain on the shoulder. Work until 1 row remain before piece measures 82-84-86-88-90-92 cm. Knit 1 row from wrong side and cast off by knitting from right side. Work the other shoulder the same way. ASSEMBLY: Sew shoulder seams inside cast-off edge to get 2 purled rows against each other on shoulders. Sew side seams from armholes and down - sew edge to edge in outer loop of edge stitch so that the seam is flat. NECK EDGE: Begin from right side mid front and pick up approx. 74 to 88 stitches around the neck (including stitches on stitch holders at the front) on circular needle size 4 mm with Paris. Knit 1 row from wrong side, knit 1 row from right side and knit 1 row from wrong side. Loosely cast off with knit from right side. Fasten off. |
|||||||||||||||||||
Diagram explanations |
|||||||||||||||||||
|
|||||||||||||||||||
 |
|||||||||||||||||||
 |
|||||||||||||||||||
 |
|||||||||||||||||||
 |
|||||||||||||||||||
Have you finished this pattern?Tag your pictures with #dropspattern #whitepearltop or submit them to the #dropsfan gallery. Do you need help with this pattern?You'll find 22 tutorial videos, a Comments/Questions area and more by visiting the pattern on garnstudio.com. © 1982-2026 DROPS Design A/S. We reserve all rights. This document, including all its sub-sections, has copyrights. Read more about what you can do with our patterns at the bottom of each pattern on our site. |
|||||||||||||||||||


With over 40 years in knitting and crochet design, DROPS Design offers one of the most extensive collections of free patterns on the internet - translated to 17 languages. As of today we count 324 catalogues and 12290 patterns translated into English (UK/cm). 12290
We work hard to bring you the best knitting and crochet have to offer, inspiration and advice as well as great quality yarns at incredible prices! Would you like to use our patterns for other than personal use? You can read what you are allowed to do in the Copyright text at the bottom of all our patterns. Happy crafting!
Post a comment to pattern DROPS 199-20
We would love to hear what you have to say about this pattern!
If you want to leave a question, please make sure you select the correct category in the form below, to speed up the answering process. Required fields are marked *.