
Popular categories
Looking for a yarn?


Comments / Questions (30)
![]() Asia wrote:
Asia wrote:
Dzień dobry, nie widzę informacji jak przerabiać lewą stronę robótki? Prawa i lewa strona według schematów?
09.01.2026 - 15:50DROPS Design answered:
Witaj Asiu, na lewej stronie robótki ścieg francuski przerabiasz na prawo. Schematy są pokazane na prawej stronie robótki. Na lewej stronie przerabiasz je od lewej do prawej strony - jak je przerabiać znajdziesz w opisie symboli (będzie napisane np. oczko prawe na lewej stronie robótki). Gdy nie ma takiego opisu, przerabiasz oczka tak jak schodzą z drutu. Jak czytać schematy w robótce na drutach znajdziesz TUTAJ. W razie dodatkowych pytań pisz. Pozdrawiamy!
11.01.2026 - 18:35
![]() Amanda L wrote:
Amanda L wrote:
Beware of these charts… I was thrilled to find a more complex pattern. And its lovely. But the charts are driving me crazy. They are done in sequence on a row so i cut them out and taped together but then they have different numbers of rows. So after the first repeat you might be on row 13 in one, row 1 and row 3 of others. I lost track and am having the worst time as the pattern grows. You are following 8 separate charts - there was a better way to do this. So disappointed!!!
05.10.2024 - 16:59
![]() MARIA PILAR BOCHACA TOHÀ wrote:
MARIA PILAR BOCHACA TOHÀ wrote:
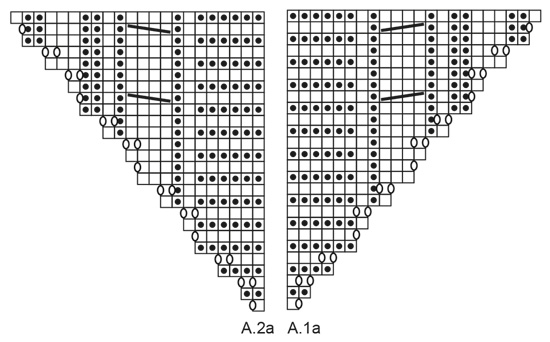
Podrian decirme que significa:A.1a= 1 punto? Si tenemos 7 puntos en la aguja, no me salen los números Muchas gràcias
31.03.2024 - 21:14DROPS Design answered:
Hola Maria Pilar, A.1a hace referencia al diagrama A.1a en la parte inferior de las instrucciones. Puedes ver que, en la 1ª fila de A.1a tienes 1 punto + 1 hebra. Entonces trabajas 1 punto orillo, el punto de A.1a (+1 hebra), el punto de A.2a (+ 1 hebra), el punto central en punto jersey, el punto de A.1a (+1 hebra), el punto de A.2a (+ 1 hebra) y el punto orillo. Es decir, tienes 7 puntos y 4 hebras.
31.03.2024 - 23:51
![]() Marie wrote:
Marie wrote:
Bonjour, Pour la dernière partie du châle, à partir de continuer ainsi, je ne comprends pas quel diagramme suit "A3a"... Merci pour votre réponse. Marie
22.02.2023 - 21:15DROPS Design answered:
Bonjour Marie, après A.3a tricotez A.3b, et après A.4a tricotez A.4b et ainsi de suite, les diagrammes -a montrent comment tricoter les augmentations avant de faire les diagrammes -b. Bon tricot!
23.02.2023 - 13:39
![]() Magda wrote:
Magda wrote:
Enligt mönstret ska man på första mönstervarvet först sticka en kantm, sedan A.1a (=1 m+1 omslag), sedan A.2a (1 omslag +1 m) och därefter 1 mittmaska och sedan upprepa A.1a och A.2a = 1 kantm, 1 m, 1 omslag, 1 omslag, 1 m, 1mittm, 1 m, 1 omslag, 1 omslag, 1 m, kantm. Då blir det 2 omslag efter varandra. Ska man istället börja med A.2a och sedan A.1a, dvs. 1 kantm, 1 omslag, 1m, 1 m, 1 omslag, 1 mittm, 1 omslag, 1 m, 1 m, 1 omslag, 1 kantm?
19.02.2023 - 16:50DROPS Design answered:
Hei Magda. Man leser et strikkediagram motsatt av slik man normalt leser: Fra høyre mot venstre, nedenfra og opp. Du begynner altså nederst i det høyre hjørnet, og jobber deg mot venstre og oppover. Altså, da blir det 1 kantmaske + A.1a (kast+1 maske rett) + A.2a (1 maske rett + 1 kast) + Midtmaske + A.1a (kast+1 maske rett) + A.2a (1 maske rett + 1 kast) + 1 kantmaske. mvh DROPS Design
27.02.2023 - 14:44
![]() Elena wrote:
Elena wrote:
Buonasera, Vorrei sapere cosa vuole dire : montare le maglie e lavorare un ferro a diritti dal rovescio del lavoro. E se mi confermate che nello schema sono indicati i ferri di andata e ritorno . Grazie
09.02.2023 - 18:08DROPS Design answered:
Buonasera Elena, significa che il primo ferro è dal rovescio del lavoro e va lavorato a diritto. I diagrammi mostrano tutti i ferri del motivo. Buon lavoro!
10.02.2023 - 16:20
![]() Mélanie D wrote:
Mélanie D wrote:
Bonjour je n’ai pas compris le dernier paragraphe de l’explication du châle qui commence par « continuez ainsi » merci
09.01.2023 - 14:00DROPS Design answered:
Bonjour Mélanie, vous tricotez maintenant A.3a et A.4a comme vous l'avez fait la 1ère fois (de chaque côté + de chaque côté de la maille centrale) - et vous continuez à augmenter et à tricoter les nouvelles mailles/les motifs comme la 1ère partie du châle, et dans le même ordre. Quand le châle mesure 64 cm environ le long de la maille centrale, continuez à augmenter comme avant, mais tricotez maintenant toutes les augmentations au point mousse (et les autres mailles comme avant). Bon tricot!
09.01.2023 - 16:42
![]() Melanie D wrote:
Melanie D wrote:
Bonjour est il possible de m’expliquer la fin du châle car je l’ai rien compris Merci
07.01.2023 - 09:29DROPS Design answered:
Bonjour Mélanie, à partir de quel moment, de quelle partie vous avez des soucis? Merci pour votre compréhension.
09.01.2023 - 08:57
![]() Julie Francoeur wrote:
Julie Francoeur wrote:
Bonjour quand on fini A.5a il y a 2 augmentations sur le rang endroit et quand on commence A.7a, il y a encore 2 augmentations en commençant. Ne faut il pas alterner 2 augmentions et 1 augmentation en début de rang endroit?
27.11.2022 - 21:14DROPS Design answered:
Bonjour Mme Francoeur, augmentez bien comme indiqué par les diagrammes, autrement dit 2 m au dernier rang sur l'endroit de A.5a/A.6a et 2 mailles au 1er rang sur l'endroit de A.7a/A.8a. Bon tricot!
28.11.2022 - 11:08
![]() Sandrine wrote:
Sandrine wrote:
Je pense qu'il y a une erreur dans le patron. Quand on obtient 199m vous écrivez: "tricoter le rg suivant sur l'endroit ainsi: 1m lisière au pt mousse *A.7.a, A.5.b, A.1.b à A.4.b comme avant (=70m) etc. mais A.1.B à A.4.b représente 56m (A.1.b 21m+ A.2.b 21m+A.4.b 14m) Il manque donc 14m En fait il faut répéter de A.3.b à A.4.b et on a bien le bon nombre de mailles (70m= A.3.b 14m + A.1.b 21m+ A.2.b 21m+A.4.b 14m) et surtout le bon motif
11.09.2022 - 23:31DROPS Design answered:
Bonjour Sandrine, les diagrammes précédent se tricotent toujours comme précédemment, autrement dit vous avez pour A.1b à A.4b 70 m au total soit: A.1b = 21 m + A.2b = 21 m + A.3b = 14 m + A.4b = 14 m (21+21+14+14=70 m). Bon tricot!
12.09.2022 - 12:15
|
||||||||||||||||||||||||||||||||||
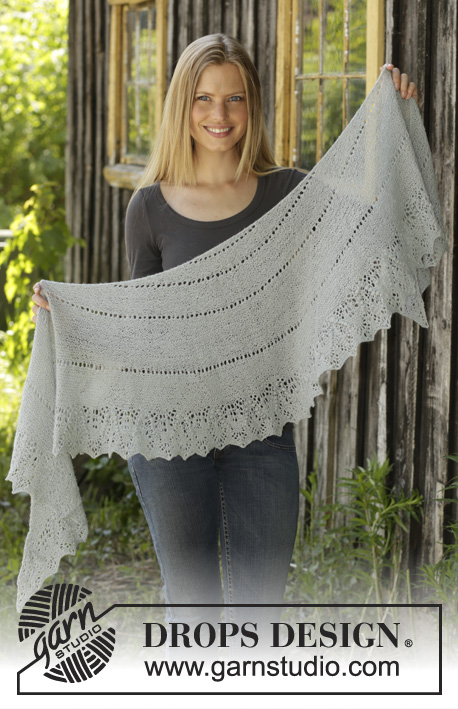
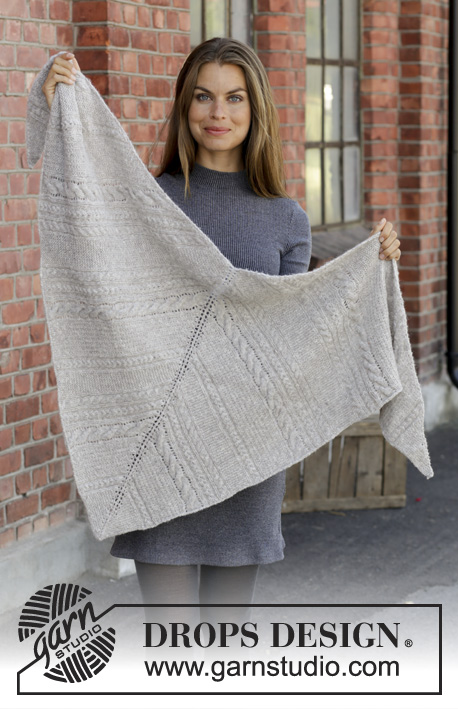
Shade of Winter#shadeofwintershawl |
||||||||||||||||||||||||||||||||||
 |
 |
|||||||||||||||||||||||||||||||||
Knitted shawl with cables, lace pattern and garter stitch in DROPS Sky.
DROPS 195-36 |
||||||||||||||||||||||||||||||||||
|
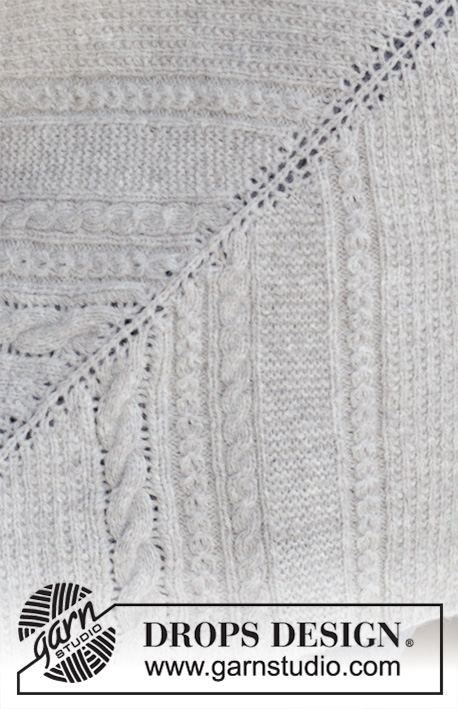
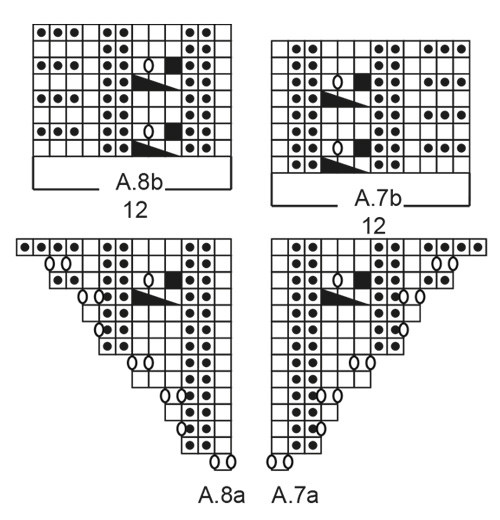
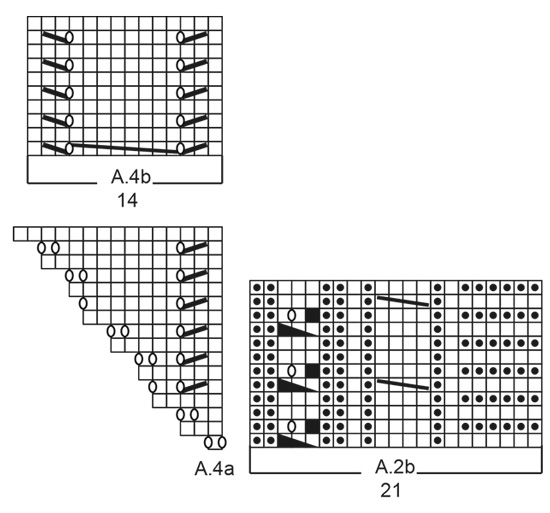
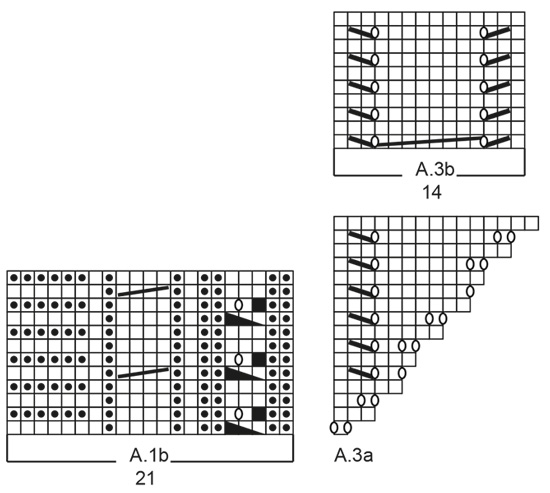
EXPLANATIONS FOR THE PATTERN: ------------------------------------------------------- RIDGE/GARTER STITCH (worked back and forth): 1 ridge = Knit 2 rows. PATTERN: See diagrams A.1 to A.8. Pattern A.a is worked first, then repeat pattern A.b in height over pattern A.a to finished length. The diagrams show all the rows in the pattern seen from the right side. As you are decreasing and increasing in diagrams A.1b and A.2b and A.7 and A.8, the number of stitches can vary by 1 stitch per repeat in the diagrams if it is just after a decreased. ------------------------------------------------------- START THE PIECE HERE: ------------------------------------------------------- SHAWL - SHORT OVERVIEW OF THE PIECE: The shawl is worked back and forth, top down. SHAWL: Cast on 7 stitches with circular needle size 4 mm and Sky. Knit 1 row from the wrong side. Work as follows from the right side: Work 1 edge stitch in GARTER STITCH - read description above, * A.1a (= 1 stitch), A.2a (= 1 stitch) *, 1 mid stitch in stocking stitch, work from *-* 1 more time and finish with 1 edge stitch in garter stitch. Continue this pattern. The yarn overs are not worked twisted to leave holes. The increases are drawn in the diagrams; you increase 4 stitches on the first increase and 8 stitches on the 2nd and 3rd increases. These three increases are repeated in height to finished length. REMEMBER THE KNITTING TENSION! When A.1a and A.2a have been worked 1 time in height there are 91 stitches on the needle. The next row is worked as follows from the right side: Work 1 edge stitch in garter stitch, * A.3a (= 1 stitch), A.1b (= 21 stitches), A.2b (= 21 stitches), A.4a (= 1 stitch) *, 1 mid-stitch in stocking stitch, work from *-* 1 more time and finish with 1 edge stitch in garter stitch. A.1b and A.2b are repeated in height to finished length. When A.3a and A.4a have been worked 1 time in height there are 147 stitches on the needle. The next row is worked as follows from the right side: Work 1 edge stitch in garter stitch, * A.5a (= 1 stitch), A.3b (= 14 stitches), A.1b and A.2b as before (= a total of 42 stitches), A.4b (= 14 stitches), A.6a (= 1 stitch) *, 1 mid-stitch in stocking stitch, work from *-* 1 more time and finish with 1 edge stitch in garter stitch. A.3b and A.4b are repeated in height to finished length. When A.5a and A.6a have been worked 1 time in height there are 199 stitches on the needle. The next row is worked as follows from the right side: Work 1 edge stitch in garter stitch, * A.7a (= 1 stitch), A.5b (= 13 stitch), A.1b to A.4b as before (= a total of 70 stitches), A.6b (= 13 stitches), A.8a (= 1 stitch) *, 1 mid-stitch in stocking stitch, work from *-* 1 more time and finish with 1 edge stitch in garter stitch. A.5b and A.6b are repeated in height to finished length. When A.7a and A.8a have been worked 1 time in height there are 247 stitches on the needle. The next row is worked as follows from the right side: Work 1 edge stitch in garter stitch, * A.1a over the next stitch, A.7b (= 12 stitches), A.1b to A.6b as before (= a total of 96 stitches), A.8b (= 12 stitches), A.2a over the next stitch *, 1 mid-stitch in stocking stitch, work from *-* 1 more time and finish with 1 edge stitch in garter stitch. A.7b and A.8b are repeated in height to finished length. Continue this pattern, i.e. when A.1a and A.2a have been worked 1 time in height inside the 1 edge stitch in each side and on each side of the mid-stitch, A.3a and A.4a are worked inside the 1 edge stitch in each side of the piece and on each side of the mid-stitch etc. Continue this pattern and these increases in height until the piece measures approx. 64 cm, measured along the mid-stitch (there is now approx. 8 cm left); adjust so that the pattern inside the 1 edge stitch and on each side of the mid-stitch has finished increasing (i.e. if there is a cable, so that all stitches in the cable has been increased). Continue to increase and work pattern as before, but now work the increased stitches in garter stitch. Continue like this until the piece measures 72 cm measured along the mid-stitch. Cast off with knit over knit, purl over purl and garter stitch over garter stitch; make sure the cast-off edge is not tight; you can use a larger needle size to cast off if this is a problem. |
||||||||||||||||||||||||||||||||||
Diagram explanations |
||||||||||||||||||||||||||||||||||
|
||||||||||||||||||||||||||||||||||
 |
||||||||||||||||||||||||||||||||||
 |
||||||||||||||||||||||||||||||||||
 |
||||||||||||||||||||||||||||||||||
 |
||||||||||||||||||||||||||||||||||
 |
||||||||||||||||||||||||||||||||||
Have you finished this pattern?Tag your pictures with #dropspattern #shadeofwintershawl or submit them to the #dropsfan gallery. Do you need help with this pattern?You'll find 18 tutorial videos, a Comments/Questions area and more by visiting the pattern on garnstudio.com. © 1982-2026 DROPS Design A/S. We reserve all rights. This document, including all its sub-sections, has copyrights. Read more about what you can do with our patterns at the bottom of each pattern on our site. |
||||||||||||||||||||||||||||||||||


With over 40 years in knitting and crochet design, DROPS Design offers one of the most extensive collections of free patterns on the internet - translated to 17 languages. As of today we count 324 catalogues and 12290 patterns translated into English (UK/cm). 12290
We work hard to bring you the best knitting and crochet have to offer, inspiration and advice as well as great quality yarns at incredible prices! Would you like to use our patterns for other than personal use? You can read what you are allowed to do in the Copyright text at the bottom of all our patterns. Happy crafting!
Post a comment to pattern DROPS 195-36
We would love to hear what you have to say about this pattern!
If you want to leave a question, please make sure you select the correct category in the form below, to speed up the answering process. Required fields are marked *.