
Popular categories
Looking for a yarn?


Comments / Questions (6)
![]() Ellen Mertens wrote:
Ellen Mertens wrote:
1. Hoe kan ik bij A.2A de voorbies in de basiskleur B breien aan begin en einde van de toer als ik die toer met kleur A moet breien? Moet ik draad B dan toch achter het werk meenemen? Of breien ik de voorbies met de kleur die in A.X staat aangegeven? 2. Hoe houd ik de rand bij de voorbiezen netjes als ik steeds de draad mee omhoog moet nemen? Ik kan op beide vragen de antwoorden niet in het patroon terugvinden.
28.10.2025 - 15:36DROPS Design answered:
Dag Ellen,
Als je de voorbies in een andere kleur breit, kun je telkens de draad van de voorbies om de draad slaan waar je de rest van het werk mee breit. Op die manier hoef je hem niet over de hele toer mee te nemen.
29.10.2025 - 18:25
![]() Anjo wrote:
Anjo wrote:
Looking at the photo, the number of ridges in the button band next to the mosaic pattern is less than expected. This evens out the tighter row tension of the slipped stitch rows and is correct. To do this, you slip the button band stitches on the rows where the colour to be slipped is the same as the colour of the button band, and knit the button band stitches on rows where the other colour is slipped. The slipped colour is always left behind with no need to carry the 2nd colour. It works!
17.11.2022 - 10:30
![]() Anjo wrote:
Anjo wrote:
I understand how to knit the mosaic pattern for the Hint of Heather jacket, but cannot work out how to get the right colour for the button bands without joining on an extra ball of yarn. Because one colour is always left behind at the beginning of each pair of rows, this results in stripes at each end rather than the block of colour as in the photo. How can this be achieved?
02.11.2022 - 17:53DROPS Design answered:
Hi Anjo, You carry the second strand with you, back and forth on each set of 2 rows (see Mosaic Pattern in Explanations at the top of the pattern). You then use the background colour for the bands. Happy knitting!
03.11.2022 - 07:00
![]() Cathy wrote:
Cathy wrote:
Bonjour, Peut on tricoter le tricot mosaïque sur des aiguilles droite ? Bien à vous
02.01.2020 - 14:47DROPS Design answered:
Bonjour Cathy, tout à fait, il sera toutefois plus facile d'utiliser une aiguille circulaire car les mailles seront moins serrées. Bon tricot!
02.01.2020 - 16:15
![]() Hourdebaigt wrote:
Hourdebaigt wrote:
Bonjour. Peut on tricoter des poches invisibles sur un top down? Quelle serait la technique? Merci
11.08.2019 - 17:54DROPS Design answered:
Bonjour Mme Houdebaigt, cette vidéo montre comment faire une poche dans un modèle top down, sur la base d'un modèle différent. Il vous faudra probablement faire quelques ajustements en fonction du modèle tricoté. Bon tricot!
12.08.2019 - 08:31
![]() Lucie Hardy wrote:
Lucie Hardy wrote:
Comment faire suivre la 2e laine sur le rang envers du motif jaquard au point mousse ?
05.12.2018 - 15:44DROPS Design answered:
Bonjour Mme Hardy, on tricote toujours 1 couleur par rang, et donc la même couleur au rang sur l'envers qu'au rang sur l'endroit (pas comme du jacquard) - les autres mailles sont seulement glissées. Vous pouvez trouver ici la vidéo de cette technique. Bon tricot!
05.12.2018 - 15:54
|
||||||||||||||||
Hint of Heather#hintofheatherjacket |
||||||||||||||||
 |
 |
|||||||||||||||
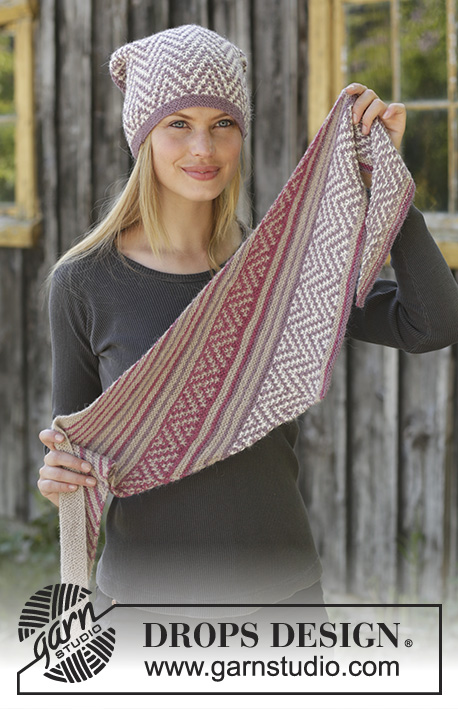
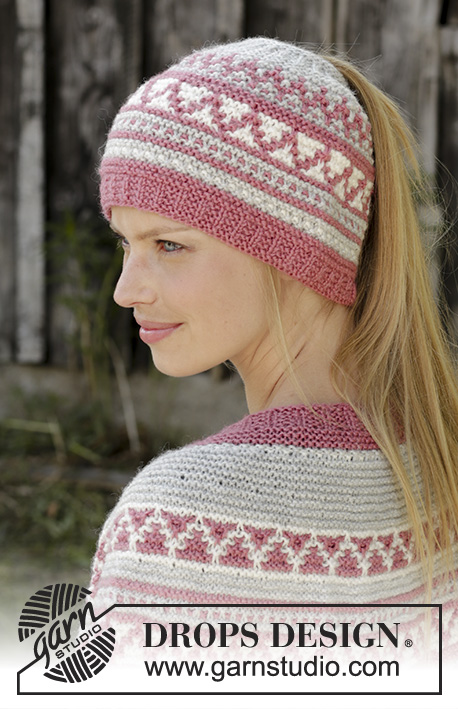
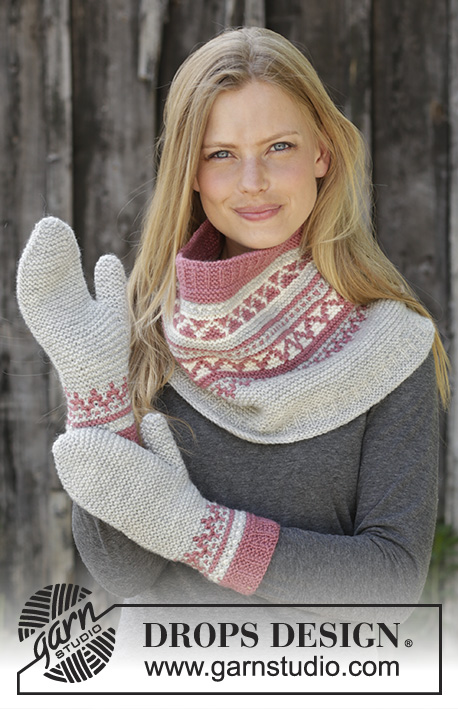
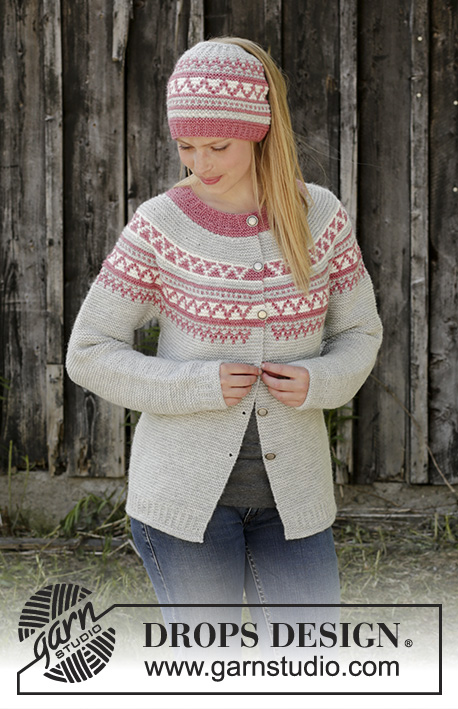
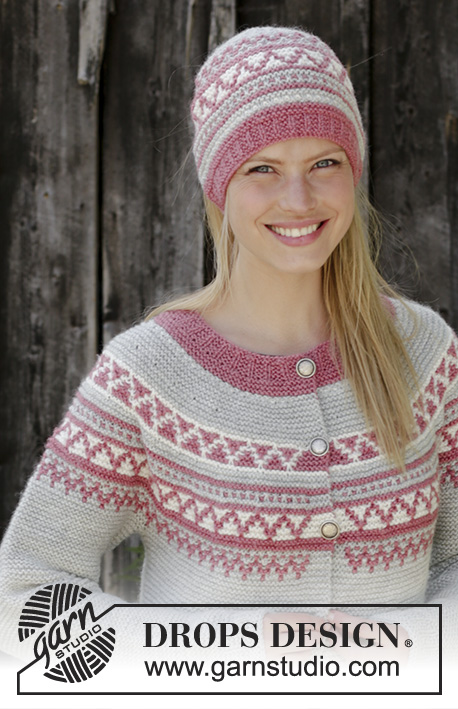
Knitted jacket in DROPS Nord. Piece is knitted top down with round yoke, garter stitch and mosaic pattern. Size: S - XXXL Knitted hat in DROPS Nord. Piece is knitted bottom up in garter stitch, mosaic pattern and opening for ponytail.
DROPS 197-18 |
||||||||||||||||
|
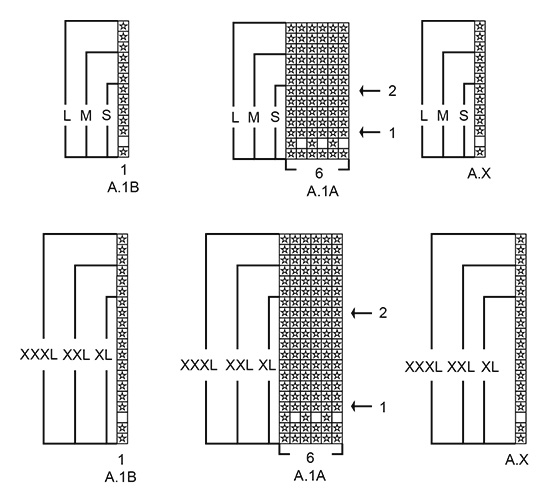
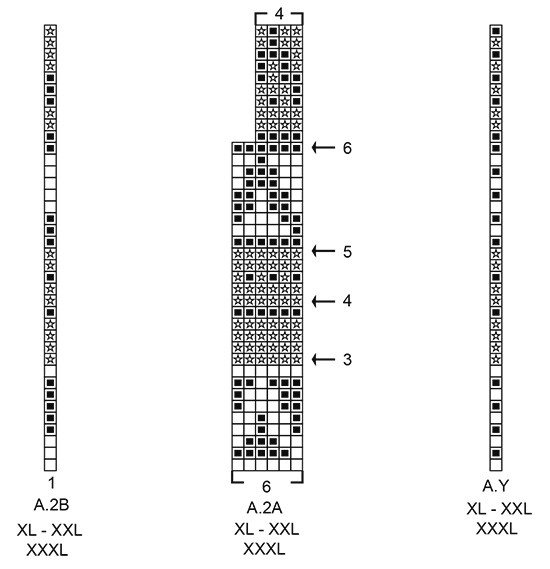
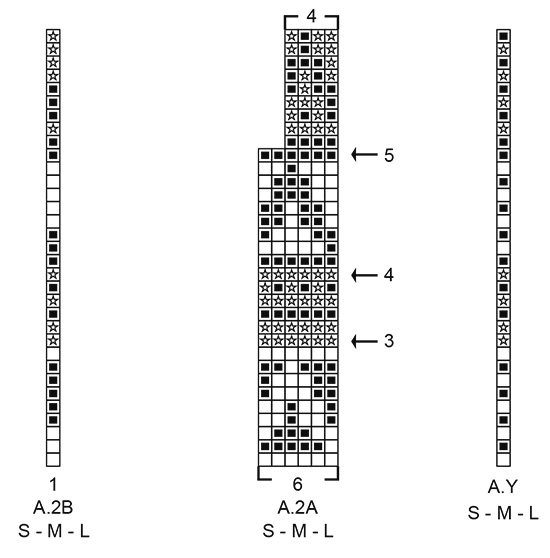
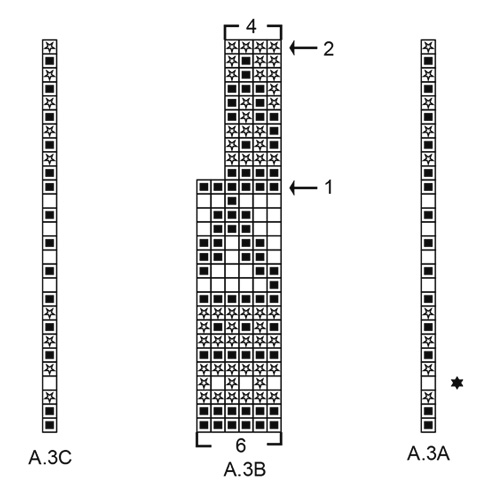
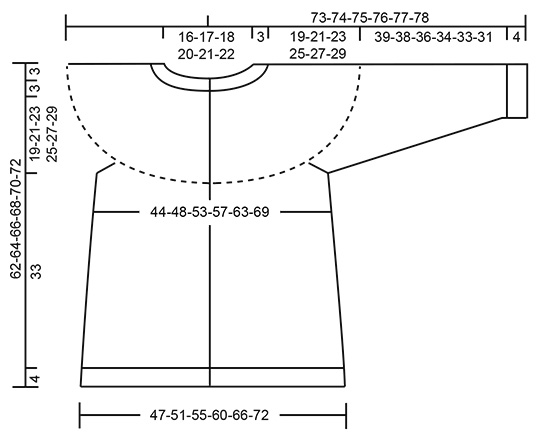
EXPLANATION FOR THE PATTERN: ---------------------------------------------------------- GARTER STITCH (back and forth): 1 ridge = knit 2 rows. MEASURING TIP: Because of ridges hold the piece up when doing length measurements to avoid that the piece is too long when worn. INCREASE TIP-1 (evenly spaced): All increases are done from the right side. To calculate how to increase evenly on needle, use the total number of stitches on row (e.g. 113 stitches), minus bands (e.g. 10 stitches) and divide the remaining stitches by number of increases to be done (e.g. 30 stitches) = 3.4. In this example increase by making 1 yarn over after alternately approx. every 3rd and 4th stitch. On next row (wrong side) knit yarn overs twisted to avoid hole. Do not increase over bands. INCREASE TIP-2 (applies to sides of body): All increases are done from the right side. Work until 3 stitches remain before marker, make 1 yarn over, knit 6 (marker thread is in the middle of these 6 stitches), make 1 yarn over (= 2 stitches increased). On next row (wrong side) knit yarn overs twisted to avoid hole. DECREASE TIP-1 (applies to mid under sleeves): All decreases are done from the right side! Decrease after 1 edge stitch as follows: Slip 1 stitch knitwise, knit 1, pass slipped stitch over stitch worked (= 1 stitch decreased). Decrease before 1 edge stitch as follows: Begin 2 stitches before edge stitch, knit 2 together (= 1 stitch decreased). DECREASE TIP-2 (evenly spaced): All decreases are done from the right side! To calculate how to decrease evenly on needle, use the total number of stitches on row (e.g. 110 stitches), minus edge stitches (e.g. 2 stitches) and divide the remaining stitches by number of decreases to be done (e.g. 12 stitches) = 9. In this example decrease by knitting every 8th and 9th stitch together. Do not decrease over edge stitches. BUTTONHOLES: Decrease for buttonholes on right band (when garment is worn). 1 buttonhole = work from right side until 3 stitches remain on needle, make 1 yarn over, knit 2 together and finish by knitting 1. On next row (wrong side) knit the yarn over to make a hole. Decrease first buttonhole when neck edge measures approx. 2 cm. Then decrease the next 5-5-5-6-6-6 buttonholes, approx. 8-8-8½-8-8-8½ cm apart. MOSAIC PATTERN JACKET: See diagram A.1 and A.2 and read explanation for technique below. Choose diagram for your size. Every row in diagram equals 2 rows. I.e. from right side work diagram from right to left and from wrong side work same row from left to right. On all rows from right side hold yarn behind piece (i.e. on wrong side of piece) when slipping a stitch. On all rows from wrong side hold yarn in front of piece (i.e. towards you and still on wrong side of piece) when slipping a stitch. Make sure that the yarn is not too tight on wrong side of piece. To maintain control over pattern insert a marker between every pattern repetition with A.1A/A.2A. A.X/A.Y = help square - this square is not worked but shoes how pattern row is worked (read explanation further down). A.1A/A.2A = 1 pattern repetition. A.1B/A.2B = last stitch before band, this stitch makes the pattern begin and end the same way inside band in each side (stitches is worked) On the rows in one colour in diagram work 1 ridge back and forth over all stitches without slipping any stitches. On pattern row in A.1 that has an empty square in A.X (colour A), knit all stitches with colour A in A.1A/A.1B and slip all stitches with colour C. On every pattern row with an empty square or a square with star in A.Y (colour A or C), knit all stitches with colour A or C in A.2A/A.2B and slip all stitches with colour B. On every pattern row that has a black square in A.Y (colour B), knit all stitches with colour B in A.2A/A.2B and slip all stitches with colour A or C. MOSAIC PATTERN HAT: See diagram A.3 and read explanation for technique below. Every row in diagram equals 2 rows. I.e. from right side work diagram from right to left and from wrong side work same row from left to right. On all rows from right side hold yarn behind piece (i.e. on wrong side of piece) when slipping a stitch. On all rows from wrong side hold yarn in front of piece (i.e. towards you and still on wrong side of piece) when slipping a stitch. Make sure that the yarn is not too tight on wrong side of piece. To maintain control over pattern insert a marker between every pattern repetition with A.3B. A.3A = start stitch from right side and end stitch from wrong side (stitch should be worked). A.3B = 1 pattern repetition. A.3C = end stitch from right side and start stitch from wrong side (stitch should be worked). On the rows in one colour in diagram work 1 ridge back and forth over all stitches without slipping any stitches. On first pattern row in A.3 that has an empty square in A.3A and A.3C (colour A – row marked with a star in A.3A), knit all stitches with colour A and slip all stitches with colour C. On the other pattern rows with an empty square or a square with star in A.3A and A.3C (colour A or C), knit all stitches with colour A and slip all stitches with colour B. On every pattern row that has a black square in A.3A and A.3C (colour B), knit all stitches with colour B and slip all stitches with colour A or C. ---------------------------------------------------------- START THE PIECE HERE: ---------------------------------------------------------- JACKET - SHORT OVERVIEW OF THE PIECE: Work neck edge, yoke and body back and forth on circular needle from mid front, work top down. Work in mosaic pattern on yoke. It is important to follow the diagrams. Work the entire pattern in garter stitch but do not work pattern in regular garter stitch stitches. The pattern is formed by slipping the stitches. Read the entire explanation for mosaic pattern before working! Sleeves are worked back and forth on circular needle in parts, top down and sewn together when finished. NECK EDGE: Cast on 113-116-122-128-131-137 stitches (including 5 band stitches in each side towards mid front) on circular needle size 3 mm with old pink. Work 1 ridge in GARTER STITCH - read explanation above. Then work as follows: ROW 1 (= right side): Knit all stitches. ROW 2 (= wrong side): 5 band stitches in garter stitch I.e. knit from wrong side), * purl 1, knit 2 *, repeat from *-* until 6 stitches remain, purl 1 and finish with 5 band stitches in garter stitch (i.e. knit from wrong side). Repeat rows 1 and 2 until piece measures 3 cm from cast-on edge – remember BUTTONHOLES on right band – read explanation above. Switch to circular needle size 3.5 mm. Work 3 ridges back and forth over all stitches, AT THE SAME TIME on first row (right side) increase 30-33-33-33-36-36 stitches evenly – read INCREASE TIP-1 = 143-149-155-161-167-173 stitches. Then work yoke as explained below. YOKE: Work first row as follows from right side: 5 band stitches in garter stitch, work MOSAIC PATTERN - read explanation above, i.e. see square in A.X (square is only an explanation on row and should not be worked), work A.1A until 6 stitches remain on needle (= 22-23-24-25-26-27 repetitions of A.1A of 6 stitches), work A.1B (= 1 stitch) and finish with 5 band stitches in garter stitch. Continue pattern like this but remember that 1 row in diagram = 2 rows and that bands are worked in base colour in pattern stripe. REMEMBER THE KNITTING TENSION! AT THE SAME TIME on every row marked with arrow in A.1A increase evenly as explained below - remember INCREASE TIP-1. On row marked with arrow-1 increase 48-48-48-54-54-60 stitches evenly = 191-197-203-215-221-233 stitches (there is now room for 30-31-32-34-35-37 repetitions of A.1A of 6 stitches). On row marked with arrow-2 increase 36-42-48-54-60-60 stitches evenly = 227-239-251-269-281-293 stitches (there is now room for 36-38-40-43-45-47 repetitions of A.1A of 6 stitches). When A.1 has been worked, work A.2 the same way, i.e. work first row as follows from right side: 5 band stitches in garter stitch, see square in A.Y (square is only an explanation on row and should not be worked), work A.2A until 6 stitches remain on needle (= 36-38-40-43-45-47 repetitions of A.2A of 6 stitches), work A.2B (= 1 stitch) and finish with 5 band stitches in garter stitch. AT THE SAME TIME on every row marked with arrow in A.2A increase evenly as explained below. On row marked with arrow-3 increase 42-42-48-48-48-48 stitches evenly = 269-281-299-317-329-341 stitches (there is now room for 43-45-48-51-53-55 repetitions of A.2A of 6 stitches). On row marked with arrow-4 increase 30-42-48-42-42-48 stitches evenly = 299-323-347-359-371-389 stitches (there is now room for 48-52-56-58-60-63 repetitions of A.2A of 6 stitches). On row marked with arrow-5 increase 24-32-40-42-42-48 stitches evenly = 323-355-387-401-413-437 stitches (there is now room for 78-86-94-65-67-71 repetitions of A.2A of 4-4-4-6-6-6 stitches). Increases in size S, M and L are now done. On row marked with arrow-6 (only applies to size XL, XXL and XXXL) increase 18-34-38 stitches evenly (there is room for 102-109-116 repetitions of A.2A of 4 stitches) = 419-447-475 stitches on needle in size XL, XXL and XXXL. When A.2 has been worked, work in garter stitch back and forth over all stitches until piece measures 22-24-26-28-30-32 cm from cast-on edge mid front – read MEASURING TIP, but adjust so that last row is worked from right side. Work next row as follows from wrong side: Knit 52-57-61-66-72-78 (= front piece), slip the next 63-69-77-83-85-87 stitches on 1 stitch holder for sleeve, cast on 8-8-10-10-12-14 new stitches on row (= in the side under sleeve), knit 93-103-111-121-133-145 (= back piece), slip the next 63-69-77-83-85-87 stitches on 1 stitch holder for sleeve, cast on 8-8-10-10-12-14 new stitches on row (= in the side under sleeve) and knit the last 52-57-61-66-72-78 stitches as before (= front piece). Finish body and sleeves separately. BODY: = 213-233-253-273-301-329 stitches. Insert 1 marker thread 56-61-66-71-78-85 stitches in from each side (= 101-111-121-131-145-159 stitches between marker threads on back piece). Work in garter stitch back and forth over all stitches (work first row from right side). When piece measures 8 cm from division - remember MEASURING TIP, increase 2 stitches in each side - read INCREASE TIP-2. Increase like this every 8 cm 3 times in total in each side = 225-245-265-285-313-341 stitches. Work until piece measures 32 cm from division in all sizes. Work 1 ridge while increasing 11-12-13-14-16-18 stitches evenly on first row – remember INCREASE TIP-1 = 236-257-278-299-329-359 stitches, Switch to circular needle size 3 mm. Then work an edge as follows: ROW 1 (= right side): Knit all stitches. ROW 2 (= wrong side): 5 band stitches in garter stitch I.e. knit from wrong side), * purl 1, knit 2 *, repeat from *-* until 6 stitches remain, purl 1 and finish with 5 band stitches in garter stitch (i.e. knit from wrong side). Repeat rows 1 and 2 until the edge measures 3 cm (jacket measures approx. 36 cm from division in all sizes). Work 2 ridges back and forth over all stitches. Then loosely cast off by knitting from right side (you can use half a needle size larger when casting off to avoid a tight edge). Jacket measures approx. 62-64-66-68-70-72 cm from shoulder and down. SLEEVE: Begin from right side on circular needle size 3.5 mm with pearl grey, in the middle of the new stitches cast on on body under sleeve, pick up 1 stitch in each of the 4-4-5-5-6-7 stitches, knit over the 63-69-77-83-85-87 stitches from stitch holder and then pick up 1 stitch in each of the remaining 4-4-5-5-6-7 stitches under sleeve = 71-77-87-93-97-101 stitches. Work in garter stitch back and forth from mid under sleeve. When piece measures 2 cm from division - remember MEASURING TIP, decrease 1 stitch inside 1 edge stitch in each side - read DECREASE TIP-1. Decrease like this every 1 cm 0-0-3-7-9-13 times in total and then every 2 cm 3-2-15-12-11-7 times in total. Then decrease 8-12-0-0-0-0 times in total every 4-2½-0-0-0-0 cm = 49-49-51-55-57-61 stitches remain on needle. Continue until piece measures 39-38-36-34-33-31 cm from division (shorter measurements in the larger sizes because of longer yoke). Work 1 ridge while decreasing 1-1-0-1-0-1 stitch on first row = 48-48-51-54-57-60 stitches on needle. Switch to circular needle size 3 mm and work edge as follows: ROW 1 (= right side): Knit all stitches. ROW 2 (= wrong side): Knit 1, * purl 1, knit 2 *, work from *-* until 2 stitches remain on row, purl 1 and finish with knit 1. Repeat rows 1 and 2 until the edge measures 3 cm (sleeve measures approx. 42-41-39-37-36-34 cm from division). Work 2 ridges back and forth over all stitches. Then loosely cast off by knitting (you can use half a needle size larger when casting off to avoid a tight edge). Sleeve measures approx. 43-42-40-38-37-35 cm from division. Work the other sleeve the same way. ASSEMBLY: Sew sleeve seams from division under sleeve and outwards, sew in outer loop of edge stitch so that the seam is flat. Sew the buttons on to the left band. ---------------------------------------------------------- HAT - SHORT OVERVIEW OF THE PIECE: Worked back and forth on circular needle, bottom up. First work and edge at the bottom. Then work in mosaic pattern. It is important to follow the diagrams. Work the entire colour pattern in garter stitch but do not work pattern in regular garter stitch stitches. The colour pattern is formed by slipping the stitches as explained above. Read the entire explanation for mosaic pattern before working! Finish by working an edge at the top of hat before sewing the piece together mid back. Hat is open at the top to make room for a ponytail. HAT: Cast on 110-116-122 stitches on circular needle size 3 mm with old pink. Work 1 ridge in GARTER STITCH - read explanation above. Then work as follows: ROW 1 (= right side): Knit all stitches. ROW 2 (= wrong side): Knit 1 (= edge stitch), * purl 1, knit 2 *, work from *-* until 1 stitch remains on needle and finish with knit 1 (= edge stitch). Repeat 1st and 2nd row until piece measures 2-2-3 cm from cast-on edge. Switch to circular needle size 3.5 mm and work MOSAIC PATTERN HAT - see explanation above. I.e. work A.3A over first stitch, repeat A.3B until 1 stitch remains on needle (= 18-19-20 repetitions of 6 stitches), finish with A.3C over last stitch. Continue pattern like this but remember that 1 row in diagram = 2 rows. REMEMBER THE KNITTING TENSION! AT THE SAME TIME on every row marked with arrow in A.3B decrease evenly as explained below - read DECREASE TIP. On row marked with arrow-1 decrease 12-10-12 stitches evenly = 98-106-110 stitches (there is now room for 24-26-27 repetitions of 4 stitches). On row with arrow-2 decrease 24-26-24 stitches evenly = 74-80-86 stitches on needle. A.3 is now done. Continue back and forth over all stitches with pearl grey until piece measures 15-16-17 cm. Switch to circular needle size 3 mm and work as follows: ROW 1 (= right side): Knit all stitches. ROW 2 (= wrong side): Knit 1, * purl 1, knit 2 *, work from *-* until 1 stitch remains on row, purl 1 and finish with knit 1. Repeat rows 1 and 2 until the same number of rows has been worked as at the bottom edge on hat, i.e. approx 2-2-3 cm. then work 2 ridges back and forth over all stitches AT THE SAME TIME decrease 24-26-28 stitches evenly on first row = 50-54-58 stitches. Loosely cast off with knit from right side. Piece measures approx. 18-19-21 cm from top and down. ASSEMBLY: Sew hat together mid back inside 1 edge stitch in garter stitch in each side. |
||||||||||||||||
Diagram explanations |
||||||||||||||||
|
||||||||||||||||
 |
||||||||||||||||
 |
||||||||||||||||
 |
||||||||||||||||
 |
||||||||||||||||
 |
||||||||||||||||
Have you finished this pattern?Tag your pictures with #dropspattern #hintofheatherjacket or submit them to the #dropsfan gallery. Do you need help with this pattern?You'll find 21 tutorial videos, a Comments/Questions area and more by visiting the pattern on garnstudio.com. © 1982-2026 DROPS Design A/S. We reserve all rights. This document, including all its sub-sections, has copyrights. Read more about what you can do with our patterns at the bottom of each pattern on our site. |
||||||||||||||||


With over 40 years in knitting and crochet design, DROPS Design offers one of the most extensive collections of free patterns on the internet - translated to 17 languages. As of today we count 324 catalogues and 12290 patterns translated into English (UK/cm). 12290
We work hard to bring you the best knitting and crochet have to offer, inspiration and advice as well as great quality yarns at incredible prices! Would you like to use our patterns for other than personal use? You can read what you are allowed to do in the Copyright text at the bottom of all our patterns. Happy crafting!
Post a comment to pattern DROPS 197-18
We would love to hear what you have to say about this pattern!
If you want to leave a question, please make sure you select the correct category in the form below, to speed up the answering process. Required fields are marked *.