
Popular categories
Looking for a yarn?


Comments / Questions (8)
![]() Megan wrote:
Megan wrote:
Hi there, I am completing the sleeves and when I start decreasing every 2cm after the division whilst completing the A.2A pattern there are no longer increments of 6 stitches to complete the chart. Will the patten not be impacted by this? Please could you explain, many thanks Megan
19.08.2022 - 16:19DROPS Design answered:
Dear Megan, in the center under the sleeve, whether working top down or bottom up, there will be an interruption in the pattern, due to increases or decreases. However, this doesn't create a bad visual effect, since it's worked in a barely visible part of the garment. Happy knitting!
21.08.2022 - 21:11
![]() Megan wrote:
Megan wrote:
Hi there, when I decrease every 2cm on the sleeves after the division, there will no longer repeats of 6 stitches for completing the A.2A pattern. How does the pattern then not get interrupted? Many thanks Megan
19.08.2022 - 16:16DROPS Design answered:
Dear Megan, please see answer above.
21.08.2022 - 21:12
![]() Malva Hilda Mejia Arregui wrote:
Malva Hilda Mejia Arregui wrote:
1. A que se refiere la descripción de elevación en la parte posterior del cuello. 2.Envian lanas a México y cual sería el procedimiento
19.01.2022 - 05:29DROPS Design answered:
Hola Malva, 1. Esta elevación es opcional, para que se asiente mejor la prenda. En este caso, el canesú es más alto en la espalda. Si prefieres que quede de la misma altura por ambos lados puedes pasar directamente al canesú. 2. A continuación, en el siguiente enlace, puedes encontrar las tiendas con envío internacional, incluyendo México: https://www.garnstudio.com/findastore.php?id=19&w=1&cid=19
23.01.2022 - 20:04
![]() Lajoie wrote:
Lajoie wrote:
J e ne comprend pas pourquoi il est indiqué pour ce cardigan d'utiliser des aiguilles circulaires
12.12.2020 - 12:21DROPS Design answered:
Bonjour Mme Lajoie, on utilise une aiguille circulaire pour avoir suffisamment de placer pour y loger les 285-315-337-367-401-429 mailles de l'empiècement quand toutes les augmentations sont faites. Bon tricot!
14.12.2020 - 07:44
![]() Marianne Helland wrote:
Marianne Helland wrote:
Kan man istedet for og strikke jakka frem og tilbake legge opp noen oppklipp masker foran som kan klippes opp til slutt og strikke stolper og sy på?Marianne Helland
03.02.2019 - 12:18DROPS Design answered:
Hei Marianne. Ja, om du heller vil strikke rundt kan du legge til oppklippsmasker midt foran. Følg ellers oppskriften som anvist. God fornøyelse
07.02.2019 - 08:28
![]() Susanne Løvheim wrote:
Susanne Løvheim wrote:
Mange tak for hurtigt svar, men det var ikke det jeg mente. Jeg tænkte på de lange LODRETTE kanter, der er i spesielt mønsterA2A. Jeg er nervøs for at strikketøjet ikke hænger sammen, når man skifter farve, det samme sted på hver pind Med venlig hilsen Susanne Løvheim
03.02.2019 - 11:34DROPS Design answered:
Hei Susanne. Du gjentar A.2a rundt hele omgangen slik at du hele tiden strikker med mørk grå og natur samtidig. For eksempel, rad 19 i A.2a for S-M-L (der den første loddrette raden med grå begynner), strikkes slik: 1 maske grå, 5 masker natur, 1 maske grå, 5 masker natur osv. Det har ikke noe å si at de samme fargene er på samme sted oppover, begge trådene vil jo følge med hele veien rundt. Jeg vil anbefale deg å tvinne den grå tråden på baksiden slik at du ikke får lange løse tråder. Dette vil også gjøre at strikketøyet ditt holder seg jevnt og fast. God fornøyelse
08.02.2019 - 07:44
![]() Inga Berit Hovde wrote:
Inga Berit Hovde wrote:
Hyggelig at Qompis ble valgt.
10.07.2018 - 12:48
![]() Elisabeth wrote:
Elisabeth wrote:
Super dejlige farver
06.06.2018 - 08:16
|
|||||||||||||||||||
Steingard Cardigan#steingardcardigan |
|||||||||||||||||||
 |
 |
||||||||||||||||||
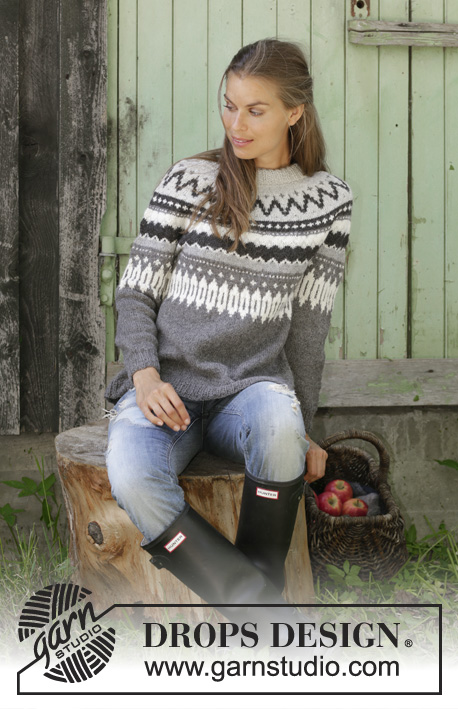
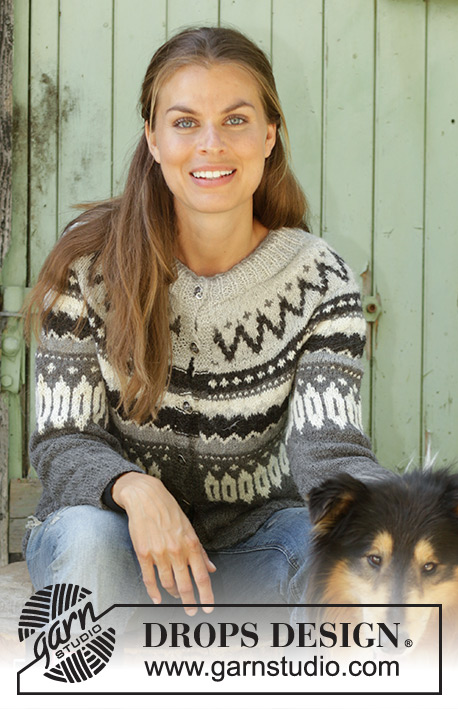
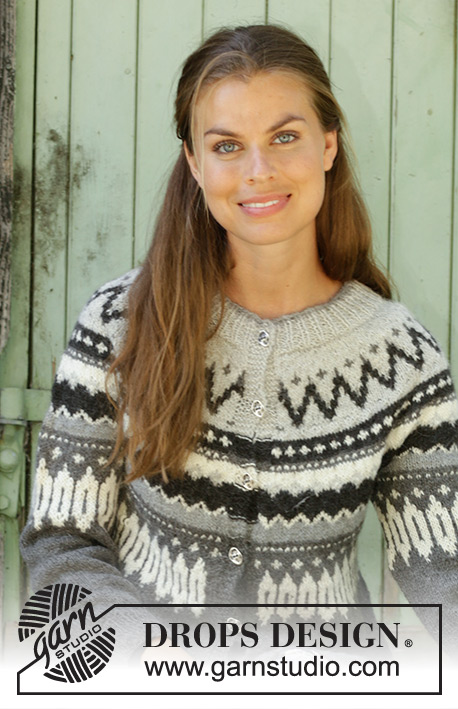
Knitted jacket in DROPS Puna. The piece is worked top down with round yoke and Nordic pattern. Sizes S - XXXL.
DROPS 195-7 |
|||||||||||||||||||
|
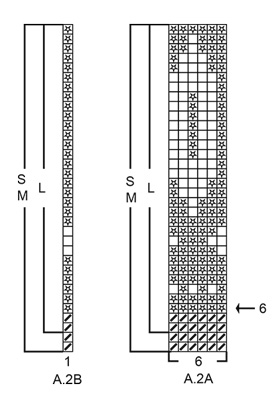
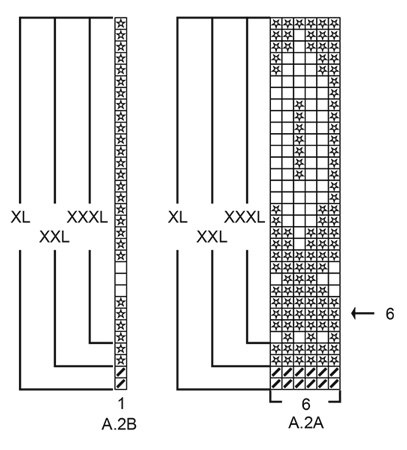
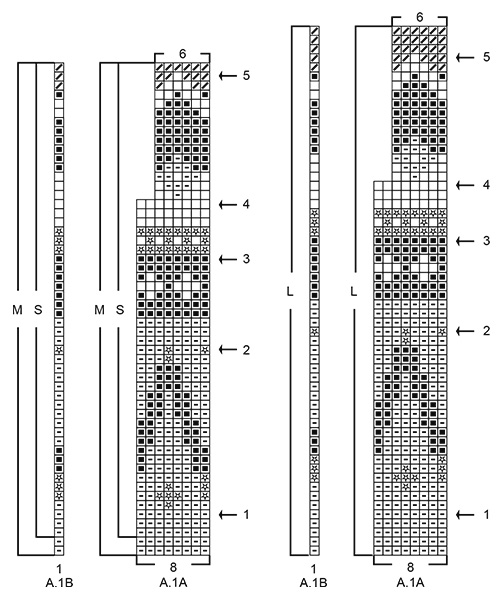
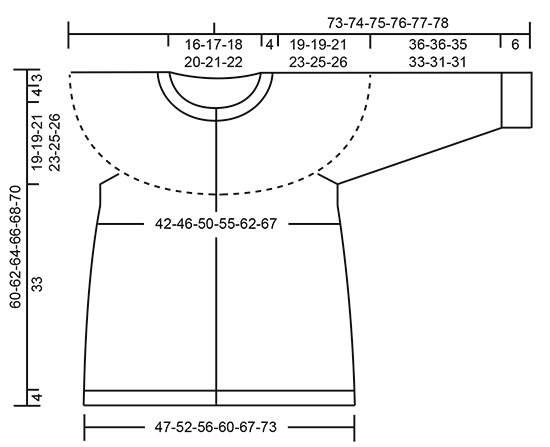
EXPLANATIONS FOR THE PATTERN: ------------------------------------------------------- RIDGE/GARTER STITCH (worked back and forth): 1 ridge = Knit 2 rows. ELEVATION (back of neck): Skip this section if you do not want an elevation. Insert 1 marker in the middle of the row. Start from the right side with light grey and knit to 16-17-18-19-20-21 stitches past the marker, turn, tighten the strand and purl 32-34-36-38-40-42 stitches. Turn, tighten the strand and knit 48-51-54-57-60-63 stitches, turn, tighten the strand and purl 64-68-72-76-80-84 stitches. Turn, tighten the strand and knit 80-85-90-95-100-105 stitches, turn, tighten the strand and purl to end of row (the band is worked in garter stitch). Then work YOKE as described in the text. KNITTING TIP-1 (for bands): On the rows of pattern with 2 colours, use the back-ground colour to work the 5 band stitches in each side. KNITTING TIP-2: To avoid the knitting tension becoming tighter when working pattern, it is important that the strands at the back are not tight. Use a size larger needle when working pattern if this is a problem. PATTERN: See diagrams A.1 and A.2. Find your size in the diagrams. The whole pattern is worked in stocking stitch. INCREASE TIP (evenly spaced): To work out how to increase evenly, count the total number of stitches on the needle (e.g. 110 stitches) minus the bands (e.g. 10 stitches) and divide the remaining stitches by the number of increases to be made (e.g. 29) = 3.4. In this example, increase by making 1 yarn over after alternately each 3rd and 4th stitch (approx.). On the next round, work the yarn overs twisted to avoid holes. Do not increase over the bands. NOTE: At arrow-2 and arrow-5 you increase in most of the sizes on a row of pattern; here it is important to adjust the increases so that you increase in stitches worked in the back-ground colour. DECREASE TIP (for mid under sleeves): Start 3 stitches before the marker thread, knit 2 together, knit 2 (the marker thread sits in the middle of these 2 stitches), slip 1 stitch as if to knit, knit 1, pass the slipped stitch over the knitted stitch (= 2 stitches decreased). BUTTONHOLES (top down): Work buttonholes on the right band when the garment is worn. 1 BUTTONHOLE = start from the right side and work as before until there are 3 stitches left on the row, make 1 yarn over, knit 2 together and knit 1. On the next row (wrong side) knit the yarn over to leave a hole. The first buttonhole is worked when the neck measures approx. 2 cm. Then work the next 4-4-4-5-5-5 buttonholes with approx. 8-8-9-7-7-8 cm between each. ------------------------------------------------------- START THE PIECE HERE: ------------------------------------------------------- JACKET - SHORT OVERVIEW OF THE PIECE: Neck, yoke and body are worked back and forth with circular needle from mid front, top down. The sleeves are worked in the round with short circular needle/double pointed needles, top down. NECK: Cast on 110-116-119-122-128-134 stitches (including 5 band stitches in each side towards mid front) with circular needle size 3.5 mm and grey. Purl 1 row (= wrong side). The next row is worked as follows from the right side: 5 band stitches in GARTER STITCH - read description above, * knit 1, purl 2 *, work from *-* until there are 6 stitches left on the row, knit 1 and finish with 5 band stitches in garter stitch. Change to light grey and continue the rib for 4 cm – remember BUTTONHOLE on right band – read description above. Knit 1 row from the right side where you increase 29-31-36-41-43-45 stitches evenly on row – read INCREASE TIP = 139-147-155-163-171-179 stitches. Change to circular needle size 4 mm. Purl 1 row from the wrong side (the bands are worked in garter stitch). You can now work an elevation in the back of the neck, so that the yoke is slightly higher at the back. This elevation can be left out; the neck will then be the same front and back – work ELEVATION – read description above, or go straight to YOKE. YOKE: Read KNITTING TIP-1 and KNITTING TIP-2! The first row is worked as follows from the right side: 5 band stitches in garter stitch, work A.1A until there are 6 stitches left on row (= 16-17-18-19-20-21 repeats of A.1A of 8 stitches), work A.1B (= 1 stitch) and finish with 5 band stitches in garter stitch. Continue this pattern. AT THE SAME TIME on each row marked with an arrow in A.1A increase evenly on row as described below – read INCREASE TIP and REMEMBER THE KNITTING TENSION! On the row marked with arrow-1 increase 24-24-32-32-32-32 stitches evenly on row = 163-171-187-195-203-211 stitches (there is now room for 19-20-22-23-24-25 repeats of A.1A of 8 stitches). On the row marked with arrow-2 increase 40-48-56-56-64-72 stitches evenly on row = 203-219-243-251-267-283 stitches (there is now room for 24-26-29-30-32-34 repeats of A.1A of 8 stitches). On the row marked with arrow-3 increase 32-40-40-48-48-56 stitches evenly on row = 235-259-283-299-315-339 stitches (there is now room for 28-31-34-36-38-41 repeats of A.1A of 8 stitches). On the row marked with arrow-4 increase 28-34-34-42-50-50 stitches evenly on row = 263-293-317-341-365-389 stitches (there is now room for 42-47-51-55-59-63 repeats of A.1A of 6 stitches). On the row marked with arrow-5 increase 22-22-20-26-36-40 stitches evenly on row = 285-315-337-367-401-429 stitches When the last row in A.1 is left, the piece measures approx. 23-23-25-27-29-30 cm from the cast-on edge mid front. If the piece measures less than this, you can continue working with grey (in sizes S, M, L, XL and XXL) or dark grey (in size XXXL) to correct length. The last row in A.1 is worked as follows from the wrong side: Work 45-49-53-57-64-69 stitches as before (= front piece), place the next 58-64-68-74-78-82 stitches on a thread for sleeve, cast on 8-8-10-10-12-14 new stitches on the needle (= in side under sleeve), purl 79-89-95-105-117-127 stitches (= back piece), place the next 58-64-68-74-78-82 stitches on a thread for sleeve, cast on 8-8-10-10-12-14 new stitches on needle (= in side under sleeve) and work the remaining 45-49-53-57-64-69 stitches as before (= front piece). Body and sleeves are finished separately. THE PIECE IS NOW MEASURED FROM HERE! BODY: = 185-203-221-239-269-293 stitches. The first row is worked as follows from the right side: 5 band stitches in garter stitch, work A.2A until there are 6 stitches left on the row (= 29-32-35-38-43-47 repeats of 6 stitches), work A.2B (= 1 stitch) and finish with 5 band stitches in garter stitch. Continue this pattern. AT THE SAME TIME on the row marked with arrow-6 in A.2A increase 24 stitches evenly on row in all sizes = 209-227-245-263-293-317 stitches (there is now room for 33-36-39-42-47-51 repeats of A.2A of 6 stitches). When A.2 has been completed, continue with stocking stitch and dark grey and 5 band stitches in garter stitch in each side towards mid front. When the piece measures 30-32-32-32-32-33 cm from the division, knit 1 row from the right side where you increase 48-54-60-66-72-78 stitches evenly on row = 257-281-305-329-365-395 stitches. Change to circular needle size 3.5 mm and work rib as follows from the wrong side: 5 band stitches in garter stitch, * purl 1, knit 2 *, work from *-* until there are 6 stitches left on the row, purl 1 and finish with 5 band stitches in garter stitch. Continue the rib like this for 4 cm. Then loosely cast off with garter stitch over garter stitch, knit over knit and purl over purl, but to avoid the cast-off edge being tight you can make 1 yarn over after each 9th stitch at the same time as you cast off (yarn overs cast off as normal stitches). The jacket measures approx. 60-62-64-66-68-70 cm from the shoulder down. SLEEVE: Place the 58-64-68-74-78-82 stitches from the thread on the one side of the piece on short circular needle size 4 mm and knit up 1 stitch in each of the 8-8-10-10-12-14 stitches cast on under the sleeve = 66-72-78-84-90-96 stitches on the needles. Insert 1 marker thread in the middle of the 8-8-10-10-12-14 stitches under the sleeve and allow the marker thread to follow your work onwards. The marker thread will be used when you decrease under the sleeve. Work the last round in A.1A so that A.1 finishes in the same way on both body and sleeve. Work A.2A in the round (= 11-12-13-14-15-16 repeats of 6 stitches). When A.2A has been completed continue with stocking stitch and dark grey. AT THE SAME TIME when the piece measures 2 cm from the division decrease 2 stitches mid under sleeve - read DECREASE TIP. Decrease like this every 1 cm a total of 0-0-0-5-8-8 times then every 2 cm a total of 3-5-7-0-0-0 times and finally every 3½-3-2½-2-2-1½ cm a total of 8-8-8-12-11-13 times = 44-46-48-50-52-54 stitches. Continue working until the piece measures 36-36-35-33-31-31 cm from the division (shorter measurements in larger sizes due to longer yoke). Knit 1 round where you increase 7-8-9-7-8-9 stitches evenly on round = 51-54-57-57-60-63 stitches. Change to double pointed needles size 3.5 mm. Work rib in the round (= knit 1 / purl 2) for 6 cm. Cast off with knit over knit and purl over purl, but to avoid the cast-off edge being tight you can make 1 yarn over after each 9th stitch at the same time as you cast off (yarn overs cast off as normal stitches). The sleeve measures approx. 42-42-41-39-37-37 cm from the division and down. Work the other sleeve in the same way. ASSEMBLY: Sew buttons onto left band. |
|||||||||||||||||||
Diagram explanations |
|||||||||||||||||||
|
|||||||||||||||||||
 |
|||||||||||||||||||
 |
|||||||||||||||||||
 |
|||||||||||||||||||
 |
|||||||||||||||||||
 |
|||||||||||||||||||
Have you finished this pattern?Tag your pictures with #dropspattern #steingardcardigan or submit them to the #dropsfan gallery. Do you need help with this pattern?You'll find 29 tutorial videos, a Comments/Questions area and more by visiting the pattern on garnstudio.com. © 1982-2026 DROPS Design A/S. We reserve all rights. This document, including all its sub-sections, has copyrights. Read more about what you can do with our patterns at the bottom of each pattern on our site. |
|||||||||||||||||||


With over 40 years in knitting and crochet design, DROPS Design offers one of the most extensive collections of free patterns on the internet - translated to 17 languages. As of today we count 324 catalogues and 12290 patterns translated into English (UK/cm). 12290
We work hard to bring you the best knitting and crochet have to offer, inspiration and advice as well as great quality yarns at incredible prices! Would you like to use our patterns for other than personal use? You can read what you are allowed to do in the Copyright text at the bottom of all our patterns. Happy crafting!
Post a comment to pattern DROPS 195-7
We would love to hear what you have to say about this pattern!
If you want to leave a question, please make sure you select the correct category in the form below, to speed up the answering process. Required fields are marked *.