
Popular categories
Looking for a yarn?


Comments / Questions (8)
![]() Bertineke wrote:
Bertineke wrote:
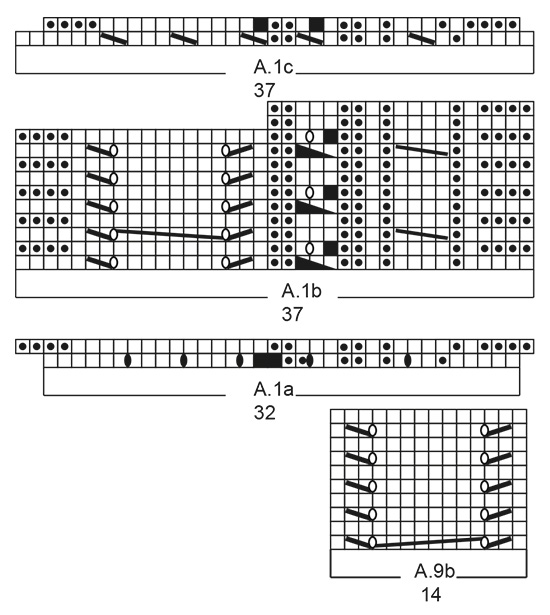
*kabelnaald
11.05.2021 - 16:18
![]() Bertineke wrote:
Bertineke wrote:
Bij A1b missen twee naalden. Ik neem aan dat het patroon zo verder gaat als daarvoor, of moet je de kabelaars nog een keer gebruiken?
11.05.2021 - 14:57DROPS Design answered:
Dag Bertineke,
Ja, de naalden kun je inderdaad zo voortzetten in de hoogte als hiervoor; het linker deel van A.1b heeft minder naalden in de hoogte, dus je begint eerder dan het rechter deel, opnieuw met een herhaling in de hoogte.
12.05.2021 - 21:00
![]() Anne-Claire wrote:
Anne-Claire wrote:
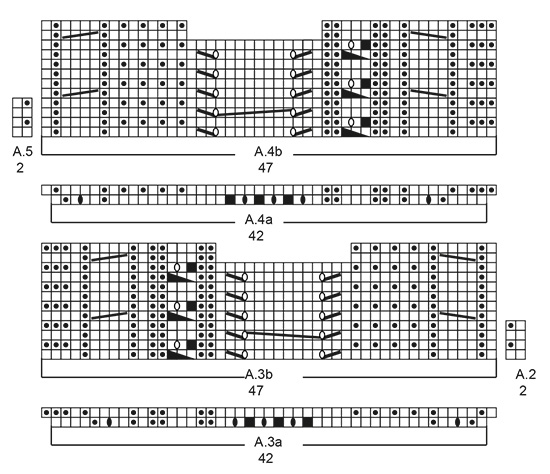
Hallo, In diagram A4.a en A4b mist het middelste deel van de laatste twee pennen. Brei je die door zoals in voorgaande regels of sla je deze steken over? Alvast bedankt!
02.01.2021 - 18:32DROPS Design answered:
Dag Anne-Claire,
Ja, breit inderdaad door zoals hiervoor. Het middelste deel heeft zeg maar een ander herhalingsritme, dus minder aantal naalden in de hoogte.
09.01.2021 - 18:24
![]() Pascale wrote:
Pascale wrote:
Hello. Could you explain in pattern A.1b (for the head band) how to work the last two rows of the pattern, since one side has 10rows, and the other half has 12 rows. I couldn’t find a video explaining this either. Thank you
30.06.2019 - 04:58DROPS Design answered:
Dear Pascale, all cables and lace patterns are not repeated over the same number of rows, when you have finished 2nd part of diagram (= over 10 rows), repeat from row 1 over these stitches, at the same time, continue the first half of diagram as before until it has been finished, then start again from row 1. You will then follow both parts of diagram separately, making sure cables are crossing on correct rows. Happy knitting!
01.07.2019 - 07:13
![]() Rosanna Kinloch wrote:
Rosanna Kinloch wrote:
Please help me on how should I read the graphs Do I read it as rows 1, 3, and 5 do I see it as only the right side of knitting
24.04.2019 - 14:58DROPS Design answered:
Dear Mrs Kinloch, read more how to read diagrams here . Happy knitting!
24.04.2019 - 16:02Oksana wrote:
Because you increase and decrease in diagrams A.1b, A.3b, A.4b, A.6b, A.7b, A.12 and A.13, the number of stitches can vary in relation to this, if you have just decreased - PLEASE EXPLAIN. THANKS
20.08.2018 - 14:07DROPS Design answered:
Hi Oksana, This sentence is a bit confusing, I agree. It just means that the number of stitches stated could be affected by which row you are on in the diagrams, especially after a row of decreases. I hope this helps and happy knitting!
21.08.2018 - 07:22
![]() Margaretha wrote:
Margaretha wrote:
Snygg!
14.06.2018 - 16:20
![]() Sigrid wrote:
Sigrid wrote:
Gefällt mir sehr gut
08.06.2018 - 21:54
|
|||||||||||||||||||||||||||||||||||||
Baltic Sea#balticseaset |
|||||||||||||||||||||||||||||||||||||
 |
 |
||||||||||||||||||||||||||||||||||||
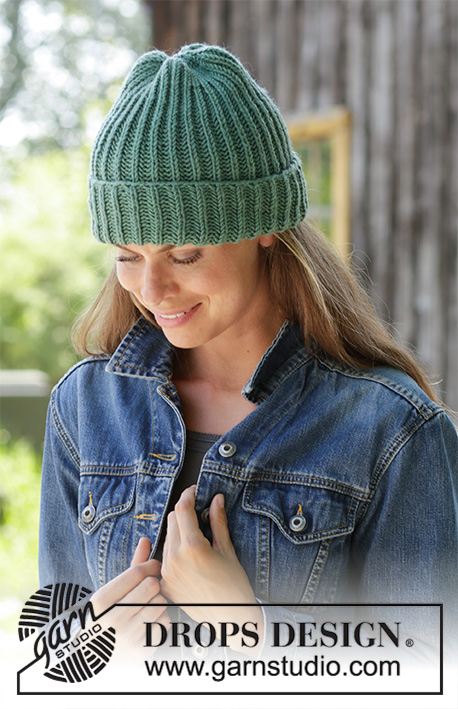
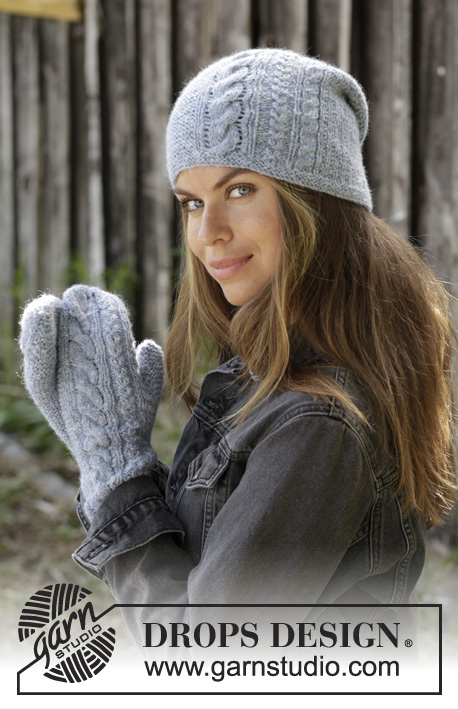
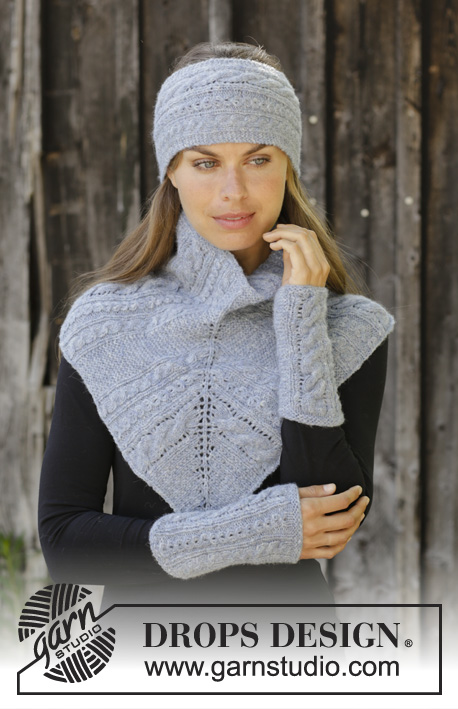
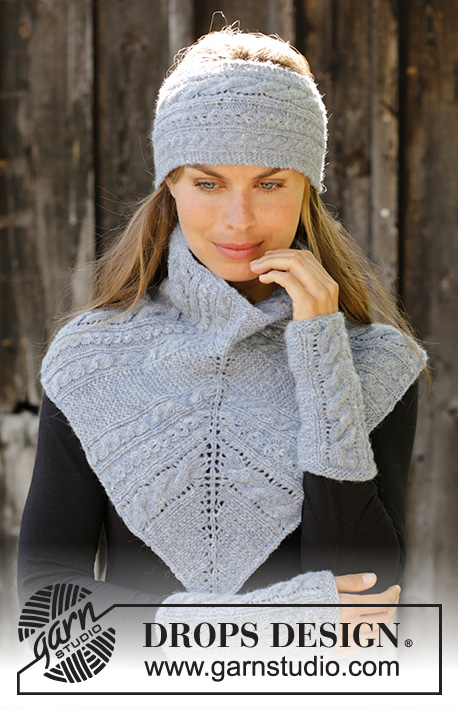
Knitted head band, neck warmer and wrist warmers with cables and garter stitch in DROPS Sky.
DROPS 192-40 |
|||||||||||||||||||||||||||||||||||||
|
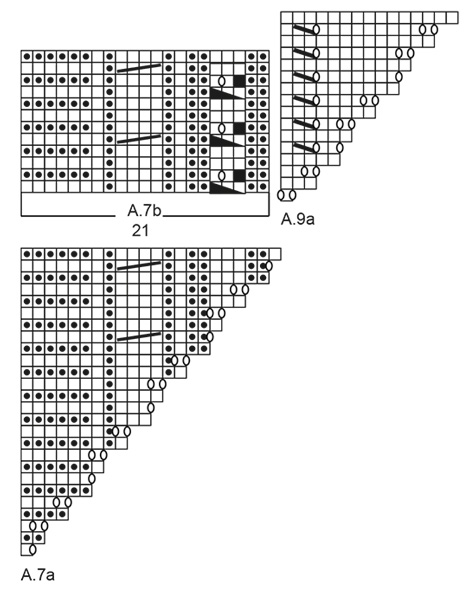
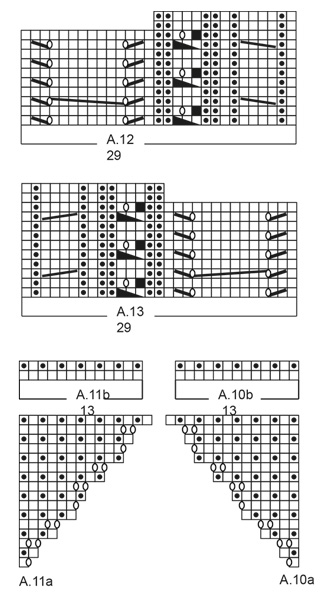
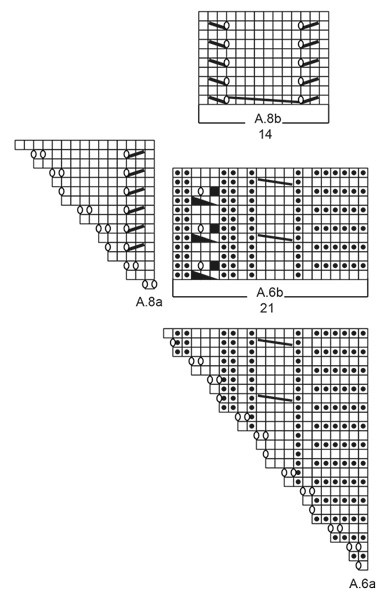
EXPLANATIONS FOR THE PATTERN: ------------------------------------------------------- RIDGE/GARTER STITCH (worked back and forth): 1 ridge = Knit 2 rows. PATTERN: Head band: See diagram A.1. Neck warmer: See diagrams A.2 to A.11. Wrist warmers: See diagrams A.12 and A.13. Because you increase and decrease in diagrams A.1b, A.3b, A.4b, A.6b, A.7b, A.12 and A.13, the number of stitches can vary in relation to this, if you have just decreased. ------------------------------------------------------- START THE PIECE HERE: ------------------------------------------------------- HEAD BAND - SHORT OVERVIEW OF THE PIECE: The piece is worked back and forth and sewn together mid back to finish. HEAD BAND: Cast on 32 stitches with needle size 3 mm and Sky. Work 1 RIDGE – read description above. Then work A.1a (= 32 stitches). When A.1a has been worked 1 time in height, there are 37 stitches on the row. Work A.1b over A.1a. The different patterns are worked over different rows in height. REMEMBER THE KNITTING TENSION! When the piece measures 48-50 cm, work A.1c over A.1b. When A.1c has been worked 1 time in height there are 32 stitches on the row. Work 1 ridge. Cast off with knit. ASSEMBLY: Sew cast-on edge to cast-off edge in the outermost loop of the outermost stitch. ------------------------------------------------------- NECK WARMER - SHORT OVERVIEW OF THE PIECE: The piece is worked back and forth, top down, with circular needle. NECK WARMER: Cast on 130-140 stitches (including 1 edge stitch in garter stitch in each side of the piece) with circular needle size 4 mm and Sky. Work 2 RIDGES – read description above. Then work pattern as follows: Work 1 edge stitch in garter stitch, A.2 (= 2 stitches) over the first 20-26 stitches, A.3a (= 42 stitches), 1 stitch in garter stitch, 1 stitch in stocking stitch (= mid-stitch), 1 stitch in garter stitch, A.4a (= 42 stitches), A.5 (= 2 stitches) over the next 21-25 stitches and finish with 1 edge stitch in garter stitch. When A.3a and A.4a have been worked 1 time in height there are 140-150 stitches on the needle. Work A.3b and A.4b over A.3a and A.4a. Continue this pattern. The different patterns are worked over different rows in height. REMEMBER THE KNITTING TENSION! When the piece measures 8 cm, start to increase mid front as follows from the right side: Work 1 edge stitch in garter stitch, A.2 over 20-26 stitches as before, continue A.3b as before (= 47 stitches), A.6a over the next stitch, 1 stitch in stocking stitch (= mid-stitch), A.7a over the next stitch, continue A.4b as before (= 47 stitches), A.5 over 21-25 stitches as before and finish with 1 edge stitch in garter stitch. When A.6a and A.7a have been worked 1 time in height, continue as follows from the right side: Work 1 edge stitch in garter stitch, A.2 and A.3b as before, A.6b over the first 21 stitches of A.6a, A.8a over the next stitch, 1 stitch in stocking stitch (= mid-stitch), A.9a over the next stitch, A.7b over the last 21 stitches of A.7a, A.4b and A.5 as before and finish with 1 edge stitch in garter stitch. When A.8a and A.9a have been worked 1 time in height (the remaining patterns continue in height), work as follows from the right side: Work 1 edge stitch in garter stitch, A.2, A.3b and A.6b as before, A.8b over the first 14 stitches of A.8a, A.10a over the next stitch, 1 stitch in stocking stitch (= mid-stitch), A.11a over the next stitch, A.9b over the last 14 stitches of A.9a, A.7b, A.4b and A.5 as before, finish with 1 edge stitch in garter stitch. Continue this pattern. Repeat A.10a and A.11a on each side of the mid-stitch in height until the piece measures a total of 28-30 cm measured along the first stitch (A.10b and A.11b are worked over A.10a and A.11a in height when the pattern is repeated). Cast off with knit over knit, purl over purl and garter stitch over garter stitch. ASSEMBLY: Sew the neck warmer together mid back inside the 1 edge stitch. ------------------------------------------------------- WRIST WARMER - SHORT OVERVIEW OF THE PIECE: The piece is worked back and forth. WRIST WARMER: The piece is worked back and forth. Cast on 44-46 stitches with needle size 3 mm and Sky. Work 2 RIDGES – read description above. Work 8-9 stitches garter stitch, A.12 (= 29 stitches) and finish with 7-8 stitches garter stitch. The different patterns are worked over different rows in height. REMEMBER THE KNITTING TENSION! When the piece measures 18-19 cm, work 2 ridges. Cast off with knit. ASSEMBLY: Sew the wrist warmer together in the outermost loop of the outermost stitch. Work 1 more wrist warmer, but work A.13 instead of A.12. |
|||||||||||||||||||||||||||||||||||||
Diagram explanations |
|||||||||||||||||||||||||||||||||||||
|
|||||||||||||||||||||||||||||||||||||
 |
|||||||||||||||||||||||||||||||||||||
 |
|||||||||||||||||||||||||||||||||||||
 |
|||||||||||||||||||||||||||||||||||||
 |
|||||||||||||||||||||||||||||||||||||
 |
|||||||||||||||||||||||||||||||||||||
Have you finished this pattern?Tag your pictures with #dropspattern #balticseaset or submit them to the #dropsfan gallery. Do you need help with this pattern?You'll find 21 tutorial videos, a Comments/Questions area and more by visiting the pattern on garnstudio.com. © 1982-2026 DROPS Design A/S. We reserve all rights. This document, including all its sub-sections, has copyrights. Read more about what you can do with our patterns at the bottom of each pattern on our site. |
|||||||||||||||||||||||||||||||||||||


With over 40 years in knitting and crochet design, DROPS Design offers one of the most extensive collections of free patterns on the internet - translated to 17 languages. As of today we count 324 catalogues and 12290 patterns translated into English (UK/cm). 12290
We work hard to bring you the best knitting and crochet have to offer, inspiration and advice as well as great quality yarns at incredible prices! Would you like to use our patterns for other than personal use? You can read what you are allowed to do in the Copyright text at the bottom of all our patterns. Happy crafting!
Post a comment to pattern DROPS 192-40
We would love to hear what you have to say about this pattern!
If you want to leave a question, please make sure you select the correct category in the form below, to speed up the answering process. Required fields are marked *.