
Popular categories
Looking for a yarn?


Comments / Questions (195)
![]() Bocktaels Danièle wrote:
Bocktaels Danièle wrote:
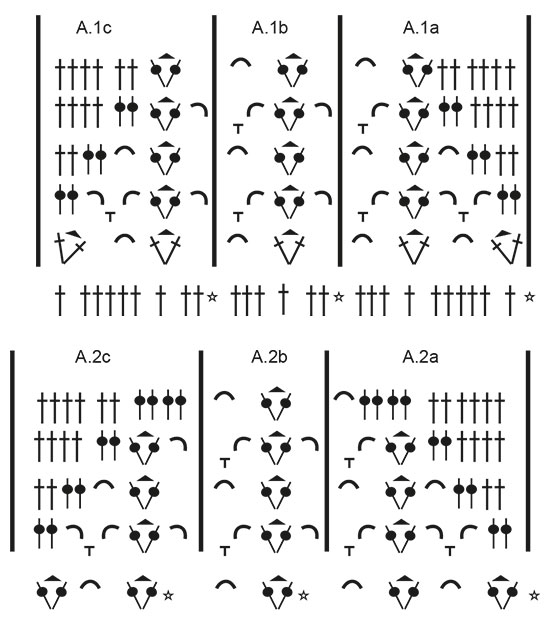
Merci.grâce à votre réponse j'ai compris ..Cependant je ne sais toujours pas interpréter le diagramme .Par exemple :comment voit -t -on que l'on doit "sauter 2 mailles ", Quel est le signe qui l'indique? J 'ai vraiment un problème de compréhension et pourtant je fais du crochet depuis bien longtemps Merci de m'aider.
28.10.2020 - 14:36DROPS Design answered:
Bonjour Mme Bocktaels, on le voit au nombre de mailles du rang précédent (celui avec l'étoile) qui n'ont pas de symbole dans cette bride au rang suivant. ainsi, dans A.1a par ex; les 2 brides (espacées du triangle = 3 mailles en l'air) pointent vers 1 bride, puis on retrouve le même symbole dans la 7ème maille = on a sauté 5 mailles entre les 2 symboles. J'espère que ces infos pourront vous aider. Bon crochet!
28.10.2020 - 15:43
![]() Daniele Bocktaels wrote:
Daniele Bocktaels wrote:
Bonjour Je ne comprends pas : pour le devant:répéter A1b au dessus des 30 brides suivantes (5 fois en largeur au total ) cela veut-il dire que A1b a une largeur qui comprend 6 brides ? (6x5 = 30 ) dans ce cas de quoi se compose A1b , comment crochète-t-on ce A1b ? Merci de m'éclairer .
16.10.2020 - 14:26DROPS Design answered:
Bonjour Mme Bocktaels, tout à fait on crochète 5 fois A.1b au total en largeur, soit, come le montre le diagramme au 1er rang: *sautez 2 mailles, dans la maille suivante crochetez: 1 bride, 3 mailles en l'air, 1 bride, 2 mailles en l'air, sautez 3 mailles*, répétez de *-* 5 fois au total = au-dessus des 30 mailles suivantes. Bon crochet!
16.10.2020 - 15:04
![]() Sonal Kapatel wrote:
Sonal Kapatel wrote:
Good 👍🏻
14.10.2020 - 11:05
![]() Yulis wrote:
Yulis wrote:
Me gustaría saber el tutorial de la blusa el paso a paso
12.10.2020 - 16:36DROPS Design answered:
Hola Yulis. Este modelo no tiene vídeo del patrón completo. Bajo el patrón tienes algunos vídeos explicativos para los diferentes tipos de puntos.
15.10.2020 - 20:32
![]() Isabelle wrote:
Isabelle wrote:
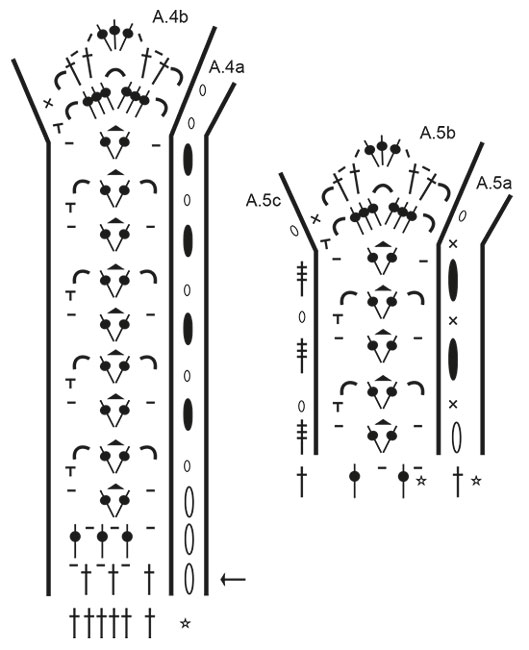
Op het einde bij "lijf" staat er " Ga verder in de rondte, dus haak altijd in patroon aan de goede kant". Wil dit zeggen dat er niet meer gekeerd moet worden ?
24.09.2020 - 14:43DROPS Design answered:
Dag Isabelle,
Ja dat klopt, vanaf telpatroon A.4, dus na de stokjes, haak je verder in de rondte zonder te keren.
19.11.2020 - 00:08
![]() Kia Schacht Brogens wrote:
Kia Schacht Brogens wrote:
Hej, jeg har lidt svært ved at finde ud af hvor meget garn, der skal bruges til at lave toppen? Tænker den skal laves i medium På forhånd tak
30.08.2020 - 19:24DROPS Design answered:
Hej Kia, til M skal du bruge 300 g DROPS Cotton Merino = 6 nøgler. God fornøjelse!
01.09.2020 - 12:28
![]() Anna Żaglewska wrote:
Anna Żaglewska wrote:
Pierwszy raz wykonuję wasz diagram i chcę się upewnić- czarne pionowe kreski pomiędzy A.1c i A.1b i A.1a oznaczają jakąś czynność? Np 3 oczka łańcuszka? Czy są jedynie do pomocy w odczytaniu schematów?
26.08.2020 - 14:26DROPS Design answered:
Witaj Aniu! Służą jako linie pomocnicze do odczytywania schematów. Miłej pracy!
26.08.2020 - 18:32
![]() Marivi wrote:
Marivi wrote:
Can u help me understand this instruction please, increase 11-11-12-13-10-12 chain spaces (= 1 double crochet + 1 chain stitch) evenly – read INCREASE TIP-2 = 84-90-99-108-117-129 chain spaces (= 1 double crochet + 1 chain stitch). Continue in the round, i.e. always work pattern from right side. When A.4 is done vertically, fasten off. Does it mean i have to increase in every 11 double crochet? Whats is 84 chain spaces means then? Thank you,
14.08.2020 - 08:00DROPS Design answered:
Dear Marivi, you increase not only 11 double crochets but also the chain stitches that are between these 11 double crochets, this means you will work evenly 11 times (= 1 double crochet, 1 chain, 1 double crochet, 1 chain) in 1 double crochet (= stitches are increased on first row in A.1). 84 chain spaces means there are now 84 times (1 dc, 1 chain = 1 chain-space). Happy crocheting!
14.08.2020 - 11:05
![]() Marivi wrote:
Marivi wrote:
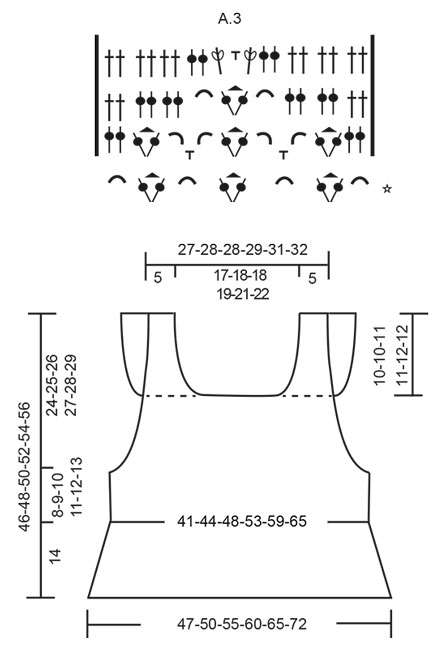
Increase like this every row 3-5-8-13-14-15 times in total, and then every other row 5-5-3-0-0-0 times in total = 65-71-73-79-83-87 double crochets on last row. Does this mean i have to made 11 row of dhouble crochet cause it does not add up.. the way i imagine it this will be the upper portion of the design right? Can u please explain farther about this instruction
10.08.2020 - 05:15DROPS Design answered:
Dear Marivi, in 3rd size you increase 8 times on every row (= for a total of 8 rows) + 3 times on every other row ( for a total of 6 rows) - this means you will have worked 14 rows when all decreases are done. You started with 51 sts + 2 sts increased x 11 times = 51+22= 73 sts. Happy crocheting!
10.08.2020 - 09:53
![]() Amanda Holman wrote:
Amanda Holman wrote:
In the 190 21 pattern it says to crochet 0 then pattern over 40 stitches altogether but that leaves 15 over ... Can you explain please ? Iv tried to work it out but I am stuck
06.07.2020 - 21:42DROPS Design answered:
Dear Mrs Holman, you start in first size with 49 sts, then inc on each side working diagrams at the same time: work A.1a (=10 sts), repeat A.1b (30 sts) and finish with A.1c (= 9 sts) = 49 sts, at the same time increase in the first st + in the last st on row = 51 sts at the end of first row. Then continue llike this, insert markers if necessary to see where diagrams start/end. Happy crocheting!
07.07.2020 - 09:57
|
|||||||||||||||||||||||||||||||||||||||||||
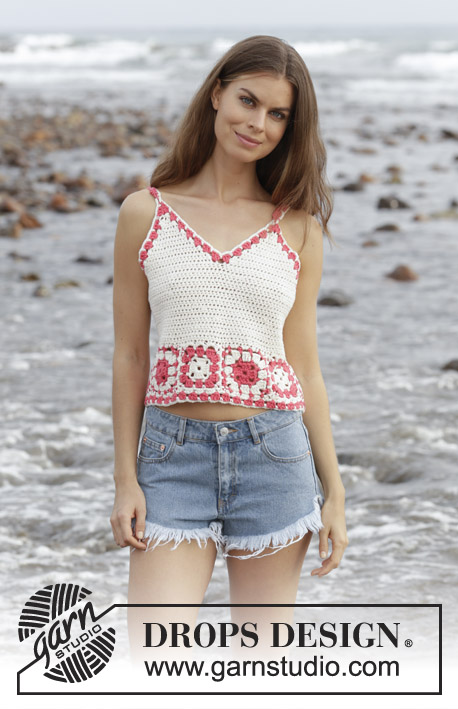
California Dream#californiadreamtop |
|||||||||||||||||||||||||||||||||||||||||||
 |
 |
||||||||||||||||||||||||||||||||||||||||||
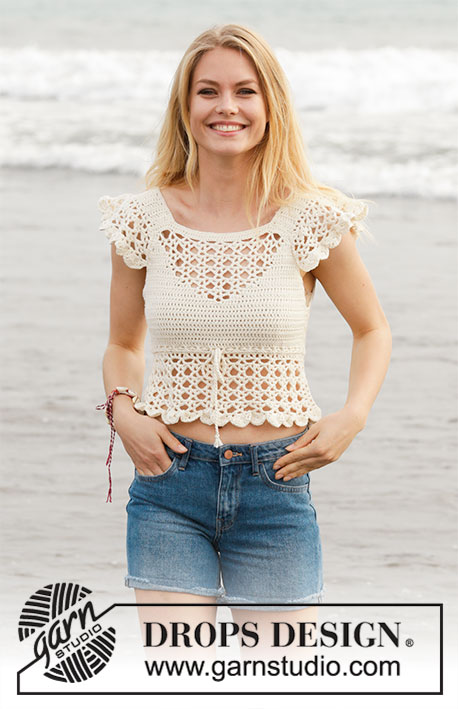
Crocheted top with lace pattern and flounce. Size: S - XXXL Piece is crocheted in DROPS Cotton Merino.
DROPS 190-21 |
|||||||||||||||||||||||||||||||||||||||||||
|
INFORMATION FOR PATTERN: PATTERN: See diagrams A.1 to A.5. INCREASE TIP-1: Increase 1 treble crochet by working 2 treble crochets in same stitch. CROCHET TIP-1 (applies to body but not diagram): Replace first treble crochet at beginning of every row with 3 chain stitches. CROCHET TIP-2 (applies to body but not diagram): When working in the round, replace first treble with 3 chain stitches, finish round with 1 slip stitch in 3rd chain stitch at beginning of round. DECREASE TIP: Decrease by working 2 treble crochets together. INCREASE TIP-2 (evenly): To calculate how to increase evenly, use the total number of treble crochets on row (e.g. 146 treble crochets) and divide treble crochets by number of increases to be done (e.g. 22) = 6.6. In this example increase by working 2 treble crochets in same treble crochet alternately approx. every 6th and 7th treble crochet. ---------------------------------------------------------- TOP: Piece is worked back and forth, top down, work front and back piece separately down to armhole, then work in the round over both parts. Then work straps from bottom up and then work flounces back and forth on straps, fasten flounce to front/back piece. FRONT PIECE: Work 51-53-53-55-57-59 chain stitches (including 3 chain stitches to turn with) on hook size 5 mm with Cotton Merino. Switch to hook size 4 mm, turn and work 1 treble crochet in 4th chain stitch from hook (= 2 treble crochets), work 1 treble crochet in each of the next 47-49-49-51-53-55 chain stitches = 49-51-51-53-55-57 treble crochets. On next row begin increase in each side of piece AT THE SAME TIME work pattern as follows: Increase 1 treble crochet in each side of piece (= 2 treble crochets increased) - read INCREASE TIP-1. Increase like this every row 3-5-8-13-14-15 times in total, and then every other row 5-5-3-0-0-0 times in total = 65-71-73-79-83-87 treble crochets on last row. Work next row as follows, begin from right side: Read CROCHET TIP-1 – work 1 treble crochet in each of the first 0-1-1-2-3-4 treble crochets, A.1a over the next 10 treble crochets, repeat A.1b over the next 30 treble crochets (= 5 times in total in width), A.1c over the next 9 treble crochets and 1 treble crochet in each of the last 0-1-1-2-3-4 treble crochets. Continue until A.1 has been work 1 time vertically. REMEMBER THE CROCHET TENSION! Then work as follows, begin from wrong side: Work 1 treble crochet in every treble crochet until 1 treble crochet remains before first chain space, work A.2c, repeat A.2b 3 times in total in width, A.2a and 1 treble crochet in every treble crochet the entire row. Continue until A.2 has been worked vertically. Then work as follows, begin from wrong side: Work 1 treble crochet in every treble crochet until first chain space, work A.3 and 1 treble crochet in every treble crochet the rest of row. Continue until A.3 has been worked vertically. Now work 1 treble crochet in every stitch until piece measures 14-15-15-16-16-17 cm. Fasten off, turn. Put piece aside. BACK PIECE: Work 51-53-53-55-57-59 chain stitches (including 3 chain stitches to turn with) on hook size 5 mm with Cotton Merino. Switch to hook size 4 mm, turn and work 1 treble crochet in 4th chain stitch from hook (= 2 treble crochets), work 1 treble crochet in each of the next 47-49-49-51-53-55 chain stitches = 49-51-51-53-55-57 treble crochets. Then work 1 treble crochet in every treble crochet - AT THE SAME TIME increase 1 treble crochet in each side of piece - remember INCREASE TIP-1. Increase like this every row 8-10-11-13-14-15 times in total = 65-71-73-79-83-87 treble crochets on last row. When piece measures 14-15-15-16-16-17 cm (adjust according to front piece), fasten off, turn. BODY: Now work the two parts together as follows: Work 4-4-7-8-12-15 chain stitches for armhole, 1 treble crochet in each of the 65-71-73-79-83-87 treble crochets from back piece, work 8-8-14-16-24-30 chain stitches for armhole, 1 treble crochet in each of the 65-71-73-79-83-87 treble crochets from front piece, work 4-4-7-8-12-15 chain stitches for armhole and finish with 1 slip stitch in first chain stitch at beginning of round. Then work piece in the round, continue with 1 treble in every treble/chain stitch = 146-158-174-190-214-234 trebles. When working in the round, turn after every round to work alternately from right side and wrong side. This is so that the texture is the same on the entire top - read CROCHET TIP-2. Insert 1 marker thread in each side, in the middle of the 8-8-14-16-24-30 chain stitches. NOW MEASURE THE PIECE FROM HERE! Continue like this until piece measures 8-9-10-11-12-13 cm. Now work in the round according to diagram A.4 while at the same time increasing on first round (round marked with arrow in diagram) as follows: Work A.4b 28-30-33-36-39-43 times in total on round – A.4a shows how rounds begin and end and is worked in addition to A.4b – AT THE SAME TIME increase 11-11-12-13-10-12 chain spaces (= 1 treble crochet + 1 chain stitch) evenly – read INCREASE TIP-2 = 84-90-99-108-117-129 chain spaces (= 1 treble crochet + 1 chain stitch). Continue in the round, i.e. always work pattern from right side. When A.4 is done vertically, fasten off. STRAPS: Now work a strap back and forth in cast-on edge on front piece over the first 8-9-9-9-10-10 treble crochets. Work 1 treble crochet in every treble crochet until strap measures 10-10-11-11-12-12 cm. Fasten off. Work 1 strap over the first 8-9-9-9-10-10 treble crochets in the other side the same way. Work straps the same way on back piece. Sew tog straps on shoulder. FLOUNCE: Work back and forth over every row on strap (= 20-20-22-22-24-24 cm). Begin from wrong side and work 1 treble crochet in first row, * 1 chain stitch, 1 treble crochet around row *, work from *-* along the entire strap – adjust so that there are 26-26-28-28-30-30 chain spaces (= 1 chain stitch + 1 treble crochet) on this row, finish with 1 treble crochet in last row = 1 treble crochet in each side and 26-26-28-28-30-30 chain spaces (= 1 chain stitch + 1 treble crochet). Turn and work as follows from right side: A.5a, A.5b 13-13-14-14-15-15 times in total in width, finish with A.5c. Continue this pattern until A.5 is done vertically, fasten off. Work flounce on the other strap the same way. NECK EDGE: Work 1 double crochet in every treble crochet/2 double crochets along every treble crochet row along the entire neck. SLEEVE EDGE: Work 1 double crochet in every treble crochet/2 double crochets along every treble crochet row along armhole – start right after flounce, work along armhole and to the flounce. Place flounce edge to edge to this sleeve edge (on both front and back piece) and fasten with small, neat stitches. Work the other sleeve edge the same way and fasten flounce. TIE: Cut 3 lengths of 3 metres each with Cotton Merino. Twine the strands tog until they resist, fold them double so that they twine again. Make a knot at each end. Baste the yarn up and down through first row with eyelet holes - start mid front. Tie a bow at the front. |
|||||||||||||||||||||||||||||||||||||||||||
Diagram explanations |
|||||||||||||||||||||||||||||||||||||||||||
|
|||||||||||||||||||||||||||||||||||||||||||
 |
|||||||||||||||||||||||||||||||||||||||||||
 |
|||||||||||||||||||||||||||||||||||||||||||
 |
|||||||||||||||||||||||||||||||||||||||||||
Have you finished this pattern?Tag your pictures with #dropspattern #californiadreamtop or submit them to the #dropsfan gallery. Do you need help with this pattern?You'll find 10 tutorial videos, a Comments/Questions area and more by visiting the pattern on garnstudio.com. © 1982-2026 DROPS Design A/S. We reserve all rights. This document, including all its sub-sections, has copyrights. Read more about what you can do with our patterns at the bottom of each pattern on our site. |
|||||||||||||||||||||||||||||||||||||||||||


With over 40 years in knitting and crochet design, DROPS Design offers one of the most extensive collections of free patterns on the internet - translated to 17 languages. As of today we count 324 catalogues and 12290 patterns translated into English (UK/cm). 12290
We work hard to bring you the best knitting and crochet have to offer, inspiration and advice as well as great quality yarns at incredible prices! Would you like to use our patterns for other than personal use? You can read what you are allowed to do in the Copyright text at the bottom of all our patterns. Happy crafting!
Post a comment to pattern DROPS 190-21
We would love to hear what you have to say about this pattern!
If you want to leave a question, please make sure you select the correct category in the form below, to speed up the answering process. Required fields are marked *.