
Popular categories
Looking for a yarn?


Comments / Questions (17)
![]() Annika wrote:
Annika wrote:
Hallo, ich würde diese Anleitung für den "Nimbus"-Pullover gern mit dem Garn "Snow" (Gruppe E) stricken. Wenn 2x C = E sein kann, dann müßte das ja funktionieren. Aber wie viele Knäule von Garn "Snow" benötige ich anstelle von "Air" und "Brushed Alpaca Silk" für diesen Pullover?
13.01.2022 - 11:14DROPS Design answered:
Liebe Annika, nehmen Sie die Garnmenge in Air - den Garnumrechner wird Ihnen damit helfen. Viel Spaß beim stricken!
13.01.2022 - 13:20
![]() Dia wrote:
Dia wrote:
Hello, it's me again. The Hungarian translation is also wrong, and the English versio is still not corrected. Could you please make sure both will be edited? Many thanks in advance.
14.11.2020 - 17:18
![]() Dia wrote:
Dia wrote:
My question is the following: when starting you said both right and left shoulder should be done until they are 3 cm and they are AFTER the right side. But then I am supposed to continue from the right side again? How? Or am I missing something? I have finished one row on the right side, there should be the reverse row and then continue, no?
12.11.2020 - 17:38DROPS Design answered:
Dear Dia, there is a mistake in the English pattern, last row on both shoulders is worked from RS, but the row where you join both shoulders together casting on 19 to 23 sts for neck in between should be worked from WS - pattern will be edited, thanks for your feedback. Happy knitting!
13.11.2020 - 08:07
![]() Lydie PIERRE wrote:
Lydie PIERRE wrote:
Bonjour, Je souhaite réaliser ce modèle avec un fil de qualité E. Quelle quantité de laine serait nécessaire pour une taille M s'il vous plaît? Je vous remercie beaucoup. Cordialement,
15.09.2020 - 06:39DROPS Design answered:
Bonjour Mme Pierre, vous trouverez ici comment calculer la nouvelle quantité en fonction de la taille et de la laine choisie. Bon tricot!
15.09.2020 - 09:39
![]() Magnaudeix wrote:
Magnaudeix wrote:
Bonjour, j'aimerais faire ce mail en laine plus fine, est-ce possible ? Merci
07.09.2020 - 08:57DROPS Design answered:
Bonjour Magnaudeix, ce modèle a été créé sur la base de 11 m x 15 rangs jersey = 10 x 10 cm, si vous utilisez une laine plus fine, votre échantillon sera différent et vous devrez entièrement recalculer le modèle en conséquence. Vous trouverez tous nos modèles de pulls femme ici, n'hésitez pas à ajouter les filtres de type de laine/échantillon souhaité pour trouver un modèle/une base qui vous conviendra. Bon tricot!
07.09.2020 - 10:00
![]() ODILE BAUMGARTNER wrote:
ODILE BAUMGARTNER wrote:
Excusez-moi , je viens de voir .....
05.05.2020 - 23:01
![]() ODILE BAUMGARTNER wrote:
ODILE BAUMGARTNER wrote:
Quelles aiguilles pour ce modèle ?
05.05.2020 - 22:59DROPS Design answered:
Bonjour Mme Baumgartner, nous avons ici utilisé des aiguilles 8 pour obtenir l'échantillon de 11 mailles x 15 rangs = 10 x10 cm avec 1 fil DROPS Air + 1 fil DROPS Brushed Alpaca Silk - pensez à bien réaliser votre échantillon et ajustez la taille des aiguilles si nécessaire - Plus d'infos ici. Bon tricot!
06.05.2020 - 10:30
![]() Judy Maguire wrote:
Judy Maguire wrote:
Good morning I have completed one sleeve and find it is too small for the arm opening. Am I correct in understanding that because you are knitting back and forth when casting off to decrease at the last bit of the sleeve , that you are casting off 1, or 2 or 3 stitches each time st the beginning of each row.
12.03.2019 - 12:21DROPS Design answered:
Dear Mrs Maguire, after you have cast off 6 sts mid under arm (3 sts on each side of the marker mid under sleeve), continue back and forth casting of at the beg of every row (= both from RS and from WS): 2 sts 1 time (= 2 rows), 1 st 1-2 times (= 2-4 rows), 2 sts 1 time (= 2 rows), 3 sts 1 time (= 2 rows) then cast off remaining sts. The length of the sleeve cap as well as the width should then match the armhole - remember to check and keep correct tension. Happy knitting!
12.03.2019 - 12:34
![]() åse wrote:
åse wrote:
Det hadde vært fint om dere også viste et bilde tatt bakfra på denne oppskriften, spesielt halsen. Jeg forstår ikke forklaringen på hvordan halsen skal være bak.
22.01.2019 - 19:33
![]() Linn wrote:
Linn wrote:
Var hittar jag en storleksguide till detta mönster? Ser ut att vara en oversizemodell
05.11.2018 - 12:33DROPS Design answered:
Hej, måtten hittar du på måttskissen nederst i mönstret.
05.11.2018 - 14:14
|
||||||||||||||||
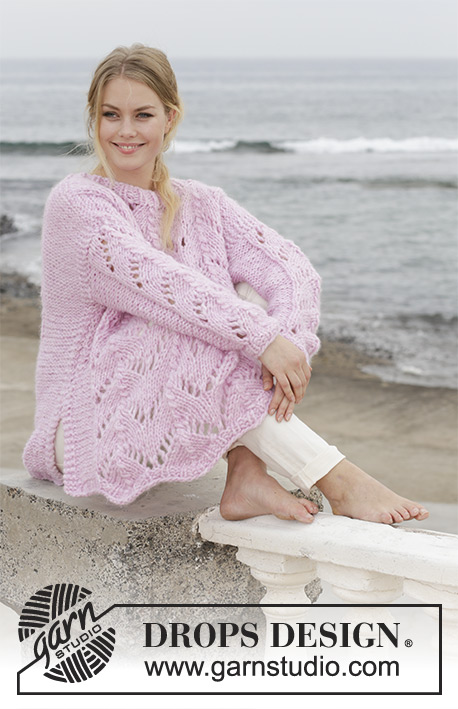
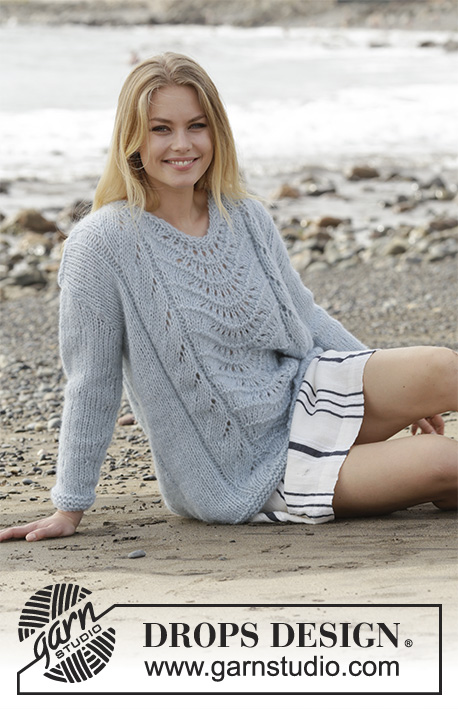
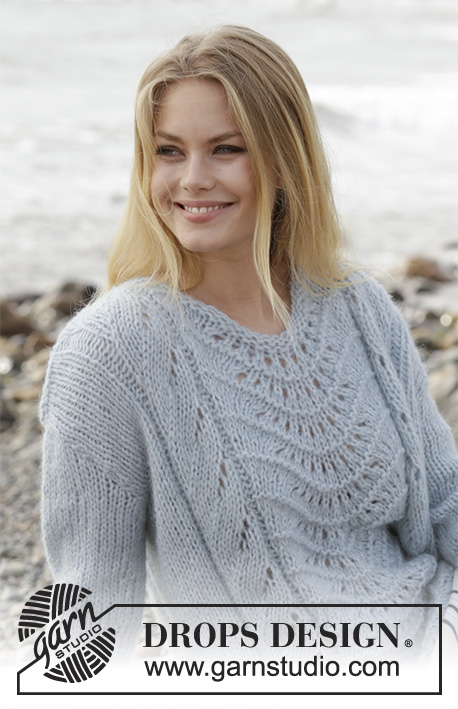
Nimbus#nimbussweater |
||||||||||||||||
 |
 |
|||||||||||||||
Knitted jumper with lace pattern. Sizes S - XXXL. The piece is worked in DROPS Air and DROPS Brushed Alpaca Silk.
DROPS 188-11 |
||||||||||||||||
|
INFORMATION FOR THE PATTERN: RIDGE/GARTER STITCH (worked back and forth): 1 ridge = Knit 2 rows. RIDGE/GARTER STITCH (worked in the round): 1 ridge = 2 rounds. Knit 1 round and purl 1 round. PATTERN: See diagrams A.1 to A.3. The diagrams show all the rows in the pattern seen from the right side. INCREASE TIP (for mid under sleeve): Start 2 stitches before the marker thread, make 1 yarn over, knit 4 (the marker thread sits in the middle of these 4 stitches), make 1 yarn over (= 2 stitches increased). On the next round knit the yarn overs twisted to avoid holes. ---------------------------------------------------------- JUMPER: Front and back pieces are worked top down. You work back and forth on needle until the armholes have been finished, then put the pieces together and continue working in the round. The sleeves are worked at the end. FRONT PIECE: RIGHT SHOULDER: Cast on 24-26-26-29-29-33 stitches with circular needle size 8 mm and 1 strand Air and 1 strand Brushed Alpaca Silk (= 2 strands). Work 1 RIDGE – see description above. The next row is worked as follows - from the right side: 7-9-10-13-14-18 stitches stocking stitch, purl 2, A.1 (= 8 stitches), purl 2, 5-5-4-4-3-3 stitches garter stitch. Continue with this pattern until the piece measures 3 cm; finish with a row from the right side. Lay the piece to one side and work the left shoulder. LEFT SHOULDER: Cast on 24-26-26-29-29-33 stitches with circular needle size 8 mm and 1 strand Air and 1 strand Brushed Alpaca Silk (= 2 strands). Work 1 ridge. The next row is worked as follows - from the right side: 5-5-4-4-3-3 stitches garter stitch, purl 2, A.3 (= 8 stitches), purl 2, 7-9-10-13-14-18 stitches stocking stitch. Continue this pattern until the piece measures 3 cm; finish with a row from the right side – Note! Make sure that you have worked the same number of rows as on the right shoulder. The next row is worked as follows from the right side: Work the stitches from the left shoulder, cast on 19-19-21-21-23-23 new stitches, and work the stitches from the right shoulder = 67-71-73-79-81-89 stitches. The next row is worked as follows – from the right side: 7-9-10-13-14-18 stitches stocking stitch, purl 2, A.1, purl 2, garter stitch over the next 29 stitches, purl 2, A.3, purl 2, 7-9-10-13-14-18 stitches stocking stitch. When you have worked 2 ridges over the middle 29 stitches, continue with A.2 over these stitches. Continue this pattern until the piece measures 18-19-20-21-22-23 cm, finish after a row from the wrong side, lay the piece to one side and work the back piece. BACK PIECE: RIGHT SHOULDER: Cast on 24-26-26-29-29-33 stitches with circular needle size 8 mm and 1 strand Air and 1 strand Brushed Alpaca Silk (= 2 strands). Work 1 ridge. Then work stocking stitch. Continue until the piece measures 2 cm, finish after a row from the right side. Lay the piece to one side and work the left shoulder. LEFT SHOULDER: Cast on 24-26-26-29-29-33 stitches with circular needle size 8 mm and 1 strand Air and 1 strand Brushed Alpaca Silk (= 2 strands). Work 1 ridge. Then work stocking stitch. Continue until the piece measures 2 cm, finish after a row from the right side. The next row is worked as follows from the wrong side: Work the stitches from the left shoulder, cast on 9-9-11-11-13-13 new stitches, and work the stitches from the right shoulder = 57-61-63-69-71-79 stitches. NOTE! There are fewer stitches cast on for the neck than on the front piece because the wave pattern in A.2 contracts in width. The next row is worked as follows – from the right side: 19-21-22-25-26-30 stitches stocking stitch, garter stitch over the next 19 stitches, 19-21-22-25-26-30 stitches stocking stitch. When you have worked 2 ridges over the middle 19 stitches, work stocking stitch over all stitches. Continue until the piece measures 18-19-20-21-22-23 cm, finish after a row from the wrong side. BODY: Work 1 row from the right side over the stitches on the back piece, cast on 6-6-8-8-12-12 new stitches, work the stitches from the front piece onto the needle and cast on 6-6-8-8-12-12 new stitches = 136-144-152-164-176-192 stitches. Continue with pattern and stocking stitch as before, the new stitches in each side are worked in stocking stitch. Continue until the piece measures 40-41-42-43-44-45 cm from where the pieces were worked together, work 2 RIDGES – see description above. Then cast off with knit. The jumper measures approx. 60-62-64-66-68-70 cm from the shoulder. SLEEVES: The sleeves are worked bottom up and in the round with double pointed needles. Change to short circular needle when you have enough stitches. Cast on 22-24-26-28-30-32 stitches with double pointed needles size 8 mm and 1 strand Air and 1 strand Brushed Alpaca Silk (= 2 strands). Work 3 ridges, then work stocking stitch in the round. Insert 1 marker thread at the beginning of the round = mid under sleeve. When the piece measures 6 cm increase 1 stitch on each side of the marker thread – read INCREASE TIP! Increase every 6-6-5-5-4-3½ cm a total of 6-6-7-7-8-8 times = 34-36-40-42-46-48 stitches. When the piece measures 41-40-39-37-37-35 cm cast off 3 stitches on each side of the marker thread under the sleeve, the sleeve cap is finished back and forth on the needle. Continue with stocking stitch, at the same time cast off on each side every 2nd row as follows: 2 stitches 1 time, 1 stitch 1-1-2-2-2-2 times, 2 stitches 1 time, 3 stitches 1 time, then cast off the remaining stitches. The sleeve measures a total 48-47-47-45-45-43 cm. Work another sleeve in the same way. ASSEMBLY: Sew shoulder seams. Sew in sleeves. |
||||||||||||||||
Diagram explanations |
||||||||||||||||
|
||||||||||||||||
 |
||||||||||||||||
 |
||||||||||||||||
Have you finished this pattern?Tag your pictures with #dropspattern #nimbussweater or submit them to the #dropsfan gallery. Do you need help with this pattern?You'll find 30 tutorial videos, a Comments/Questions area and more by visiting the pattern on garnstudio.com. © 1982-2026 DROPS Design A/S. We reserve all rights. This document, including all its sub-sections, has copyrights. Read more about what you can do with our patterns at the bottom of each pattern on our site. |
||||||||||||||||


With over 40 years in knitting and crochet design, DROPS Design offers one of the most extensive collections of free patterns on the internet - translated to 17 languages. As of today we count 324 catalogues and 12290 patterns translated into English (UK/cm). 12290
We work hard to bring you the best knitting and crochet have to offer, inspiration and advice as well as great quality yarns at incredible prices! Would you like to use our patterns for other than personal use? You can read what you are allowed to do in the Copyright text at the bottom of all our patterns. Happy crafting!
Post a comment to pattern DROPS 188-11
We would love to hear what you have to say about this pattern!
If you want to leave a question, please make sure you select the correct category in the form below, to speed up the answering process. Required fields are marked *.