
Popular categories
Looking for a yarn?


Comments / Questions (42)
![]() Virginia wrote:
Virginia wrote:
Taglia xl, cardigan taormina. Al 29 giro di A3a, il mio giro no termina come indicato, ma con 2 maglie dopo il secondo accavallato. Dove ho sbagliato? Grazie
24.04.2026 - 16:54DROPS Design answered:
Buonasera Virginia, non sono riportate ulteriori correzioni del diagramma. Il giro precedente le risulta corretto? Buon lavoro!
26.04.2026 - 22:33
![]() Isabelle wrote:
Isabelle wrote:
Bonjour, Où se trouve les diagrammes A.4 et A.5? Je suis en train de lire ce patron et je les trouve pas. Merci!
30.07.2025 - 15:44DROPS Design answered:
Bonjour Isabelle, vous trouverez les diagrammes A.4 et A.5 à droite du schéma des mesures, sous la manche. Bon tricot!
30.07.2025 - 16:39
![]() Josiane wrote:
Josiane wrote:
Bonjour je me suis trompée , j\'ai tricoter le 2eme diagramme en 1er. peut- on tricoter le 1er diagramme en suivant conte tenu que les augmentations ne sont pas au même endroit . Merci
20.02.2024 - 13:01DROPS Design answered:
Bonjour Josiane, pour obtenir la bonne forme avec les augmentations au bon endroit pour l'empiècement, il est sûrement préférable de tricoter les diagrammes dans le bon ordre, je suis désolée. Bon tricot!
20.02.2024 - 15:43
![]() Joan Høst wrote:
Joan Høst wrote:
Jeg spurgte tidligere om knaphul. Jeg har nu tænkt mig om. Det er selvfølgelig fordi jeg strikker oppefra og ned. Det har jeg ikke prøvet før. Nu giver det mening.
27.02.2023 - 19:00
![]() Joan Høst wrote:
Joan Høst wrote:
Knaphul skal laves i højre side. Skal laves fra retsiden. Der står det skal laves i slutningen af retpinden. Bliver det så ikke i venstre forkant. Eller misforstår jeg noget?
26.02.2023 - 20:30DROPS Design answered:
Hej Joan, ikke når du strikker oppefra, fra retsiden starter du med venstre forstykke, strikker rundt og kommer om til højre forstykke og her laver du knaphullet :)
28.02.2023 - 15:01
![]() Catherine wrote:
Catherine wrote:
Comment adapter le modèle taormina en 6/8 ans
11.04.2022 - 16:25DROPS Design answered:
Bonjour Catherine, nous ne sommes malheureusement pas en mesure de pouvoir ajuster chacun de nos modèles à chaque demande individuelle. Pour toute assistance complémentaire, vous pouvez vous adresser à votre magasin DROPS qui saura vous conseiller et vous renseigner. Bon tricot!
12.04.2022 - 08:57
![]() Christiane wrote:
Christiane wrote:
Is the whole pattern worked with needles 2,5mm? I guess I’m confused because the gauge (trial sample) is worked with needle 3 mm.
03.07.2021 - 21:23DROPS Design answered:
Dear Christiane, you do change the needles to 3 mm doing the youke, and sleeves are started with 3 mm as well, only changing at the last part to 2,5 mm. Happy Knitting!
04.07.2021 - 00:45
![]() Lorraine wrote:
Lorraine wrote:
Are the increases in the body meant to make holes as in the instructions? I do not understand why there should be holes down each side of the garment
12.06.2021 - 07:39DROPS Design answered:
Dear Lorraine, the holes used as a design element, to emphasize the lines of teh sweater. Of course, if it bothers you, and / or you'd prefer not to have them there, you can always knit the yarnover twisted in the next row. Happy Stitching!
13.06.2021 - 09:48
![]() Janne Feldstedt wrote:
Janne Feldstedt wrote:
Hvorfor skal der strikke 2 masker sammen og derefter omslag på pind 51 i rapport A 3b str. XL når der i rapport A 2b og A 1b først laves omslag og derefter en maske løs af som trækkes over næste maske? Kan det være rigtigt at jeg skal strikke på pinde nr 4 for at få strikkefastheden til at passe? Der står i opskriften at udtagningstips 2 skal bruges til udtagning på for- og bagstykke, men der bliver da hul hvis man ikke strikker masken drejet på næste pind.,
11.04.2021 - 22:30DROPS Design answered:
Hej Janne, for at det skal blive ens på hver side mod midt foran. Det er muligt, du skal få 24 masker i glatstrik på 10 cm. Ja det stemmer, vi har små huller ved udtagningerne i siderne, men du gør selvfølgelig som du vil :)
12.04.2021 - 14:18
![]() Christine MONNIER wrote:
Christine MONNIER wrote:
Bonjour Modele 186.18 Après avoir tricoté A4 et A5 pour dos devant et manches, vous indiquez rabattre souplement. Sur le modèle cela paraît plus large après le dernier rang et ça ne roulotte pas. Que préconisez vous ? Cordialement
12.03.2021 - 14:37DROPS Design answered:
Bonjour Mme Monnier, vous pouvez tricoter une ou plusieurs autres côtes mousse supplémentaires si vous le souhaitez (avant et après le point ajouré au milieu de A.5 ou bien avant ou bien après seulement, au choix). Quand le gilet est terminé, humidifiez-le ou lavez-le (en suivant très attentivement les consignes de l'étiquette + ces quelques généralités), laissez le sécher bien à plat en épinglant les bords si besoin. Bon tricot!
12.03.2021 - 15:33
|
||||||||||||||||||||||
Taormina#taorminacardigan |
||||||||||||||||||||||
|
|
||||||||||||||||||||||
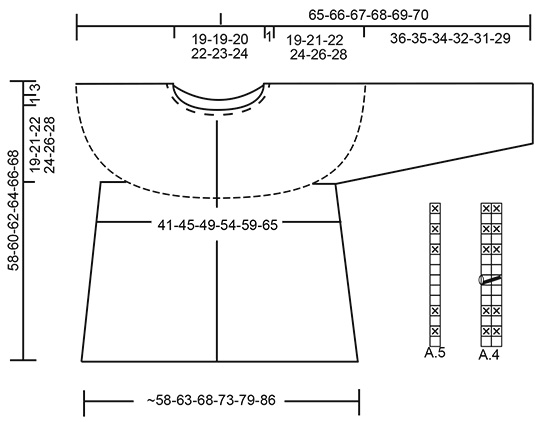
Jacket with lace pattern and round yoke, knitted top down. Size: S - XXXL Piece is knitted in DROPS BabyMerino.
DROPS 186-18 |
||||||||||||||||||||||
|
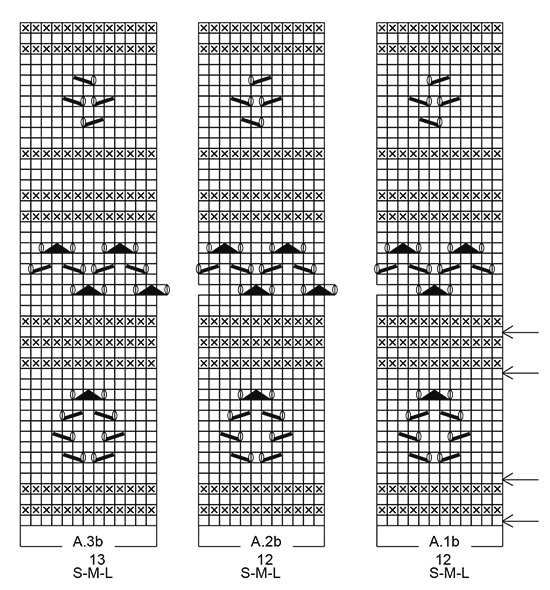
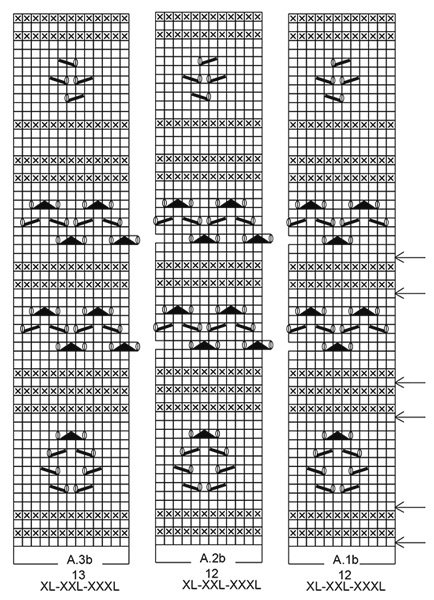
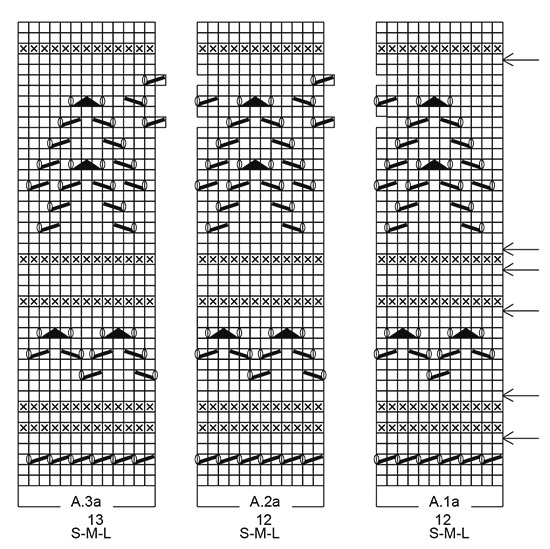
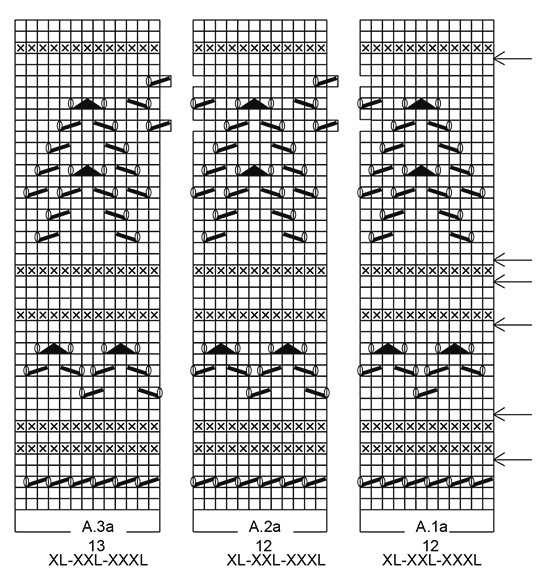
INFORMATION FOR PATTERN: GARTER STITCH (back and forth): 1 ridge = knit 2 rows. PATTERN: See diagrams A.1 to A.5. Choose diagram for your size (applies to A.1 to A.3). Diagrams show all rows in pattern seen from the right side. INCREASE TIP-1 (applies to increase on yoke): To calculate how to increase evenly, use the total number of stitches on row (e.g. 143 stitches), minus bands (e.g. 10 stitches = 133 stitches) and divide the remaining stitches by number of increases to be done (e.g. 24) = 5.54. I.e. in this example increase by making 1 yarn over after alternately approx. every 5th and 6th stitch. On next row work yarn over twisted to avoid hole. INCREASE TIP-2 (applies to increase on body): Work until 2 stitches remain before marker thread, 1 yarn over, knit 4 (marker thread is in the middle of these stitches), 1 yarn over (= 2 stitches increased), increase like this at both marker threads (= 4 stitches increased on row). Do not work yarn overs twisted on next row, they should make holes. DECREASE TIP (applies to mid under sleeve): Begin 3 stitches before marker and knit 2 together, knit 2 (marker is between these 2 stitches), slip 1 stitch knitwise, knit 1, pass slipped stitch over stitch worked (= 2 stitches decreased). BUTTONHOLES: Decrease for buttonholes on right band (when garment is worn): Work from right side until 3 stitches remain at the end of row, make 1 yarn over, knit the next 2 stitches together and knit last stitch. On next row knit yarn over to make holes. Decrease first buttonhole when piece measures approx. 1½-2 cm. Then decrease the next 5-5-5-6-6-6 buttonholes, approx. 8½ cm apart. ---------------------------------------------------------- JACKET: Yoke and body are worked back and forth, top down. Sleeves are worked in the round on double pointed needles. YOKE: Cast on 126-130-136-142-149-154 stitches (including 5 band stitches in each side towards mid front) on circular needle size 2.5 mm with BabyMerino. Work 2 ridges in GARTER STITCH - see explanation above. Work next row as follows from right side: Work 5 stitches in garter stitch (= band), knit 22-23-25-26-27-29 and increase 1-3-1-2-3-2 stitches evenly over these stitches – read INCREASE TIP-1, * 1 yarn over, knit 2-2-1-1-1-1 *, work from *-* over the next 14 stitches (= 7-7-14-14-14-14 stitches increased), knit 44-46-48-52-57-58 and increase 1-5-1-5-8-5 stitches evenly over these stitches, * 1 yarn over, knit 2-2-1-1-1-1 *, work from *-* over the next 14 stitches (= 7-7-14-14-14-14 stitches increased), knit 22-23-25-26-27-29 and increase 1-3-1-2-3-2 stitches evenly over these stitches and finish with 5 stitches in garter stitch (= band) = 143-155-167-179-191-191 stitches. Knit 1 row from wrong side but knit the yarn overs twisted to avoid holes. REMEMBER THE KNITTING TENSION! Remember BUTTONHOLES - see explanation above. Switch to circular needle size 3 mm. Work next row as follows from right side: Work 5 stitches in garter stitch (= band), A.1a (= 12 stitches), work A.2a (= 12 stitches) over the next 108-120-132-144-156-156 stitches (= 9-10-11-12-13-13 times in width), A.3a (= 13 stitches) and finish with 5 stitches in garter stitch (= band). Continue pattern like this AT THE SAME TIME increase evenly on every row marked with increase arrow in diagram A.1 as follows: Every time 12 stitches are increased work A.2 1 more time in total in width. Every time 24 stitches are increased work A.2 2 more times in total in width. Every time 36 stitches are increased work A.2 3 more times in total in width. 1ST INCREASE: Increase 24-24-24-24-24-36 stitches = 167-179-191-203-215-227 stitches. 2ND INCREASE: Increase 24-24-24-24-24-36 stitches = 191-203-215-227-239-263 stitches. 3RD INCREASE: Increase 24 stitches = 215-227-239-251-263-287 stitches. 4TH INCREASE: Increase 24 stitches = 239-251-263-275-287-311 stitches. 5TH INCREASE: Increase 24 stitches = 263-275-287-299-311-335 stitches. 6TH INCREASE: Increase 24 stitches = 287-299-311-323-335-359 stitches. When A.1a to A.3a have been worked 1 time vertically, piece measures approx. 14 cm from neck edge. Now work A.1b over A.1a, A.2b over A.2a and A.3b over A.3a and continue increases as follows: 7TH INCREASE: Increase 12-24-24-24-24-24 stitches = 299-323-335-347-359-383 stitches. 8TH INCREASE: Increase 12-12-24-24-24-24 stitches = 311-335-359-371-383-407 stitches. 9TH INCREASE: Increase 12-12-24-24-24-24 stitches = 323-347-383-395-407-431 stitches. 10TH INCREASE: Increase 12-12-12-12-24-24 stitches = 335-359-395-407-431-455 stitches. Increase is now done in size S, M and L, but continues in XL, XXL and XXXL as follows: 11TH INCREASE: Increase 12-24-24 stitches = 419-455-479 stitches. 12TH INCREASE: Increase 12-12-24 stitches = 431-467-503 stitches. ALL SIZES: = 335-359-395-431-467-503 stitches (repeat A.2b 25-27-30-33-36-39 times in width). Work pattern until piece measures 20-22-23-25-27-29 cm from cast-on edge. Now divide piece for body and sleeves from right side as follows: (Work stitches that do not fit the pattern as first stitch in A.1b) Work 5 stitches in garter stitch (= band), pattern as before over the next 44-49-53-60-66-73 stitches (= front piece), slip the next 74-76-86-90-96-100 stitches on a stitch holder for sleeve, cast on 10 new stitches on row (= in the side under sleeve), work pattern as before over the next 89-99-107-121-133-147 stitches (= back piece), slip the next 74-76-86-90-96-100 stitches on a stitch holder for sleeve, cast on 10 new stitches on row (= in the side under sleeve) and work pattern as before over the next 44-49-53-60-66-73 stitches and finish with 5 stitches in garter stitch (= band = front piece). Now finish body and sleeves separately. NOW MEASURE PIECE FROM HERE! BODY: = 207-227-243-271-295-323 stitches. Work pattern with 5 band stitches in garter stitch in each side of piece, work the stitches that do not fit the pattern in each of the sides (i.e. under sleeves) as first stitch in A.1b. When A.1b to A.3b have been worked 1 time vertically, piece measures approx. 27-27-27-30-30-30 cm. Then work in stocking stitch with 5 band stitches in garter stitch in each side of piece. Insert 1 marker thread 54-59-63-70-76-83 stitches in from each side (= front pieces = 99-109-117-131-143-157 stitches on back piece). On next row from right side, increase 1 stitch on each side of every marker thread - read INCREASE TIP-2! Increase like this every 4th row until piece measures 32-32-33-33-33-33 cm from where body was divided from sleeves = approx. 287-311-335-359-391-423 stitches. Switch to circular needle size 2.5 mm. Work next row as follows from right side: Work 5 stitches in garter stitch, work A.4 until 6 stitches remain, work A.5 over next stitch and 5 stitches in garter stitch. When A.4 and A.5 have been worked 1 time vertically, piece measures approx. 35-35-36-36-36-36 cm from where body was divided from sleeves and approx. 55-57-59-61-63-65 cm from neck edge. Cast off (make sure to cast off loosely, cast off with 1 needle size bigger if needed). SLEEVE: Worked in the round on double pointed needles. Slip the 74-76-86-90-96-100 stitches from stitch holder in one side of piece on double pointed needles size 3 mm and pick up 1 new stitch in each of the 10 stitches cast on under sleeve = 84-86-96-100-106-110 stitches. Insert 1 marker thread in the middle of the new stitches. Work A.2b over the stitches that fit the pattern, purl the stitches that do not fit the pattern under sleeve when stitches are purled and knit them when stitches are knitted. When A.2b has been worked vertically, sleeve measures approx. 7-5-4-5-3-1 cm from where sleeve was divided from body. On next row decrease 1 stitch on each side of marker thread - read DECREASE TIP! Decrease like this every 1½-1½-1-1-1-1 cm 14-15-19-20-22-23 times in total = 56-56-58-60-62-64 stitches. Continue until sleeve measures 33-32-31-29-28-26 cm from division (shorter measurements in the larger sizes because of longer yoke). Switch to double pointed needles size 2.5 mm and work A.4 over all stitches. When A.4 has been worked 1 time vertically, cast off all stitches (make sure to cast off loosely, cast off with 1 needle size bigger if needed). Sleeve measures approx. 36-35-34-32-31-29 cm from where sleeve was divided from body. Work the other sleeve the same way. ASSEMBLY: Sew the buttons on to the left band. |
||||||||||||||||||||||
Diagram explanations |
||||||||||||||||||||||
|
||||||||||||||||||||||
 |
||||||||||||||||||||||
 |
||||||||||||||||||||||
 |
||||||||||||||||||||||
 |
||||||||||||||||||||||
 |
||||||||||||||||||||||
Have you finished this pattern?Tag your pictures with #dropspattern #taorminacardigan or submit them to the #dropsfan gallery. Do you need help with this pattern?You'll find 25 tutorial videos, a Comments/Questions area and more by visiting the pattern on garnstudio.com. © 1982-2026 DROPS Design A/S. We reserve all rights. This document, including all its sub-sections, has copyrights. Read more about what you can do with our patterns at the bottom of each pattern on our site. |
||||||||||||||||||||||


With over 40 years in knitting and crochet design, DROPS Design offers one of the most extensive collections of free patterns on the internet - translated to 17 languages. As of today we count 324 catalogues and 12290 patterns translated into English (UK/cm). 12290
We work hard to bring you the best knitting and crochet have to offer, inspiration and advice as well as great quality yarns at incredible prices! Would you like to use our patterns for other than personal use? You can read what you are allowed to do in the Copyright text at the bottom of all our patterns. Happy crafting!
Post a comment to pattern DROPS 186-18
We would love to hear what you have to say about this pattern!
If you want to leave a question, please make sure you select the correct category in the form below, to speed up the answering process. Required fields are marked *.