
Popular categories
Looking for a yarn?


Comments / Questions (4)
![]() Anna wrote:
Anna wrote:
Il modello è bellissimo, l'unica pecca è che il bordo di 5 m lavorate a legaccio alla fine risulta un po' cedevole rispetto al resto. Meglio farlo con un tubolare o in ogni altro metodo che lo irrobustisca un pochino
13.12.2022 - 13:44
![]() Françoise wrote:
Françoise wrote:
Merci pour votre rapide réponse,je me lance... Bonne journée.
19.05.2020 - 14:25
![]() Françoise wrote:
Françoise wrote:
Bonjour, J'ai un doute concernant le 1er rang du diagramme il s'agit bien d'1 jeté 5 mailles 1jeté 1 maille (1 jeté pour la suite) ce n'est pas habituel de voir des augmentations séparée par 1 maille. Je vous remercie pour votre réponse. Prenez soin de vous . Cordialement. Françoise
18.05.2020 - 18:48DROPS Design answered:
Bonjour Françoise, c'est bien ainsi que se lit le 1er rang de A.1A. Au rang suivant, veillez à bien tricoter les jetés torse pour éviter les trous. Bon tricot!
19.05.2020 - 07:38
![]() Sonja Demerlier wrote:
Sonja Demerlier wrote:
Een vraagje, wat bedoel jullie met de pijl = mindernaald/meerdernaald. Het staat nergens beschreven wat dat is
12.11.2017 - 16:56DROPS Design answered:
Hallo Sonja, Bij het stuk over 'LIJF' staat hoe je moet minderen op de naalden gemarkeerd met een pijl in het telpatroon. (In telpatroon A.2a en A.3a zie je pijlen staan)
13.11.2017 - 21:08
|
|||||||||||||||||||
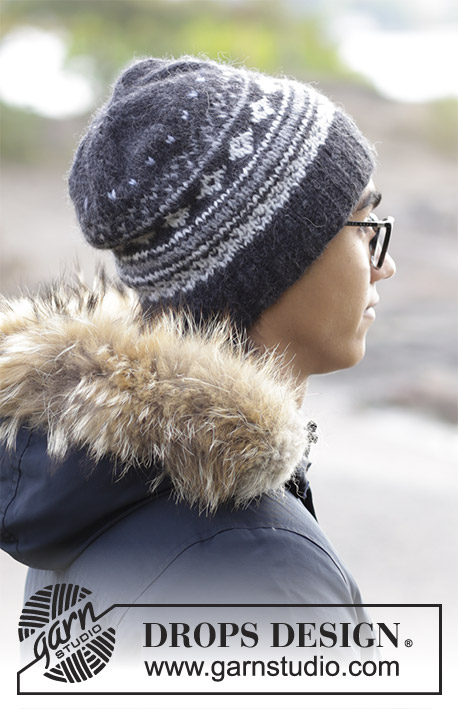
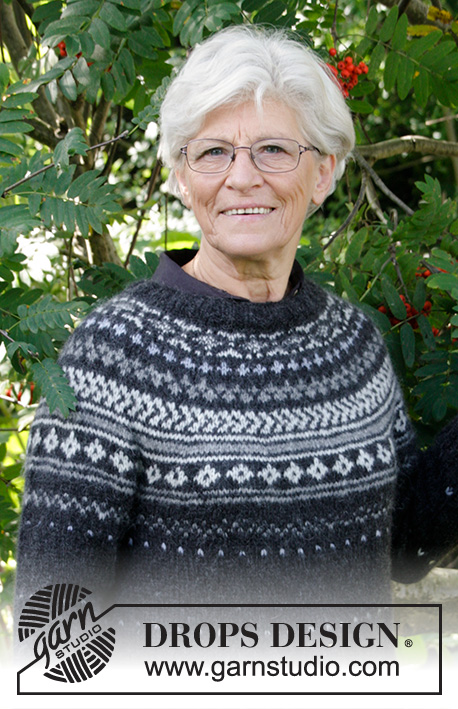
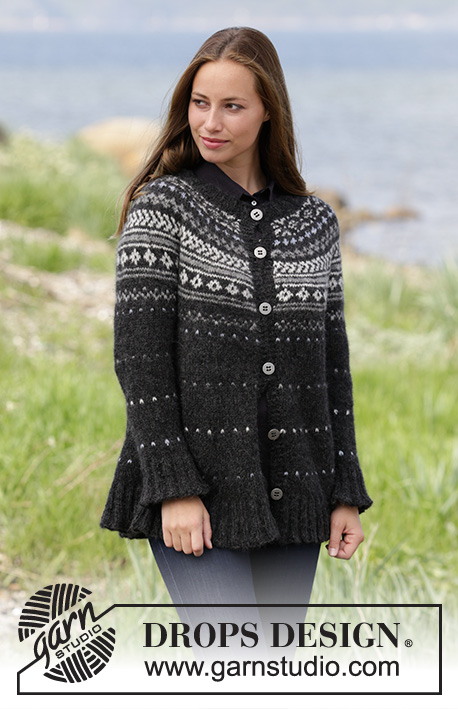
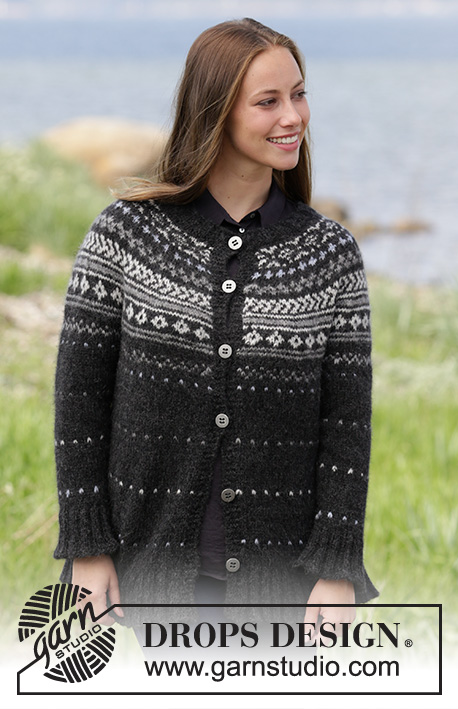
Night Shade Jacket#nightshadejacket |
|||||||||||||||||||
 |
 |
||||||||||||||||||
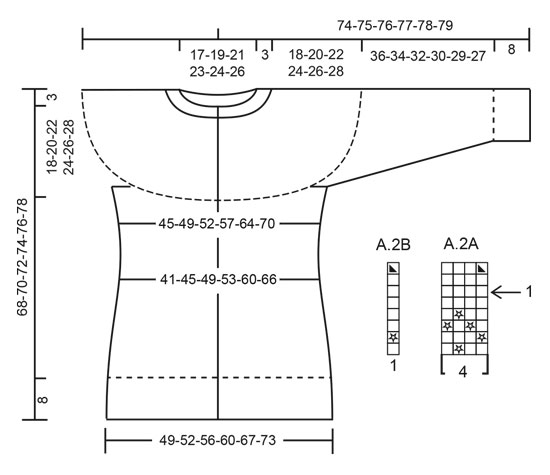
Knitted jacket with round yoke and multi-coloured Norwegian pattern, worked top down. Size: S - XXXL Piece is knitted in DROPS Air.
DROPS 184-25 |
|||||||||||||||||||
|
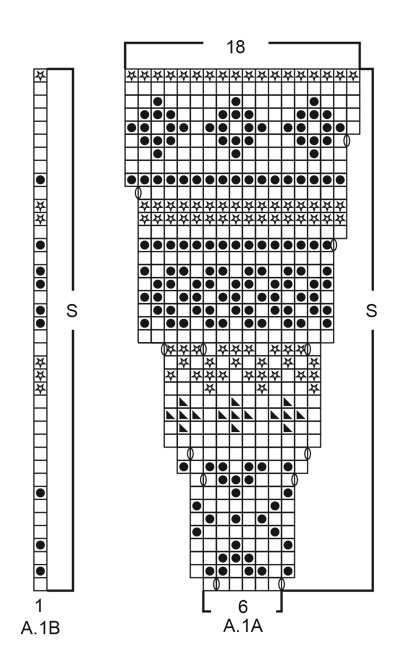
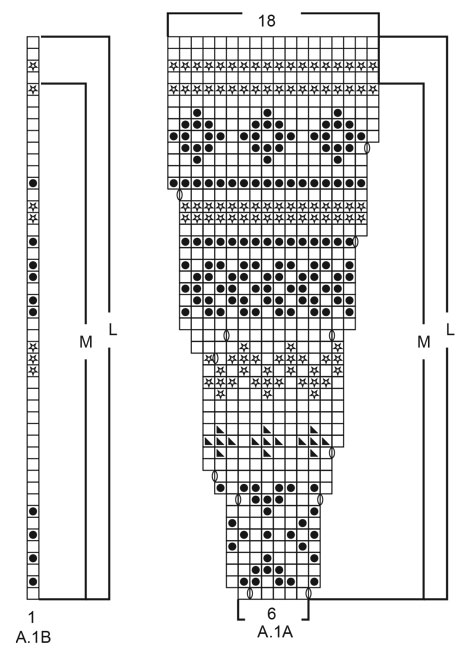
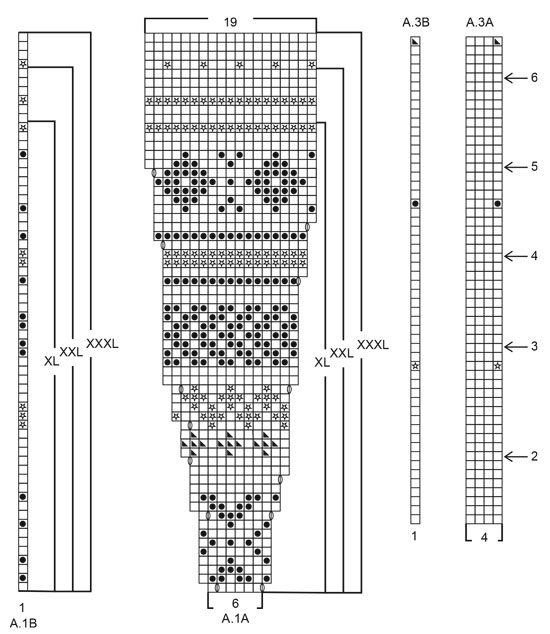
INFORMATION FOR PATTERN: GARTER STITCH (back and forth): 1 ridge = knit 2 rows. DECREASE/INCREASE TIP: All decreases/increases are done from the right side. To calculate how to decrease evenly, use the total number of stitches on row (e.g. 96 stitches), minus bands (e.g. 10 stitches) and divide the remaining stitches by number of decreases/increases to be done (e.g. 7) = 12.2. In this example knit approx. every 11th and 12th stitch together. Do not decrease over bands. When increasing make 1 yarn over after every approx. 12th stitch. On next row purl yarn overs twisted to avoid holes. PATTERN: See diagrams A.1 to A.3. Choose diagram for your size (applies to A.1A and A.1B). Work the entire pattern in stocking stitch. ELEVATION (applies to back of neck): Insert 1 marker thread mid back (= in the 45th-48th-51st-54th-57th-60th stitch). Begin from wrong side with black and purl until 7-8-8-9-9-10 stitches have been worked past marker thread (work band in garter stitch), turn, tighten yarn and knit 14-16-16-18-18-20. Turn, tighten yarn and purl 21-24-24-27-27-30, turn, tighten yarn and knit 28-32-32-36-36-40. Turn, tighten yarn and purl 35-40-40-45-45-50, turn, tighten yarn and knit 42-48-48-54-54-60. Turn and purl the rest of row (work band in garter stitch). DECREASE TIP-1 (applies to mid under sleeve): Begin 3 stitches before marker and knit 2 together, knit 2 (marker is between these 2 stitches), slip 1 stitch knitwise, knit 1, pass slipped stitch over stitch worked (= 2 stitches decreased). INCREASE TIP-1 (applies to rib): All increases are done from the right side. Increase 1 stitch in every purl section as follows: Purl 2, pick up loop before next stitch and purl twisted to avoid holes. BUTTONHOLES: Decrease for buttonholes on right band (when jacket is worn). Work from right side until 3 stitches remain on needle, make 1 yarn over, knit 2 together and knit last stitch. On next row knit yarn over to make holes. Decrease for buttonholes when piece measures: S: 2, 12, 22, 33, 44 and 55 cm M: 2, 12, 22, 32, 42, 52 and 62 cm L: 2, 12, 22, 32, 42, 53 and 64 cm XL: 2, 12, 22, 32, 42, 53 and 64 cm XXL: 2, 12, 22, 33, 44, 55 and 66 cm XXXL: 2, 12, 22, 33, 44, 55 and 66 cm ---------------------------------------------------------- JACKET: Work back and forth on circular needle from mid front, work top down. Work sleeves in the round on double pointed needles. NECK EDGE: Cast on 96-104-108-116-120-128 stitches (including 5 band stitches in each side towards mid front) on circular needle size 4 mm with black. Purl 1 row from wrong side. Work next row as follows from right side: 5 band stitches in GARTER STITCH - see explanation above, * knit 2, purl 2 *, repeat from *-* until 7 stitches remain on needle, knit 2 and finish with 5 band stitches in garter stitch. Continue rib like this – remember BUTTONHOLES on right band – see explanation above. When rib measures 3 cm, knit 1 row from right side while at the same time decreasing 7-9-7-9-7-9 stitches evenly - read DECREASE/INCREASE TIP = 89-95-101-107-113-119 stitches. Then work yoke as explained below. YOKE: Switch to circular needle size 5 mm. For better fit work an ELEVATION at the back of neck - see explanation above. When elevation is done, work PATTERN - see explanation above, as follows from right side: 5 band stitches in garter stitch, work A.1A until 6 stitches remain on row (choose diagram for your size) (= 13-14-15-16-17-18 repetitions of 6 stitches), work A.1B (= 1 stitch) and finish with 5 band stitches in garter stitch. Continue pattern like this and increase as shown in diagram. REMEMBER THE KNITTING TENSION! When A.1A and A.1B have been worked, there are 245-263-281-315-334-353 stitches on row and piece measures approx. 21-23-25-27-29-31 cm measured mid front from cast-on edge. Knit 1 row from right side with black while increasing 2-8-6-0-9-14 stitches evenly (do not increase over bands) = 247-271-287-315-343-367 stitches. Work next row as follows from wrong side: Work as before with black over the first 40-43-45-49-54-58 stitches (= right front piece), slip the next 48-54-58-64-68-72 stitches on a stitch holder (= sleeve), cast on 6-6-8-8-10-12 new stitches (= in the side under sleeve), work as before over the next 71-77-81-89-99-107 stitches (= back piece), slip the next 48-54-58-64-68-72 stitches on a stitch holder (= sleeve), cast on 6-6-8-8-10-12 new stitches (= in the side under sleeve), work as before over the remaining 40-43-45-49-54-58 stitches (= left front piece). Finish body and sleeves separately. NOW MEASURE PIECE FROM HERE! BODY: = 163-175-187-203-227-247 stitches. Work next row as follows from right side: 5 band stitches in garter stitch, work A.2A until 6 stitches remain on row (= 38-41-44-48-54-59 repetitions of 4 stitches), work A.2B (= 1 stitch) and finish with 5 band stitches in garter stitch. Continue pattern like this. On row marked with arrow-1 in diagram decrease 4 stitches evenly (do not decrease over bands ) = 159-171-183-199-223-243 stitches. When A.2A and A.2B have been worked, work A.3A/A.3B the same way (= 37-40-43-47-53-58 repetitions of 4 stitches). Repeat A.3A/A.3B until finished measurements. AT THE SAME TIME on row marked with arrow-2 in diagram decrease 8 stitches evenly = 151-163-175-191-215-235 stitches. Then increase 6 stitches evenly on each of the rows marked with arrow-3, arrow-4, arrow-5 and arrow-6 (do not increase over bands) – remember DECREASE/INCREASE TIP = 175-187-199-215-239-259 stitches. When piece measures 39 cm from division, purl 1 row from wrong side with black while increasing 53-57-61-69-77-81 stitches evenly = 228-244-260-284-316-340 stitches. Switch to circular needle size 4 mm and work rib (= knit 2/purl 2) with 5 band stitches in garter stitch and knit 2 in each side towards mid front (seen from right side). When rib measures 4 cm, increase all purl 2 to purl 3 - read INCREASE TIP-1 = 282-302-322-352-392-422 stitches. When rib measures 8 cm (the entire jacket measures approx. 68-70-72-74-76-78 cm from shoulder), cast off with knit over knit and purl over purl. SLEEVE: Work sleeve in the round on double pointed needles. Slip the 48-54-58-64-68-72 stitches from stitch holder back on double pointed needles size 5 mm and pick in addition up 1 new stitch in each of the 6-6-8-8-10-12 stitches mid under sleeve = 54-60-66-72-78-84 stitches on needle. Insert 1 marker thread at the beginning of round = mid under sleeve (= 3-3-4-4-5-6 new stitches on each side of marker thread). Move the marker thread upwards when working. Work A.2A in the round and decrease at the same time 2-0-2-0-2-0 stitches evenly on first round = 52-60-64-72-76-84 stitches (13-15-16-18-19-21 repetitions of 4 stitches). When A.2A has been worked, work A.3A in the round. When A.3A has been worked 1 time vertically, work piece in stocking stitch with black until finished measurements. AT THE SAME TIME when sleeve measures 3 cm from division, decrease 2 stitches mid under sleeve - read DECREASE TIP-1. Decrease 7-11-12-16-17-20 times in total as follows: S: On every 10th round, M: On every 6th round, L: On every 5th round, XL: Alternately on every 3rd and 4th round, XXL: On every 3rd round, XXXL: Alternately on every 2nd and 3rd round, When all decrease are done, 38-38-40-40-42-44 stitches remain - NOTE: When decreasing, the pattern will not fit mid under sleeve, but make sure that the dots in A.3A are directly above each other on the rest of the sleeve). When piece measures 36-34-32-30-29-27 cm from marker thread (NOTE: Shorter measurements in the larger sizes because of longer yoke), knit 1 round while increasing 10-10-12-12-14-16 stitches evenly = 48-48-52-52-56-60 stitches. Switch to double pointed needles size 4 mm and work rib in the round = knit 2/purl 2 for 8 cm. On next round increase all purl 2 to purl 3 – remember INCREASE TIP-1 = 60-60-65-65-70-75 stitches (this is done to avoid a tight sleeve edge). Cast off stitches with knit over knit and purl over purl. Sleeve now measures approx. 44-42-40-38-37-35 cm from marker. Work another sleeve the same way. ASSEMBLY: Sew the buttons on to the left band. |
|||||||||||||||||||
Diagram explanations |
|||||||||||||||||||
|
|||||||||||||||||||
 |
|||||||||||||||||||
 |
|||||||||||||||||||
 |
|||||||||||||||||||
 |
|||||||||||||||||||
Have you finished this pattern?Tag your pictures with #dropspattern #nightshadejacket or submit them to the #dropsfan gallery. Do you need help with this pattern?You'll find 33 tutorial videos, a Comments/Questions area and more by visiting the pattern on garnstudio.com. © 1982-2026 DROPS Design A/S. We reserve all rights. This document, including all its sub-sections, has copyrights. Read more about what you can do with our patterns at the bottom of each pattern on our site. |
|||||||||||||||||||


With over 40 years in knitting and crochet design, DROPS Design offers one of the most extensive collections of free patterns on the internet - translated to 17 languages. As of today we count 324 catalogues and 12290 patterns translated into English (UK/cm). 12290
We work hard to bring you the best knitting and crochet have to offer, inspiration and advice as well as great quality yarns at incredible prices! Would you like to use our patterns for other than personal use? You can read what you are allowed to do in the Copyright text at the bottom of all our patterns. Happy crafting!
Post a comment to pattern DROPS 184-25
We would love to hear what you have to say about this pattern!
If you want to leave a question, please make sure you select the correct category in the form below, to speed up the answering process. Required fields are marked *.