
Popular categories
Looking for a yarn?


Comments / Questions (27)
![]() Viola wrote:
Viola wrote:
Hallo, ich würde diese Jacke für ein neunjähriges Mädchen stricken. Es gibt nicht zufällig diese Anleitung für die Größe XXS oder XS? Viele Grüße
03.04.2018 - 21:17DROPS Design answered:
Liebe Frau Viola, dieses Modell gibt es nur in Damen-Größe. Viel Spaß beim stricken!
04.04.2018 - 08:54
![]() Holly Hensel Kinsella wrote:
Holly Hensel Kinsella wrote:
When not working the A-1 pattern or the front band garter do you knit on your purls and purl on your knits on the opposite sides? After you set up the pattern it just says to continue the pattern upwards and I find this confusing? Exp. on the 25 knit stitches on either side do you purl these on the wrong side? And the 2 purls between the patterns do you knit these on the wrong sides? Thank you!
12.03.2018 - 21:30DROPS Design answered:
Dear Mrs Kinsella, from WS you work in garter st the sts in garter st and K over K and P over P and diagram as shown on WS row in diagram. Happy knitting!
13.03.2018 - 09:30
![]() Barbara wrote:
Barbara wrote:
Guten Tag, ich wollte mir diese Anleitung ausdrucken, aber es hat leider NICHT funktioniert, nur die Seiten 1 - 3 sind ausdruckbar, das Lochmuster und die Skizze für die Maße kann ich nicht ausdrucken, können Sie mir bitte weiterhelfen? Grüße Barbara
24.02.2018 - 18:41DROPS Design answered:
Liebe Barbara, die Settings Ihrer Drücker sollen Sie vielleicht mal prüfen, damit alle Seiten gedrückt werden. Viel Spaß beim stricken!
26.02.2018 - 08:09
![]() Fran Miller wrote:
Fran Miller wrote:
I am assembling the piece and working on the neck and so there is no decreasing at all. I want to know if I should knit the stitches off of the thread and then pick up stitches around the rest of the neck and then knit the final 15 stitches that are on the thread.
15.01.2018 - 17:28DROPS Design answered:
Dear Mrs Miller, correct, you will knit the sts from thread back on needle and knit up sts around whole neckline, beg on one shoulder or on mid back. Happy knitting!
16.01.2018 - 09:03
![]() Fran Miller wrote:
Fran Miller wrote:
I still have a question about the stitches on the thread. Since they are at the beginning of each side, there are no stitches that have been worked previously. If I slip the first 15 on the right needle and then join a yarn to work the others of the neck on to the needle, the last 15 are on the thread. If I just slip them on, then my yarn would be in the middle of a row. If I knit them on, then the first 15 have not been knitted but the last 15 have! Please clarify as I am very confused.
15.01.2018 - 15:04DROPS Design answered:
Dear Mrs Miller, for neck you will work first 15 sts from RS then slip them on a st holder (so that you don't have to cut the yarn), work to the end of row. Turn and work return row. At the beg from next row from RS beg to dec for neck. Happy knitting!
15.01.2018 - 15:54
![]() Fran Miller wrote:
Fran Miller wrote:
I am assembling my sweater and am on the neckline. How do I know up the stitches for the neckline, specifically the 15 stitches that are on the threads. Do I just slip them on the needle and then join yarn to get the other stitches on the needle or do I treat these stitches like bound off stitches and pull thread through them. I have tried finding a video but can't find any.
15.01.2018 - 02:02DROPS Design answered:
Hi Fran, Slip the stitches on the thread onto the right needle when you have knitted up the other stitches as far as the front and then work them too. Then carry on knitting up stitches on the other side of the thread stitches. I hope this helps and happy knitting!
15.01.2018 - 06:18
![]() Sabina wrote:
Sabina wrote:
Hi.can you please explain in detail the sleeve cap and the 3 stitches cast off on each side-does that mean you cast off while on wrong side and right side? Thanks
17.12.2017 - 09:24DROPS Design answered:
Hi Sabina, Yes, you cast off at the beginning of each row, so the one will be RS the other WS. Happy knitting!
18.12.2017 - 06:21
![]() Fran Miller wrote:
Fran Miller wrote:
I have another question about the front piece. On the right front piece, if you put the first 15 stitches on the thread, the yarn from your knitting is with it. So do you attach new yarn to do the stitches after that so you can begin the bind off? Likewise on the left side, do you work from the wrong side and take the 15 stitches off at the beginning or do you work from the right side and slip them to the thread at the end? Again what happens to that yarn if done in the beginning?
18.11.2017 - 23:52DROPS Design answered:
Dear Mrs Miller, when slipping the first 15 sts from RS on right front piece, work them first to avoid cutting the yarn. On left front piece, leave the last 15 sts from RS unworked and turn. This way you won't have to cut yarn and join it on next row. Happy knitting!
20.11.2017 - 09:21
![]() Fran Miller wrote:
Fran Miller wrote:
I still have a question about the right front piece. After you put the 15 stitches on the thread, what happens to them. I don't see anything in the directions. Also when it says"bind off for the neck at the beginning of the row from the neck " does this mean after the stitches that are on the thread? I would think so in order to have the 18 stitches for the shoulder.
18.11.2017 - 01:13DROPS Design answered:
Hi Fran, The 15 stitches on the thread are worked when you get to Neck, The new stitches that you bind off are, as you say, the ones next to the stitches on the thread so you shape the neck up to the shoulders. Happy knitting!
18.11.2017 - 07:07
![]() Fran Miller wrote:
Fran Miller wrote:
I am starting this sweater and want clarification on the ribbing. Is the purl row just done for the first row? So knit 5, (knit 2,purl 2) to last 7 stitches, knit last 7 stitches is done every row?
24.10.2017 - 22:19DROPS Design answered:
Dear Mrs Miller, you will K every row the first 5 sts and the last 5 sts on row, all remaining sts between these will be worked K2/P2, ie from RS you will finish with K7 and from WS you will start with K5 (= front band), then work K over K and P over P for the rib, and finish with K5 (= front band). Happy knitting!
25.10.2017 - 08:44
|
||||||||||||||||
Lotus Jacket#lotusjacket |
||||||||||||||||
 |
 |
|||||||||||||||
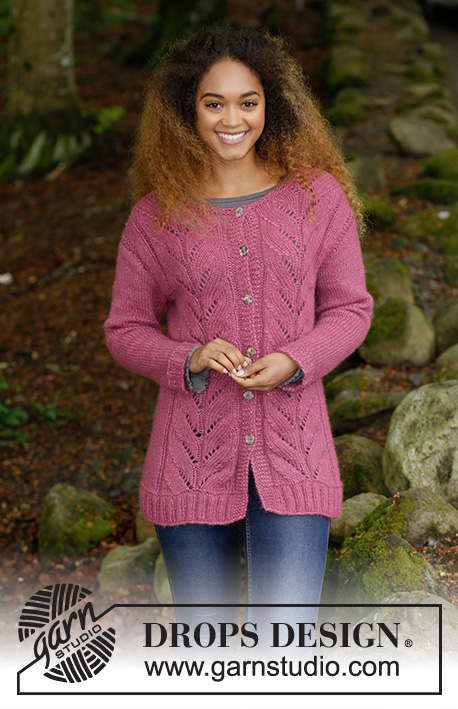
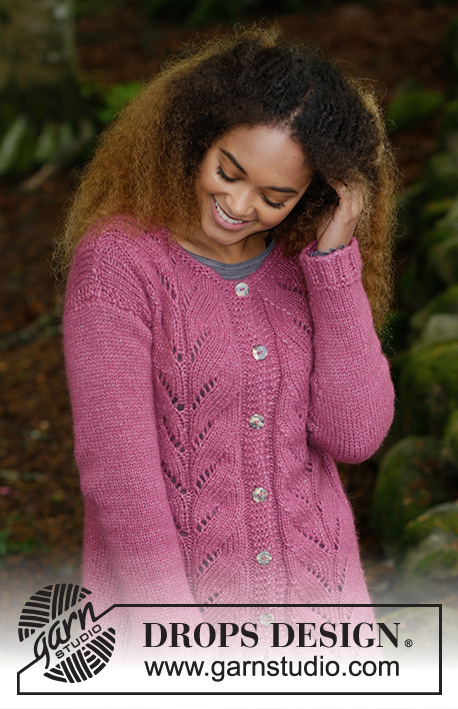
Knitted jacket with lace pattern and rib. Sizes S - XXXL. The jacket is worked in DROPS Air.
DROPS 179-18 |
||||||||||||||||
|
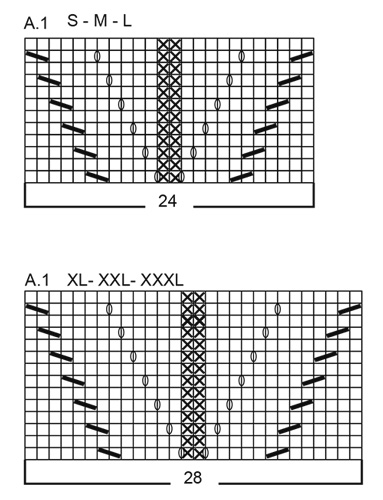
INFORMATION FOR THE PATTERN: RIDGE/GARTER STITCH (worked in the round): 1 ridge = 2 rounds. Knit 1 round and purl 1 round. RIDGE/GARTER STITCH (worked back and forth): 1 ridge = Knit 2 rows. PATTERN: See diagram A.1. The diagram shows all the rows in the pattern seen from the right side. See diagram for your size. DECREASE TIP (for the side): Start 3 stitches before the marker thread in the side: Knit 2 stitches together, knit 2 stitches (the marker thread sits between these stitches), slip 1 stitch, knit 1 stitch, pass the slipped stitch over the knitted stitch. INCREASE TIP (for mid under the sleeve): Start 1 stitch before the marker thread, make 1 yarn over, knit 2 (marker thread sits in the middle of these 2 stitches), make 1 yarn over (= 2 stitches increased). On the next round, knit the yarn overs twisted to prevent holes. BUTTONHOLE: Decrease for buttonholes on the right band. 1 BUTTONHOLE = knit third and fourth stitch from the edge together and make 1 yarn over. On the next row knit the yarn over = hole. Decrease for buttonholes when the piece measures: S: 16, 25, 34, 43, 52 and 61 cm M: 16, 25, 34, 43, 53 and 63 cm L: 16, 25, 35, 45, 55 and 65 cm XL: 16, 24, 32, 40, 49, 58 and 67 cm XXL: 16, 24, 33, 42, 51, 60 and 69 cm XXXL: 16, 26, 35, 44, 53, 62 and 71 cm ---------------------------------------------------------- JACKET: The piece is worked back and forth from mid front, bottom up to the armholes. Then work the front and back pieces back and forth on circular needle, separately. The sleeves are worked in the round with double pointed needles/short circular needle. BODY: Cast on 204-220-232-252-272-296 stitches with circular needle size 5 mm and Air. Purl 1 row from the wrong side, then work rib as follows – from the right side: 5 stitches GARTER STITCH – see description above, * knit 2 / purl 2 *, repeat from *-* until there are 7 stitches left, knit 2 stitches and 5 stitches garter stitch. Continue with rib until the piece measures 6 cm. Change to circular needle size 6 mm and work 1 ridge over all stitches, AT THE SAME TIME on the first row of the ridge, decrease 34-38-38-42-46-50 stitches evenly on the row = 170-182-194-210-226-246 stitches. Continue as follows – from the right side: 5 stitches garter stitch, purl 2, A.1 (= 24-24-24-28-28-28 stitches), purl 2, knit 25-31-37-37-45-55, purl 2, A.1, purl 2, A.1, purl 2, knit 25-31-37-37-45-55, purl 2, A.1, purl 2 and 5 stitches garter stitch. Continue this pattern upwards. REMEMBER THE KNITTING TENSION! Insert 1 marker thread in each side, 45-48-51-55-59-64 stitches in from mid front (back piece = 80-86-92-100-108-118 stitches). When the piece measures 8 cm decrease 1 stitch on each side of the marker threads in the sides = 4 stitches decreased, READ DECREASE TIP! Decrease every 12-12-13-13-14-14 cm a total of 4 times = 154-166-178-194-210-230 stitches. AT THE SAME TIME when the piece measures 16 cm start decreasing for BUTTONHOLE – see description above. When the piece measures 48-49-50-51-52-53 cm work ridges over 14 stitches in each side (= 7 stitches on each side of the marker threads in the sides). When you have worked 2 ridges over the stitches in the sides, work the next row as follows – from the right side: Work 37-40-43-47-51-56 stitches, cast off the next 8 stitches for the armhole (= 4 stitches on each side of the marker threads in the sides), work 64-70-76-84-92-102 stitches, cast off the next 8 stitches for the armhole, work 37-40-43-47-51-56 stitches. Now work each part separately. BACK PIECE: = 64-70-76-84-92-102 stitches. Continue with pattern as before, the 3 outermost stitches in each side are now worked in garter stitch. When the piece measures 66-68-70-72-74-76 cm cast off the middle 26-26-28-28-30-30 stitches for the neck and each shoulder is finished separately. Cast off 1 stitch on the next row from the neck = 18-21-23-27-30-35 stitches left on the shoulder. Continue working until the piece measures 68-70-72-74-76-78 cm (the remaining stitches in A.1 are worked in stocking stitch) and cast off. Work the other shoulder in the same way. RIGHT FRONT PIECE: = 37-40-43-47-51-56 stitches. Continue with pattern as before, the 3 outermost stitches in the side towards the armhole are worked in garter stitch. REMEMBER BUTTONHOLES. Continue working until the piece measures 62-64-66-68-70-72 cm. Now place the first 15-15-16-16-17-17 stitches on a thread for the neck. Continue the pattern as before and cast off for the neck at the beginning of each row from the neck as follows: 2 stitches 1 time and 1 stitch 2 times = 18-21-23-27-30-35 stitches left on the shoulder. Continue working until the piece measures 68-70-72-74-76-78 cm (the remaining stitches in A.1 are worked in stocking stitch) and cast off. Work the other shoulder in the same way. LEFT FRONT PIECE: Work as for the right, but reversed. SLEEVE: The sleeve is worked in the round with double pointed needles/circular needle. Cast on 40-40-44-48-52-52 stitches with double pointed needles size 5 mm and Air. Knit 1 round, then work rib, knit 2/ purl 2. Work rib for 5 cm, then change to double pointed needles size 6 mm, work 1 RIDGE, see description above, on the first round of the ridge decrease 6-6-8-10-12-12 stitches evenly on round = 34-34-36-38-40-40 stitches. Continue with stocking stitch. Insert 1 marker thread at the beginning of the round = mid under the sleeve. Work stocking stitch in the round. When the piece measures 8-8-8-8-10-9 cm increase 2 stitches mid under the sleeve – READ INCREASE TIP. Increase in this way every 3½-3-2½-2½-2-2 cm a total of 12-13-14-14-15-16 times = 58-60-64-66-70-72 stitches. When the piece measures 49-48-47-46-44-41 cm (shorter measurements in larger sizes because of the shoulder width), cast off the middle 6 stitches under the sleeve and the sleeve cap is finished back and forth on circular needle. Work stocking stitch and cast off at the beginning of each row in each side as follows: 3 stitches 3 times = 34-36-40-42-46-48 stitches. The sleeve measures approx. 52-51-50-48-47-44 cm. Cast off the remaining stitches. Work one more sleeve in the same way. ASSEMBLY: Sew shoulder seams. Sew in the sleeves. Sew the buttons onto the left front piece. NECKLINE: Knit up approx. 80 - 100 stitches (including the stitches on the threads) with circular needle size 5 mm and Air. Work 2 ridges back and forth, then cast off with knit from the right side. |
||||||||||||||||
Diagram explanations |
||||||||||||||||
|
||||||||||||||||
 |
||||||||||||||||
 |
||||||||||||||||
Have you finished this pattern?Tag your pictures with #dropspattern #lotusjacket or submit them to the #dropsfan gallery. Do you need help with this pattern?You'll find 27 tutorial videos, a Comments/Questions area and more by visiting the pattern on garnstudio.com. © 1982-2026 DROPS Design A/S. We reserve all rights. This document, including all its sub-sections, has copyrights. Read more about what you can do with our patterns at the bottom of each pattern on our site. |
||||||||||||||||


With over 40 years in knitting and crochet design, DROPS Design offers one of the most extensive collections of free patterns on the internet - translated to 17 languages. As of today we count 324 catalogues and 12290 patterns translated into English (UK/cm). 12290
We work hard to bring you the best knitting and crochet have to offer, inspiration and advice as well as great quality yarns at incredible prices! Would you like to use our patterns for other than personal use? You can read what you are allowed to do in the Copyright text at the bottom of all our patterns. Happy crafting!
Post a comment to pattern DROPS 179-18
We would love to hear what you have to say about this pattern!
If you want to leave a question, please make sure you select the correct category in the form below, to speed up the answering process. Required fields are marked *.