
Popular categories
Looking for a yarn?


Comments / Questions (15)
![]() Eb wrote:
Eb wrote:
Merci de votre aide!La vidéo montre comment raccorder une manche déjà montée à part sur une autre aiguille, mais l'explication du modèle parle de les "monter sur la même aiguille"et"en rond",alors que c'est en aller retour sur la vidéo.On la monte donc à part,en faisant juste une côte mousse?Je n'arrive décidément pas à comprendre,pourtant, je tricote depuis des années, sur aiguilles circulaires,en rond,en aller retour,des raglans éventuellement.
15.06.2021 - 14:56DROPS Design answered:
Bonjour Eb, la bordure des manches se tricote séparément (faites en 2, une pour chaque manche) = 2 côtes mousse = 4 rangs endroit, puis on rabat les 10 à 16 premières mailles du tour (emmanchure) et on met en attente. Pour l'empiècement, on va placer les 60 à 86 mailles de la bordure de chaque manche au-dessus des 10 à 16 m rabattues pour les emmanchures à la fin du dos/devants. Et vous retrouvez donc cette partie dans la vidéo: comment reprendre toutes les mailles des manches/des devants/du dos ensemble. En espérant que ça soit plus clair ainsi. Bon tricot!
15.06.2021 - 16:35
![]() Eb wrote:
Eb wrote:
Bonjour,Madame et navrée de vous déranger. Je n'arrive pas à comprendre comment monter les mailles au niveau des manches(juste avant l'empiècement):faut il absolument mettre les autres mailles sur une aiguille supplémentaire?Je n'arrive pas à les tricoter en rond?On les monte sur l'envers?Navrée ,je suis perdue et ne sais comment continuer...Merci beaucoup!
14.06.2021 - 23:15DROPS Design answered:
Bonjour Eb, cette vidéo montre comment tricoter les mailles des manches au-dessus des mailles rabattues pour les emmanchures, les premiers rangs sont parfois un peu serrés à cette transition et vous pouvez vous aider d'une autre aiguille si besoin, mais après quelques rangs tout sera plus simple. Bon tricot!
15.06.2021 - 08:19Bellinda Notari wrote:
What is ment by "Set eyelet pattern"? because : and what means:Row1....A3"A" across next 6sts, A3"B" across next 276 sts, A3"C" across next 7 sts, ... why those "A", "B" and "C", which should mean the colors of the yarn, when the body is knit in only 1 color (pistachio)!! ??
23.11.2018 - 21:04DROPS Design answered:
Dear Belinda, "set eyelet pattern" means that you continue the pattern as it was knitted before. If you take a look at the diagram, you can see that "A", "B" and "C" refers to the different parts of the pattern repeat, and not the colors. Happy Knitting!
25.11.2018 - 11:11Bellinda Notari wrote:
YOU CONFUSE ME ALSO WITH YOUR MISTAKES !!! YOUR REPLY IS COMPLETELY WRONG AND ACTUALLY INACCEPTABLE !! Chart A1 refers to 21 sts and Chart A2 refers to 5 sts!!!!! YOU MIXED THE 2 CHARTS ; AGAIN!! ARE THERE OTHER MISTAKES I HAVE TO KNOW???
20.11.2018 - 14:36Bellinda Notari wrote:
AGAIN YOUR REPLY IS COMPLETELY WRONG AND ACTUALLY INACCEPTABLE !! Chart A1 refers to 5 sts and Chart A2 refers to 21 sts!!!!! YOU MIXED THE 2 CHARTS ; AGAIN!! ARE THERE OTHER MISTAKES I HAVE TO KNOW???
20.11.2018 - 14:34DROPS Design answered:
Dear Mrs Notari, diagrams have been corrected online - see correction in May 2017, we are sorry for any inconvience caused - there shouldn't be any other mistake. Should you have any other questions about the pattern, you are welcome to ask them there. Happy knitting!
21.11.2018 - 09:17Bellinda Notari wrote:
Can you tell me the corrections of the charts & all the to knit sts in those charts, please, because I already knitted the 5 border in stocking sts ; do I have to knit same sts as mention with the 2 knits sts & the YO's? and do I knit the 21 sts from chart A1 instead of A2 for all the remaining stitches for the lower cardigan border (the waves?)! BECAUSE YOU MADE THIS MISTAKES I KNITTED THE 11 ROWS THE WRONG WAY ; I AM VERY DISAPPOINTED IN DROPS ! ! ! are there other mistakes??
20.11.2018 - 13:24DROPS Design answered:
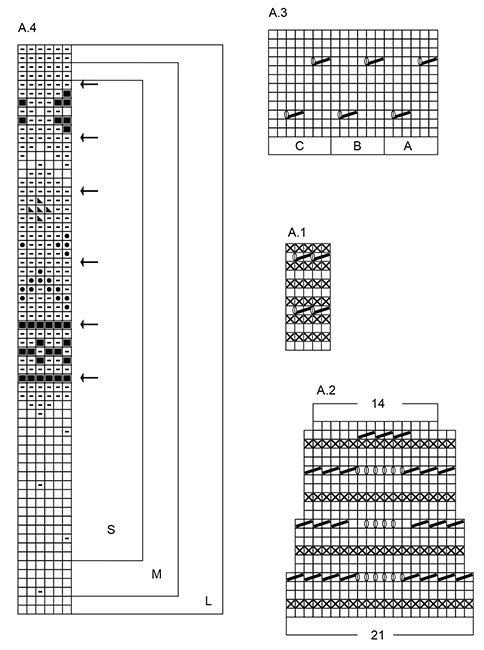
Dear Mrs Notari, diagrams A.1 and A.2 have been edited in May 2017 as follows: you are working A.1 over the first 5 sts, then repeat A.2 over the next sts (17-19-21-22-24-26 times in width) until 5 sts remain and work the last 5 sts in A.1. There are more rows in A.1 but when A.1 has been worked 1 time in height, you repeat A.1 from row 1 and continue A.2. The number of sts in A.2 will decrease by and by: you dec 2 sts in each A.2 on row 5 (= A.2 is now worked over 19 sts) then on row 11 (= A.2 is then worked over 17 sts) and 21 (A.2 is then worked over 14 sts). Happy knitting!
20.11.2018 - 14:24
![]() Natalie wrote:
Natalie wrote:
Hej! Jag blir inte klok på minskningarna och hur jag ska få mönstret att stämma efter dessa! När jag minskat 2x2 maskor (1 på varje sida om de två markörerna) är det ju bara tre maskor mellan omtag och 2 räta tillsammans - ska jag så sticka tre mellan dessa (och fyra resten) eller hur ska jag göra?
06.06.2018 - 20:29
![]() Kirsten wrote:
Kirsten wrote:
Hier wurde schon auf die Verwechselung zwischen A1 und A2 hingewiesen. Desweiteren, stricke ich gerade. In der Erklärung des Diagramms steht unter " 2 Maschen rechts zusammenstricken" nochmal das selbe , wozu zu der Erklärung eigentlich ... " 1 Umschlag zwischen 2 Maschen" gehört. ! So ist jedenfalls die Erklärung bei anderen Drops Anleitungen ! Wie soll man das nun stricken? Wenn ich nochmals 2 Maschen zusammen stricke, wird das Stück im Nu immer kleiner und es fehlt das Lochmuster!?????
24.05.2017 - 13:26DROPS Design answered:
Liebe Kirsten, 5. Reihe in A.1 wird so gestrick: 3 x 2 M rechts zusammen, dann (1 Umschlag, 1 M re) x 5, 1 Umschlag, 3 x 2 M rechts zusammen = 19 M übrig (2 M werden abgenommen). Viel Spaß beim stricken!
24.05.2017 - 14:53
![]() Magotte wrote:
Magotte wrote:
Bonjour A1 et A2 ne sont ils pas inversés? Pourquoi 21 mailles sur A1, alors que je suis en bordure? Merci
17.04.2017 - 08:32DROPS Design answered:
Bonjour Margotte, il semble qu'il y ait effectivement une erreur, tricotez les 5 m pour la bordure devant et répétez les 21 m en largeur (point de vagues), merci pour votre retour. Bon tricot!
18.04.2017 - 11:12
![]() Svenja Grönewald wrote:
Svenja Grönewald wrote:
Könnte es eventuell sein, dass nicht Muster A1 über 5 Maschen gestrickt wird sondern A2?
29.03.2017 - 20:29DROPS Design answered:
Liebe Frau Grönewald, Danke für den Hinweis. Das Diagram mit 5 Maschen soll für die Blende gestrickt sein und das mit 21 Maschen wird dann inzwischen wiederholt. Viel Spaßbeim stricken!
30.03.2017 - 09:05
|
|||||||||||||||||||||||||
Spring Valley#springvalleytop |
|||||||||||||||||||||||||
 |
 |
||||||||||||||||||||||||
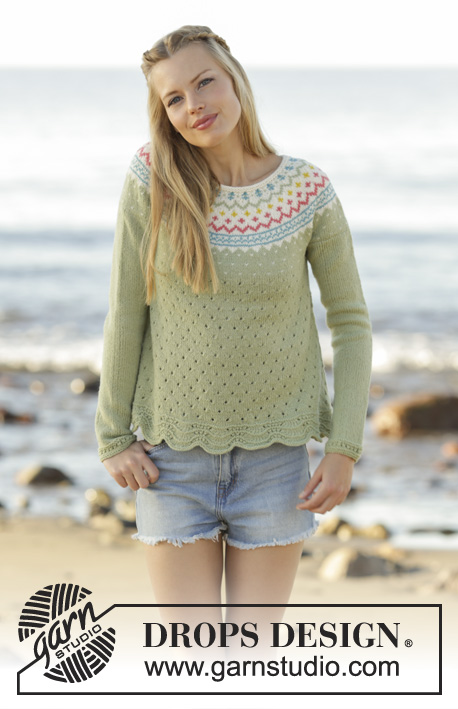
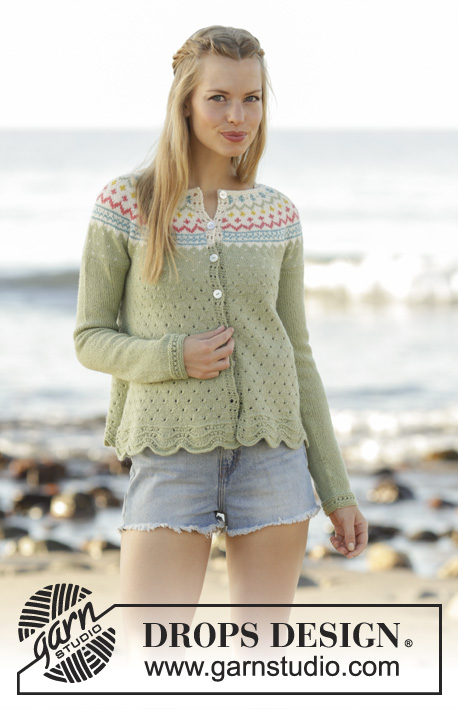
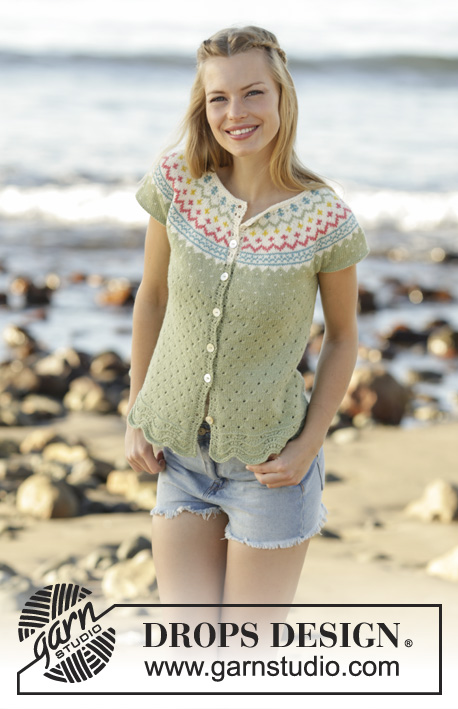
Knitted top with wave pattern, round yoke and multi coloured pattern in DROPS Flora. Sizes S - XXXL.
DROPS 175-7 |
|||||||||||||||||||||||||
|
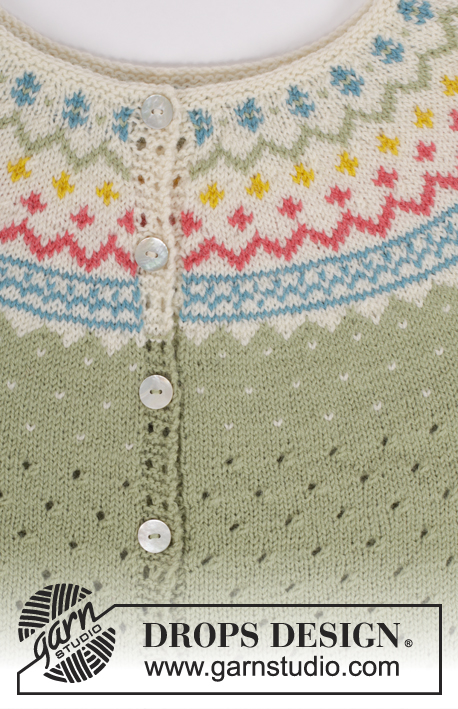
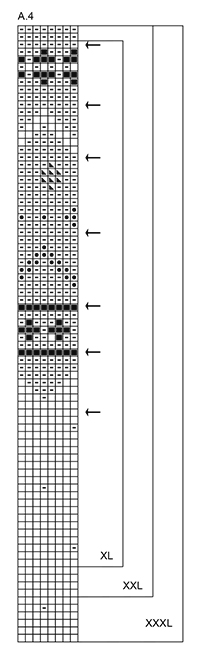
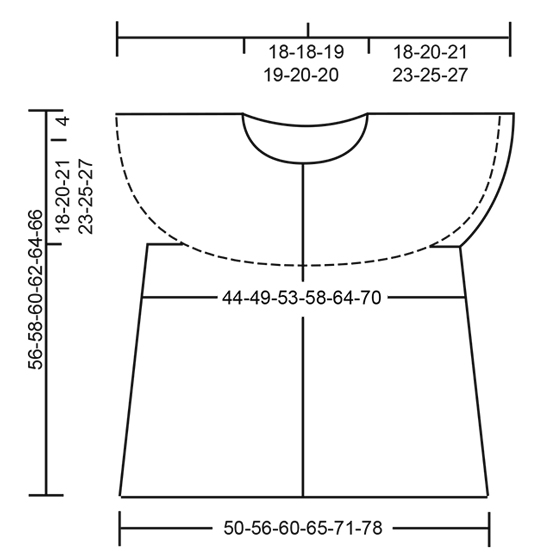
PATTERN: See diagrams A.1 to A.4. The diagrams show all rows in the pattern seen from the right side. The whole of A.4 is worked in stocking stitch – chose the right diagram for your size. DECREASE TIP-1: Start 3 stitches before the marker thread in the side. Knit 2 together, knit 2 (the marker thread sits between these 2 stitches), slip 1 stitch, knit 1, pass the slip stitch over the knitted stitch. When decreasing in the sides, work the stitches that do not fit in A.3 in stocking stich. DECREASE TIP-2: To work out where to decrease on the row, count the total number of stitches on the needle (e.g. 377 stitches), minus the bands (e.g. 10 stitches) and divide the remaining stitches by the number of stitches to be decreased (e.g. 42) = 8.7. In other words, in this example, every 7th and 8th stitch are worked together. Do not decrease across the bands. Decrease by knitting 2 stitches together from the right side and purling 2 stitches together from the wrong side. RIDGE/GARTER STITCH (worked back and forth): 1 ridge = knit 2 rows. RIDGE/GARTER STITCH (worked around): 1 ridge = 2 rounds. Knit 1 round and purl 1 round. ELEVATION: Start from the right side and knit the first 53-55-57-59-61-63 stitches, insert a marker (= mid back), knit the next 7-7-7-8-8-8 stitches, turn, tighten the strand and knit 14-14-14-16-16-16 stitches, turn, tighten the strand and knit 21-21-21-24-24-24 stitches, turn, tighten the strand and knit 28-28-28-32-32-32 stitches. Continue back and forth in this way by knitting 7-7-7-8-8-8 stitches more each time until the middle 63-63-63-72-72-72 stitches on the needle are all worked, knit the rest of the row. ---------------------------------------------------------- TOP: The top is worked back and forth on the circular needle from mid front from bottom up. BODY: Cast on 367-409-451-472-514-556 stitches (including 5 band stitches in each side towards mid front) with circular needle size 3 mm and pistachio. Work as follows – from the right side: A.1 across the first 5 stitches, A.2 across the next 357-399-441-462-504-546 stitches (= 17-19-21-22-24-26 repeats in width), finish with A.1 across the last 5 stitches. REMEMBER THE KNITTING TENSION! When the next to last row of A.2 is completed there are 248-276-304-318-346-374 stitches on the needle, on the last row of A.2 adjust the number of stitches evenly along the row to 251-281-299-323-353-383 stitches. Continue working as follows – from the right side: A.1 across the first 5 stitches as before, A.3 A (= 6 stitches), A.3 B across the next 228-258-276-300-330-360 stitches, A.3 C across the next 7 stitches and A.1 across the last 5 stitches as before. Insert 2 marker threads in the piece, 65-73-77-83-91-98 stitches in from each side (back piece = 121-135-145-157-171-187 stitches). When the piece measures 8 cm decrease 1 stitch on each side of both marker threads (= 4 stitches decreased) – READ DECREASE TIP-1. Decrease every 3 cm in total 8-9-9-9-9-9 times = 219-245-263-287-317-347 stitches. When the piece measures 34-34-35-35-35-35 cm cast off 10-10-12-12-14-16 stitches in each side from right side (= 5-5-6-6-7-8 stitches on each side of each marker thread) = 199-225-239-263-289-315 stitches on the body. Lay the piece to one side and work the sleeve edges. SLEEVE EDGES: The sleeve edges are worked around on a short circular needle. Cast on 70-80-90-92-98-102 stitches on a short circular needle size 3 mm and pistachio. Work 2 RIDGES – see description above, then cast off the first 10-10-12-12-14-16 stitches of the round = 60-70-78-80-84-86 stitches. Work another sleeve edge in the same way. YOKE: (1st row = wrong side) Work the sleeve edges on to the same circular needle size 3 mm as the body where the cast-off stitches are for the armholes, at the same time decrease 2-0-0-4-6-4 stitches evenly along the row = 317-365-395-419-451-483 stitches. Continue working as follows – from the right side: A.1 across the first 5 stitches, A.4 across the next 306-354-384-408-440-472 stitches (= 51-59-64-51-55-59 repeats of A.4), finish with the first stitches in A.4 and A.1 above the last 5 stitches. Continue this pattern upwards. On the first row with an arrow decrease 24-30-30-24-24-32 stitches evenly along the row – READ DECREASE TIP -2. Continue to decrease 36-42-42-40-40-48 stitches evenly along the rows with arrows. From the 1st-1st-1st-2nd-2nd-2nd row with decreases continue by working A.1 in each side with off white. When A.4 is completed in height there are 113-125-155-155-187-163 stitches on the needle. Work 1 row knit from the right side with off white where 6-14-40-36-64-36 stitches are decreased evenly along the row = 107-111-115-119-123-127 stitches. Work 1 row purl from the wrong side. For a better fit you can work a small ELEVATION in the back of the neck with off white – see description above. Finish by working 2 RIDGES with off white – see description above, then cast off. The top measures approx. 56-58-60-62-64-66 cm to the shoulder. ASSEMBLY: Sew the openings under the armhole borders. Sew on the buttons evenly spaced along the left band, the buttons are buttoned through the holes in the right band. |
|||||||||||||||||||||||||
Diagram explanations |
|||||||||||||||||||||||||
|
|||||||||||||||||||||||||
 |
|||||||||||||||||||||||||
 |
|||||||||||||||||||||||||
 |
|||||||||||||||||||||||||
Have you finished this pattern?Tag your pictures with #dropspattern #springvalleytop or submit them to the #dropsfan gallery. Do you need help with this pattern?You'll find 27 tutorial videos, a Comments/Questions area and more by visiting the pattern on garnstudio.com. © 1982-2026 DROPS Design A/S. We reserve all rights. This document, including all its sub-sections, has copyrights. Read more about what you can do with our patterns at the bottom of each pattern on our site. |
|||||||||||||||||||||||||


With over 40 years in knitting and crochet design, DROPS Design offers one of the most extensive collections of free patterns on the internet - translated to 17 languages. As of today we count 324 catalogues and 12290 patterns translated into English (UK/cm). 12290
We work hard to bring you the best knitting and crochet have to offer, inspiration and advice as well as great quality yarns at incredible prices! Would you like to use our patterns for other than personal use? You can read what you are allowed to do in the Copyright text at the bottom of all our patterns. Happy crafting!
Post a comment to pattern DROPS 175-7
We would love to hear what you have to say about this pattern!
If you want to leave a question, please make sure you select the correct category in the form below, to speed up the answering process. Required fields are marked *.