
Popular categories
Looking for a yarn?


Comments / Questions (267)
![]() Sylvia wrote:
Sylvia wrote:
And what am I doing on the WS? knitting, purling?
22.04.2026 - 02:47DROPS Design answered:
Dear Sylvia, from the wrong side work the stitches as they should appear as before seen from RS to avoid "breaking" the previous pattern. If your RS rows are (P2, K1) in A.1 you will then purl all stitches from WS. Happy knitting!
22.04.2026 - 08:13
![]() Sylvia wrote:
Sylvia wrote:
Also, I have 90 stitches after finishing an all K row in the pattern. Do I knit the 72 stitches in the PPKPPK etc. pattern because then I won't be doing all knit stitches for the 55 stitches. Or, do I do one round of 90 stitches in the PPKPPK pattern and then knit all 72 stitches before placing a marker and starting row 1 elevated decrease on the right side?
22.04.2026 - 02:47
![]() Sylvia wrote:
Sylvia wrote:
If the 55 stitches starts between A.2 and the right sleeve, there will only be 3 A.2 sequences to do the K3 tog elevated decrease before I have to turn the work to the wrong side. This gives only 3 x 2 stitches = 6 stitches decreased, not 8. Not sure how the total number of stitches decreased is 8.
22.04.2026 - 02:44
![]() Sylvia wrote:
Sylvia wrote:
After the 90 stitches have been worked, if I knit 72 stitches, I end up after A.2 (between the end of A.2 and the right sleeve) and place a marker here. Then I start knitting the 55 stitches. When do I start the K3 tog twisted after A.2. Do I start it here - over the first 3 stitches after the marker - or after the next A.2 sequence (between A.2 and the back)?
22.04.2026 - 02:41DROPS Design answered:
Dear Sylvia, you will decrease now only on transitions/raglan between sleeves and back piece, not towards front piece anymore so that you decrease 2 sts a total of 4 times= 8 sts per decrease row. Happy knitting!
22.04.2026 - 08:11
![]() Sylvia wrote:
Sylvia wrote:
Where do you work the k3 twisted tog in the neck elevation? Do you still do the k2 tog and ssk for the sleeve and back raglans?
21.04.2026 - 03:38DROPS Design answered:
Dear Sylvia, when working the short rows only decrease as explained under RAGLAN DEC (ELEVATION): at raglan stitches, don't decrease with K2 tog/ssk as before, you now decrease 2 sts and not only 1. Happy knitting!
21.04.2026 - 09:44
![]() Sylvia wrote:
Sylvia wrote:
I can't find the description of how to work the elevation under "Explanations". I don't see explanations anywhere. Also, after the 90 stitches have been worked, do you do a PPK round and then knit across the 72 stitches. Also, are you continuing the decrease for raglan on the sleeves and the back and also decrease elevation all at the same time?
21.04.2026 - 02:49DROPS Design answered:
Dear Sylvia, after you have decreased to 90 stitches for raglan, start the short rows as explained just afterwards, work the first 72 sts from RS as before, insert the marker, then start working the short rows alternately from RS and from WS as explained for your size remember to decrease as explained above under RAGLAN DEC (ELEVATION):. Happy knitting!
21.04.2026 - 09:42
![]() Lin wrote:
Lin wrote:
I have knitted the swatch and while the length is 10cm, the width is 8cm because it is a rib. On the needle the width is 10cm. Please advise .
05.04.2026 - 21:46DROPS Design answered:
Hi Lin, The knitting tension should be measured while working the ribbed pattern in A.1. So it sounds like your knitting tension is too tight and you need to increase your needle size. Regards, Drops Team.
06.04.2026 - 15:25
![]() Lin wrote:
Lin wrote:
I knitted the swatch and if I measure flat, it is 10 cm by 8 cm underneath but on the needle 10cm. The rib makes a concertina. Can i assume that my swatch is 10 cm by 10 cm?
05.04.2026 - 17:52DROPS Design answered:
Dear Lin, make sure you get the correct tension otherwise piece might be too narrow/short. Read more about tension here. Happy knitting!
08.04.2026 - 10:39
![]() Jennifer wrote:
Jennifer wrote:
Is the 72 stitches being knit at the end of the sweater pattern only knit across the back from right sleeve to left sleeve or is it across the front of the sweater? The description unfortunately is difficult to follow.
23.03.2026 - 21:06DROPS Design answered:
Hi Jennifer, The 72 stitches are worked in pattern as before, then these stitches wait while you work an elevation back and forth in short rows (also continuing the pattern) at the back of the neck. There is a description of how to work the elevation and continue decreasing for raglan at the top of the pattern, under Explanations. Regards, Drops Team.
24.03.2026 - 06:27
![]() Grenier wrote:
Grenier wrote:
Ou commencent les 72 mailles ?
11.03.2026 - 16:51DROPS Design answered:
Cf. Réponse précédente = tricotez ces 72 mailles à partir du début des tours précédents (vous allez désormais tricoter en rangs à partir d'ici). Bon tricot!
12.03.2026 - 09:29
|
|||||||
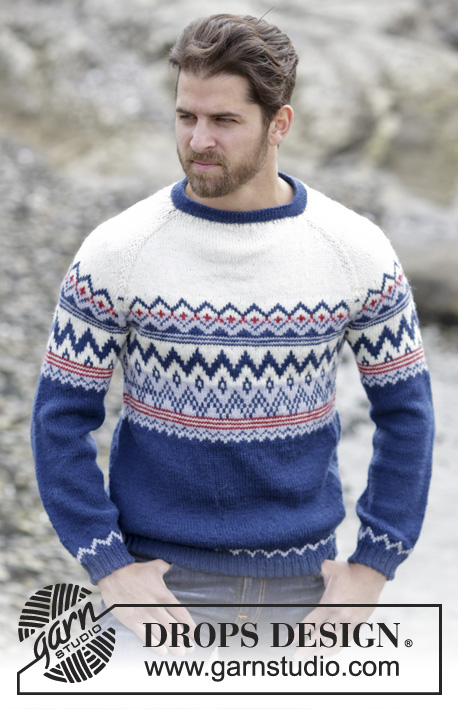
Twin River#twinriversweater |
|||||||
 |
 |
||||||
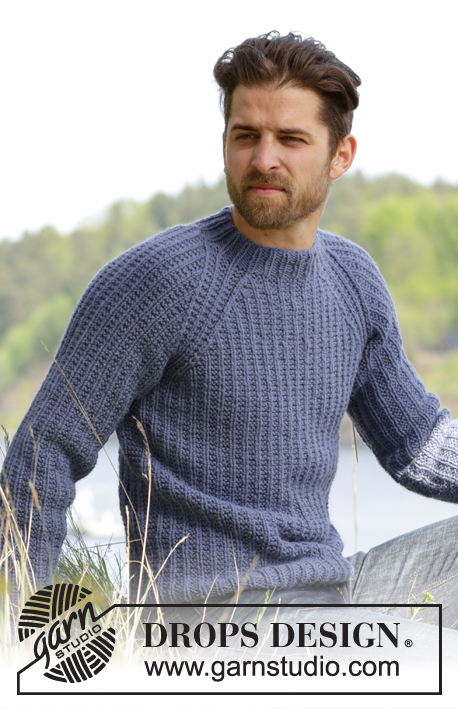
Knitted DROPS men’s jumper with textured pattern and raglan in Nepal. Size: S - XXXL.
DROPS 174-14 |
|||||||
|
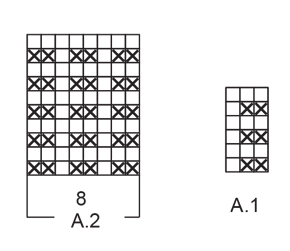
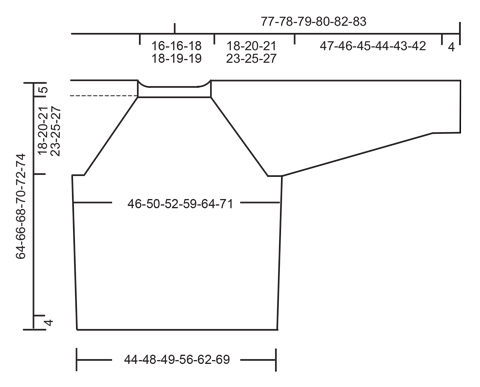
PATTERN: See diagrams A.1 and A.2. RAGLAN: Dec as follows before A.2: Work until 2 sts remain before A.2, K the next 2 tog. Dec as follows after A.2: Slip 1 st as if to K, K 1, psso INCREASE TIP (BODY): Inc 4 sts on round as follows: Work until 1 st remains before marker in the side, 1 YO, work 2 sts in garter st, 1 YO (= 2 sts inc). Repeat inc in the other side of piece. On next round work YO twisted to avoid holes. Work the new sts in garter st. INCREASE TIP (SLEEVE): Inc as follows mid under sleeve: Work until 1 st remains before marker, 1 YO, work 2 sts in garter st, 1 YO. On next round work YO twisted to avoid holes. Work the inc sts gradually in the pattern. NOTE: Work sts on each side of marker in garter st. RAGLAN DEC (ELEVATION): All dec are done from RS! Dec as follows after A.2: K 3 twisted tog. Dec as follows before A.2: Work until 3 sts remain before A.2, K 3 tog. ---------------------------------------------------------- JUMPER: Worked in the round. BODY: Cast on 150-162-168-192-210-234 sts with Nepal on circular needle size 5 mm. * P 1, (K 1, P 2), repeat from (-) 23-25-26-30-33-37 more times, K 1, P 1, insert a marker here (= side) *, repeat from *-* 1 more time. NOTE: Move the markers upwards when working. Continue rib in the round like this until piece measures 4 cm. Now work pattern A.1 as follows: Work the last 2 sts in A.1, then repeat A.1 the entire round until 1 st remains on round, work the first st in A.1. REMEMBER THE KNITTING TENSION When piece measures 13-13-14-14-15-15 cm, inc 1 st on each side of each marker – see INCREASE TIP (BODY). Repeat inc when piece measures 27-28-29-29-30-30 cm = 158-170-176-200-218-242 sts. When piece measures 41-41-42-42-42-42 cm (adjust so that next round worked is 2nd round in A.1), cast off sts for armholes as follows: Cast off the first 5 sts on round, work the next 69-75-78-90-99-111 sts, cast off the next 10 sts for armhole, work the next 69-75-78-90-99-111 sts, cast off the remaining 5 sts. Cut the yarn. Put piece aside and knit the sleeves. SLEEVE: Work sleeves in the round on double pointed needles. Cast on 42-42-42-48-48-48 sts with Nepal on double pointed needles size 5 mm. Insert a marker at beg of round = mid under sleeve. Work rib as follows: P 1, K 1, * P 2, K 1 *, repeat from *-* until 1 st remains on round, P 1. Continue like this in the round until rib measures 4 cm. Now work pattern as follows: Work the last 2 sts in A.1, A.1 until 1 st remains on round, work the first st in A.1. When piece measures 9-8-7-6-10-9 cm, inc 1 st on each side of marker – see INCREASE TIP (SLEEVE). Inc like this approx. every 13th-9th-7th-7th-6th-5th round 8-11-14-14-14-17 times in total = 58-64-70-76-76-82 sts. When piece measures 51-50-49-48-47-46 cm - adjust so that next round worked is 2nd round in A.1, cast off the middle 10 sts under sleeve (= 5 sts on each side of marker) = 48-54-60-66-66-72 sts. Knit another sleeve the same way. YOKE: Slip sleeves on to same circular needle size 5 mm as body where armholes were cast off = 234-258-276-312-330-366 sts. This is done without working the sts. Insert a marker in every transition between sleeves and body = 4 markers. Beg round on back piece, 4 sts after marker between sleeve and back piece. Now continue pattern as before and work in addition A.2 (= 8 sts) in every transition between body and sleeves (markers are in the middle of A.2). On next round start dec for RAGLAN – see explanation above! NOTE: Dec differently on body and sleeves as follows: RAGLAN BODY: Dec every other round 21-24-24-24-26-26 times and then every round 0-0-0-6-7-13 times (= 21-24-24-30-33-39 times in total). RAGLAN SLEEVES: Dec every 4th round 6-6-4-3-5-5 times and then every other round 9-12-17-21-19-22 times (= 15-18-21-24-24-27 times in total). When all dec are done, 90-90-96-96-102-102 sts remain on round (= 144-168-180-216-228-264 sts in total dec). Now work pattern as before over the first 72-72-78-78-84-84 sts. Insert marker here (= between A.2 and right sleeve). Then work an elevation back and forth in neck in pattern as before AT THE SAME TIME dec for raglan on every row from RS over the sts worked – READ RAGLAN DEC (ELEVATION) as follows: NOTE: Tighten yarn at every turn to avoid holes. ROW 1 (= RS): Work 55-55-58-58-61-61 sts (including the 8 dec sts), ROW 2 (= WS): Turn and work 45-45-48-48-51-51 sts, ROW 3: Turn and work 43-43-46-46-49-49 sts (including the 8 dec sts), ROW 4: Turn and work 33-33-36-36-39-39 sts. There are now 74-74-80-80-86-86 sts on round. Turn and continue in the round with rib as follows: Work K over K and P over sts in garter st until rib measures 4 cm. Cast off sts with K over K and P over P. Jumper measures 64-66-68-70-72-74 cm from cast-on edge and up to shoulder. Fasten off. ASSEMBLY: Sew the openings under the sleeves. |
|||||||
Diagram explanations |
|||||||
|
|||||||
 |
|||||||
 |
|||||||
Have you finished this pattern?Tag your pictures with #dropspattern #twinriversweater or submit them to the #dropsfan gallery. Do you need help with this pattern?You'll find 26 tutorial videos, a Comments/Questions area and more by visiting the pattern on garnstudio.com. © 1982-2026 DROPS Design A/S. We reserve all rights. This document, including all its sub-sections, has copyrights. Read more about what you can do with our patterns at the bottom of each pattern on our site. |
|||||||


With over 40 years in knitting and crochet design, DROPS Design offers one of the most extensive collections of free patterns on the internet - translated to 17 languages. As of today we count 324 catalogues and 12290 patterns translated into English (UK/cm). 12290
We work hard to bring you the best knitting and crochet have to offer, inspiration and advice as well as great quality yarns at incredible prices! Would you like to use our patterns for other than personal use? You can read what you are allowed to do in the Copyright text at the bottom of all our patterns. Happy crafting!
Post a comment to pattern DROPS 174-14
We would love to hear what you have to say about this pattern!
If you want to leave a question, please make sure you select the correct category in the form below, to speed up the answering process. Required fields are marked *.