
Popular categories
Looking for a yarn?


Comments / Questions (169)
Sixtine wrote:
Hello! I've just started this pattern and I'm confused by the instructions after the first round with A2 and A3. It says stockinette stitch with A2 and A3 between the transition body/sleeves, and increases every two rows, but since how do you knit the added stitches? Since there is now more stitches than the two A2/A3 that we had in the previous row? Sorry if my question isn't very clear...
18.09.2018 - 21:45DROPS Design answered:
Dear Sixtine, All new sts will be worked in stocking stitch - see INCREASE FOR SLEEVE + MID FRONT AND MID BACK - either knit or twisted knit depending on if you need a hole or not. You increase a different way on sleeve and on body as explained later: on sleeve: first every 2nd round then every 4th round - on mid front/mid back: 2 sts every 2nd round then only 1 st every 2nd round. Happy knitting!
19.09.2018 - 10:02
![]() Annika wrote:
Annika wrote:
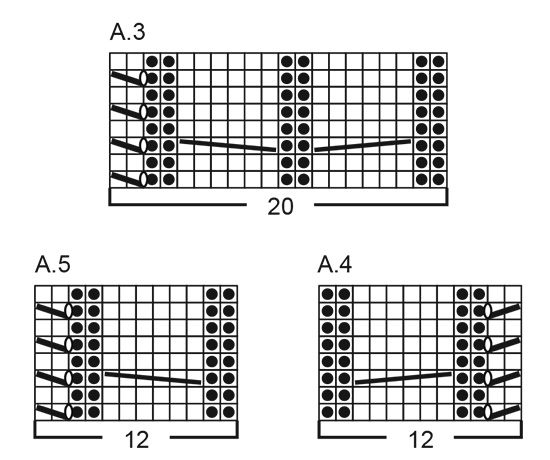
Kan ni förklara A3 och A2B 2 m räta tillsammans och lyft 1 m som om den skulle stickas rät etc. Jag tolkar detta som att man då minskar en maska vid varje tillfälle och det stämmer då inte överens med antal maskar som det bör bli med de ökningar som samtidigt ska göras under varvet om jag förstår det hela rätt?
16.08.2018 - 18:15DROPS Design answered:
Hei Annika. Det stemmer at det felles en maske i hvert av disse symbolene. Men samtidig skal det også lages 1 kast rett før/etter som gjør at masketalelt forblir det samme (se symbol 4 i symbolforklaringen). God fornøyelse
23.08.2018 - 11:25
![]() Quashie wrote:
Quashie wrote:
Bonjour, pouvez-vous me confirmer que l'ASTUCE 2 telle inexpliquée revient, tous les 8 tours, à ne PAS AUGMENTER de 2 mailles de chaque côté de la maille centrale du devant/dos, plutôt qu'à DIMINUER à proprement parler. J'ai relu plusieurs fois l'explication et je ne vois aucune diminution (=suppression de mailles) à l'oeuvre. Merci de votre aide.
07.08.2018 - 09:44DROPS Design answered:
Bonjour Mme Quashie, dans le modèle tel quel, on continue à augmenter après les emmanchures. Si vous souhaitez que le bas du pull soit moins large, vous pouvez diminuer comme indiqué sous l'ASTUCE-2 tous les 8 tours: vous allez augmenter comme avant avec un jeté (pour ne pas rompre le motif ajouré) mais diminuer en même temps autant de mailles, ainsi, le nombre de mailles restera le même et vous augmenterez moins. Bon tricot!
07.08.2018 - 15:21
![]() Quashie wrote:
Quashie wrote:
Bonjour, si je souhaite continuer à tricoter le dos+devant au-delà des 20 augmentations de part et d\'autre de la m.centrale, faut-il continuer avec ces augmentations et l\'ASTUCE 2 ? est-il possible d\'éviter ces aug. pour ne pas avoir une pointe trop prononcée sur le devant et le dos? Merci
04.08.2018 - 15:58DROPS Design answered:
Bonjour Mme Quashie, peut-être que si vous diminuez sur les côtés en même temps que vous augmentez au milieu dos et au milieu devant, la pointe sera moins prononcée. N'hésitez pas à contacter votre magasin DROPS pour toute assistance personnalisée et modifications sur le modèle - même par mail ou téléphone. Bon tricot!
06.08.2018 - 09:02
![]() Beata wrote:
Beata wrote:
Hei! På slutten av bærestykke skal være 474 m, men det stemmer ikke. Før øninger er det 110m. økningen til ermene gir 128 m. økningen foran og bak gir 248. til sammen er det494. vi striker sammen masker i følge diagram A2 og A3. Så har vi i minus 164 m . Det er kun332 mykke på slutten av bærest. Tar jeg feil?
10.06.2018 - 22:02DROPS Design answered:
Hei Beata. Den første økningen til ermer, og foran og bak er inkludert i de 110 maskene. Så etter det økes det totalt 124 masker til ermer og 240 masker foran og bak = 474 masker på pinnen. Det er ingen endring i masketallet i A.2 og A.3, for hver felling er det også et kast på samme omgang, som holder masketallet likt hele veien. God fornøyelse.
13.06.2018 - 09:22
![]() Boon wrote:
Boon wrote:
This is such a fabulous pattern. I get compliments every time I wear this tunic. Thanks for all the wonderful patterns!
30.04.2018 - 05:29
![]() GoldenEagle1620 wrote:
GoldenEagle1620 wrote:
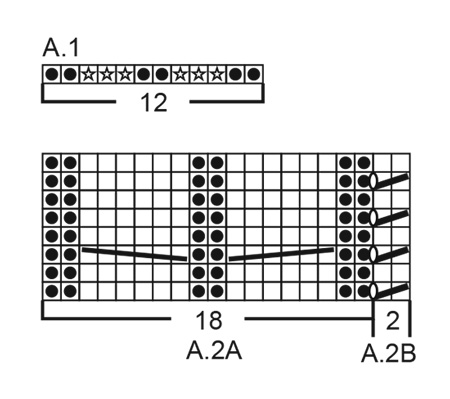
Hi there. I have still not completed the 1st round! There are 18+2 sts for each sleeve and 17+7 sts for the mid-front/back - That much I understand & the increasing for the sleeves, but the A3 (20 sts) is where? Because from the Chart, the A3 shows DECREASE at each end of 18st! I think the 7 sts are for the 'cable', but please, I desperately need your help to proceed past the first round. Thanks.
02.04.2018 - 15:57DROPS Design answered:
Dear GoldenEagle1620, the number of sts in A.3 will not dec, the last 2 sts are worked (YO, slip 1 as if to K, K1, psso), ie there will still be 2 sts. You start with 2 sts for each sleeve with A.2a before the first sleeve and A.3 after the 1st sleeve (round finishes with A.2B = end of raglan line) and work A.2B, A.2A before 2nd sleeve and A.3 after 2nd sleeve. You will then increase for sleeve after A.2A, work the sts for sleeve in stocking st, inc before A.3 and work A.3. Happy knitting!
03.04.2018 - 09:20
![]() GoldenEagle1620 wrote:
GoldenEagle1620 wrote:
Hello again. Thanks for the help. But, how many sts should I increase for the mid back/front - because in one sentence, you state 2sts on either side of marker; but in the paragraph before it, you state 1st? The Drops Air is a lovely wool, but I am having difficulty defining the stitches as they are 'matting' together. Thanks. GoldenEagle1620.
21.03.2018 - 11:11DROPS Design answered:
Dear GoldenEagle1620, when you start increasing for raglan, you inc on sleeves and at the same time, you will first increase on mid front and mid back: first 2 sts on every 2nd round a total of 11-14 times (size S-M) and then you will increase 1 st on mid front and mid back on every 2nd round a total of 21-20 times. Happy knitting!
21.03.2018 - 13:33
![]() GoldenEagle1620 wrote:
GoldenEagle1620 wrote:
Hi again. Thanks for helping me. I still cannot find diagram A2. I see A1 - A2A - A2B - A3 - A4 - and A5 IS A2 THE COMBINED STS OF A2A and A2B? Which is the opposite to A£! Thank you. GoldenEagle1620 (Richard).
20.03.2018 - 16:16DROPS Design answered:
Dear GoldenEagle1620, when it says to work with A.2 and A.3, work A.2A and A.2B just as you did before, repeating A.2A and A.2B as explained just before. Happy knitting!
21.03.2018 - 09:42
![]() GoldenEagle1620 wrote:
GoldenEagle1620 wrote:
How many sts should the increases for mid front/back be in total for the round? Because in one note, I read it as being a total of 8sts. But in the section below, it states 4st in total. Also, where is the diagram 'A2'? Thanks.
20.03.2018 - 13:42DROPS Design answered:
Dear GoldenEagle1620, in size S-M you will increase: 2 sts on each sleeve: 10-13 times every other round + 11-14 times every 4th round and on body: 2 sts on each side of the marker a total of 11-14 times every other round (4 sts on front and on body = 8 sts) and 1 st on each side of the marker 21-20 times every other round. Note that increases are done on a different rythm on sleeves/body. Diagram A.2 is below the diagram key, just above measurement chart. Happy knitting!
20.03.2018 - 15:37
|
|||||||||||||||||||||||||
Emerald Queen#emeraldqueensweater |
|||||||||||||||||||||||||
 |
 |
||||||||||||||||||||||||
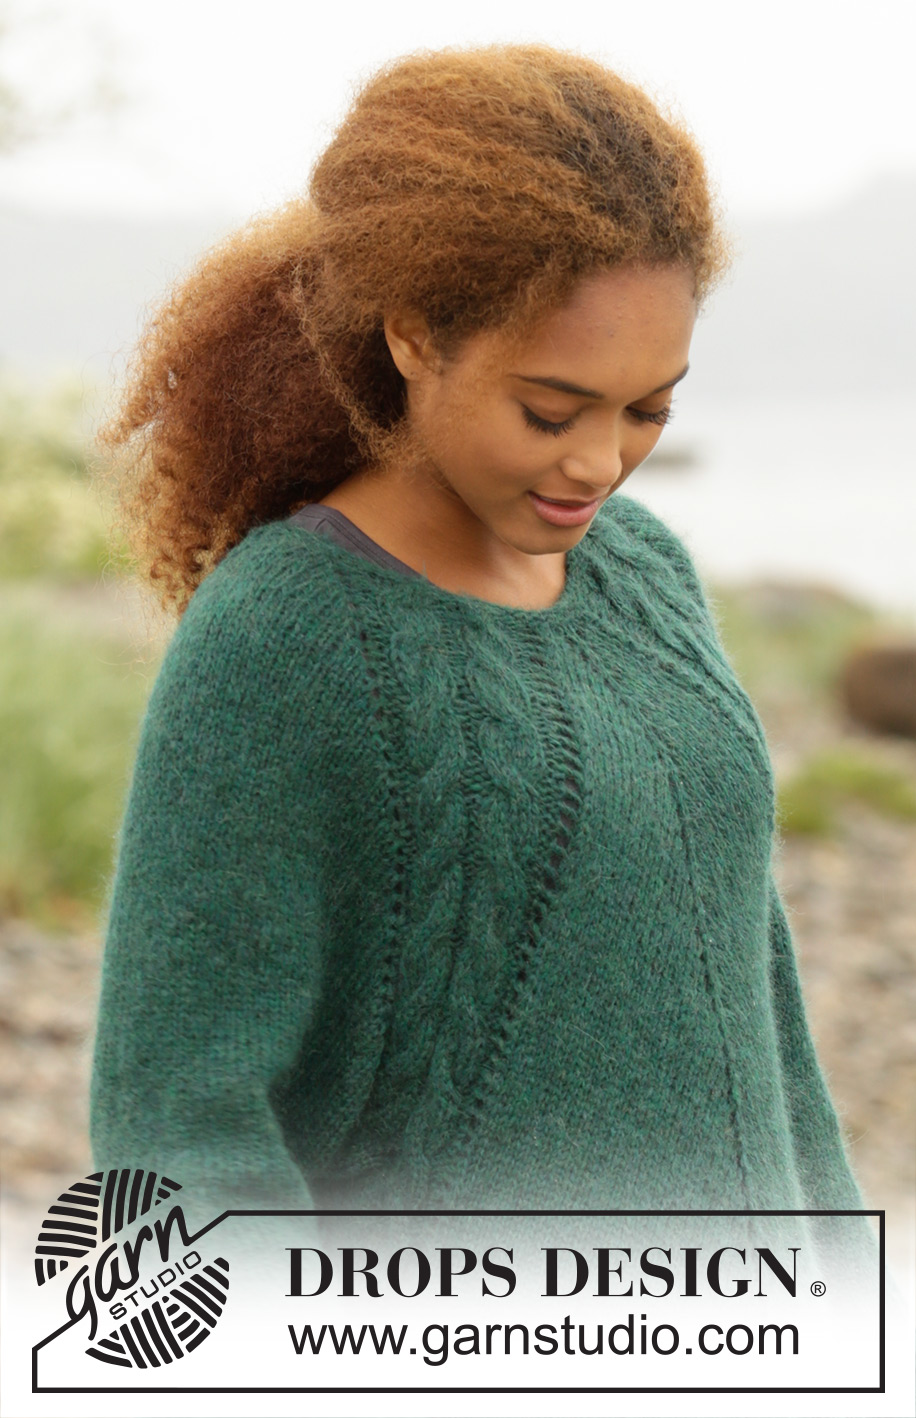
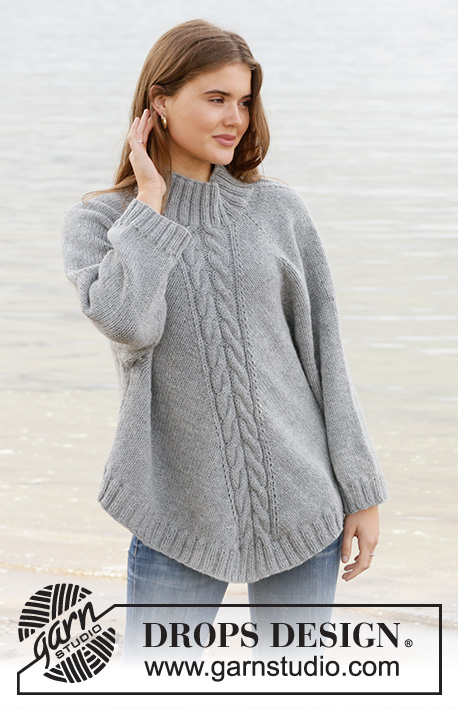
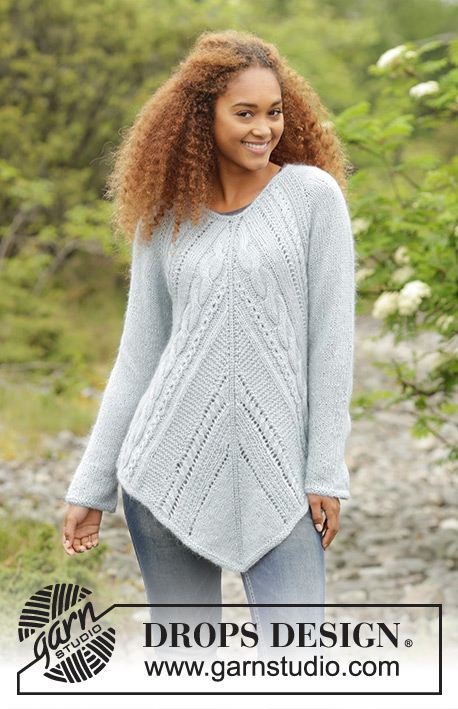
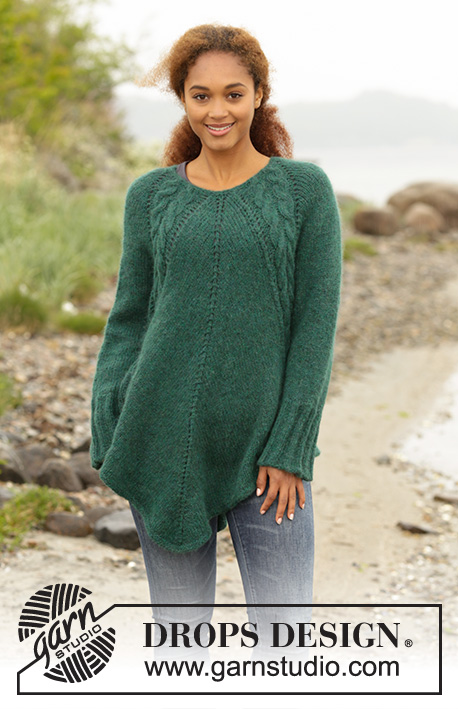
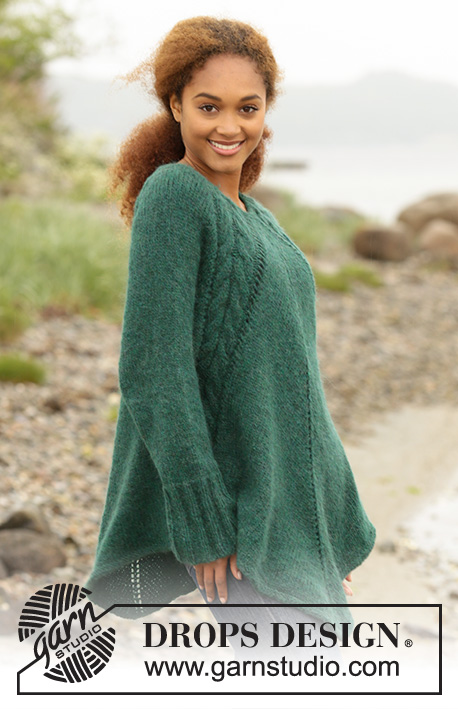
Knitted DROPS tunic with deep raglan and cables, worked top down in ”Air”. Size: S - XXXL.
DROPS 171-1 |
|||||||||||||||||||||||||
|
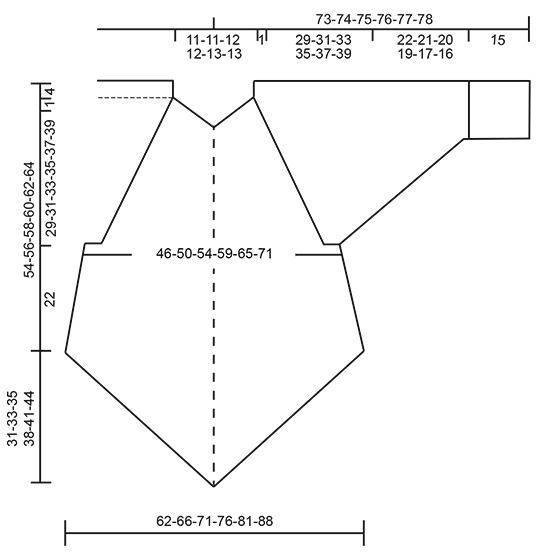
GARTER ST (worked in the round): 1 ridge = 2 rounds. * K 1 round and P 1 round *, repeat from *-*. PATTERN: See diagrams A.1 to A.5. INCREASE FOR SLEEVES: Increase 1 st in each side on each sleeve by increasing after A.2 and before A.3 (= 2 st inc on each sleeve and 4 sts in total on round). Inc 1 st by making 1 yarn over, on next round knit yarn over to make holes. INCREASE MID FRONT AND MID BACK: Increase 2 sts on each side of st with marker thread on mid front and mid back as follows: Knit until 1 st before st with marker thread, make 1 yarn over, knit 1, make 1 yarn over, knit st with marker thread, make 1 yarn over, knit 1, make 1 yarn over (= 4 sts inc mid front/mid back and 8 sts in total on round). On next round knit the 2 yarn overs closest to the st with mid-st to make holes, the outermoste 2 sts should be knit twisted to avoid holes. Increase 1 st on each side of st with marker thread on mid front and mid back as follows: Work until st with maker thread, make 1 yarn over, knit st with maker thread (mid-st), make 1 yarn over (= 2 sts inc mid front/mid back and 4 sts in total on round).On next round knit yarn overs to make holes. KNITTING TIP-1: To avoid the eye let row being interrupted while increasing for sleeves on every 4th row and not on every 2nd row as before, work as follows on the rows that previously had increases: After A.2: Make 1 yarn over, slip 1 st knitvise, knit 1 and pass slipped st over the knit st. Before A.3: Knit until 2 sts before A.3, knit 2 st tog and make 1 yarn over. KNITTING TIP-2: If you want a little less volume on body, it is possible to make some adjustments after dividing for sleeves. Decrease 2 sts mid front and mid back on i.e every 8th round as follows (decrease on a round with increases): Knit until 2 sts before st with marker (= mid-st), knit 2 tog, make 1 yarn over, knit 1 (= mid-st), make 1 yarn over, slip 1 st knitvise, knit 1 and pass slipped st over the knit st (this decrease vil give approx 8 cm less width in total at the end of body). DECREASE TIP (applies to sleeves): Beg 3 sts before marker and dec as follows: K 2 tog, K 2 (marker is in the middle of these 2 sts), slip 1 st as if to K, K 1, psso. ---------------------------------------------------------- TUNIC: Worked in the round on circular needle, top down. YOKE: Cast on 66-66-70-70-74-74 sts on a short circular needle size 4 mm with 2 strands Air. Remove 1 strand and continue with 1 strand Air as follows: Work 2 ridges in GARTER ST - see explanation above. Switch to a short circular needle size 5 mm, work next round as follows: Work A.1 (= 12 sts inc to 18 sts), 2 sts in stocking st (= sleeve), A.1 (= 12 sts inc to 18 sts), 7-7-9-9-11-11 sts in stocking st (insert 1 marker in the middle of these sts = mid front), A.1 (= 12 sts inc to 18 sts), 2 sts in stocking st (= sleeve), A.1 (= 12 sts inc to 18 sts) and 7-7-9-9-11-11 sts in stocking st (insert 1 marker in the middle of these sts = mid back) = 90-90-94-94-98-98 sts on needle. Next round work as follows: Work A.2A (= 18 sts), inc 1 st – READ INCREASE FOR SLEEVES, knit 2, inc 1 st for sleeve, work A.3 (= 20 sts), knit 0-0-1-1-2-2 s, inc 2 sts on each side of st with marker thread – READ INCREASE MID FRONT AND MID BACK, knit 0-0-1-1-2-2 sts, work A.2B (= 2 sts), work A.2A (=18 sts), inc 1 st for sleeve, knit 2 sts, inc 1 st for sleeve, work A.3 (= 20 sts), knit 0-0-1-1-2-2 sts, inc 2 sts on each side of st with marker thread (= mid back) and knit 0-0-1-1-2-2 sts and work A.2B (= 2 sts) = 102-102-106-106-110-110 sts on needle. Then work stocking st in the round with A.2 and A.3 in every transition between body and sleeves. AT THE SAME TIME continue increase for sleeves and increase mid front and mid back as follows: SLEEVES: Increase on every 2nd round 10-13-15-21-23-27 times in total (including the increase explained on firste round), then increase on every 4th round 11-11-11-9-9-8 times in total - READ KNITTING TIP-1. MID FRONT AND MID BACK : Inc 2 sts on every side of st with marker in it on every 2nd round 11-14-15-18-21-25 times in total (including the increases explained on first round). Then increase 1 st on each side of st with marker in it on every 2nd round 21-20-21-21-20-18 times in total. REMEMBER THE KNITTING TENSION! After last increase on body and sleeves there are 346-378-402-442-474-510 sts on needle. Work next round as follows: Work as before over the first 11 sts (= until middle of 2 P sts in A.2), slip the next 62-68-72-80-84-90 sts on a stitch holder (= sleeve), cast on 6-6-8-8-10-12 new sts under sleeve, work as before over the next 111-121-129-141-153-165 sts on front piece(i.e 11 st in A.3, 89-99-107-119-131-143 knit sts, 11 sts in A.2)slip the next 62-68-72-80-84-90 sts on a stitch holder (= sleeve), cast on 6-6-8-8-10-12 new sts under sleeve and work the remaining 100-110-118-130-142-154 sts on back piece as before (i.e 11 sts in A.3 and 89-99-107-119-131-143 knit sts). Finish body and sleeves separately. BODY: = 234-254-274-298-326-354 sts. Insert 1 marker in the piece. Work next round as follows: Work A.4 (12 sts), knit 4-4-6-6-8-10 sts, A.5 (=11 sts), knit until mid-st, make 1 yarn over, knit 1 (= mid-st), make 1 yarn over, knit until A.2, work A.4 (= 12 sts), knit 4-4-6-6-8-10 sts, A.5 (= 12 sts), knit until mid-st, make 1 yarn over, knit 1 (= mid-st), make 1 yarn over and knit the rest of round (= 4 sts increased). Continue pattern like this while AT THE SAME TIME continuing to increase mid front and mid back on every 2nd round until inc has been done 20 times on each side of mid front/mid back from marker - READ KNITTING TIP-2 = 314-334-354-378-406-434 sts on needle (or work until desired length). On next round work sts in each cable K tog 2 by 2 (= 12 sts dec) = 302-322-342-366-394-422 sts. Switch to circular needle size 4 mm and work 2 ridges in garter st in the round over all sts. Switch back to circular needle size 5 mm and cast off (this is done to avoid a tight cast-off edge). SLEEVE: Worked in the round on a short circular needle, switch to double pointed needles when needed. Slip the sts from stitch holder in one side of piece on a short circular needle size 5 mm and pick up 1 st in each of the 6-6-8-8-10-12 sts cast on under sleeve on body = 68-74-80-88-94-102 sts on needle. Insert 1 marker at beg of round (= mid under sleeve) - NOW MEASURE PIECE FROM HERE. Work in stocking st in the round over all sts AT THE SAME TIME on first round dec over the two cables by working sts in each cable K tog 2 by 2 (= 6 sts dec) = 62-68-74-82-88-96 sts. When piece measures 2 cm, dec 2 sts mid under sleeve - READ DECREASE TIP. Dec a total of 12-14-17-20-22-25 times in Size S: On every 4th round, in size M: On every 3rd round, in size L: Alternately on every 2nd and 3rd round, in size XL: On every other round, in size XXL: Alternately on every and every other round and size XXXL. On every round = 38-40-40-42-44-46 sts on needle. Continue to work until piece measures 22-21-20-19-17-16 cm (NOTE: Shorter measurements in the larger sizes because of wider shoulders). K 1 round while AT THE SAME TIME inc 7-10-10-8-11-9 sts evenly = 45-50-50-50-55-55 sts. Switch to double pointed needles size 4 mm and work rib in the round = K 2/P 3. When rib measures 15 cm, switch back to double pointed needles size 5 mm before casting off with K over K and P over P (this is done to avoid a tight cast-off edge). Work the other sleeve the same way. |
|||||||||||||||||||||||||
Diagram explanations |
|||||||||||||||||||||||||
|
|||||||||||||||||||||||||
 |
|||||||||||||||||||||||||
 |
|||||||||||||||||||||||||
 |
|||||||||||||||||||||||||
Have you finished this pattern?Tag your pictures with #dropspattern #emeraldqueensweater or submit them to the #dropsfan gallery. Do you need help with this pattern?You'll find 26 tutorial videos, a Comments/Questions area and more by visiting the pattern on garnstudio.com. © 1982-2026 DROPS Design A/S. We reserve all rights. This document, including all its sub-sections, has copyrights. Read more about what you can do with our patterns at the bottom of each pattern on our site. |
|||||||||||||||||||||||||


With over 40 years in knitting and crochet design, DROPS Design offers one of the most extensive collections of free patterns on the internet - translated to 17 languages. As of today we count 324 catalogues and 12239 patterns translated into English (UK/cm). 12239
We work hard to bring you the best knitting and crochet have to offer, inspiration and advice as well as great quality yarns at incredible prices! Would you like to use our patterns for other than personal use? You can read what you are allowed to do in the Copyright text at the bottom of all our patterns. Happy crafting!
Post a comment to pattern DROPS 171-1
We would love to hear what you have to say about this pattern!
If you want to leave a question, please make sure you select the correct category in the form below, to speed up the answering process. Required fields are marked *.