
Popular categories
Looking for a yarn?


Comments / Questions (222)
![]() Jami R Dion wrote:
Jami R Dion wrote:
Im an experienced crocheter. I really want to make this pattern. The A5(?) Do i do 4dc in 1 stitch?? Pattern is showing chains in between but not written that way. What does first/next mean? Can't get past 2nd row!!!
22.02.2024 - 16:42DROPS Design answered:
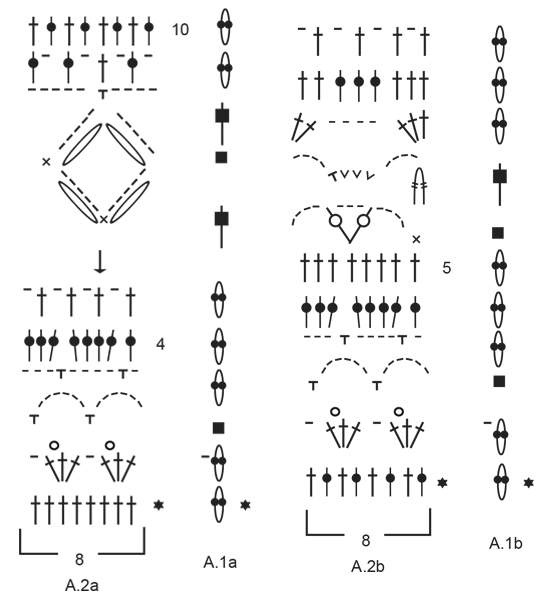
Dear Mrs Dion, correct, on first row you will crochet in the same stitch on previous round: 2 dc, 3 chains, 2 dc; in the written pattern when it's written: first/next, this means the first time you work from *-* you work in the first stitch but then to the end of the round you will work in the next stitch. Happy crocheting!
23.02.2024 - 08:01
![]() Gaspart Karine wrote:
Gaspart Karine wrote:
Bonjour je suis en train de réaliser ce modèle et je ne comprends pas comment faire une augmentation . comment faire l'augmentation A3a le petit rond entre les deux brides. la légende du petit rond est un picot. pouvez vous m'aider à comprendre comment faire. je dois surement me trompée. J'ai plus l'habitude de faire une bride supplémentaire pour faire une augmentation et non un picot. pouvez vous m'aider s'il vous plait cordialement. karine
24.01.2024 - 10:37DROPS Design answered:
Bonjour Mme Gaspart, lorsque vous devez augmenter à intervalles réguliers, crochetez simplement 2 brides dans la même maille pour 1 augmentation. Le picot de A.2/A.3 se crochète ainsi entre 2 brides: 1 bride dans la maille indiquée, puis 2 ml, 1 demi-bride dans la bride, et terminez par 1 bride dans la même maille que la bride précédente. Ce picot n'est pas une augmentation, au tour suivant, vous crochetez des mailles en l'air au-dessus des 3 brides avec le picot ainsi: 1 ms dans la maille en l'air avant ce groupe de 3 brides avec picot, les mailles en l'air et 1 ms dans la maille en l'air après ce groupe. Bon crochet!
25.01.2024 - 08:04
![]() Bettina wrote:
Bettina wrote:
Hallo und wie muss ich in der 2 Runde A2a mit den picco häckeln . Bei mir sind 4 stb vor der luftmaschenbogen nich zwei
30.03.2023 - 12:10DROPS Design answered:
Liebe Bettina, bei der 1. Reihe in A.2a (die mit dem Sternchen zählt nicht als 1.) häkeln Sie so: *1 Stäbchen überspringen, in das nächste Stb häkeln Sie: 2 Stb, 1 Pikot, 1 Stb, dann 1 Luftmasche, 3 Stb übersrpingen, in das nächste Stb häkeln Sie: 2 Stb, 1 Pikot, 1 Stb, dann 1 Luftmasche, 2 Stb überspringen*, und von *bis* wiederholen. Viel Spaß beim häkeln!
11.04.2023 - 09:43
![]() Bettina wrote:
Bettina wrote:
Ich muss aber erst faden wegschneiden nach der Reihe mit dem Stäbchen und luftmaschenreihe
28.03.2023 - 09:55DROPS Design answered:
Liebe Bettina, nein, hier brauchen Sie das nicht, Sie häkeln einfach mit A.1b, A.2b und A.3b weiter - genauso wie bei den Diagrammen A.1a, A.2a und A.3a. Viel Spaß beim häkeln!
28.03.2023 - 10:25
![]() Bettina wrote:
Bettina wrote:
Habe auf beiden Seiten 179Stb aber wenn ich A.2b die 10. Runde mache dann wieviel Stb müsste ich haben? Meine Arbeit rollt sich auch wenn ich diese Runde fertig habe also habe ich zu wenig
27.03.2023 - 16:19DROPS Design answered:
Liebe Bettina, mit 179 Stäbchen auf beiden Seiten sind es Platz für 21 Rapporter A.2 zwischen beiden A.3. Beachten Sie daß Ihre Luftmaschen genauso breit wie die Stäbchen sind, so verliert man die Breite nicht. Viel Spaß beim häkeln!
28.03.2023 - 09:46
![]() Bettina wrote:
Bettina wrote:
Die erste in A.2b
24.03.2023 - 13:52DROPS Design answered:
Liebe Bettina, die Reihe in A.2b mit dem schwarzen Sternchen ist die letzte Reihe von A.2a, dh beginnen Sie mit der nächsten Reihe. Viel Spaß beim häkeln!
24.03.2023 - 14:08
![]() Bettina wrote:
Bettina wrote:
Okay danke aber bei A.2b gehts mit ein Stb um die Luftmasche und das nächste in das Stb. Los ich habe keine luftmasche
24.03.2023 - 13:43DROPS Design answered:
Bei welcher Reihe meinen Sie das?
24.03.2023 - 13:47
![]() Bettina wrote:
Bettina wrote:
Also ich nehme nur das Diagramm B zum häckeln her?
24.03.2023 - 13:25DROPS Design answered:
Liebe Bettina, ja genau, die Diagramme -a sind fertig (es sind 163 M zwischen beiden Luftmaschenbogen) und jetzt werden die Diagramme -b gehäkelt. Viel Spaß beim häkeln!
24.03.2023 - 13:35
![]() Bettina wrote:
Bettina wrote:
Danke für die nette und schnelle Hilfe hab es jetzt. Aber wieder ein Problemchen was bedeutet das den Weiter im Muster wie zuvor häkeln, jedoch nun A.1b über A.1a, A.2b über A.2a und A.3b über A.3a (nun ist Platz für je 19-20-21 Rapporte von A.2 an beiden Seiten von A.3). In der 4. Rd 3 Stb gleichmäßig verteilt an beiden Seiten von A.3 zunehmen (d.h. 6 Stb insgesamt in der Rd) = je 169-177-185 Stb zwischen dem Lm-Bogen an der vorderen Mitte und der hinteren Mitte.
24.03.2023 - 11:36DROPS Design answered:
Liebe Bettina, jetzt häkeln Sie wie zuvor mit den Diagrammen -a aber dieses Mal mit den Diagrammen -b: A.1b am Anfang, A.3b in jeder Ecke und A.2b dazwischen. Bei der 4. Reihe nehmen Sie 3 Stb zwischen jedem A.3b zu = 169 Stb zwischen jedem Lm-Bogen. Viel Spaß beim häkeln!
24.03.2023 - 13:21
![]() Bettina wrote:
Bettina wrote:
Und ich bekomme auch keine 163stb zusammen nur 130stb
24.03.2023 - 05:24DROPS Design answered:
Bei der 4. Reihe hatten Sie 133 Stb und 16 Rapporte von A.2a, 16 x 8 Stb = 128 Stb + 13 Stb am Anfang A.3 + 14 Stb am Ende A.3a = 155 Stb + 8 Stb reglelmäßig verteilt bei der 10. Reihe A2a/A.3a = 163 Stb. Beachten Sie, daß Sie die richtige Maschenanzahl bzw Blumenanzahl in A.2a haben. Viel Spaß beim häkeln!
24.03.2023 - 08:33
|
|||||||||||||||||||||||||||||||||||||||||||||||||
Light's Embrace#lightsembraceponcho |
|||||||||||||||||||||||||||||||||||||||||||||||||
 |
 |
||||||||||||||||||||||||||||||||||||||||||||||||
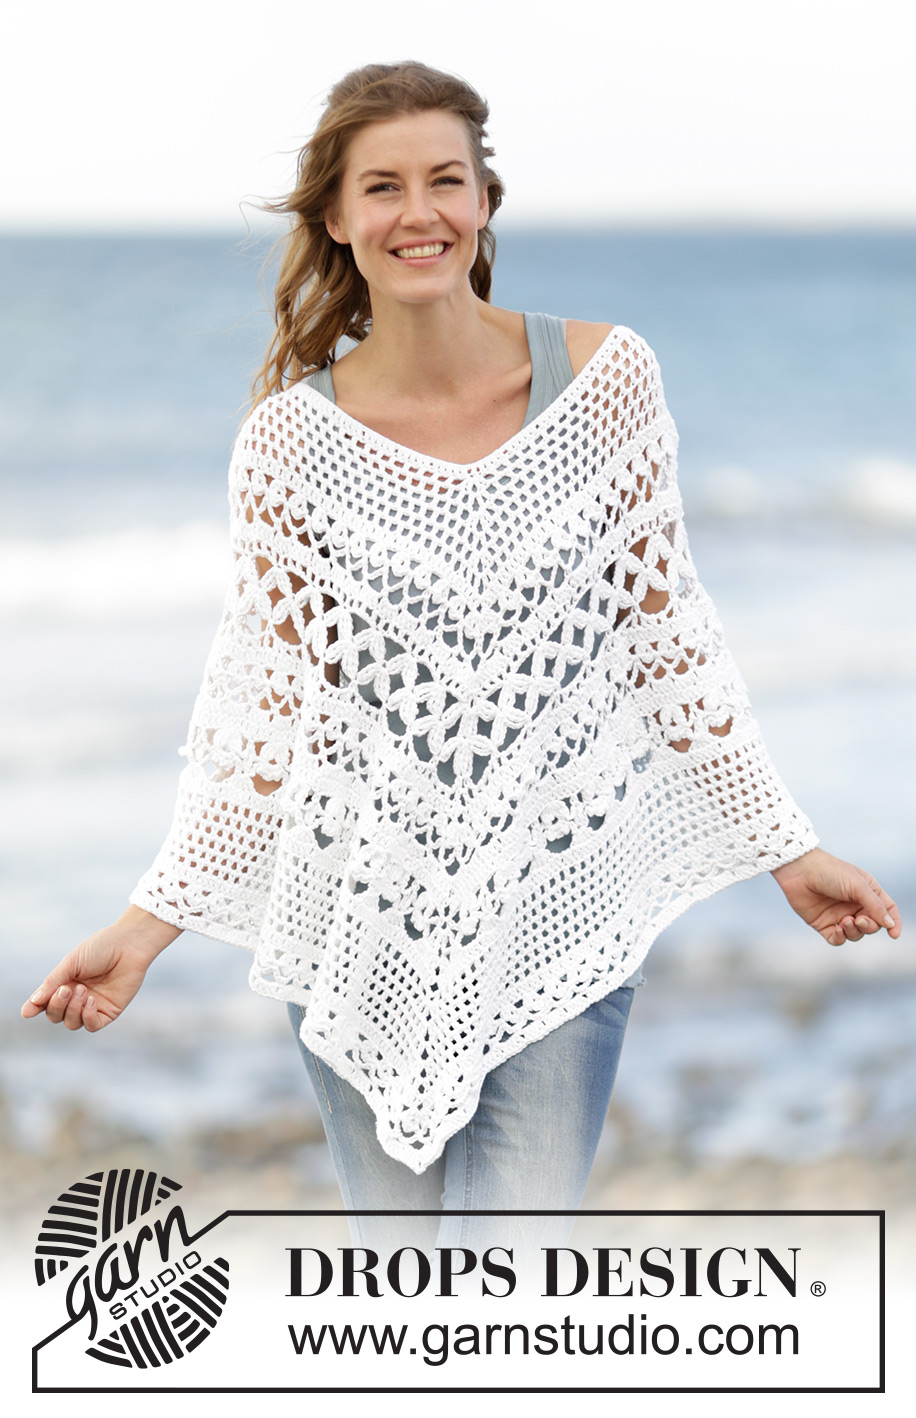
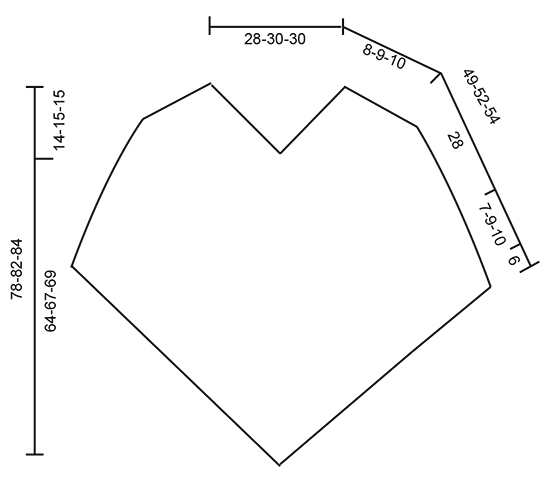
Crochet DROPS poncho with lace pattern, worked top down in ”Paris”. Size S-XXXL.
DROPS 169-4 |
|||||||||||||||||||||||||||||||||||||||||||||||||
|
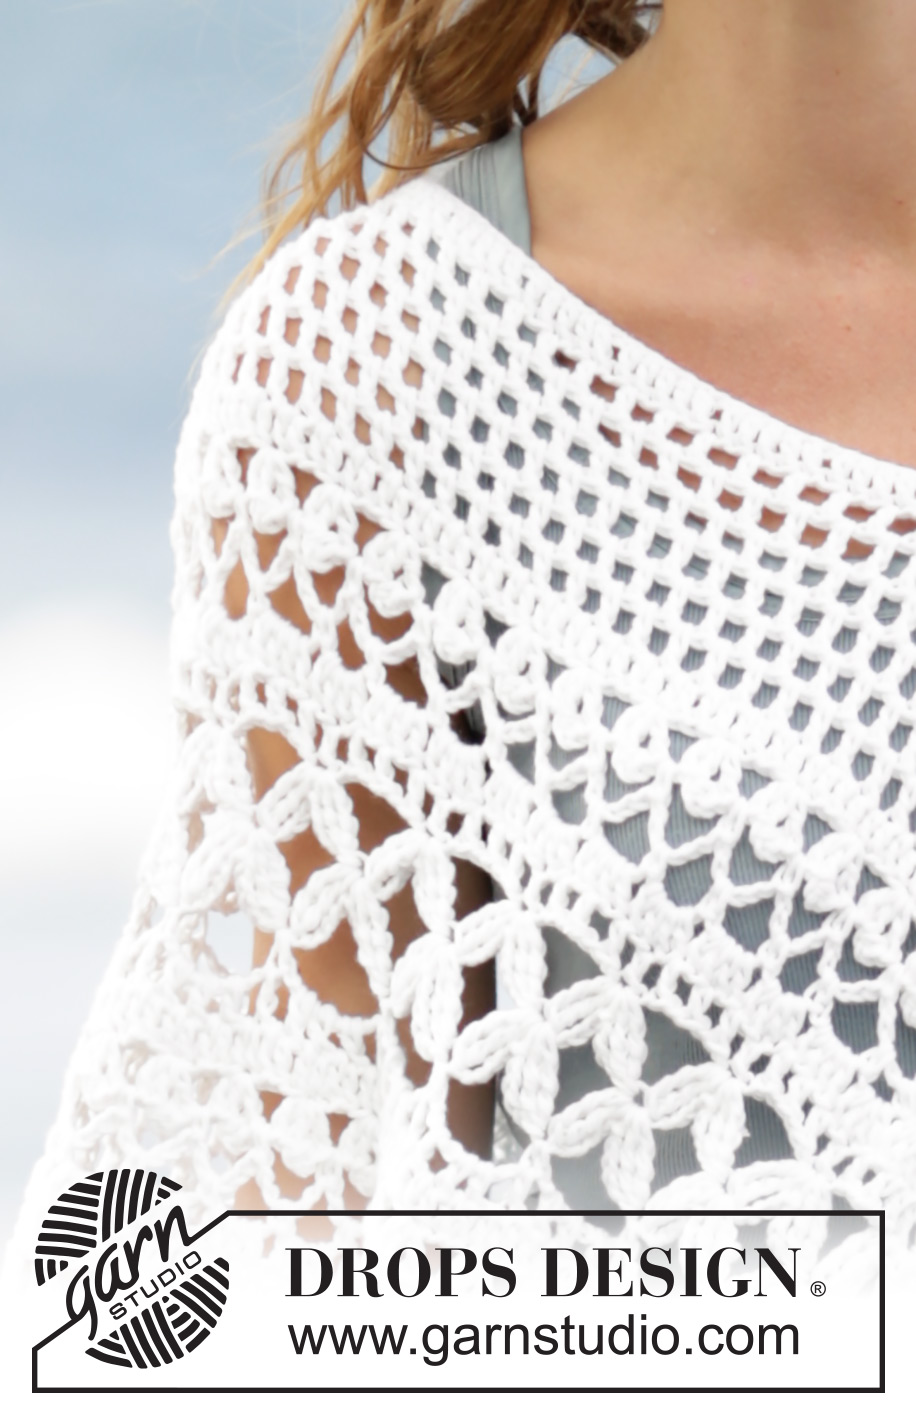
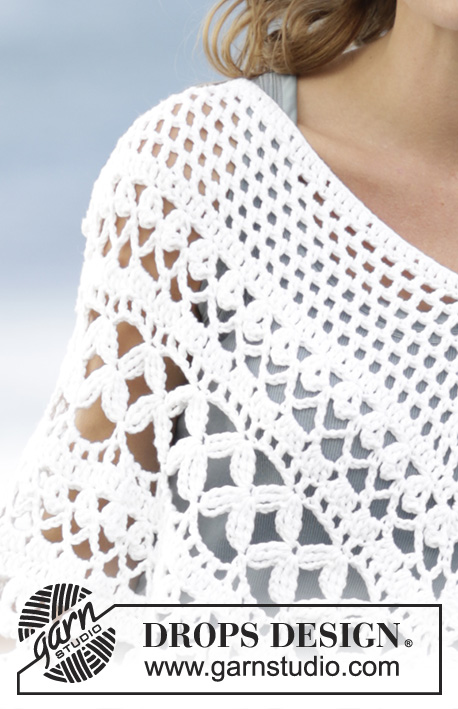
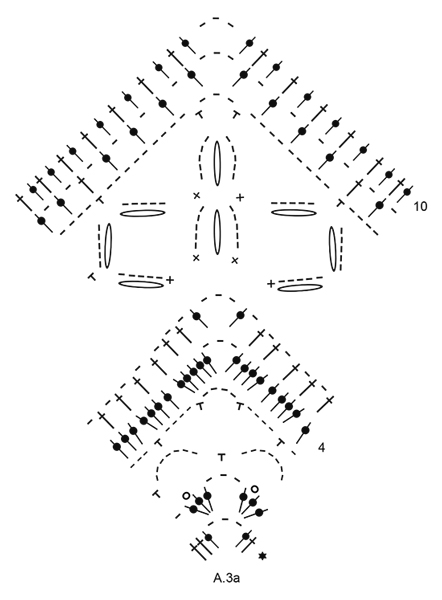
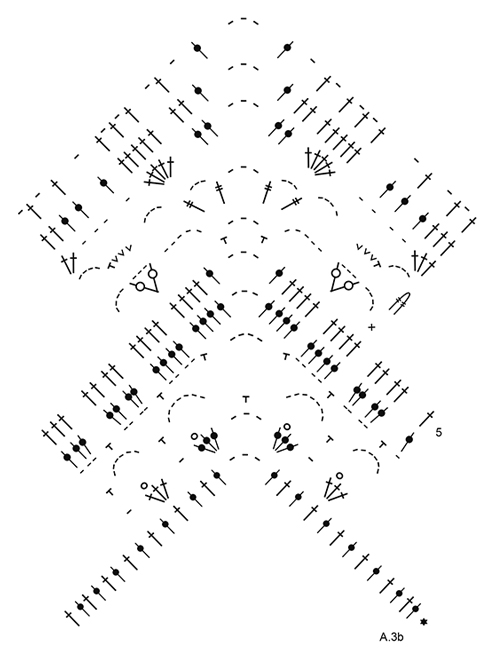
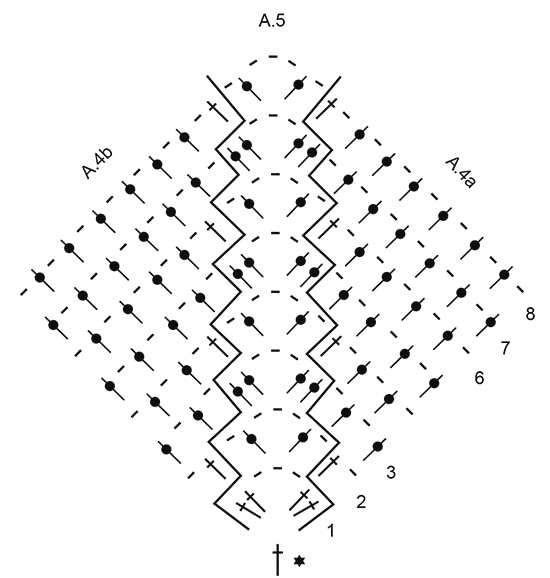
PATTERN: See diagrams A.1 to A.5. Diagrams A.1a and A.1b show how round beg and ends. CROCHET INFO: Beg every tr round with 3 ch (these ch do not replaces first tr). At the end of round work 1 sl st in 3rd ch at beg of round. NOTE: When working A.5 beg round with 3 ch. At the end of round work 1 tr in first st worked on round (i.e. st with the 3 ch in), then 1 sl st in 3rd ch at beg of round. WORK 2 DTR TOG: Work 1 dtr around ch-space below but wait with last pull through (= 2 loops on hook), skip 1 dc and work 1 dtr around next ch-space but on last pull through, pull yarn through all loops on hook. WORK 3 DTR TOG: Work 1 dtr but wait with last pull through (= 2 sts on hook), work 1 more dtr but wait with last pull through (= 3 loops on hook), work 1 more dtr but on last pull through, pull yarn through all loops on hook. MESH PATTERN: ROUND 1: * Start with 1st row of A.5, work the 4 tr in first/next tr with marker, work (1 ch, ship 1 tr, 1 tr in next tr) until 1 tr remains before next marker, work 1 ch, skip next tr *, repeat from *-* 3 times more. There is now 4 repeats of A.5 on round. ROUND 2: * Work A.5 around first/next ch-space with marker, then work 1 tr in next tr, 1 ch, 1 tr around first ch-space, (1 ch, skip 1 tr, 1 tr in next ch-space) until 1 ch-space remains before next repeat of A.5, work 1 ch, 1 tr in next tr *, repeat from *-* 3 times more. ROUND 3: * Work A.5 around first/next ch-space with marker, then work (1 ch, skip 1 tr, 1 tr around next ch-space) until next repeat of A.5, 1 ch *, repeat from *-* 3 times more. ---------------------------------------------------------- PONCHO: Worked in the round, top down. First inc mid front, mid back and on each shoulder, then inc only mid front and mid back. Work 153-163-163 ch on hook size 4.5 mm with Paris and form a ring with 1 sl st. Work 3 ch – see CROCHET INFO! Then work 1 tr in each of the next 3-1-1 ch, * skip 1 ch, 1 tr in each of the next 5 ch *, repeat from *-* 24-26-26 more times on round = 128-136-136 tr + 3 ch on round. Now insert 4 markers from beg of round without working: Insert 1 marker in 1st tr on round (= mid back), skip 31-33-33 tr, insert 1 marker in next tr (= shoulder), skip 31-33-33 tr, insert 1 marker in next tr (= mid front), skip 31-33-33 tr, insert 1 marker in next tr (= shoulder), there are now 31-33-33 tr between last marker and beg of round. Now work MESH PATTERN - see explanation above. When 1st-3rd round have been worked, repeat 2nd and 3rd round until 6-7-8 rounds with mesh pattern have been worked - see diagram A.4a and A.4b to see how to work the whole inc in each side of A.5. REMEMBER THE CROCHET TENSION! Piece measures approx. 8-9-10 cm. Work next round as follows AT THE SAME TIME dec 0-8-8 tr evenly (= 0-4-4 tr dec on each side of mid back and mid front): *Work (2 tr, 3 ch, 2 tr) around ch-space (= mid back on 1st repetition and mid front on 2nd repetition), then work 1 tr in every tr and 1 tr around every ch until next inc tr-group, work 3 tr around ch-space (= shoulder), work 1 tr in every tr and 1 tr around every ch until inc tr-group (mid front on 1st repetition and mid back on 2nd repetition)*, repeat from *-* 1 more time. There are now 117-125-133 tr between ch-space mid front and mid back (= 234-250-266 tr in total on round + 2 ch-space). Cut the yarn. NOTE: Then do not inc on each shoulder but only mid front and mid back on poncho. Work 1 sl st in the 10th st from ch-space mid back and work pattern as follows: Work A.1a (shows how round beg and end, does not replace first st), A.2a (= 8 tr) 13-14-15 times in width, A.3a (= inc mid front), continue with A.2a 14-15-16 times in width, A.3a (= inc mid back) and A.2a 1 time in all sizes. On 4th round in A.3a there are 133-141-149 tr between ch-space mid front and mid back. Continue with pattern as before (there is now room for 16-17-18 repetitions A.2a on each side of A.3a). On 10th round inc 8 tr evenly on each side of A.3a (= 16 tr in total on round) = 163-171-179 tr on each side of ch-space mid front and mid back. Continue with pattern as before, but now work A.1b over A.1a, A.2b over A.2a and A.3b over A.3a (there is now room for 19-20-21 repetitions A.2 on each side of A.3). On 4th round inc 3 tr evenly between every repetitions of A.3 (i.e. 6 tr in total on round) = 169-177-185 tr between each ch-space mid front and mid back. Continue pattern (there is now room for 21-22-23 repetitions A.2 on each side of A.3). When entire diagram has been worked vertically, piece measures 36-37-38 cm. Cut the yarn. Now work mesh pattern as at beg of piece. Beg in ch-space mid back, and work mesh pattern from 3rd round in mesh pattern. Repeat 2nd and 3rd round until 6-8-10 rounds in total have been worked (incl last round in A.2 and A.3). Work next round as follows: * Work (2 tr, 3 ch, 2 tr) around ch-space (= mid back), then work 1 tr in every tr and 1 tr around every ch until next repeat of A.5 *, repeat from *-* 1 more time = 193-209-225 tr between ch-space mid front and mid back. Cut the yarn. Now work pattern A.1a, A.2a and A.3a as follows: Work 1 sl st in 12th tr from ch-space mid back and work pattern as follows: Work A.1a (shows how round beg and end, does not replace first st), A.2a until 2 tr remain before ch-space mid front, A.3a (= inc mid front), continue with A.2a until 2 tr remain before ch-space mid back, A.3a (= inc mid back) and A.2a 1 time in all sizes. When 4th row has been worked vertically, poncho measures 49-52-54 cm. Fasten off. |
|||||||||||||||||||||||||||||||||||||||||||||||||
Diagram explanations |
|||||||||||||||||||||||||||||||||||||||||||||||||
|
|||||||||||||||||||||||||||||||||||||||||||||||||
 |
|||||||||||||||||||||||||||||||||||||||||||||||||
 |
|||||||||||||||||||||||||||||||||||||||||||||||||
 |
|||||||||||||||||||||||||||||||||||||||||||||||||
 |
|||||||||||||||||||||||||||||||||||||||||||||||||
 |
|||||||||||||||||||||||||||||||||||||||||||||||||
Have you finished this pattern?Tag your pictures with #dropspattern #lightsembraceponcho or submit them to the #dropsfan gallery. Do you need help with this pattern?You'll find 13 tutorial videos, a Comments/Questions area and more by visiting the pattern on garnstudio.com. © 1982-2026 DROPS Design A/S. We reserve all rights. This document, including all its sub-sections, has copyrights. Read more about what you can do with our patterns at the bottom of each pattern on our site. |
|||||||||||||||||||||||||||||||||||||||||||||||||


With over 40 years in knitting and crochet design, DROPS Design offers one of the most extensive collections of free patterns on the internet - translated to 17 languages. As of today we count 324 catalogues and 12290 patterns translated into English (UK/cm). 12290
We work hard to bring you the best knitting and crochet have to offer, inspiration and advice as well as great quality yarns at incredible prices! Would you like to use our patterns for other than personal use? You can read what you are allowed to do in the Copyright text at the bottom of all our patterns. Happy crafting!
Post a comment to pattern DROPS 169-4
We would love to hear what you have to say about this pattern!
If you want to leave a question, please make sure you select the correct category in the form below, to speed up the answering process. Required fields are marked *.