
Popular categories
Looking for a yarn?


Comments / Questions (42)
![]() Anna wrote:
Anna wrote:
Witam. Teksty opisujące Wasze projekty są dla mnie nieczytelne. Np: "przer.1 sł2 wokół oł", albo jak zrobić "1 sł wokół między 2 sł"? Czy "sł wokół" oznacza słupek reliefowy? Próbuję się domyślać, ale to na nic. Czy jest gdzieś legenda do skrótów stosowanych w tekście, albo tekst bez skrótów? Bez tego chyba nie dam rady, a szydełkuję bardzo dużo i mam ochotę zrobić wiele Waszych projektów. Dziękuję.
09.02.2026 - 19:58
![]() Randi wrote:
Randi wrote:
Hvodan skal jeg lave det der ligner en pind med en på tværs næsten helt oppe🤔😥 Kan ikke se forklaring på den, kun en med en pind med 2 streger for næsten helt oppe
18.04.2025 - 19:21DROPS Design answered:
Hej Randi, jo det er en stangmaske i masken :)
30.04.2025 - 11:25
![]() Ashley wrote:
Ashley wrote:
For the increases, is if just 6 stitches for the whole row? Or is it 6 stitches increase repeated on the diagramed stitches?
10.01.2023 - 17:26DROPS Design answered:
Dear Ashley, you increase 6 stitches on each of the increase rounds, eg in size S and M you increase 6 sts 16 times = you will increase a total of 96 sts + 120-132= 216-228 sts. Happy crocheting!
11.01.2023 - 09:21
![]() Tarja Saari wrote:
Tarja Saari wrote:
Förstår inte hur man virkar det varv som liknar 2 stycken V ? Finns ingen förklaring?!
12.07.2022 - 22:27DROPS Design answered:
Hej Tarja. Om det är de 2 V med streck över så är det 2 stycken "st i m" som då virkas i samma maska i varvet under. Mvh DROPS Design
13.07.2022 - 13:34
![]() Yen Bach Do Thi wrote:
Yen Bach Do Thi wrote:
Unnskyld. Kan du se bort fra forrige mail? Det var så rot;( Jeg lurer på hvordan hekle dette symbol T? (jeg har prøvd heklet som forklaring på oppskrift, men uskikket det er riktig). Mvh Yen.
31.03.2021 - 16:20DROPS Design answered:
Hei Yen. Ta en titt på denne videoen. Den viser hvordan man kan hekle gjennom begge maskebuene på masken under (som er mest vanlig) eller for å få forskjellige strukturer så kan man hekle i de bakre maskebuene eller i de fremre. Hvordan hekle i begge eller i en maskebue mvh DROPS design
07.04.2021 - 14:40
![]() Yen Bach Do Thi wrote:
Yen Bach Do Thi wrote:
Hei. Jeg er nybegynner, men veldig interessert å hekle denne skjørt til meg selv:) Kan dere/du hjelpe meg fra steg til steg? Først steget : Hva betyr her (Hekle 1 st i 4.lm fra nålen (= 2 st)? På forhånd takk:) Mvh. Yen
20.03.2021 - 11:29DROPS Design answered:
Hei Yen. Du har en heklet en luftmaskerad (flere luftmasker), nå skal du hekle 1 stav i den fjerde luftmasken fra nålen. Ikke tell masken på nålen og tell "bakover" fra nålen. Altså den siste luftmasken du heklet er nr.1, den nest siste luftmasken er nr. 2 og den nest nest siste er nr.3 og den nest, nest, nest side er nr. 4 og det er i denne masken du skal hekle 1 stav i. Da blir de luftmaskene du hoppet over 1 stav og den du heklet i 4. luftmaske 1 stav = 2 staver tilsammen. God Fornøyelse!
22.03.2021 - 19:02
![]() Vivian Rosager wrote:
Vivian Rosager wrote:
Kan du forklare mig hvad det symbol betyder som ligner et V med en sort kugle på hvert ben? Det findes i diagrammet men ikke i “oversættelsen” af diagramsymboler. Hvad er det for en maske og hvordan laver man den? Indsæt gerne en video. Og det her: = på første række/omg hækl 1 lm, på næste række/omg hækles 1 dbl-st om lm og ned til fm på 2 række/omg før. Vil jeg også gerne se en video på. Håber I kan hjælpe. Tak.
18.02.2021 - 21:47DROPS Design answered:
Hej Vivian, det er den som betyder stangmaske om mellem 2 stangmasker, og den hækles 2 gange om samme maske. God fornøjelse!
19.02.2021 - 13:44
![]() Kimberly Hobbs wrote:
Kimberly Hobbs wrote:
Hi, does this pattern measure the hip circumference or just the width of the skirt across? Thanks!
15.12.2020 - 21:19
![]() Silvia wrote:
Silvia wrote:
Il diagramma A.1a comprende solo la riga delle ma incrociate o anche quella sotto di ma normali?
14.11.2020 - 20:12DROPS Design answered:
Buonasera Silvia, il quadratino nero indica che quella riga è già stata lavorata e si trova lì solo per mostrare le maglie precedenti. Deve iniziare dalla riga di A.1a. Buon lavoro!
14.11.2020 - 21:12
![]() Combes wrote:
Combes wrote:
Merci ! J'ai une autre question par rapport au groupe de bride. Le rang précédent il y a des brides ce qui donne au final une ligne de chaînettes. Aussi lorsqu'on nous dit : "crocheter une bride dans la bride " est ce que cela veut dire passer sous la chaînette de la bride réalisé dans le rang précédent ou dois je aller dans le trou entre les deux brides ou ailleurs ? De plus pourquoi dit on: "la bride suivante". Est ce égal à : la bride réalisée précédemment ?
11.02.2020 - 22:37DROPS Design answered:
Bonjour Mme Combes, tant que rien n'est indiqué (comme par ex. pour les groupes de brides), vous crochetez les 2 brins de la maille du tour précédent (cf vidéo). La bride suivante est celle du rang/tour précédent. Au 5ème rang de A.1b vous crochetez: 1 groupe de brides dans la 1ère b, *1 ml, sautez 1 b, 1 groupe de brides dans la bride suivante*, et vous répétez de *-*. Bon crochet!
12.02.2020 - 08:11
|
||||||||||||||||||||||||||||||||||||||||
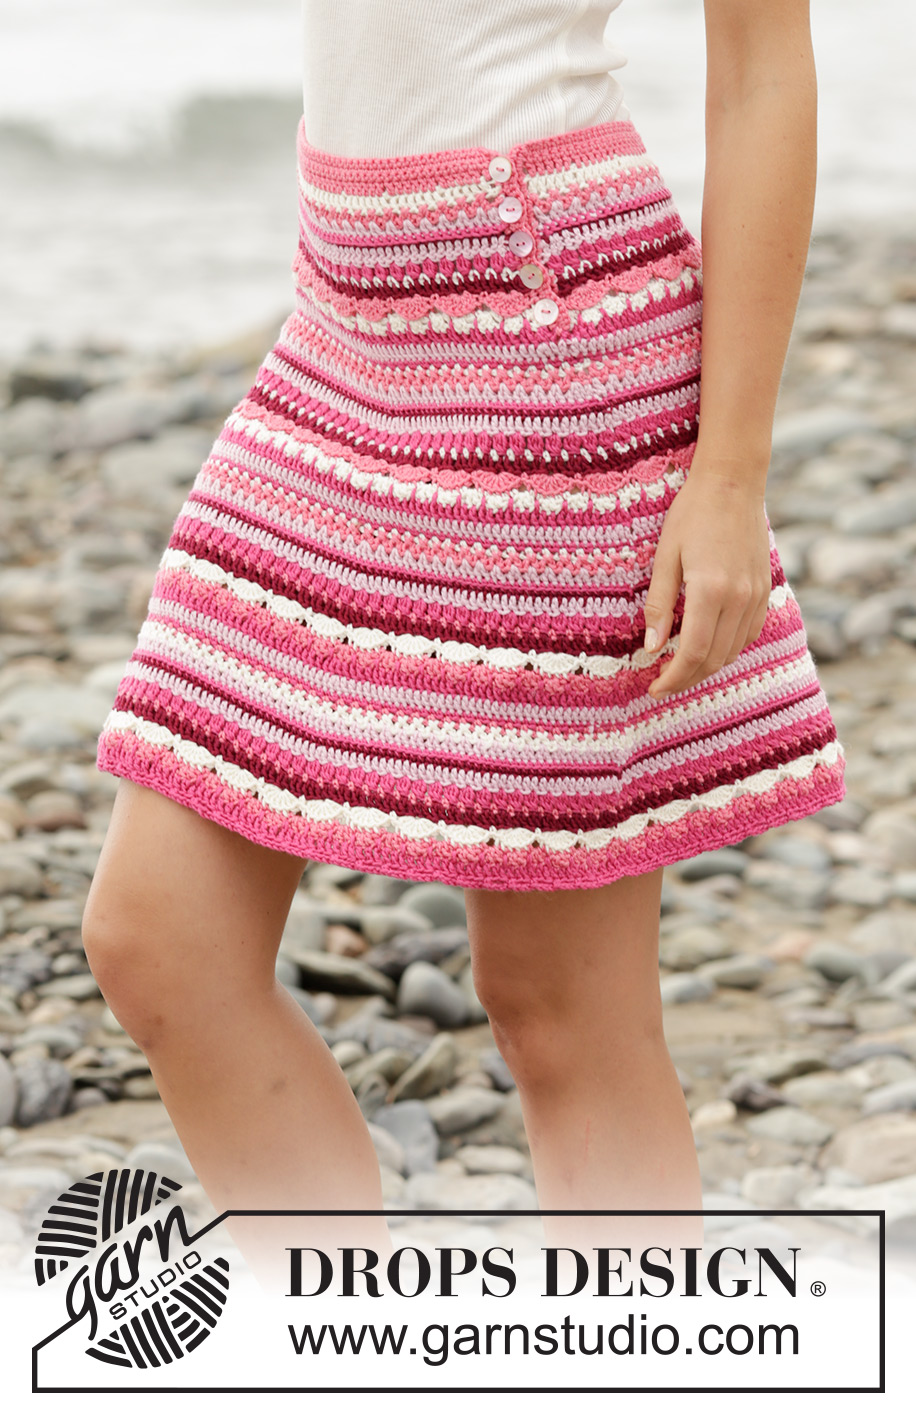
Berry Ripple#berryrippleskirt |
||||||||||||||||||||||||||||||||||||||||
|
|
||||||||||||||||||||||||||||||||||||||||
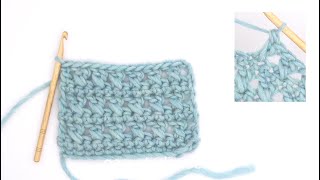
Crochet DROPS skirt with fan pattern and stripes in "Cotton Merino" The piece is worked top down. Size: S - XXXL.
DROPS 169-22 |
||||||||||||||||||||||||||||||||||||||||
|
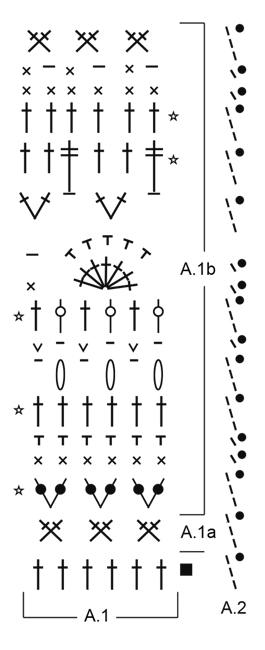
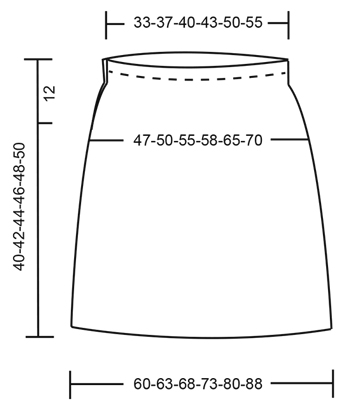
PATTERN: See diagram A.1 and A.2. A.2 show how each row/round starts and ends (ie when working back and forth the sl st at the end of row will not be made). CROCHET INFO: Replace first tr at beg of every tr row with 3 ch. Replace first dc at beg of every dc row with 1 ch. STRIPES-1: Work A.1a as follows: ROW 1: Coral Then repeat A.1b in stripes as follows: ROW/ROUND 1: Powder pink - NOTE: Inc on this row/round. ROW/ROUND 2: Cerise ROW/ROUND 3: Bordeaux ROW/ROUND 4: Powder pink - NOTE: Inc on this row/round. ROW/ROUND 5: Cerise ROW/ROUND 6: Off white ROW/ROUND 7: Bordeaux - NOTE: Inc on this row/round. ROW/ROUND 8: Coral ROW/ROUND 9: Off white ROW/ROUND 10: Off white ROW/ROUND 11: Cerise - NOTE: Inc on this row/round. ROW/ROUND 12: Powder pink - NOTE: Inc on this row/round. ROW/ROUND 13: Cerise ROW/ROUND 14: Off white ROW/ROUND 15: Coral INCREASE TIP: Inc on 1st, 4th, 7th, 11th and 12th row/round in pattern A.1b (i.e. inc 6 sts evenly 5 times in total per repetition of A.1b). Inc by working 2 tr in/around same st. To calculate how often inc should be done, use the total no of sts on row/round (e.g. 132 sts) and divide by no of inc to be done (e.g. 6) = 22. I.e. in this example inc 1 tr in every 22nd st. STRIPES-2: Continue to work A.1b but coral and off white switch places. I.e. on round where it says coral work with off white and vice versa. ---------------------------------------------------------- SKIRT: Work top down. Work back and forth until the vent is finished, then work in the round. Work 141-155-169-183-211-232 ch (incl 3 ch to turn with) on hook size 4 mm with off white. Work first row as follows: Work 1 tr in 4th ch from hook (= 2 tr) - READ CROCHET INFO, 1 tr in each of the next 4 ch, * skip 1 ch, 1 tr in each of the next 6 ch *, repeat from *-* the entire row = 120-132-144-156-180-198 tr. Work in STRIPES-1 - see explanation above. Work A.1a 20-22-24-26-30-33 times in total in width. When A.1a has been worked, work A.1b over A.1a (first row in A.1b is from WS). Continue with stripes. REMEMBER THE CROCHET TENSION! Repeat A.1b vertically and inc as follows: Inc 6 sts evenly - READ INCREASE TIP - 16-16-17-18-18-20 times in total = 216-228-246-264-288-318 sts. For every inc work 1 more repetition of A.1b in width AT THE SAME TIME when piece measures 12 cm, end the vent in the side and continue piece in the round, beg round in the side. When A.1b has been repeated 2 times vertically, continue with STRIPES-2 - see explanation above. Fasten off when piece measures 40-42-44-46-48-50 cm, finish neatly according to A.1b. EDGE AT THE TOP: Work an edge in tr from first row on skirt with coral. Work 1 row with 1 dc in every tr and the work 2 rows with 1 dc in every dc = 120-132-144-156-180-198 dc. BUTTONHOLE LOOPS: Along the opening on front piece work buttonhole loops with coral as follows (beg at the bottom): 2 dc (work 2 dc around tr row and 1 dc around dc row), 3 ch, skip 1 cm, * work 2 dc around next tr/dc row, 3 ch, skip 1 cm *, repeat from *-* 3 more times and finish with 2 dc around last tr row at the top, turn and work back as follows: 1 dc in every dc and 3 dc in every ch-space. Fasten off. BUTTON FOLDING EDGE: Along the other side of the opening work 5 rows with dc back and forth with coral (on 1st row work 2 dc around every tr row and 1 dc around every dc row), fasten off. Sew the buttons on to the button folding edge. |
||||||||||||||||||||||||||||||||||||||||
Diagram explanations |
||||||||||||||||||||||||||||||||||||||||
|
||||||||||||||||||||||||||||||||||||||||
 |
||||||||||||||||||||||||||||||||||||||||
 |
||||||||||||||||||||||||||||||||||||||||
Have you finished this pattern?Tag your pictures with #dropspattern #berryrippleskirt or submit them to the #dropsfan gallery. Do you need help with this pattern?You'll find 12 tutorial videos, a Comments/Questions area and more by visiting the pattern on garnstudio.com. © 1982-2026 DROPS Design A/S. We reserve all rights. This document, including all its sub-sections, has copyrights. Read more about what you can do with our patterns at the bottom of each pattern on our site. |
||||||||||||||||||||||||||||||||||||||||


With over 40 years in knitting and crochet design, DROPS Design offers one of the most extensive collections of free patterns on the internet - translated to 17 languages. As of today we count 324 catalogues and 12290 patterns translated into English (UK/cm). 12290
We work hard to bring you the best knitting and crochet have to offer, inspiration and advice as well as great quality yarns at incredible prices! Would you like to use our patterns for other than personal use? You can read what you are allowed to do in the Copyright text at the bottom of all our patterns. Happy crafting!
Post a comment to pattern DROPS 169-22
We would love to hear what you have to say about this pattern!
If you want to leave a question, please make sure you select the correct category in the form below, to speed up the answering process. Required fields are marked *.