
Popular categories
Looking for a yarn?


Comments / Questions (50)
![]() Roxanne Sandiford wrote:
Roxanne Sandiford wrote:
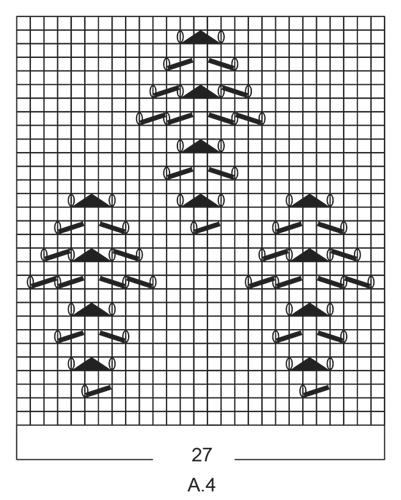
I have counted down from the top of the pattern and where the star sits is the 12th row I am confused. Also is the pattern ie knit together etc done on the right or wrong side? thank you
03.06.2017 - 00:32DROPS Design answered:
Dear Roxanne, you have to count from the bottom, not from the top. How to read the diagrams that come with the patterns you will find HERE. Happy knitting!
03.06.2017 - 08:59
![]() Sandiford wrote:
Sandiford wrote:
I have done back up to starting chart and find that star falls on row 12 not 13 so will start below star. I have 69 stitches on my needle but counting 5 plus 16 x 3=48 plus 6 this adds up to 59 not 69 what i am not understanding please
01.06.2017 - 20:37DROPS Design answered:
Dear Sandiford, could you please tell us more, ie until where you are, the size worked, etc. Thank you!
02.06.2017 - 10:03
![]() Jennifer MacKenzie wrote:
Jennifer MacKenzie wrote:
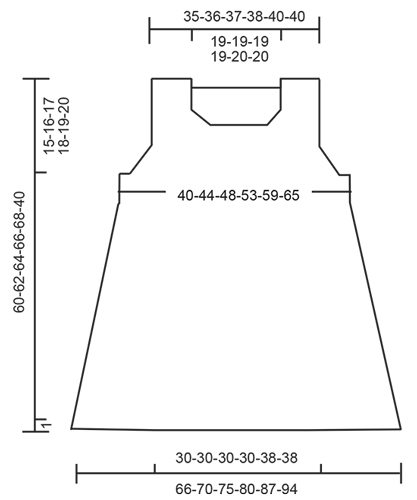
I am making size S and need help with front instructions. I finished my neck increases (start at 7 cm) before the start of the armhole increases (at 13 cm) - then did those 3 inc at arm hole and 2 ridges at neck. So I'm now not sure when to start the lace chart A4 and those 4 CO arm hole increases. If I cast on those 4 st immediately after the first 3 inc the arm hole will not be big enough.
22.05.2017 - 21:52DROPS Design answered:
Dear Mrs MacKenzie, when you have worked both shoulders tog, casting on 27 new sts for neck and worked the 2 ridges over these sts, start A.4 on next row from RS with the 27 sts in A.4 over the middle 27 sts. At the same time, continue increase for armhole as before. Happy knitting!
23.05.2017 - 08:45
![]() Rita wrote:
Rita wrote:
Hallo, mir kommen die 16 cm für den Armausschnitt bei Größe M sehr wenig vor. Oder liegt es vielleicht daran, dass die Wolle sich noch etwas längt. Der Armausschnitt auf dem Foto erscheint deutlich größer.
01.04.2017 - 12:39DROPS Design answered:
Liebe Rita, es wird danach etwas länger, Ihre Maschenprobe dann beachten, und wie in der Anleitung stricken. Viel Spaß beim stricken!
03.04.2017 - 11:30
![]() Mieke wrote:
Mieke wrote:
Ok bedankt maar weer.
29.03.2017 - 12:17
![]() Mieke wrote:
Mieke wrote:
Wanneer alle meerderingen voor de armsgaten gedaan zijn brei ik een naald aan de verkeerde kant. Daarna keren en breien over alle steken voorpand en 8 nieuwe steken opzetten (maat L) etc. Moet deze naald in patroon gebreid worden? Of gewoon recht? Want bij Lijf staat later: Ga nu verder in patroon.
29.03.2017 - 00:02DROPS Design answered:
Hoi Mieke, Je breit inderdaad gewoon verder in patroon, nadat je de naald aan de verkeerde kant hebt gebreid. Eerder in het patroon staat ook: maar de patroonherhaling zal nog niet klaar zijn in de hoogte als u het voorpand en achterpand samen op een rondbreinld zet om verder te breien in de rondte voor het lijf Op het lijf, wanneer voor- en achterpand zijn samengevoegd, brei je gewoon weer verder in patroon.
29.03.2017 - 11:34
![]() Anette wrote:
Anette wrote:
Also mein Tipp zum Muster wäre, markierer setzen von A1 bis A3 und vor unter hinter A4. So kommt man nicht durcheinander bei den vielen zunahmen 😄
26.03.2017 - 23:07
![]() Lisa Casazza wrote:
Lisa Casazza wrote:
What are the bust measurements for each of the sizes? I don't see a sizing chart. Thank you.
17.03.2017 - 13:06DROPS Design answered:
Dear Mrs Casazza, you will find at the bottom of the page a measurement chart with all measurements in cm, taken flat from side to side. Compare these to a similar garment you have and like the shape to find out the matching size. Read more here. Happy knitting!
17.03.2017 - 13:10Arlete wrote:
Bom dia. Como você disse teço a carreira 13 apenas A1e A3?e quando for fazer a 15 carreira já teço o gráfico A2.
13.10.2016 - 13:18DROPS Design answered:
Bom dia, Deve tecer a partir da carreira 13 os diagramas A.1, A.2 e A.3 quando começa a parte rendada. Depois, continua normalmente a tricotar os 3 gráficos. Bom tricô.
24.10.2016 - 11:52Arlw wrote:
O gráfico das costas começa na 13 carreira,como serão feitas as repetições,porque o gráfico tecido não corresponde ao desenho da blusa.aguardo resposta Arlete,Brasil.
12.10.2016 - 13:06DROPS Design answered:
O gráfico das costas começa na carreira 13 de A.1 e A.3 mas, depois, nas repetições, tricotam-se todas as carreiras dos gráficos. Bom tricô!
12.10.2016 - 19:21
|
|||||||||||||||||||
Woodstock#woodstocktop |
|||||||||||||||||||
 |
 |
||||||||||||||||||
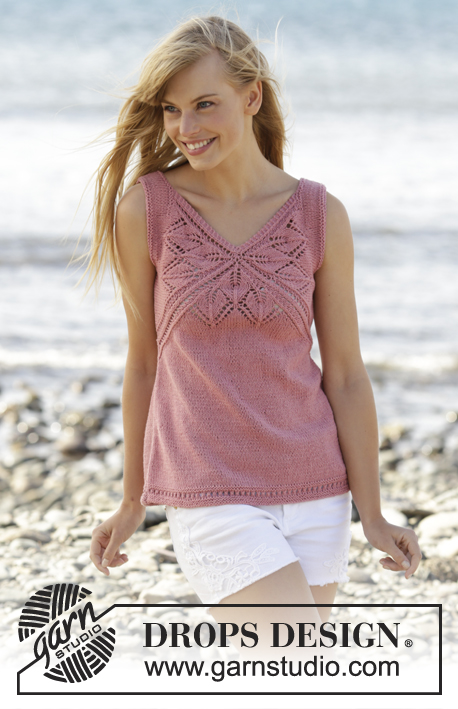
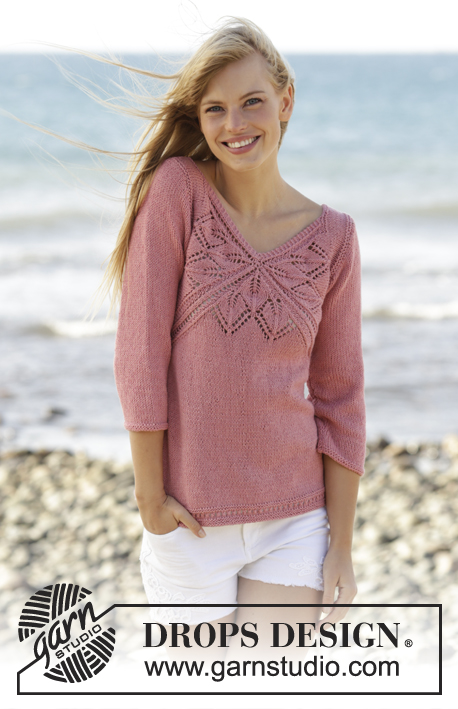
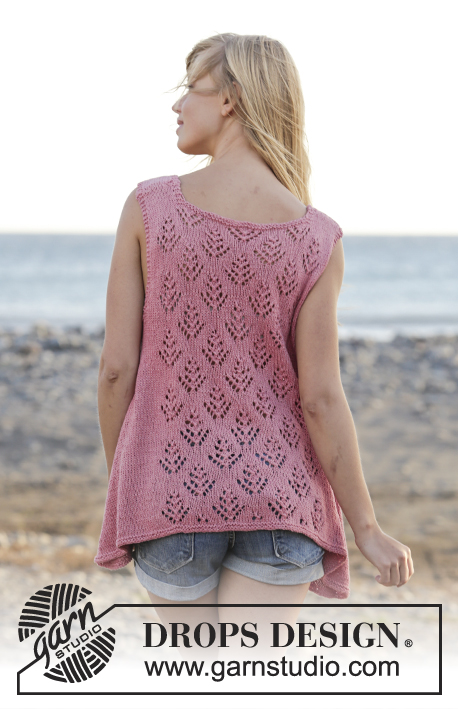
Knitted DROPS top with lace pattern and A-shape, worked top down in ”Belle”. Size: S - XXXL.
DROPS 167-6 |
|||||||||||||||||||
|
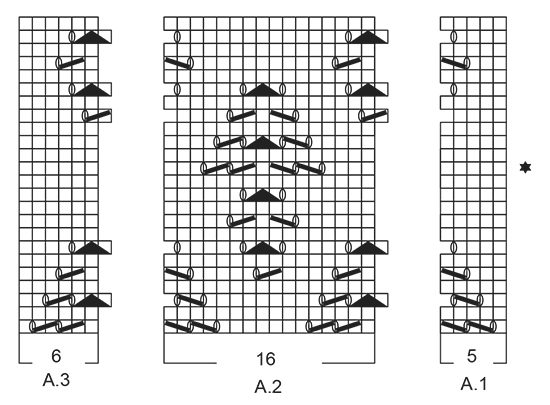
GARTER ST (worked in the round): 1 ridge = 2 rounds. * K 1 round and P 1 round *, repeat from *-*. GARTER ST (back and forth): K all rows. 1 ridge = 2 rows K. PATTERN: See diagrams A.1 to A.4. The diagrams show all rounds/rows in pattern seen from RS. INCREASE TIP 1: All inc are done from RS. Inc 1 st by making a YO. On next row P YO twisted (i.e. work in back loop of YO instead of front) to avoid holes. NOTE: Work the new sts in stocking st. INCREASE TIP 2: Work until 1 st remains before marker in the side, 1 YO, 2 sts in stocking st, 1 YO. Repeat in the other side. On next round K the YOs. They should make holes. ---------------------------------------------------------- TOP: The piece is worked top down. Work first front and back piece separately, back and forth down to armholes, then work in the round. BACK PIECE: Work right shoulder as follows: Cast on 16-17-17-18-20-20 sts on circular needle size 4.5 mm with Belle. Work as follows (1st row = from RS): 3 sts in GARTER ST - see explanation above (= towards the neck), work 10-11-11-12-14-14 sts in stocking st, 3 sts in garter st (= towards armhole). Continue like this until 4 rows in stocking st have been work inside the 3 sts in garter st in each side. On next row inc 1 st inside the 3 sts in garter st towards the neck - READ INCREASE TIP 1 = 17-18-18-19-21-21 sts. Work 1 row from WS and put piece aside. Work left shoulder as follows: Cast on and work as right shoulder but reversed. I.e. inc 1 st before the 3 sts in garter st towards the neck on 5th row in stocking st. Work 1 row from WS. Turn and work as before over all sts. At the end of row cast on 35-35-37-37-39-39 new sts for neck and then work the 17-18-18-19-21-21 sts from right shoulder on to needle = 69-71-73-75-81-81 sts. Work the new sts cast on for neck in garter st. When 2 ridges have been worked over these sts, continue with 2 rows in stocking st inside the 3 sts in garter st in each side. REMEMBER THE KNITTING TENSION Now work pattern as follows on next row from RS (NOTE: Beg on 13th row in A.1- A.3, see star in diagram): Work 3 sts in garter st, 2-3-4-5-0-0 sts in stocking st, A.1 (= 5 sts), A.2 (= 16 sts) 3-3-3-3-4-4 times in width, A.3 (= 6 sts), 2-3-4-5-0-0 sts in stocking st, 3 sts in garter st. Repeat A.1-A.3 vertically until finished measurements. When piece measures 13-12-12-10-10-7 cm from cast-on edge, inc 1 st inside the 3 sts in garter st in each side for armhole. Repeat inc on every row from RS 2-4-6-9-11-16 more times = 75-81-87-95-105-115 sts. Work 1 row from WS after last inc and put piece aside. FRONT PIECE: Work right shoulder as follows: Cast on 16-17-17-18-20-20 sts on circular needle size 4.5 mm with Belle. Work as follows (1st row = from RS): 3 sts in garter st (= towards armhole), work 10-11-11-12-14-14 sts in stocking st, 3 sts in garter st (= towards the neck). READ ALL OF THE FOLLOWING SECTION BEFORE CONTINUING! Continue like this, AT THE SAME TIME when piece measures 7-8-7-8-8-9 cm, inc for neck and when piece measures 13-12-12-10-10-7 cm inc for armholes the same way as on back piece. NOTE: In size XXXL beg inc for armholes before inc for neck. INCREASE NECK: Inc 1 st inside the 3 sts in garter st towards the neck. Repeat inc on every row from RS 4-4-5-5-6-6 more times = 5-5-6-6-7-7 sts inc for neck. When all inc are done, work 1 row from WS. Put piece aside. Work left shoulder as follows: Cast on and work as right shoulder but reversed. I.e. inc 1 st before the 3 sts in garter st towards the neck. When all inc for neck are done, work 1 row from WS. Turn and work as before over all sts. At the end of row cast on 27 new sts in all sizes for neck, then work all sts from right shoulder on to needle. Continue back and forth like this (continue inc for armholes) until 2 ridges have been worked over the new sts for neck. On next row from RS work pattern A.4 (= 27 sts) over the middle 27 sts on needle. NOTE: Work A.4 1 time vertically but the repetition will not be finished vertically before front and back pieces are put tog and you are working in the round on body. When all inc for armholes are done, there are 75-81-87-95-105-115 sts on needle. After last inc work 1 row from WS. Turn and work over all sts on front piece, cast on 4-6-8-10-12-14 new sts for armhole, insert a marker in the middle of these new sts (= 2-3-4-5-6-7 sts on each side of marker), work 75-81-87-95-105-115 sts from back piece on to same circular needle and cast on 4-6-8-10-12-14 new sts for armhole, insert a marker in the middle of these new sts (= 2-3-4-5-6-7 sts on each side of marker) = 158-174-190-210-234-258 sts on round. Beg of round is after the last 4-6-8-10-12-14 new sts cast on. BODY: Then work in the round on circular needle. NOW MEASURE THE PIECE FROM HERE. Now continue with pattern as follows: Work 3 sts in garter st, continue in stocking st with pattern as before over the next 69-75-81-89-99-109 sts - NOTE: Continue pattern A.4 until entire repetition has been worked 1 time vertically, then work in stocking st over all sts on front piece, 10-12-14-16-18-20 sts in garter st, stocking st over the next 5-8-11-15-12-17 sts, continue pattern A.1-A.3 as before over the next 59-59-59-59-75-75 sts, 5-8-11-15-12-17 sts in stocking st, 7-9-11-13-15-17 sts in garter st. When 2 ridges have been worked over the new sts for armholes, continue these sts in stocking st until finished measurements. When piece measures 4 cm, inc 2 st in each side of piece - READ INCREASE TIP 2! Repeat inc every 4th round until finished measurements. When piece measures 44-45-46-47-48-49 cm – adjust to finish after 10th or 20th round in A.1-A.3 - work 1 round in stocking st. There are now approx. 262-278-298-318-346-374 sts on round depending on where the pattern is finished. Then work 2 ridges. Cast off. ASSEMBLY: Sew the shoulder seams tog. Make sure that to avoid a tight seam. |
|||||||||||||||||||
Diagram explanations |
|||||||||||||||||||
|
|||||||||||||||||||
 |
|||||||||||||||||||
 |
|||||||||||||||||||
 |
|||||||||||||||||||
Have you finished this pattern?Tag your pictures with #dropspattern #woodstocktop or submit them to the #dropsfan gallery. Do you need help with this pattern?You'll find 22 tutorial videos, a Comments/Questions area and more by visiting the pattern on garnstudio.com. © 1982-2026 DROPS Design A/S. We reserve all rights. This document, including all its sub-sections, has copyrights. Read more about what you can do with our patterns at the bottom of each pattern on our site. |
|||||||||||||||||||


With over 40 years in knitting and crochet design, DROPS Design offers one of the most extensive collections of free patterns on the internet - translated to 17 languages. As of today we count 324 catalogues and 12290 patterns translated into English (UK/cm). 12290
We work hard to bring you the best knitting and crochet have to offer, inspiration and advice as well as great quality yarns at incredible prices! Would you like to use our patterns for other than personal use? You can read what you are allowed to do in the Copyright text at the bottom of all our patterns. Happy crafting!
Post a comment to pattern DROPS 167-6
We would love to hear what you have to say about this pattern!
If you want to leave a question, please make sure you select the correct category in the form below, to speed up the answering process. Required fields are marked *.