
Popular categories
Looking for a yarn?


Comments / Questions (114)
![]() Sharlene Currin wrote:
Sharlene Currin wrote:
Hi. I am knitting the medium size. For the top when you get to 14 cm, after the first row of decreases it says continue to decrease alternately on each side of every purl section. Please can you explain this. Do you decrease on the first purl section on one side and then on the next purl section on the other side. I am not sure how to proceed.
29.10.2023 - 18:27DROPS Design answered:
Dear Sharlene, you will decrease alternately on different rows. For example, you decrease before each of the purl sections on the first row of decreases. On the next row of decreases you will decrease after each of the purl sections. Happy knitting!
29.10.2023 - 23:41
![]() Suzanne Crosier wrote:
Suzanne Crosier wrote:
Hi I'm working on front piece and find it very confusing. I have 105 stitches on needles place middle 23 on stitch holder that leaves 41 stitch on each side. And don't understand how decreasing according to pattern I would end up with 20 stitches left. I can't get the numbers to add up. Hope you can explain this more clearly than pattern does
12.10.2023 - 11:51DROPS Design answered:
Dear Mrs Crosizer, you have to work front piece as back piece, this means you cast off 4 sts on each side = 97 sts remain, then decrease 1 stitch on each side inside 3 edge in garter stitch a total of 10 times in size M = 97 - (2x10) = 77 sts remain. Then you slipped the middle 23 sts on a thread for neck = 27 sts remain for each shoulder. Cast off at the beg of each row from neck: 2 sts 2 times and 1 st 2 times = 27-2x2-2x1=21 sts remain for the shoulder. Happy knitting!
12.10.2023 - 14:11
![]() Suzanne Crosier wrote:
Suzanne Crosier wrote:
Hi such a pretty pattern! I have a question about A2 chart. Should I purl over yo on next round or just knit over them? I see that YO increases it states to purl them on next round. Thanks
29.08.2023 - 22:11DROPS Design answered:
Hi Suzanne, The increases described in the increase tip are by the markers in the sides. The markers are inserted in purled sections on the round (not as part of A.2). So the Y/Os by the markers are purled twisted on the next round. The Y/Os in A.2 are knitted to leave holes. Hope this helps and happy knitting!
30.08.2023 - 06:45
![]() Camilla wrote:
Camilla wrote:
Jeg har et par spørgsmål 🙈 Jeg har strikket første omgang med A1 og der er altså 6 masker tilbage på omgangen men jeg ender ud med det rigtige antal masker altså 298 (m/l)? Diagrammet A1 viser to rækker, vil det sige at man skal lave en omgang bare med ret masker? Og når man skal strikke A2 hvad skal man strikke imellem? Ved A1 stod der 6 vr imellem men der står ikke noget ved A2?
05.04.2023 - 14:45DROPS Design answered:
Hej Camilla, du strikker 1 rapport af A.1 i højden og når du har gjort det strikker du A.2 med vrang over vrang. Når arbejdet måler 10 cm tager du ind ifølge din størrelse :)
13.04.2023 - 12:28
![]() Mary wrote:
Mary wrote:
Hi, I am knitting the front piece and I am stuck on the instruction "Then cast off on every other row towards neck as follows: 2 sts 2 times and 1 st 2 times". What does "2 sts 2 times and 1 st 2 times" mean?
02.06.2022 - 15:16DROPS Design answered:
Dear Mary, This means you have to cast off at the beginning of every row from the neck towards shoulder (= from RS on right shoulder / from WS on left shoulder): 2 stitches 2 times (= 2 rows with cast off = 4 sts cast off in total) + 1 stitch only at the beginning the next 2 rows from the neck towards shoulder (= 2 rows with cast off = 2 sts cast off in total). Happy knitting!
02.06.2022 - 17:32
![]() Petra Simonidesová wrote:
Petra Simonidesová wrote:
Dobrý den, pletla jsem tento vzor a vše mi sedělo. Pletu velikost S, teď jsem začala ubírat na náramenice a mám pocit, že úplně nechápu tu závorku. (když ujímání zasahuje do vzoru A.2, ujímáme spletením 2 ok hladce; oka, která nezapadají do vzoru, pleteme lícovým žerzejem) Nepochopila jsem, kdy ujímání zasahuje do vzoru A2, protože mám ujmout 4x a mezi ujímanými oky a prvním vzorem A2 jsou 3 oka obratce.
04.08.2021 - 21:10
![]() Wenche Gabrielsen wrote:
Wenche Gabrielsen wrote:
Hei. Fantastisk modell!! Jeg er kommet til A2. Første pinne. Skal det strikkes: 1 kast, 2r, 1 m av, 2sm, 2r, 1kast, sånn at når en repeterer mønsteret, så blir det to kast etterhverandre? Eller bare ett kast? Skjønner de andre radene i A2, men ikke akkurat dette… det er jo ikke likt instruksjonsbilde… da bildet viser kastet mellom to masker, som i radene over, men ikke første. Ha ha, er litt grønn på dette.
07.07.2021 - 09:04
![]() Annicka wrote:
Annicka wrote:
Hej! Jag skulle behöva sticka modellen kortare. Hur gör jag då? Mvh Annicka
11.04.2021 - 23:04DROPS Design answered:
Hej Annicka, du starter med udtagningerne efter taljen ved 30 cm. Hvis du vil strikke den kortere, så kan du forkorte det første stykke inden de 30 cm. Vi kan desværre ikke hjælpe dig med at skrive opskriften om :)
12.04.2021 - 13:37
![]() Zsuzsa wrote:
Zsuzsa wrote:
Thank you, it makes sense now! :) I have read it in 3 languages (german, english and hungarian), but it seems I misunderstood all versions.
19.09.2020 - 13:41
![]() Zsuzsa wrote:
Zsuzsa wrote:
Hi, I am knitting the smallest size. And you wrote in the description, that repeat 8 times 7P + A.1 (each front and back). And in the comments you wrote: "You have 9 repeats of 7 stitches + A.1" Are you still sure that the pattern is correct? Beautiful pattern, btw :)
18.09.2020 - 12:48DROPS Design answered:
Dear Zsuzsa, sure it is :) Pattern says: ... * P 7-6-6-5-5, A.1 *, repeat from *-* 8-10-12-14-16 more times... = this means you will work P7, A.1 a total of 9 times. Happy knitting!
18.09.2020 - 13:23
|
||||||||||
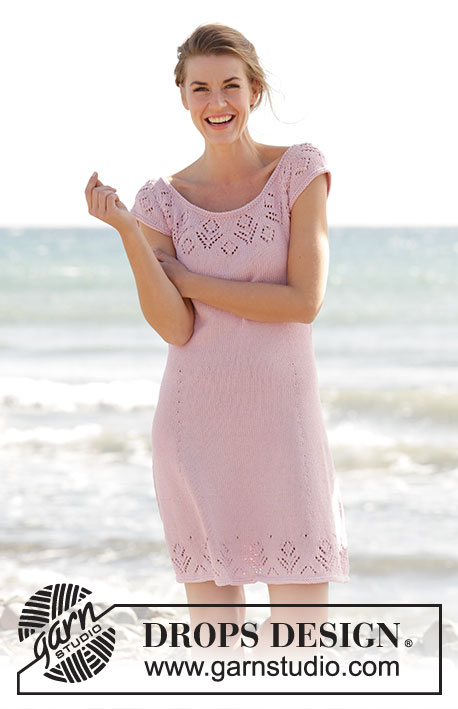
Love Is In The Air#loveisintheairtop |
||||||||||
 |
 |
|||||||||
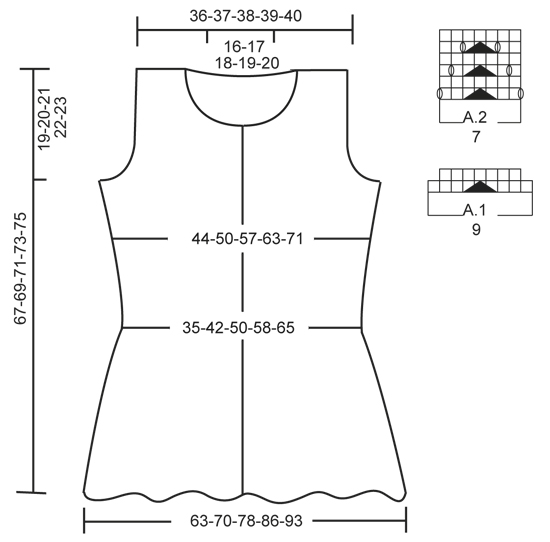
Knitted DROPS top with lace pattern in ”Muskat”. Size: S - XXXL.
DROPS 160-24 |
||||||||||
|
GARTER ST (worked in the round): * K 1 round and P 1 round *, repeat from *-*. 1 ridge = 2 rounds. GARTER ST (back and forth): K all rows. 1 ridge = 2 rows K. PATTERN: See diagrams A.1 and A.2. INCREASE TIP: Work until 1 st remains before marker, 1 YO, P 2 (marker is in the middle of these sts), 1 YO = 2 sts inc. On next round P YO twisted to avoid holes. ---------------------------------------------------------- TOP: Worked in the round on circular needle. Cast on 302-342-402-430-486 sts on circular needle size 3.5 mm with Muskat. Work 2 ridges in GARTER ST - see explanation above. Switch to circular needle size 4 mm. Then work as follows: * P 7-6-6-5-5, A.1 *, repeat from *-* 8-10-12-14-16 more times, P 7-6-6-5-5, insert 1 marker (= back piece), * P 7-6-6-5-5, A.1 *, repeat from *-* 8-10-12-14-16 more times, P 7-6-6-5-5, insert 1 marker (= front piece). Move the markers upwards when working. When A.1 has been worked 1 time vertically, there are 266-298-350-370-418 sts on needle. Then work A.2 (= 7 sts) over A.1 until finished measurements. When piece measures 10 cm, dec as follows: * P 2 tog, P 5-4-4-3-3, A.2 *, repeat from *-* 8-10-12-14-16 more times, P 2 tog, P 5-4-4-3-3, marker, * P 2 tog, P 5-4-4-3-3, A.2 *, repeat from *-* 8-10-12-14-16 more times, P 2 tog, P 5-4-4-3-3, marker = 246-274-322-338-382 sts (20-24-28-32-36 sts dec). Continue with P and pattern as before until piece measures 13-14-14-15-15 cm. Then dec as follows: * P 4-3-3-2-2, P 2 tog, A.2 *, repeat from *-* 8-10-12-14-16 more times, P 4-3-3-2-2, P 2 tog, marker, * P 4-3-3-2-2, P 2 tog, A.2 *, repeat from *-* 8-10-12-14-16 more times, P 4-3-3-2-2, P 2 tog, marker = 226-250-294-306-346 sts (20-24-28-32-36 sts dec). Continue dec (i.e. dec alternately on each side of every P section) every 3-4-4-5-5 cm 4-3-3-2-2 more times = 146-178-210-242-274 sts. Work next round as follows: * P 1, A.2 *, repeat from *-* 8-10-12-14-16 more times, P 1, marker, * P 1, A.2 *, repeat from *-* 8-10-12-14-16 more times, P 1, marker. Continue with this pattern. When piece measures 30 cm, inc 1 st on each side of each marker (= 4 sts inc) - READ INCREASE TIP! Work inc sts P. Repeat inc every 1½-2-2½-3½-3½ cm 9-7-6-5-5 more times = 186-210-238-266-298 sts. When piece measures 46-47-48-49-50 cm, work in garter st over 7 sts on each side of marker in each side (= 14 sts in garter st in each side), work the other sts as before. When piece measures 48-49-50-51-52 cm, work only over the first 93-105-119-133-149 sts on round (= back piece), slip sts for front piece on a stitch holder. BACK PIECE: = 93-105-119-133-149 sts. Now work piece back and forth. Cast off 4 sts at beg of next 2 rows for armholes = 85-97-111-125-141 sts. Then dec for armhole inside 3 sts in garter st, dec 1 st in each side on every other row 4-10-16-23-29 times, dec by P 2 tog (when dec goes over into A.2 dec with K 2 tog, work the sts that do not fit the pattern in stocking st) = 77-77-79-79-83 sts. When piece measures 65-67-69-71-73 cm, slip the middle 31-33-35-37-39 sts on a stitch holder for neck and finish each shoulder separately = 23-22-22-21-22 sts. On next row from neck, K the first 2 sts tog = 22-21-21-20-21 sts. Work sts in the side that do not fit A.2 in stocking st. Continue to work A.2, P sts and in stocking st as before. When piece measures 66-68-70-72-74 cm, work 1 ridge in garter st over all sts, then cast off. Work the other shoulder the same way. FRONT PIECE: = 93-105-119-133-149 sts. Now work piece back and forth. Work as on back piece until piece measures 57-59-61-63-65 cm. Now slip the middle 21-23-25-27-29 sts on a stitch holder for neck and finish each shoulder separately. Then cast off on every other row towards neck as follows: 2 sts 2 times and 1 st 2 times. Continue with dec for armhole, when all dec are done, there are 22-21-21-20-21 sts on needle. Work sts in the side that do not fit A.2 in stocking st. Continue to work A.2, P sts and in stocking st as before. When piece measures 66-68-70-72-74 cm, work 1 ridge in garter st (see explanation above) over all sts, then cast off. Work the other shoulder the same way. ASSEMBLY: Sew the shoulder seams. NECK EDGE: Pick up 100-120 sts (incl sts on stitch holder for neck) on circular needle size 3.5 mm with Muskat. Work 2 ridges. Cast off. |
||||||||||
Diagram explanations |
||||||||||
|
||||||||||
 |
||||||||||
Have you finished this pattern?Tag your pictures with #dropspattern #loveisintheairtop or submit them to the #dropsfan gallery. Do you need help with this pattern?You'll find 26 tutorial videos, a Comments/Questions area and more by visiting the pattern on garnstudio.com. © 1982-2026 DROPS Design A/S. We reserve all rights. This document, including all its sub-sections, has copyrights. Read more about what you can do with our patterns at the bottom of each pattern on our site. |
||||||||||


With over 40 years in knitting and crochet design, DROPS Design offers one of the most extensive collections of free patterns on the internet - translated to 17 languages. As of today we count 324 catalogues and 12290 patterns translated into English (UK/cm). 12290
We work hard to bring you the best knitting and crochet have to offer, inspiration and advice as well as great quality yarns at incredible prices! Would you like to use our patterns for other than personal use? You can read what you are allowed to do in the Copyright text at the bottom of all our patterns. Happy crafting!
Post a comment to pattern DROPS 160-24
We would love to hear what you have to say about this pattern!
If you want to leave a question, please make sure you select the correct category in the form below, to speed up the answering process. Required fields are marked *.