
Popular categories
Looking for a yarn?


Comments / Questions (114)
![]() Caitlynn wrote:
Caitlynn wrote:
Hi, I really want to knit this but I'm strugling with the size. I'm right inbetween the S and M/L but I don't know how to change the pattern/ downsize it to fit. Is there a formula I can use to help with that?
23.10.2025 - 14:31DROPS Design answered:
Hi Caithlynn,
Based on the gauge, which tells you how many stitches there are in 10 cm, you can calculate how many stitches you need to cast on, etc., to get different measurements. 23.10.2025 - 17:54
![]() Gudrun wrote:
Gudrun wrote:
Cast on 402 sts on needle 3.5 mm. Work 2 ridges in GARTER ST. Switch to needle 4 mm. Then work as follows: * P 6, A.1 *, repeat from *-* 12 more times, P 6, insert 1 marker (= back piece), * P 6, A.1 *, repeat from *-* 12 more times, P 6, insert 1 marker (= front piece). Move the markers upwards when working. When A.1 has been worked 1 time vertically, there are 350 sts on needle. 6+13*9+6+6+13*9+6=258, what do i do with the other 144 sts?
15.07.2025 - 11:22DROPS Design answered:
Hi Gudrun, in second row of A.1 you have 7 stitches insted of 9. [(6+A.1)*13]+6= [(6+7)*13+6}=(13*13)+6=169+6=175. 175*2 (front and back)=350. Happy knitting!
17.07.2025 - 11:00
![]() Reiah N wrote:
Reiah N wrote:
Hi! So I’m at the decrease section in the top where it says to continue decreasing every 4 cm 3 more times for size M. does that mean I have to purl 2 together every 4cm? Or do I have to purl 2 together in every purl section in a row, then leave 4 cm until I start the next decrease row and purl 2 together again and repeat it for the third time, all while doing A.2 between each purl section? Sorry for the bother 😰!
23.01.2025 - 09:39DROPS Design answered:
Dear Reiah, you will decrease as indicated in the first row every 4cm vertically. That is, work 1 decrease row as indicated, work normally until you have worked 4cm from the decrease row, work a decrease row as the previous one (the decreases and the charts); repeat once more 4cm later. Happy knitting!
25.01.2025 - 19:54
![]() Reiah N wrote:
Reiah N wrote:
Hi! Thank you so much for the answer last time 😍. After finishing the row of A.1, and starting the next row do we have to p 6 (for size m) every time before working A.2 like with A.1 ? Until the piece measures 10 cm? Thank you so much 😁
14.01.2025 - 16:54DROPS Design answered:
Dear Reiah, when A.1 is done, there are 7 sts between each purl section, work now *purl 6, A.2* all the round, then after 10 cm from cast on edge, start decreasing in the purl section as explained in the written pattern. Happy knitting!
15.01.2025 - 08:03
![]() Reiah N wrote:
Reiah N wrote:
Hi! I’m knitting this in size medium and it says that I’m supposed to p6+7(A.1) x10 , p6, p6+7(A.1) x10 , p6. I have 30 stitches left What do I do with them? Thank you so much 🥰
11.01.2025 - 08:36DROPS Design answered:
Dear Reiah, you work: (purl 6, A.1)x 11 times (10 more, so 11 in total), purl 6, (marker), (purl 6, A.1) x 11 times (total), purl 6, (marker). The charts are read from the bottom up so in the first row of A.1 you have 9 stitches (which are decreased to 7). So you will have: (6+9)x11 + 6 + (6+9)x11 +6 = 342 stitches. Happy knitting!
12.01.2025 - 16:04
![]() Penny wrote:
Penny wrote:
Is there a straight needle instruction available for this pattern.
18.09.2024 - 06:24DROPS Design answered:
Dear Penny, this lesson might help you adjusting the pattern for straight needles. Happy knitting!
18.09.2024 - 08:57
![]() Nina wrote:
Nina wrote:
On the back piece when the 33 sts or slipped on a holder are the 22 stitches worked first as before and when the project is turned that's when K together close to the neck sts holder or are they K together at the beginning of the row?
03.06.2024 - 07:30DROPS Design answered:
Dear Nina, work 1 row from RS as before working the first 22 sts and slipping them on a thread or keeping them on the needle but they will be worked later; slip the next 33 sts on a thread for neck and work the last 22 sts for shoulder as before, finish now each shoulder separately. Happy knitting!
03.06.2024 - 08:24
![]() Nina wrote:
Nina wrote:
When working in round and doing A1 and A2 it says k from RS and P from WS. Does that mean we P6 before A1 and k3 before the passo then k3 after then back to P6 or is the 3 st before the passo part of the P6 or is it P6, P3 then passo?
20.05.2024 - 10:01DROPS Design answered:
Dear Nina, when working in the round you will always work from RS, ie the stitches in A.1 and in A.2 will be knitted on every round, and the purl stitches between diagrams will be always purled. When working in rows after dividing for armholes, you will then purl the stitches in A.2 from wrong side and knit the stitches between diagrams (reversed stocking stitch). Happy knitting!
21.05.2024 - 13:22
![]() Carina wrote:
Carina wrote:
Hej, Gäller garnval. Om jag vill byta Muskat till t.ex. Cotton Merino eller Merino extra fine, är det möjligt och hur mycket garn behöver jag då. Garnkonverteraren kunde inte svara! TACK
18.04.2024 - 11:53DROPS Design answered:
Hej Carina, jo det kan den, vælg Muskat, vælg antal gram for din størrelse, vælg 1 tråd, så får du både Cotton Merino og Merino Extra Fine med flere :)
19.04.2024 - 14:31
![]() Jenny wrote:
Jenny wrote:
Hello, in A.2, there should be a yarn-over at the beginning and at the end of each 7 stitches? I just know how to do a yarn-over before knitting the actual stitch, how is it done after knitting a stitch? Or am I misreading this, and there should only be one yarn-over in the first row? But then the total amount of stitches would be exactly the same, whereas there would be more stitches in row 3. thanks!
17.01.2024 - 13:00DROPS Design answered:
Dear Jenny, on first row in A.2 you start and end A.2 with a yarn over and make a double decrease in the middle, so that the number of stitches remains the same, this means work the first row in A.2 as follows: YO, K2, slip 1, K2 tog, psso, K2, YO. Happy knitting!
18.01.2024 - 08:19
|
||||||||||
Love Is In The Air#loveisintheairtop |
||||||||||
 |
 |
|||||||||
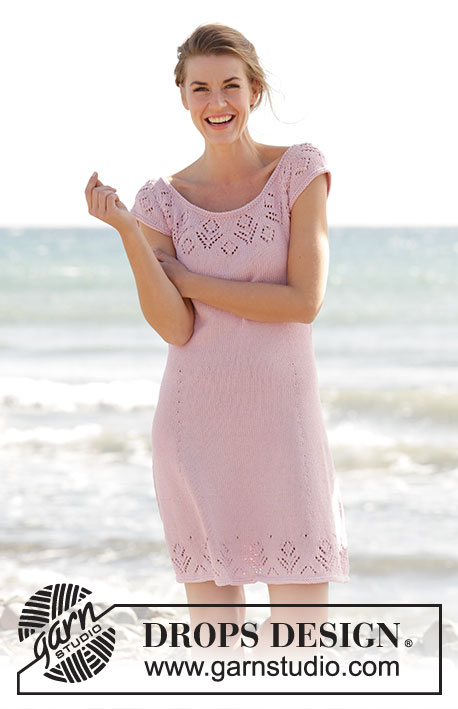
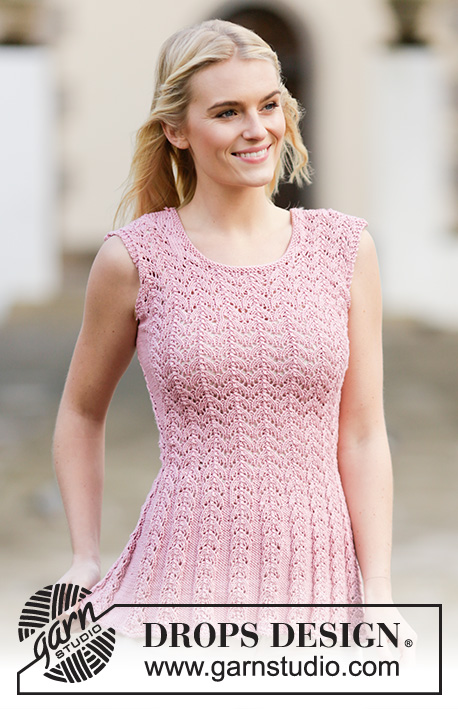
Knitted DROPS top with lace pattern in ”Muskat”. Size: S - XXXL.
DROPS 160-24 |
||||||||||
|
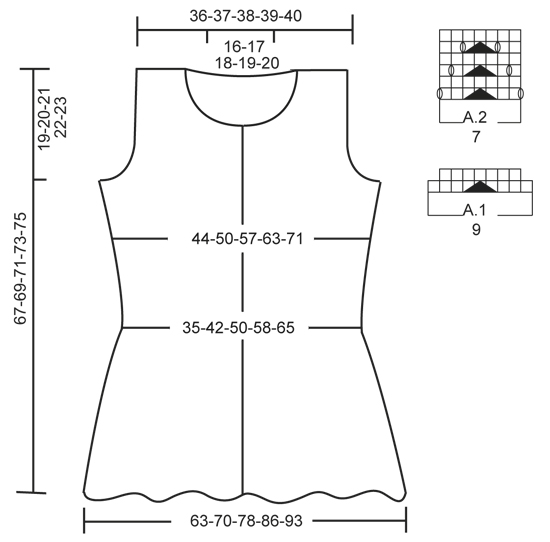
GARTER ST (worked in the round): * K 1 round and P 1 round *, repeat from *-*. 1 ridge = 2 rounds. GARTER ST (back and forth): K all rows. 1 ridge = 2 rows K. PATTERN: See diagrams A.1 and A.2. INCREASE TIP: Work until 1 st remains before marker, 1 YO, P 2 (marker is in the middle of these sts), 1 YO = 2 sts inc. On next round P YO twisted to avoid holes. ---------------------------------------------------------- TOP: Worked in the round on circular needle. Cast on 302-342-402-430-486 sts on circular needle size 3.5 mm with Muskat. Work 2 ridges in GARTER ST - see explanation above. Switch to circular needle size 4 mm. Then work as follows: * P 7-6-6-5-5, A.1 *, repeat from *-* 8-10-12-14-16 more times, P 7-6-6-5-5, insert 1 marker (= back piece), * P 7-6-6-5-5, A.1 *, repeat from *-* 8-10-12-14-16 more times, P 7-6-6-5-5, insert 1 marker (= front piece). Move the markers upwards when working. When A.1 has been worked 1 time vertically, there are 266-298-350-370-418 sts on needle. Then work A.2 (= 7 sts) over A.1 until finished measurements. When piece measures 10 cm, dec as follows: * P 2 tog, P 5-4-4-3-3, A.2 *, repeat from *-* 8-10-12-14-16 more times, P 2 tog, P 5-4-4-3-3, marker, * P 2 tog, P 5-4-4-3-3, A.2 *, repeat from *-* 8-10-12-14-16 more times, P 2 tog, P 5-4-4-3-3, marker = 246-274-322-338-382 sts (20-24-28-32-36 sts dec). Continue with P and pattern as before until piece measures 13-14-14-15-15 cm. Then dec as follows: * P 4-3-3-2-2, P 2 tog, A.2 *, repeat from *-* 8-10-12-14-16 more times, P 4-3-3-2-2, P 2 tog, marker, * P 4-3-3-2-2, P 2 tog, A.2 *, repeat from *-* 8-10-12-14-16 more times, P 4-3-3-2-2, P 2 tog, marker = 226-250-294-306-346 sts (20-24-28-32-36 sts dec). Continue dec (i.e. dec alternately on each side of every P section) every 3-4-4-5-5 cm 4-3-3-2-2 more times = 146-178-210-242-274 sts. Work next round as follows: * P 1, A.2 *, repeat from *-* 8-10-12-14-16 more times, P 1, marker, * P 1, A.2 *, repeat from *-* 8-10-12-14-16 more times, P 1, marker. Continue with this pattern. When piece measures 30 cm, inc 1 st on each side of each marker (= 4 sts inc) - READ INCREASE TIP! Work inc sts P. Repeat inc every 1½-2-2½-3½-3½ cm 9-7-6-5-5 more times = 186-210-238-266-298 sts. When piece measures 46-47-48-49-50 cm, work in garter st over 7 sts on each side of marker in each side (= 14 sts in garter st in each side), work the other sts as before. When piece measures 48-49-50-51-52 cm, work only over the first 93-105-119-133-149 sts on round (= back piece), slip sts for front piece on a stitch holder. BACK PIECE: = 93-105-119-133-149 sts. Now work piece back and forth. Cast off 4 sts at beg of next 2 rows for armholes = 85-97-111-125-141 sts. Then dec for armhole inside 3 sts in garter st, dec 1 st in each side on every other row 4-10-16-23-29 times, dec by P 2 tog (when dec goes over into A.2 dec with K 2 tog, work the sts that do not fit the pattern in stocking st) = 77-77-79-79-83 sts. When piece measures 65-67-69-71-73 cm, slip the middle 31-33-35-37-39 sts on a stitch holder for neck and finish each shoulder separately = 23-22-22-21-22 sts. On next row from neck, K the first 2 sts tog = 22-21-21-20-21 sts. Work sts in the side that do not fit A.2 in stocking st. Continue to work A.2, P sts and in stocking st as before. When piece measures 66-68-70-72-74 cm, work 1 ridge in garter st over all sts, then cast off. Work the other shoulder the same way. FRONT PIECE: = 93-105-119-133-149 sts. Now work piece back and forth. Work as on back piece until piece measures 57-59-61-63-65 cm. Now slip the middle 21-23-25-27-29 sts on a stitch holder for neck and finish each shoulder separately. Then cast off on every other row towards neck as follows: 2 sts 2 times and 1 st 2 times. Continue with dec for armhole, when all dec are done, there are 22-21-21-20-21 sts on needle. Work sts in the side that do not fit A.2 in stocking st. Continue to work A.2, P sts and in stocking st as before. When piece measures 66-68-70-72-74 cm, work 1 ridge in garter st (see explanation above) over all sts, then cast off. Work the other shoulder the same way. ASSEMBLY: Sew the shoulder seams. NECK EDGE: Pick up 100-120 sts (incl sts on stitch holder for neck) on circular needle size 3.5 mm with Muskat. Work 2 ridges. Cast off. |
||||||||||
Diagram explanations |
||||||||||
|
||||||||||
 |
||||||||||
Have you finished this pattern?Tag your pictures with #dropspattern #loveisintheairtop or submit them to the #dropsfan gallery. Do you need help with this pattern?You'll find 26 tutorial videos, a Comments/Questions area and more by visiting the pattern on garnstudio.com. © 1982-2026 DROPS Design A/S. We reserve all rights. This document, including all its sub-sections, has copyrights. Read more about what you can do with our patterns at the bottom of each pattern on our site. |
||||||||||


With over 40 years in knitting and crochet design, DROPS Design offers one of the most extensive collections of free patterns on the internet - translated to 17 languages. As of today we count 324 catalogues and 12290 patterns translated into English (UK/cm). 12290
We work hard to bring you the best knitting and crochet have to offer, inspiration and advice as well as great quality yarns at incredible prices! Would you like to use our patterns for other than personal use? You can read what you are allowed to do in the Copyright text at the bottom of all our patterns. Happy crafting!
Post a comment to pattern DROPS 160-24
We would love to hear what you have to say about this pattern!
If you want to leave a question, please make sure you select the correct category in the form below, to speed up the answering process. Required fields are marked *.