
Popular categories
Looking for a yarn?


Comments / Questions (50)
![]() Helena wrote:
Helena wrote:
Can you sent me that swetter in german. Thank you
29.03.2026 - 00:37DROPS Design answered:
Hi Helena, the sweater in German is available for free on our website. You can find it HERE. Happy knitting!
30.03.2026 - 09:08
![]() Laura wrote:
Laura wrote:
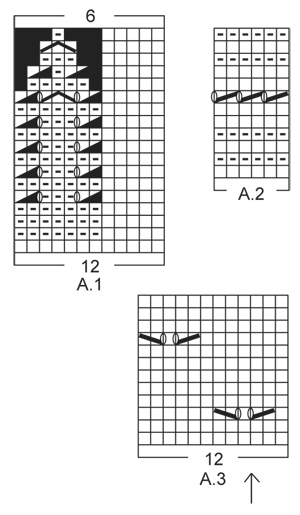
Hi, could you please tell me what the upward pointing arrows indicate below charts A3 and A4 on this pattern
26.05.2025 - 09:08DROPS Design answered:
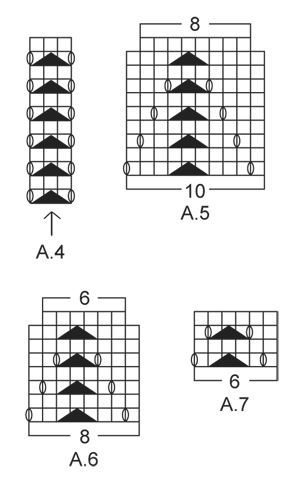
Dear Laura, sure, you will find the explanations in the written pattern, under YOKE; the arrow in A.3 shows the middle stitch on top of sleeve; and the arrow in A.4 is matching the stitch with the marker, at the transition between body/sleeves (raglan stitches). Happy knitting!
26.05.2025 - 14:13
![]() Delhon Pascale wrote:
Delhon Pascale wrote:
Bonjour madame Merci d abords pour votre dernière reponse Je suis arrivée au dessus de 7 j ai mis un marqueur au milieu devant comme indiqué. Juste je tricoté jusqu a 16 mailles avant le marqueur dos ou devant ? Es que l on tricoté sur toutes nos mailles en aller retour du milieu dos et retourner milieu dos en prenant en compte le nombres de mailles avant marqueur Merci pour votre réponse cordialement
19.05.2025 - 14:01DROPS Design answered:
Bonjour Mme Delhon, après A.7 vous allez tricoter des rangs raccourcis pour que l'encolure dos soit plus haute: commencez au milieu dos et tricotez sur l'endroit jusqu'à ce qu'il reste 16 m avant le marqueur au milieu du devant, tournez, et tricotez sur l'envers jusqu'à ce qu'il reste 16 mailles avant le marqueur au milieu du devant, tournez et continuez ainsi en tricotant toujours moins de mailles (comptez le nombre de mailles avant le marqueur du milieu devant). Au dernier rang sur l'endroit, vous tricotez jusqu'au milieu dos, puis vous tricoterez le col de nouveau en rond. Bon tricot!
19.05.2025 - 15:59
![]() Pascale Delhon wrote:
Pascale Delhon wrote:
Bonjour je suis au niveau de ensemble mes manches avec le dos et le devant Juste que A4 je tricoté en maintant les mailles à cheval avec les manches et le dos et le devant ? Ou il faut A4 de chaque côté des manches c est à dire que sur le dos et le devant ? Merci pour votre réponse cordialement
15.05.2025 - 17:13DROPS Design answered:
Bonjour Mme Delhon, lorsque vous avez mis toutes vos mailles sur la même aiguille circulaire, vous avez mis également un marqueur dans la 1ère et un autre marqueur dans la dernière maille de chacune des manches (4 marqueurs au total); vous tricotez A.3 et, en même temps, vous tricotez A.4 ainsi: tricotez jusqu'à ce qu'il reste 1 maille avant celle avec le marqueur, tricotez A.4 (la maille avec le marqueur est celle avec la flèche dans le diagramme = la maille au milieu de A.4); répétez ainsi à chaque marqueur (n'oubliez pas les diminutions du raglan). Bon tricot!
16.05.2025 - 08:40
![]() Birgit Pedersen wrote:
Birgit Pedersen wrote:
Hej igen, skal indtagning til raglan ikke være lige omvendt - altså 1m løs af, 1 ret, løft den løse m over FØR A4 og 2 ret sammen EFTER?(lidt underligt at I beskriver EFTER før FØR)?? Vh Birgit
31.03.2025 - 11:20DROPS Design answered:
Hej Birgit, nej vi gør det omvendt, men prøv at se hvad som passer dig bedst :)
08.04.2025 - 14:10
![]() Birgit Eklund Pedersen wrote:
Birgit Eklund Pedersen wrote:
Tak for hurtigt svar. Kan du forklare hvordan jeg sætter ærmerne, som er strikket på Magic loop, over på rundpinden - skal de tages bagfra fra hver sin side af ærmegabet til hver sin pind på rundpinden?
21.03.2025 - 16:23DROPS Design answered:
Hej Birgit, når du har strikket forstykket, sætter du højre ærme ind i den ene side, strikker bagstykket og sætter venstre ærme ind, nu fortsætter du rundt over alle masker. Klik også på video øverst i opskriften, her kan du se hvordan man sætter ærmerne ind på rundpinden :)
27.03.2025 - 11:52
![]() Birgit Eklund Pedersen wrote:
Birgit Eklund Pedersen wrote:
“Sæt ærmerne ind på samme rundp som ryg- og forstykke hvor der er lukket m af til ærmegab (dette gøres uden at m strikkes) “ VIDEOEN VISER KUN HVORDAN DE STRIKKES PÅ - HVORDAN GØR JEG?
21.03.2025 - 09:24DROPS Design answered:
Hej Birgit. Du gör på samma sätt som i videon, men istället för att strikke maskorna så lyfter du bara över de. Mvh DROPS Design
21.03.2025 - 13:39
![]() Marie Carlbaum wrote:
Marie Carlbaum wrote:
På bilden finns det två varianter. V-ringad och rund hals Mönstret har en version Jag vill ha V-ringad hals Försökte experimentera själv, men misslyckades tyvärr
08.08.2024 - 07:41DROPS Design answered:
Hej Marie, nej det er samme bluse og samme hals :)
09.08.2024 - 12:38
![]() Laura Wilkinson wrote:
Laura Wilkinson wrote:
Hi, I am having trouble when placing sleeves into yoke, when I am knitting them the sleeve stitches are so tight that threads are snapping and thus getting knotted and I have to unpick it all again. The garment is looking so good I don't want to lose it completely, I have watched the tutorial video for doing this but mine doesn't lay flat like yours, please can you help?? Thanks
13.04.2024 - 17:18DROPS Design answered:
Dear Laura, have you checked the gauge of your garment? If you have trouble working the sleeve stitches then maybe some part of these stitches has been worked too tight, so it makes it difficult to work the sleeve stitches and the high tension makes the thread snap. Check if your gauge in your sleeves/body pieces is correct or try and make it looser so that you can work it more easily. Take into account that the way this piece is worn it requires to be loosely worked so that the garment will flow down; if it's too tight the shaping will be incorrect too. Happy knitting!
14.04.2024 - 23:48
![]() ILANA wrote:
ILANA wrote:
Hello. can you explain me how I should knit sleeves +front+back together on on a circular needle and gradually knit till the neck ? Should I change the needle length? Thanks
20.08.2022 - 17:27DROPS Design answered:
Dear Ilana, you can see how to join the different parts in this video: https://www.garnstudio.com/video.php?id=335&lang=en. Happy knitting!
21.08.2022 - 21:06
|
||||||||||||||||||||||||||||
White Romance#whiteromancetop |
||||||||||||||||||||||||||||
 |
 |
|||||||||||||||||||||||||||
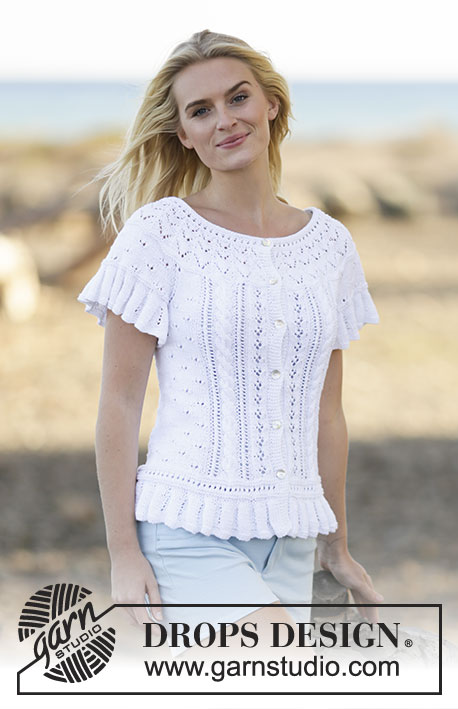
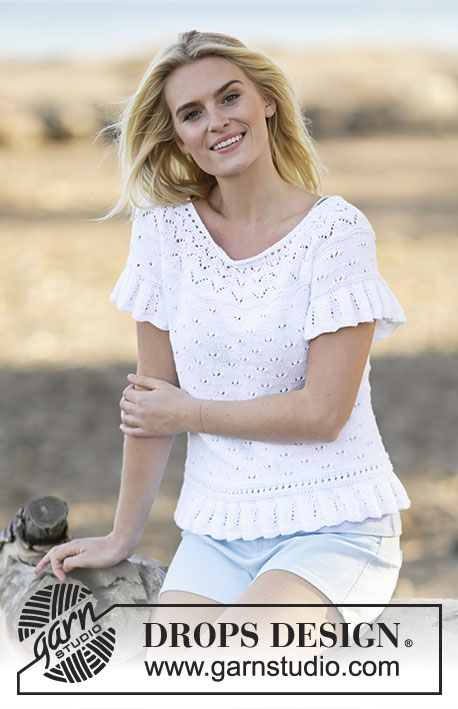
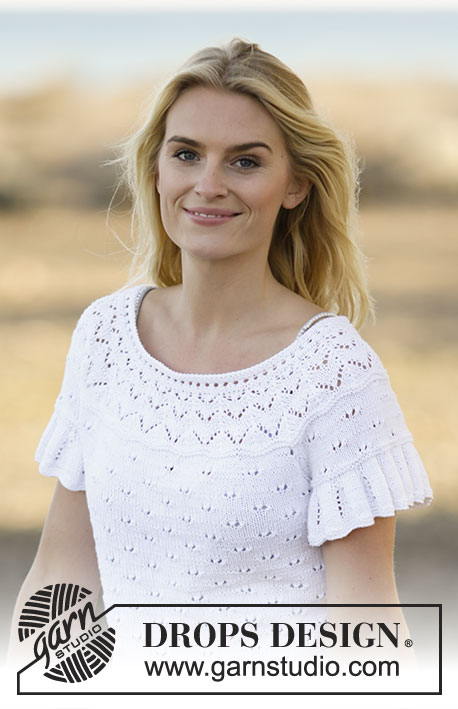
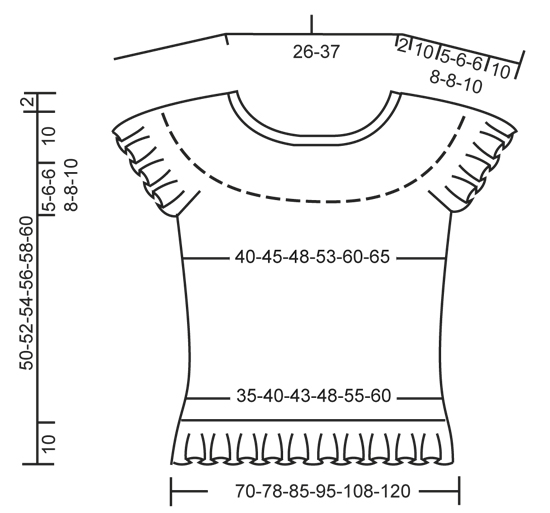
Knitted DROPS top with lace pattern, short sleeves and round yoke in ”Safran”. Size: S - XXXL.
DROPS 159-12 |
||||||||||||||||||||||||||||
|
GARTER ST (in the round on circular needle): * K 1 round and P 1 round *, repeat from *-*. 1 ridge = 2 rounds. PATTERN: See diagrams A.1 to A.7. The diagrams show all rows in pattern seen from RS. INCREASE TIP: Inc 1 st by making 1 YO. On next round work YO twisted to avoid holes - work inc sts in stocking st. RAGLAN: Dec for raglan on each side of A.4 in every transition between sleeves and body. Dec as follows after A.4: Slip 1 st as if to K, K 1, psso. Dec as follows 2 sts before A.4: K 2 tog. ---------------------------------------------------------- BODY: Worked in the round on circular needle. Cast on 336-372-408-456-516-576 sts on circular needle size 2.5 mm with Safran. Work 2 ridges in GARTER ST - see explanation above. Switch to circular needle size 3 mm and work pattern according to diagram A.1. When A.1 has been worked 1 time vertically, there are 168-186-204-228-258-288 sts on needle. Then continue pattern according to diagram A.2. After A.2 K 2 rounds while AT THE SAME TIME inc 0-6-0-0-6-0 sts evenly on last round = 168-192-204-228-264-288 sts. Insert 1 marker at beg of round and 1 marker after 84-96-102-114-132-144 sts (= the sides). Then continue pattern according to diagram A.3. REMEMBER THE KNITTING TENSION AT THE SAME TIME when piece measures 12 cm, inc 1 st on each side of both markers - READ INCREASE TIP (= 4 sts inc). Repeat inc every 4-4-4-5-5-5 cm a total of 6 times in each side = 192-216-228-252-288-312 sts - NOTE: Work inc sts in stocking st. Continue to work until piece measures 35-36-38-38-40-40 cm. Work next round as follows: Cast off 5-5-5-6-6-6 sts for armhole, work 86-98-104-114-132-144 sts (= front piece), cast off 10-10-10-12-12-12 sts for armhole (i.e. 5-5-5-6-6-6 sts on each side of marker), work 86-98-104-114-132-144 sts (= back piece) and cast off the remaining 5-5-5-6-6-6 sts. Put piece aside and knit the sleeves. SLEEVE: Worked in the round on circular needle. Cast on 144-156-156-168-168-180 sts on circular needle size 2.5 mm with Safran. Work 2 ridges in GARTER ST - see explanation above. Switch to circular needle size 3 mm and work pattern according to diagram A.1. When A.1 has been worked, there are 72-78-78-84-84-90 sts on needle. Work 2 ridges. AT THE SAME TIME on last round cast off the middle 10-10-10-12-12-12 sts mid under sleeve = 62-68-68-72-72-78 sts remain on needle. Put piece aside and knit another sleeve. YOKE: Slip sleeves on to same circular needle as body where armholes were cast off (without working them first) = 296-332-344-372-408-444 sts. AT THE SAME TIME insert 1 marker in first and last st on both sleeves (= 4 markers). Beg mid back and continue pattern as before on body AT THE SAME TIME work A.3 on sleeves (arrow in diagram should match middle of sleeve, beg on same row in diagram as on body). Work in addition A.4 in every transition between body and sleeves (arrow in diagram should match against st with marker). When 2 rounds have been worked in the round over all sts, beg dec for RAGLAN - see explanation above (= 8 sts dec). Repeat dec on every 4th round 4-5-5-7-7-8 times in total = 264-292-304-316-352-380 sts. Work 2 ridges over all the sts while AT THE SAME TIME dec 4-12-4-6-12-10 sts evenly on 1st round = 260-280-300-310-340-370 sts. K 2 rounds. Now beg dec for round yoke and work pattern in the round according to diagram A.5 (= 26-28-30-31-34-37 repetitions on round – NOTE: Switch to a shorter circular needle when needed). When A.5 has been worked 1 time vertically, work A.6 instead of A.5. When A.6 has been worked 1 time vertically, there are 156-168-180-186-204-222 sts on needle. Now work A.7 instead of A.6. When A.7 has been worked 1 time vertically, work an elevation in the back of neck. Insert 1 marker mid front. Beg mid back and K until 14-14-16-16-18-20 sts remain before marker. Turn, K back until 14-14-16-16-18-20 sts remain before marker in the other side. Turn, K until 30-30-34-34-38-42 sts remain before marker. Turn, K back until 30-30-34-34-38-42 sts remain before marker in the other side. Turn, K until 46-46-52-52-58-64 sts remain before marker. Turn, K back until 46-46-52-52-58-64 sts remain before marker in the other side. Turn, K until 62-62-70-70-76-86 sts remain before marker. Turn, K back until 62-62-70-70-76-86 sts remain before marker in the other side. Turn and K back to beg of round. NECK EDGE: Switch to circular needle size 2.5 mm and work pattern in the round over all sts according to diagram A.2. AT THE SAME TIME on 1st round dec 22-24-24-26-30-32 sts evenly = 134-144-156-160-174-190 sts. After A.2, loosely cast off with K from RS. Top measures approx. 52-54-56-58-60-62 cm from shoulder and down. ASSEMBLY: Sew the openings under the sleeves. |
||||||||||||||||||||||||||||
Diagram explanations |
||||||||||||||||||||||||||||
|
||||||||||||||||||||||||||||
 |
||||||||||||||||||||||||||||
 |
||||||||||||||||||||||||||||
 |
||||||||||||||||||||||||||||
Have you finished this pattern?Tag your pictures with #dropspattern #whiteromancetop or submit them to the #dropsfan gallery. Do you need help with this pattern?You'll find 30 tutorial videos, a Comments/Questions area and more by visiting the pattern on garnstudio.com. © 1982-2026 DROPS Design A/S. We reserve all rights. This document, including all its sub-sections, has copyrights. Read more about what you can do with our patterns at the bottom of each pattern on our site. |
||||||||||||||||||||||||||||


With over 40 years in knitting and crochet design, DROPS Design offers one of the most extensive collections of free patterns on the internet - translated to 17 languages. As of today we count 324 catalogues and 12290 patterns translated into English (UK/cm). 12290
We work hard to bring you the best knitting and crochet have to offer, inspiration and advice as well as great quality yarns at incredible prices! Would you like to use our patterns for other than personal use? You can read what you are allowed to do in the Copyright text at the bottom of all our patterns. Happy crafting!
Post a comment to pattern DROPS 159-12
We would love to hear what you have to say about this pattern!
If you want to leave a question, please make sure you select the correct category in the form below, to speed up the answering process. Required fields are marked *.