
Popular categories
Looking for a yarn?


Comments / Questions (43)
![]() Chantal wrote:
Chantal wrote:
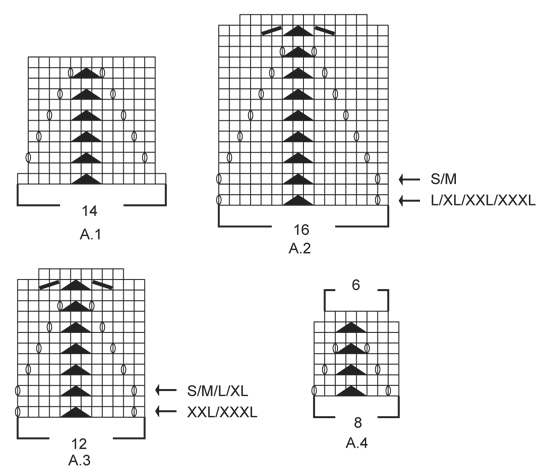
Monter 221-235-249-277-305-333 m (y compris 5 m de bordure devant au point mousse de chaque côté) POINT FANTAISIE: 5 m de bordure devant au point mousse, 15-16-17-19-21-23 fois A.1 (= 14 m au 1er rang) en largeur, 1 m jersey, 5 m de bordure devant au point mousse = 191-203-215-239-263-287 m. 249m-(17x14m) =238m pour moi et non 215m A verifier les chiffres ds ces 2 modèles je suis peut être dans l'erreur.merci
04.05.2025 - 16:38DROPS Design answered:
Bonjour Chantal, en taille L, vous montez 249 mailles et vous tricotez: 5 m point mousse, 17xles 14 m de A.1 (=17x14=238), 1 m jersey et 5 m point mousse soit 5+238+1+5=249; dès que le 1er rang de A.1 est terminé, il reste 12 m dans chaque A.1 vous aurez ainsi: 5 m point mousse, 17x12 m (= 204), 1 m jersey et 5 m point mousse soit 5+204+1+5=215. Bon tricot!
05.05.2025 - 09:19
![]() Chantal wrote:
Chantal wrote:
Bonjour, Pour Taille (42-44), dois je commander 1 pelote de plus que préconisé ? J'attends votre réponse pour commander . Merci
19.04.2025 - 15:28DROPS Design answered:
Bonjour Chantal, si votre échantillon est juste à la fois en largeur mais aussi en hauteur, le nombre de pelotes indiqué pour votre taille doit être suffisant, si vous craignez d'en manquer, vous pouvez en commander plus -contactez votre magasin sur leur politique retour si besoin. Bon tricot!
22.04.2025 - 14:45
![]() Sophie wrote:
Sophie wrote:
Hej, tycker det stämmer bättre med två maskor mellan omslagen. Då blir maskantalet rätt på bakstycke/framstyckena. (Storlek M).
05.11.2024 - 22:03
![]() Sophie wrote:
Sophie wrote:
Hej! Tycker det blir lite märkligt när man ska öka i sidorna. Det blir två omslag efter varann. Markören, som jag uppfattar det, ska sitta MELLAN två maskor, inte I en maska?
04.11.2024 - 22:33DROPS Design answered:
Hej Sophie, du skal have 1 maske imellem udtagningerne i siderne :)
05.11.2024 - 08:42
![]() Guy-Anne Levesque wrote:
Guy-Anne Levesque wrote:
Can I change the language of the pattern to French?
08.04.2024 - 19:16DROPS Design answered:
Hi Guy-Anne Levesque, just above pattern instructions you will find drop-down menu where you can change the language. Happy knitting!
08.04.2024 - 20:57
![]() Christine Barholt wrote:
Christine Barholt wrote:
Måske er det bare mig, men hvorfor er ærmegabet så lille. Den sidder helt oppe under armen. Overvejer at pille op og lave hele bærestykket om . Rigtig ærgerligt, da den ikke skal ende i skabet. Er ellers vildt glad for den .
02.05.2023 - 12:41
![]() Maria Del Rocio Paradá Mortales wrote:
Maria Del Rocio Paradá Mortales wrote:
Estoy atorada a nivel del inicio de las mangas. Estoy haciendo la talla mediana. Monto los 64 puntos en otras agujas, hago tres vueltas en derecho reduzco 4 puntos al i inicio y final y las íntegro para hacer el canesú?
02.04.2023 - 03:59DROPS Design answered:
Hola María, sí, montas 64 puntos, trabajas 3 filas de derecho de ida y vuelta. En la siguiente fila, cierras 4 pts al inicio y al final de la fila y aumentas 6 pts. Dejar una cenefa en espera y trabajar la otra cenefa. Después, colocar ambas cenefas en la misma aguja que las partes del cuerpo, para trabajar el canesú todo junto.
02.04.2023 - 22:18
![]() Serap wrote:
Serap wrote:
Hallo. Ik ben bezig met dit patroon te breien in maat M. Als ik de markeerders plaat na 53 st en voor 53 aan de 2 kanten dan heb ik 91 st voor de achterpand en niet 97 st. Met vriendelijke groeten, Serap
09.02.2023 - 11:12
![]() Carina wrote:
Carina wrote:
Gracias, entonces doy por confirmado que sí me sirven las mangas que he tejido en redondo, no?
09.07.2022 - 19:10DROPS Design answered:
Hola Carina, sí, siempre que hagas el ajuste indicado para la sisa.
09.07.2022 - 19:37
![]() Carina wrote:
Carina wrote:
Hola. He hecho las mangas más largas(3/4), pero las he hecho en redondo por inercia, tengo que deshacerlas y volverlas a hacer de ida y vuelta o me sirven estás que he hecho en redondo? Es que ahora no sé cómo ponerlas y que no se retuerza el cable, así es que no sé si es que no se pueden hacer en redondo cuando se trata de una chaqueta. Gracias
09.07.2022 - 02:32DROPS Design answered:
Hola Carina, para unir la manga solo tienes que cerrar 8-10 pts en el centro bajo la manga antes de unir las mangas con el canesú. La forma de la manga se hace con el canesú.
09.07.2022 - 18:45
|
|||||||||||||||||||
Call It Spring Cardigan#callitspringcardigan |
|||||||||||||||||||
 |
 |
||||||||||||||||||
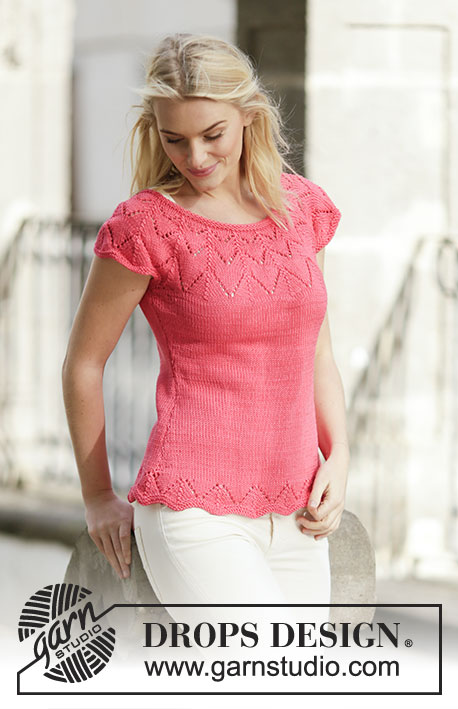
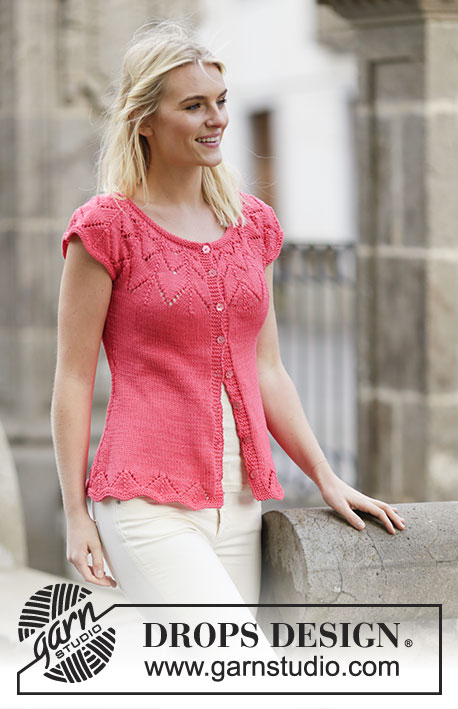
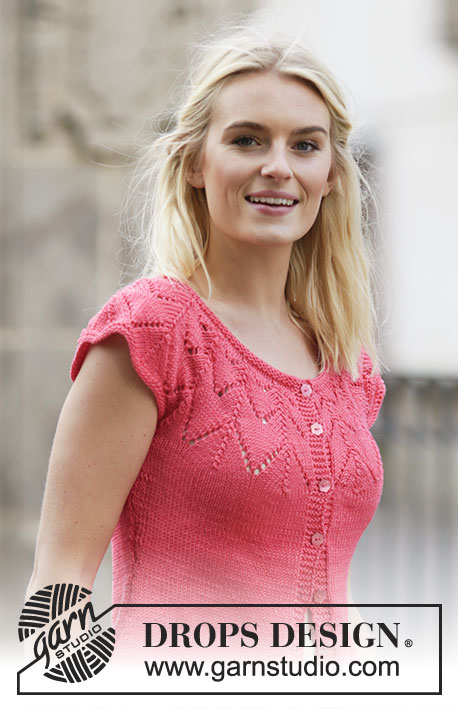
Knitted DROPS jacket in stocking st with lace pattern and round yoke in ”Muskat”. Size: S - XXXL.
DROPS 159-5 |
|||||||||||||||||||
|
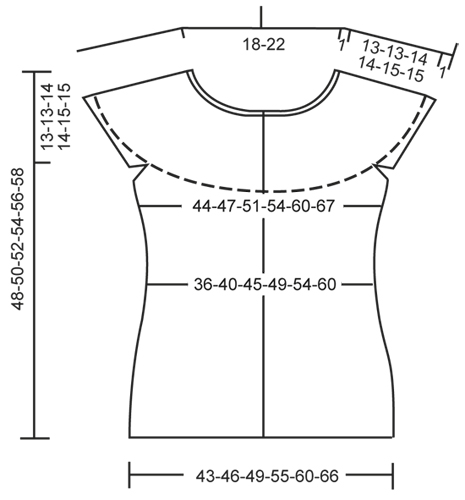
GARTER ST (back and forth): K all rows. 1 ridge = 2 rows K. PATTERN: See diagrams A.1 to A.4. The diagrams show all rows in pattern seen from RS. DECREASE TIP: All dec are done from RS! Dec as follows before marker: Work until 2 sts before marker: K 2 tog. Dec as follows after marker: Slip 1 st as if to K, K 1, psso. INCREASE TIP: Inc 1 st by making 1 YO, on next row P YO twisted (i.e. work in back loop of st instead front) to avoid holes. BUTTONHOLES: Dec for buttonholes on right band. 1 buttonhole = K tog third and fourth st from edge and make 1 YO. Dec for buttonholes when piece measures: SIZE S: 5, 11, 17, 23, 29, 35, 41 and 47 cm. SIZE M: 6, 13, 19, 25, 31, 37, 42 and 49 cm. SIZE L: 6, 12, 19, 25, 32, 38, 45 and 51 cm. SIZE XL: 6, 12, 19, 26, 33, 40, 47 and 53 cm. SIZE XXL: 6, 13, 20, 27, 34, 41, 48 and 55 cm. SIZE XXXL: 7, 15, 22, 29, 36, 43, 50 and 57 cm. ---------------------------------------------------------- JACKET: Worked back and forth on circular needle. Cast on 221-235-249-277-305-333 sts (incl 5 band sts in garter st in each side) on circular needle size 4 mm with Muskat. Work 2 ridges in GARTER ST back and forth - see explanation above! Continue to work PATTERN as follows (= from RS): 5 band sts in garter st, A.1 (= 14 sts on 1st row) 15-16-17-19-21-23 times in width, 1 st in stocking st, 5 band sts in garter st = 191-203-215-239-263-287 sts. NOTE: Work 5 band sts in garter st in each side until finished measurements. REMEMBER THE KNITTING TENSION REMEMBER BUTTONHOLES! When entire A.1 has been worked vertically, insert a marker in each side as follows: Insert a marker after 50-53-56-62-68-74 sts in from each side of piece for front piece. There are now 91-97-103-115-127-139 sts for back piece. Then continue in stocking st inside band sts in garter st. When piece measures 7 cm, dec 1 st on each side of each marker - READ DECREASE TIP. Repeat dec every 2-2½-4-2½-2-2½ cm 6-5-3-5-6-5 more times = 163-179-199-215-235-263 sts. When piece measures 24 cm, inc 1 st on each side of the 2 markers - READ INCREASE TIP! Repeat inc every 1-1-1½-2-2-2 cm 7-6-5-4-6-6 more times = 195-207-223-235-263-291 sts. When piece measures 35-37-38-40-41-43 cm, cast off sts for armhole as follows on next row: Work the first 47-50-54-56-63-70 sts, cast off the next 8-8-8-10-10-10 sts for armhole, work the next 85-91-99-103-117-131 sts, cast off the next 8-8-8-10-10-10 sts for armhole, work the remaining 47-50-54-56-63-70 sts = 179-191-207-215-243-271 sts. Put piece aside and knit the sleeve edges. SLEEVE EDGE: Worked back and forth on circular needle. Cast on 62-64-65-71-74-76 sts on circular needle size 4 mm with Muskat. K 3 rows back and forth (1st row = WS). Work next row as follows: Cast off the first 4-4-4-5-5-5 sts, K the next 54-56-57-61-64-66 sts while AT THE SAME TIME inc 6-6-5-5-4-4 sts evenly (inc by working 2 sts in 1 st), cast off the last 4-4-4-5-5-5 sts, cut the yarn = 60-62-62-66-68-70 sts. Put piece aside and knit another sleeve edge. YOKE: Slip sleeve edges on to same circular needle as body where armholes were cast off = 299-315-331-347-379-411 sts. Work 1 row from WS. Now work pattern as follows: 5 band sts in garter st, A.2 (18-19-20-21-23-25 times) until 6 sts remain, 1 st in stocking st, 5 band sts in garter st. NOTE: See arrow in diagram A.2 and A.3 for correct size. When A.2 has been worked vertically, continue with A.3 over A.2 and A.4 over A.3. There are now 119-125-131-137-149-161 sts on needle. Work 1 ridge while AT THE SAME TIME dec 7-5-3-1-5-9 sts evenly on 1st row from RS = 112-120-128-136-144-152 sts. Work 1 more ridge and loosely cast off. ASSEMBLY: Sew sleeve seams tog edge to edge in front loop of outermost sts. Sew the openings under the sleeves. Sew in outer loops of edge sts. Sew the buttons on to the left band. |
|||||||||||||||||||
Diagram explanations |
|||||||||||||||||||
|
|||||||||||||||||||
 |
|||||||||||||||||||
 |
|||||||||||||||||||
Have you finished this pattern?Tag your pictures with #dropspattern #callitspringcardigan or submit them to the #dropsfan gallery. Do you need help with this pattern?You'll find 24 tutorial videos, a Comments/Questions area and more by visiting the pattern on garnstudio.com. © 1982-2026 DROPS Design A/S. We reserve all rights. This document, including all its sub-sections, has copyrights. Read more about what you can do with our patterns at the bottom of each pattern on our site. |
|||||||||||||||||||


With over 40 years in knitting and crochet design, DROPS Design offers one of the most extensive collections of free patterns on the internet - translated to 17 languages. As of today we count 324 catalogues and 12290 patterns translated into English (UK/cm). 12290
We work hard to bring you the best knitting and crochet have to offer, inspiration and advice as well as great quality yarns at incredible prices! Would you like to use our patterns for other than personal use? You can read what you are allowed to do in the Copyright text at the bottom of all our patterns. Happy crafting!
Post a comment to pattern DROPS 159-5
We would love to hear what you have to say about this pattern!
If you want to leave a question, please make sure you select the correct category in the form below, to speed up the answering process. Required fields are marked *.