
Popular categories
Looking for a yarn?


Comments / Questions (10)
![]() Carol McMillan wrote:
Carol McMillan wrote:
Is the 4th symbol for the charts actually put 1 st on cable needle in back of work, K 2, P 1 from cable needle. this symbol in other patterns is K2, K1? Are the 4th and 7th symbols reversed? Also are the 6th and 8th symbols also reversed?
14.11.2024 - 07:36DROPS Design answered:
Dear Mrs McMilan, the symbol and its text are correct, the "reversed" symbol is the 6th one, juste note that the 7th and 8th symbols are somewhat similar but a bit dfferent. Happy knitting!
15.11.2024 - 08:31
![]() Dorrit Evensen wrote:
Dorrit Evensen wrote:
Strikker denne. Gjør oppmerksom på feil. I diagram forklaringens to siste linjer er det feil. De forekommer ikke i mønsteret og de som er i mønsteret er ikke i forklaringen. Dessuten i den mrdtnederdte Jeg strikker denne modell og det er graverende feil i oppskriften. De to nederste i diagram forklaringen er ikke i mønsteret og omvendt. Dessuten er det byttet om på 1 og 2 i den nestnederste . Håper dere skjønner. Mvh Dorrit Evensen
20.07.2022 - 13:22
![]() Judith Rowe wrote:
Judith Rowe wrote:
Should the 6th symbol down say put 2 sts on cable needle in front of work, rather than back of work. I have knitted the first 5 rows and it doesn't look right doing it the way it is written in the pattern.
14.03.2022 - 00:04DROPS Design answered:
Dear Mrs Rowe, thanks for noticing, 5th symbol (= in back of work) and 6th symbol (in front of work) have been edited now. Happy knitting!
14.03.2022 - 13:46
![]() Gerd B Jensen wrote:
Gerd B Jensen wrote:
Har foreslått navn på denne genseren og kan sende bilde av min dersom dere ønsker det?
27.03.2020 - 16:31DROPS Design answered:
Hei Gerd. Takk for ditt bidrag, det jobbes fortløpende med navn. Legg gjerne ut bilde av din genser på vår Facebook siden/ Workshop. mvh DROPS design
30.03.2020 - 15:31
![]() Ulla Greibe wrote:
Ulla Greibe wrote:
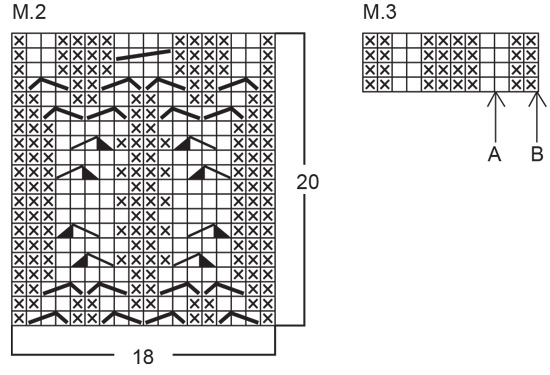
Hvad skal man strikke på første pind af M2 i første snoning lige efter midten i diagrammet? Markeringen i toppen er placeret midt i et felt.
14.11.2018 - 06:26DROPS Design answered:
Hei Ulla. Jeg ser hva du mener, det er litt skjevt det symbolet - dette er et gammelt, håndtegnet diagram. Men det er symbolet for sett 2 m på hj.p foran arb, 1 vr, 2 r fra hj.p. God fornøyelse.
14.11.2018 - 11:21
![]() Joy wrote:
Joy wrote:
What does 20 p = ca 6 cm mean?
05.11.2018 - 05:54DROPS Design answered:
Hi Joy, This means 20 rows will measure approx. 6 cm in height. Happy knitting!
05.11.2018 - 08:00
![]() Gerd B. Jensen wrote:
Gerd B. Jensen wrote:
Hei. jeg lurer på om diagram M1 er riktig. Skal ikke maskene være speilvendt etter omg.9. M2 er speilvendt etter mitre omg. Mvh Gerd
26.10.2018 - 20:17DROPS Design answered:
Hei Gerd. Flettene i begge diagrammene går riktig vei - og motsatt vei utover enn innover. Hvis du sikter til symbolene for om det strikkes rett og vrang eller bare rett under flettingen er dette ulikt fordi M.1 og M.2 er 2 ulike fletter. Dette kan du også se om du ser på bildet. God fornøyelse.
20.11.2018 - 13:00Taryn Padiak wrote:
I believe the English cable directions are wrong for one of the crossovers-- For the fourth cable crossover, it says, "put 2 sts on cable needle in back of work, P1, K2 from cable needle." I believe the cable needle should go to the front instead. It looks very strange when done as in the instructions.
17.02.2015 - 14:55DROPS Design answered:
Dear Mrs Padia, you were right, text for 5th and 6th symbols has been updated. Thank you. Happy knitting!
18.02.2015 - 13:19
![]() Janet Calderbank wrote:
Janet Calderbank wrote:
Your system won't tell me which are the "forbidden words or links" in my original draft of this message, which is not very helpful, as I don't know which words to omit. I like the pattern but couldn't knit it from such a small and fuzzy image, which won't magnify very well. Would you be able to put a better image online, like that used for 114.8 ?
13.02.2014 - 11:57DROPS Design answered:
Dear Mrs Calderbank, a new diagram is now available. Happy knitting!
14.02.2014 - 09:07
![]() A.V. wrote:
A.V. wrote:
Hallo, in der Zeichenerklärung scheint ein Fehler zu sein: bei dem 6. Zeichen sind nur 3 Kästchen vorgesehen und es sollen lt. Beschreibung: 2 M auf 1 Hilfsnadel hinter die Arb legen, 2 re, 2re von der Hilfsnadel - somit sind es 4 M die "gearbeitet" werden. Könnten Sie den M 2 in Reihe 1 noch mal kontrollieren? mir scheint der 3 Zopf anders als in das Muster passend. Zudem möchte ich erwähnen, dass die Musterrapporte sehr schlecht zu erkennen sind. Vielen Dank für die Info
08.02.2014 - 20:25DROPS Design answered:
Sie haben Recht, es hatte sich in der Übersetzung ein Fehler eingeschlichen, die beiden Texte zum 5. und 6. Zeichen waren vertauscht. Der Fehler ist jetzt korrigiert. Nun viel Spaß beim Weiterstricken!
15.02.2014 - 11:58
|
|||||||||||||||||||||||||
Wintering Wisteria |
|||||||||||||||||||||||||
 |
 |
||||||||||||||||||||||||
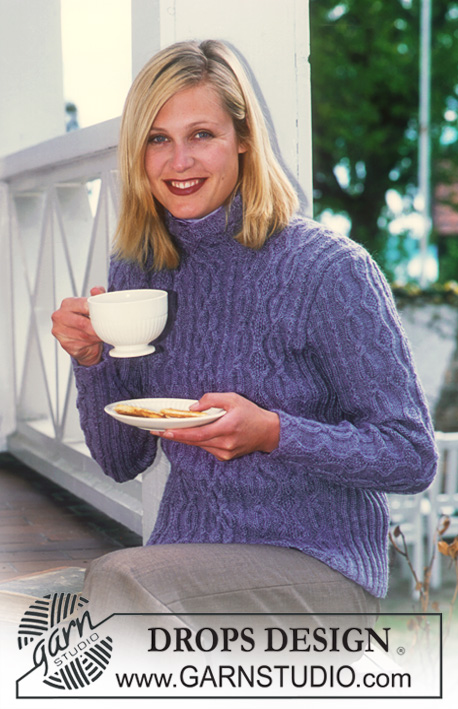
DROPS Pullover in Alpaca
DROPS 72-8 |
|||||||||||||||||||||||||
|
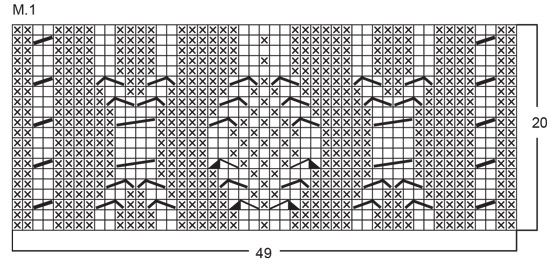
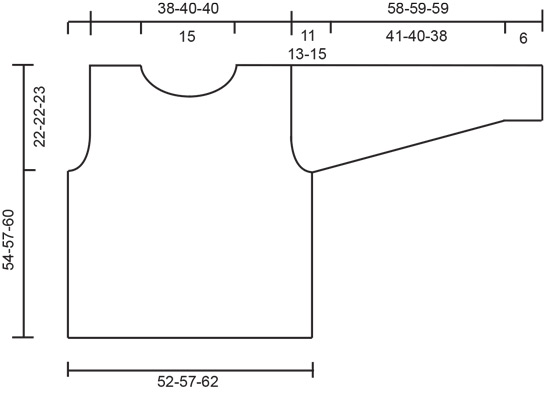
Gauge: 24 sts x 32 rows in stockinette st = 10 x 10 cm [4" x 4"] Garter st, when knitting flat: Knit all sts, all rows. Pattern: See charts. The pattern is seen from the right side. Arrows in the chart for Pattern 3 indicate starting points in the instructions below. ------------------------------------------------------------------- Body: Cast on 316-340-364 sts; join and establish pattern as follows: place a marker, knit 21-27-33 sts of Pattern 3 - start with K 1 at arrow A, Pattern 1 (49 sts), Pattern 2 (18 sts), Pattern 1 (49 sts), 42-54-66 sts of Pattern 3 - start with P 2 at arrow B (place a marker in the middle of these 42-54-66 sts), Pattern 1 (49 sts), Pattern 2 (18 sts), Pattern 1 (49 sts), 21-27-33 sts of Pattern 3 - start with P 2 at arrow B. Each marker should have a K 1 on each side of it. Continue with pattern as established until the piece measures 32-35-37 cm, then bind off 4 sts each side of each marker for armhole. Knit each side separately. Front: = 150-162-174 sts. Bind off for armhole at each side every other row: 3 sts 1-1-2 times, 2 sts 3-4-6 times and 1 st 3-5-4 times = 126-130-130 sts remain on needles. Continue the pattern keeping 1 st in garter st at each side. When the piece measures approx. 47-50-53 cm put the center 18 sts on a st holder for the neck. Bind off at each neck edge every other row: 6 sts 1 time, 4 sts 2 times and 1 st 4 times = 36-38-38 sts remain on each shoulder. Continue until piece measures approx. 54-57-60 cm, bind off. Back: = 150-162-174 sts. Bind off for armhole as on front = 126-130-130 sts. When the piece measures approx. 53-56-59 cm - adjust to end so that there will be 1 more repeat of Pattern 2 (that is, 20 rows more) on the back than when sts were put on a st holder for the front. Now put the center 50 sts on a st holder for the neck. Bind off 2 sts at each neck edge on the next row = 36-38-38 sts remain on each shoulder. Bind off when the piece measures approx. 54-57-60 cm - or length to match front. Sleeve: Cast on 67-67-79 sts on double-pointed needles; join and place a marker at the join. Establish pattern on first row as follows: 9-9-15 sts of Pattern 3 - start with K 1 at arrow A, Pattern 1 (49 sts), 9-9-15 sts of Pattern 3 - start with P 2 at arrow B. The marker should have a K 1 on each side of it. Continue with pattern. When the piece measures 6 cm inc 1 st each side of marker (make incs inside the K 1 at each side of marker) 24-24-18 times: Sizes S/M + M/L: every 5 rows Size XL: alternately every 6th and 7th row - knit the increased sts in Pattern 3 as you go along = 115-115-115 sts. When the piece measures 47-46-44 cm bind off 4 sts each side of marker and knit the rest back and forth on the needles. Bind off for sleeve cap at each side every other row: 3 sts 1-1-1 time, 2 sts 5-4-3 times, 1 st 4-9-14 times, then bind off 2 sts at each side every other row until the piece measures 57-58-58 cm and then bind off 3 sts each side 1 time. On the next row, K 2 tog over the K sts in cables of Pattern 1 (8 sts decreased), then bind off the remaining sts. Sleeve measures approx. 58-59-59 cm. Assembly: Sew shoulder seams. Neck: Pick up around the neck on double-pointed needles as follows: 50 sts from st holder on back, 28 sts down to front st holder, 18 sts from front st holder, 28 sts up other side of neck = 124 sts. Continue Pattern from body over the center 52 sts of front and back, knit 10 sts each side of pattern as follows: K 2, P 2, K 2, P 2, K 2. Bind off when the collar measures approx. 8 - 10 cm - adjust to end on a row without cables. Sew in sleeves. |
|||||||||||||||||||||||||
Diagram explanations |
|||||||||||||||||||||||||
|
|||||||||||||||||||||||||
 |
|||||||||||||||||||||||||
 |
|||||||||||||||||||||||||
 |
|||||||||||||||||||||||||
Have you finished this pattern?Tag your pictures with #dropspattern or submit them to the #dropsfan gallery. Do you need help with this pattern?You'll find 24 tutorial videos, a Comments/Questions area and more by visiting the pattern on garnstudio.com. © 1982-2026 DROPS Design A/S. We reserve all rights. This document, including all its sub-sections, has copyrights. Read more about what you can do with our patterns at the bottom of each pattern on our site. |
|||||||||||||||||||||||||


With over 40 years in knitting and crochet design, DROPS Design offers one of the most extensive collections of free patterns on the internet - translated to 17 languages. As of today we count 324 catalogues and 12290 patterns translated into English (UK/cm). 12290
We work hard to bring you the best knitting and crochet have to offer, inspiration and advice as well as great quality yarns at incredible prices! Would you like to use our patterns for other than personal use? You can read what you are allowed to do in the Copyright text at the bottom of all our patterns. Happy crafting!
Post a comment to pattern DROPS 72-8
We would love to hear what you have to say about this pattern!
If you want to leave a question, please make sure you select the correct category in the form below, to speed up the answering process. Required fields are marked *.