
Popular categories
Looking for a yarn?


Comments / Questions (91)
![]() LAUNAY wrote:
LAUNAY wrote:
Bonjour 1) Pour les manches, si on utilise les aiguilles doubles pointes, on tricote aussi en rond, n'est-ce-pas ? Où doit-on monter les 10m (sous la manche) ? A la fin d'une aiguille ? Au milieu des 64m reprises ? 2) Pour les diminutions, c'est bien 1 de chaque côté du marqueur ? D'avance, merci pour vos réponses.
12.10.2021 - 18:42DROPS Design answered:
Bonjour Mme Launay, les manches se tricotent effectivement en rond sur les aiguilles doubles pointes, vous montez les 10 mailles du même côté que vous avez monté les 10 mailles lors de la division de l'empiècement, dans cette leçon, on montre à partir de la photo 11) comment on va monter les mailles pour le dessous de la manche. Vous mettez ensuite un marqueur au milieu de ces 10 mailles et diminuez 1 m avant le marqueur à la fin du tour + 1 m après le marqueur au début du tour (= 2 m à chaque fois). Bon tricot!
13.10.2021 - 08:05
![]() Karina wrote:
Karina wrote:
Beklager, min fejl, at jeg ikke var mere præcis. Jeg skal til mønsterstrik på første ærme. Der står oplyst, at de to masker i midten, skal være midt på ærmet. Hvordan starter jeg på mønsteret, da der er 12 masker i mønsteret og der er 74 masker på ærmet.
11.10.2021 - 16:31
![]() Karina wrote:
Karina wrote:
Hejsa. Hvordan skal jeg få mønsteret til at passe med 74 masker, og et mønster på 12? På forhånd tak 🙂
10.10.2021 - 21:05DROPS Design answered:
Hei Karina. For at vi skal kunne hjelpe deg er det fint om du opplyser hvor i oppskriften du er, bærestykket, bolen eller erme? Og hvilken str. du strikker. Husk å avpass mønstret slik det står forklart i oppskriften (om det gjelder erme) mvh DROPS Design
11.10.2021 - 16:22
![]() Lis Snedevig Steenberg wrote:
Lis Snedevig Steenberg wrote:
Angående design u-739 (l57-23) og efter ribstrikning til krave og udtagning til xxl skal jeg fortsætte med A1. Hvad med A2-A3-A4?? Venligst Lis Steenberg
03.09.2021 - 11:55DROPS Design answered:
Hei Lis. Når bærestykket er ferdig/A.1 er strikket 1 gang i høyden (og 16 ganger i bredden), og du har 252 masker på pinnen skal det så strikkes ryg&forstk. Og nå skal A.2 strikkes. A.2 strikkes også når du skal strikke ermene sammen med diagram A.3 og A.4. mvh DROPS design
13.09.2021 - 11:06
![]() Kathrin wrote:
Kathrin wrote:
Kann ich diesen wunderschönen Pulli auch mit der Brushed Alpaca Silk stricken? Falls es möglich ist, müsste ich dann Doppelfädig stricken?
02.07.2021 - 17:58DROPS Design answered:
Liebe Kathrin, dieses Modell wird mit Karisma gestrickt, dh ein Garn der Garngruppe B, Brushed Alpaca Silk ist aber ein Garn der Garngruppe C und wird hier keine Alternative sein - hier lesen Sie mehr über Garnalternativen. Viel Spaß beim stricken!
05.07.2021 - 07:22
![]() Jessica wrote:
Jessica wrote:
Hello, Quick question about sleeves. Am I decreasing at the same time as working A2, or do I work A2 and then start to decrease at same time as A3? Thanks!
20.01.2021 - 12:31DROPS Design answered:
Dear Jessica, work A.2 and start to decrease when working A.3. Happpy knitting!
20.01.2021 - 14:38
![]() Maria Del Mar wrote:
Maria Del Mar wrote:
En las explicaciones del patrón pone que:"en las tallas S, L, XL, XXL, para el trabajo cuando queden 24 puntos(=1 repetición) antes de la última vuelta" No entiendo muy bien cómo lo tengo que tejer con esa explicación
12.12.2020 - 17:41DROPS Design answered:
Hola Maria Del Mar, para las tallas mencionadas el inicio de la vuelta nueva se desplaza 24 puntos hacia atrás desde el final de la vuelta que estamos trabajando. Esto se necesita para cuadrar bien el dibujo cuando separemos la labor para las mangas y el cuerpo.
13.12.2020 - 11:50
![]() Berlanger Melinda wrote:
Berlanger Melinda wrote:
Bonjour Donc il y aura 24 mailles non tricotée. Ça ne va pas faire un décalage ? Merci Mélinda
14.11.2020 - 13:07DROPS Design answered:
Bonjour Mme Berlanger, vous continuez le diagramme comme avant, mais le tour suivant doit commencer à ce niveau là pour que le motif soit centré lors de la division. Bon tricot!
16.11.2020 - 07:54
![]() Berlanger wrote:
Berlanger wrote:
Bonjour, Je ne comprends pas très bien quand on a tricoté A1 1x, il faut tricoter 9 tours en Jersey, il faut arrêter 24 m. Comment faire ????? On tricoté pas les mailles ? , on doit déplacer l'anneau marqueur ? Les 9 tours se tricotent avant ou après ? J'avoue je suis bloqué Merci de votre aide À vous lire Excellente journée
06.11.2020 - 14:38DROPS Design answered:
Bonjour Mme Berlanger, à la fin du 9ème tour, tricotez jusqu'à ce qu'il reste 24 mailles avant la dernière maille des tours précédent, autrement dit 1 motif complet avant la fin du tour. Décalez votre marqueur, les tours commencent désormais ici. Vous divisez maintenant l'ouvrage à partir dici (= les 46 premières mailles sont à tricoter pour le dos etc...). Bon tricot!
06.11.2020 - 15:58
![]() Janine Audebert wrote:
Janine Audebert wrote:
Bonjour. Pour commencer A1, faut il faire les augmentations à chaque motif ? ( cela fait 2x13) ou uniquement sur les côtés ? Où faut il faire les augmentations de côté ? Où faut il placer les marqueurs ?
25.10.2020 - 07:59DROPS Design answered:
Bonjour Mme Audebert, vous devez répéter 11 à 17 fois (cf taille) A.1 en largeur; les augmentations figurent dans A.1, lorsque vous tricotez le diagramme, vous devez répéter tous les rangs comme indiqué; vous pouvez mettre un marqueur entre chaque diagramme pour vous permettre de bien vérifier votre nombre de mailles à chaque fois. Le nombre de mailles de chaque A.1 doit être le même pour chaque A.1 de chaque tour et va augmenter en fonction des jetés à faire (3ème symbole). Bon tricot!
26.10.2020 - 08:17
|
||||||||||
Silver Stag#silverstagsweater |
||||||||||
 |
 |
|||||||||
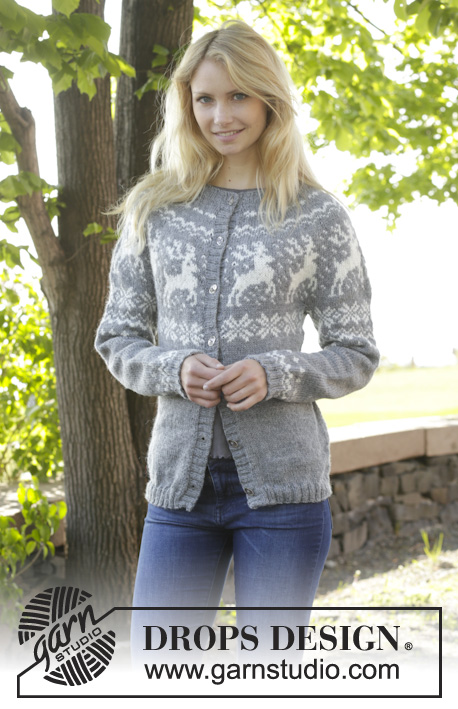
Knitted DROPS Christmas jumper with round yoke, reindeer pattern, worked top down in ”Karisma”. Size: S - XXXL.
DROPS 157-23 |
||||||||||
|
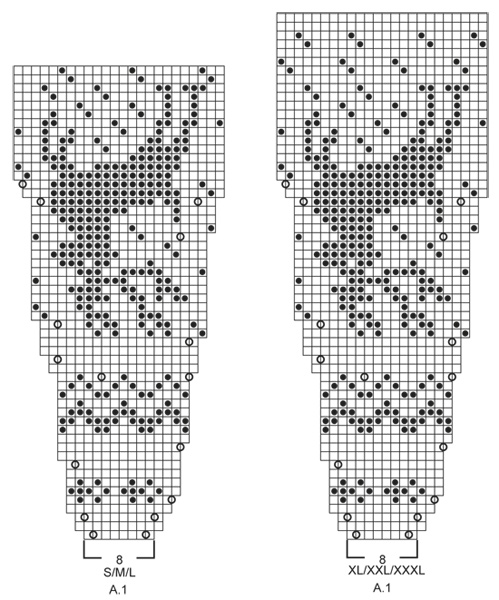
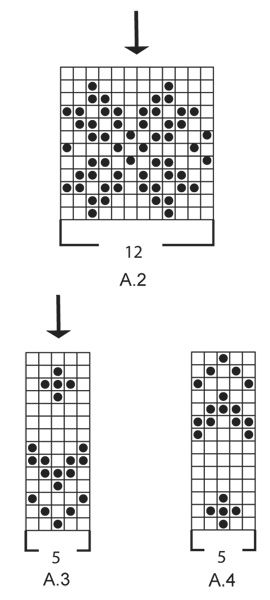
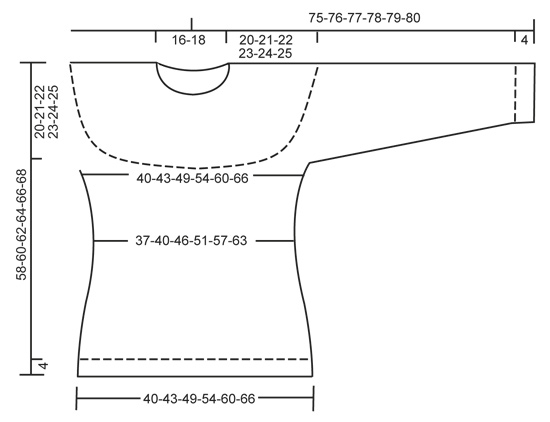
PATTERN: See diagrams A.1 to A.4. The diagrams show all rows in pattern seen from RS. Work entire pattern in stocking st. DECREASE TIP (applies to sides and sleeves): Dec before marker and 1 st K as follows: K 2 tog. Dec after marker and 1 st K as follows: Slip 1 st as if to K, K 1, psso. INCREASE TIP (applies to sides): Inc 4 sts in total on row. Work until 1 st remains before marker, 1 YO, 2 sts in stocking st, 1 YO = 2 sts inc. On next round K YO twisted (i.e. work in back loop of st instead of front) to avoid holes. ---------------------------------------------------------- JUMPER: Worked in the round on circular needle, top down. Work sleeves in the round on double pointed needles. YOKE: Cast on 88-92-96-100-104-108 sts on circular needle size 3 mm with medium grey. Work rib P 2/K 2 until piece measures 3 cm. Now switch to circular needle size 4 mm and work 1 round in stocking st, AT THE SAME TIME inc 0-4-8-20-24-28 sts evenly = 88-96-104-120-128-136 sts. Now work as follows: A.1 (= 8 sts) 11-12-13-15-16-17 times in width. REMEMBER THE KNITTING TENSION! When A.1 has been worked 1 time vertically, there are 264-288-312-360-384-408 sts on round. Continue with 3-5-9-5-7-11 rounds with medium grey. NOTE: In size S, L, XL, XXXL stop 24 sts (= 1 repetition) before last round is worked. This is now beg of the next rounds. Pattern is now correctly placed after sts are divided for sleeves and body. Work next round as follows: Work the first 37-40-46-52-58-64 sts (= half back piece), slip the next 58-64-64-76-76-76 sts on a stitch holder (= sleeve), cast on 10 new sts under sleeve, insert a marker in the middle of these 10 sts, work the next 74-80-92-104-116-128 sts (= front piece), slip the next 58-64-64-76-76-76 sts on a stitch holder (= sleeve), cast on 10 new sts under sleeve, insert a marker in the middle of these 10 sts, work the remaining 37-40-46-52-58-64 sts (= half back piece). BODY: There are now 168-180-204-228-252-276 sts for body. Now work A.2 (= 12 sts) over all sts on round. Continue like this until A.2 has been worked 1 time vertically. Now work piece in stocking st with medium grey. On next round dec 1 st on each side of each marker in the sides - SEE DECREASE TIP. Repeat dec every 2 cm 2 more times = 156-168-192-216-240-264 sts. When piece measures 12-13-14-15-16-17 cm from marker under sleeves, inc 1 st on each side of marker in each side of piece – see INCREASE TIP. Repeat inc every 2 cm 2 more times = 168-180-204-228-252-276 sts. When piece measures 56-58-60-62-64-66 cm, switch to circular needle size 3 mm and inc 20-24-24-28-28-32 sts evenly = 188-204-228-256-280-308 sts. Continue to work rib as follows: * K 2, P 2 *, repeat from *-*. When rib has been worked for 4 cm, cast off with K over K and P over P. SLEEVES: First work pattern, then continue sleeve in medium grey. Slip sts from stitch holder back on double pointed needles size 4 mm. There are now 58-64-64-76-76-76 sts for sleeve. Work 1 row in stocking st. Then cast on 10 sts under sleeve = 68-74-74-86-86-86 sts. Insert a marker in the middle of these new sts. Then work the sleeve in the round. Now work A.2. NOTE: Adjust so that the 2 middle sts in diagram (see arrow) are the 2 middle sts on sleeve. When A.2 has been worked, continue with A.3. NOTE: Adjust pattern so that the middle st in diagram (see arrow) is one of the 2 middle sts on sleeve, AT THE SAME TIME beg dec under sleeve - remember DECREASE TIP. Repeat dec every 3-2½-2½-2½-2½-2½ cm 9-12-12-12-12-12 more times = 48-48-48-60-60-60 sts. When sleeve measures 38 cm, work A.4. NOTE: Adjust so that the middle st in diagram (see arrow) is one of the 2 middle sts on sleeve. When A.4 has been worked vertically, switch to double pointed needles size 3 mm and inc 4-8-8-0-4-4 sts evenly = 52-56-56-60-64-64 sts. Then work rib (= K 2/P 2) for 3 cm. Cast off with K over K and P over P. |
||||||||||
Diagram explanations |
||||||||||
|
||||||||||
 |
||||||||||
 |
||||||||||
 |
||||||||||
Have you finished this pattern?Tag your pictures with #dropspattern #silverstagsweater or submit them to the #dropsfan gallery. Do you need help with this pattern?You'll find 25 tutorial videos, a Comments/Questions area and more by visiting the pattern on garnstudio.com. © 1982-2026 DROPS Design A/S. We reserve all rights. This document, including all its sub-sections, has copyrights. Read more about what you can do with our patterns at the bottom of each pattern on our site. |
||||||||||


With over 40 years in knitting and crochet design, DROPS Design offers one of the most extensive collections of free patterns on the internet - translated to 17 languages. As of today we count 324 catalogues and 12291 patterns translated into English (UK/cm). 12291
We work hard to bring you the best knitting and crochet have to offer, inspiration and advice as well as great quality yarns at incredible prices! Would you like to use our patterns for other than personal use? You can read what you are allowed to do in the Copyright text at the bottom of all our patterns. Happy crafting!
Post a comment to pattern DROPS 157-23
We would love to hear what you have to say about this pattern!
If you want to leave a question, please make sure you select the correct category in the form below, to speed up the answering process. Required fields are marked *.