
Popular categories
Looking for a yarn?


Comments / Questions (33)
![]() Toussaint Michèle wrote:
Toussaint Michèle wrote:
Sur le modèle 110-29 j'aimerais remplacer le point d'astrakan par un autre. Par avance merci
29.02.2024 - 14:41DROPS Design answered:
Bonjour Mme Toussaint, il vous faudra alors trouver un point fantaisie qui correspond à la tension indiquée pour le point d'astrakan et adapter en fonction. Ou bien consultez nos modèles de vestes ici, en ajoutant les filtres supplémentaires pour affiner votre recherche. Bon tricot!
29.02.2024 - 16:27
![]() Monterrin wrote:
Monterrin wrote:
Bonsoir, pour l’encolure j’ai compris qu’il s’agit de rangs raccourcis mais je ne comprends pas combien il en faut et comment mesurer Merci pour la novice que je suis
13.11.2022 - 17:38DROPS Design answered:
Bonjour Mme Monterrin, vous pensiez col, correct? La réponse ci-dessous devrait pouvoir vous aider, le nombre de rangs dépend de votre tension en hauteur; mesurez du côté le plus court (celui qui se trouve côté épaule, qui sera ensuite cousu le long de l'encolure dos). Bon tricot!
14.11.2022 - 10:03
![]() Monterrin wrote:
Monterrin wrote:
Bonjour, je suis un peu perdue pour l’encolure. Tricoter les 22 m OK mais la suite je ne comprends pas . C’est des rangs raccourcis ? 2 rgs sur les 16 premières m Je ne sais pas si vous allez me comprendre
13.11.2022 - 11:02DROPS Design answered:
Bonjour Mme Monterrin, tout à fait, vous tricotez les 22 mailles du col en rangs raccourcis pour former le retombé, autrement dit, vous tricotez 2 rangs sur les 16 premières mailles (en commençant sur l'envers pour le devant gauche et sur l'endroit pour le devant droit), le côté du col le plus court sera celui cousu le long de l'encolure dos - cette vidéo montre cette technique (sans les rangs raccourcis). Bon tricot!
14.11.2022 - 09:45
![]() Monterrin wrote:
Monterrin wrote:
Bonjour je suis débutante mais je vais essayer il faut bien se lancer Le M1er M2 se lise de gauche à droite ou l’inverse
01.11.2022 - 09:43DROPS Design answered:
Bonjour Mme Monterrin, lisez les diagrammes M.1 et M.2 de la même façon: en commençant en bas à droite, lisez de droite à gauche sur l'endroit et de gauche à droite sur l'envers. M.1 va se tricoter par ex ainsi: 1 m lis, répétez les 6 mailles de M.1 jusqu'à ce qu'il reste 5 mailles, tricotez les 4 premières mailles de M.1 et terminez par 1 m lis (sur l'envers, lisez de gauche à droite). Bon tricot!
01.11.2022 - 10:38
![]() Elisabeth Servin wrote:
Elisabeth Servin wrote:
Mönstret verkar felvänt, jag får avigan utåt. Kan ni uppdatera mönstret. Såg liknande kommentar från en amerikansk stickade.
18.08.2022 - 23:48
![]() Annie Lindsay wrote:
Annie Lindsay wrote:
What does NB! mean in the above pattern?
29.03.2021 - 22:15DROPS Design answered:
Hi Annie, NB! means NOTE! Happy crafting.
30.03.2021 - 07:50
![]() Isabelle wrote:
Isabelle wrote:
Attention, le patron français est truché d'erreurs, surtout pour les augmentations du dos. J'ai dû recommencer deux fois avant de découvrir que le patron anglais a été corrigé et est différent.
12.01.2021 - 17:21DROPS Design answered:
Bonjour Isabell et merci pour votre retour, les explications en français ont été corrigées. Bon tricot!
13.01.2021 - 08:30
![]() Ineke wrote:
Ineke wrote:
De kraag is te kort, ik heb aan de binnenkant 9 ribbels, dus 18 naalden gebreid, zodat de hoogte aan de binnenkant ongeveer 7 cm is.
28.12.2020 - 14:37
![]() Jeannine wrote:
Jeannine wrote:
Die ersten 2 Zeilen bei dem Rückenteil sind in Deutsch ganz anders beschrieben als in Französisch. Ich komme nicht weiter , weil ich nicht verstehe, ob ich nach der Randmasche noch 2 M Krausrippe stricken muss. Danke für Ihre Antwort.
04.02.2018 - 16:43
![]() Jeannine wrote:
Jeannine wrote:
Guten Tag, wieso ist in dem Muster M1 eine Masche links abheben in der deutschen Anleitung und in der französischen eine Masche rechts abheben? Was ist richtig , oder ist es egal?
02.02.2018 - 20:02
|
||||||||||
DROPS 96-23 |
||||||||||
|
|
||||||||||
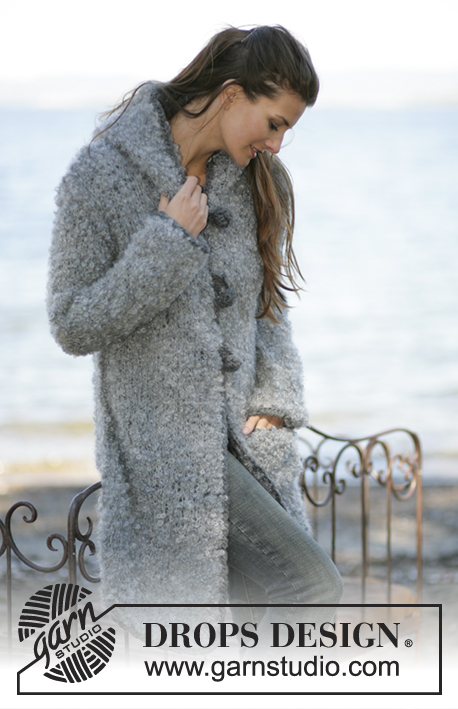
Knitted jacket with false English rib variation and crochet edges in DROPS Alaska. Size: S-XXL
DROPS 96-23 |
||||||||||
|
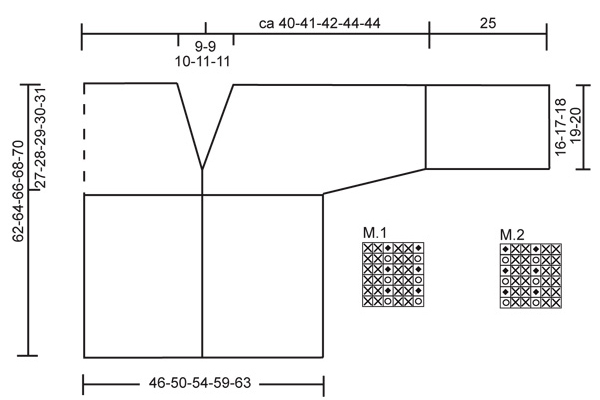
Knitting Tension: 14 sts x 17 rows on needle size 7 mm in stocking sts = 10 x 10 cm and 14 sts x 26 rows in garter sts = 10 x 10 cm Pattern: see diagrams M.1 and M.2. The diagrams are seen from the right side. Garter sts: knit all rows. Increasing tips: Inc inside 1 edge st as follows: make a yo, knit into back of yo, on the returning row. Measurement tips: Because of the weight of the yarn, make all measurements whilst the pieces are “hanging”. Buttonhole: Cast off for buttonholes on right front edge. 1 buttonhole = cast off the 3rd st from the edge mid front and cast on 1 new st in the same place on next row. Cast off for buttonholes when the piece measures: Size S: 25, 31 and 37 cm Size M: 26, 32 and 38 cm Size L: 27, 33 and 39 cm Size XL: 28, 34 and 40 cm Size XXL: 29, 35 and 41 cm Back piece: Cast on 66-72-78-84-90 sts (incl 1 edge st each side, knitted in garter sts throughout) on needle size 7 mm with Alaska. Knit 4 rows garter sts and continue in M.1 with 1 edge st each side. NB! The pattern beg and ends the same way both sides. When piece measures 35-36-37-38-39 cm finish the piece in garter sts. At the same time cast on new sts each side for sleeves on every other row ( i.e at the end of each row) as follows: 1 st 5-6-8-9-11 times, 2 sts 8-7-5-4-2 times, 3 sts 1 time = 114-118-120-124-126 sts. When piece measures 60-62-64-66-68 cm cast of the middle 10-10-12-14-14 sts for neck and dec to shape the neckline on next row: 1 st 1 time = 51-53-53-54-55 sts on each shoulder/sleeve. Cast of when piece measures 62-64-66-68-70 cm. Left front: Cast on 39-42-45-48-51 sts (incl 1 edge st at side and 5 front edge sts towards mid front, knitted in garter sts throughout) on needle size 7 mm with Alaska. Please read all of the following section before continuing! Knit 4 rows garter sts and knit next row as follows from the side (= the RS): 1 edge st, M.2 over the next 33-36-39-42-45 sts and finish with 5 edge sts mid front in garter sts. Continue pattern like this. When piece measures 34-35-36-37-38 inc 1 st inside the first edge st towards mid front – see Increasing tips. Now knit 2 rows garter sts over the 6 front edge sts only (don’t knit the other sts). Continue in garter sts over all sts, at the same time inc 1 st towards mid front on every 4th row a total of 9 times. At the same time when piece measures 35-36-37-38-39 cm cast on new sts for sleeve at the side as described for back piece. After all inc are complete = 73-75-76-78-79 sts on row. Continue in garter sts until piece measures 62-64-66-68-70 cm and cast off the outermost 51-53-53-54-55 sts (= shoulder/sleeve) = 22-22-23-24-24 collar sts left on row. Knit garter sts over these sts as follows: *2 rows garter sts over all sts, 2 rows garter sts over the outermost 14-14-16-16-16 sts only*, repeat from *-* until collar measures 4.5-4.5-5.5-4.5 cm on the inside (it will measure approx 9-9-10-11-11 cm on the outside). Right front: Cast on and knit as left front, but mirrored. Remember buttonholes, see above. Assembly: Sew shoulder/sleeve seam using mattress sts. Sew on buttons to left front piece. Cuffs: Pick up 47-50-53-56-59 sts (incl 1 edge st each side) along sleeve edge. Knit M.1 with 1 edge st each side. When the cuff measures approx 25 cm (try on the jacket for exact measurement) knit 1 row from the RS and cast off. Repeat along the other sleeve. Sew tog the collar mid back and sew it to neckline on back piece – sew in the outer loops of sts to avoid a chunky seam. Sew under arm and side seam inside 1 edge st. Crochet border: Crochet a border round the opening of the jacket, i.e. along bottom edge and up along both front pieces and collar, with crochet hook size 7 and Alaska as follows: 1 dc in first st, 3 ch, now crochet 1 tr in each st and finish with 1 sl st in 3rd ch from beg of round. ___________________________________________________________________ |
||||||||||
Diagram explanations |
||||||||||
|
||||||||||
 |
||||||||||
Have you finished this pattern?Tag your pictures with #dropspattern or submit them to the #dropsfan gallery. Do you need help with this pattern?You'll find 21 tutorial videos, a Comments/Questions area and more by visiting the pattern on garnstudio.com. © 1982-2026 DROPS Design A/S. We reserve all rights. This document, including all its sub-sections, has copyrights. Read more about what you can do with our patterns at the bottom of each pattern on our site. |
||||||||||


With over 40 years in knitting and crochet design, DROPS Design offers one of the most extensive collections of free patterns on the internet - translated to 17 languages. As of today we count 324 catalogues and 12290 patterns translated into English (UK/cm). 12290
We work hard to bring you the best knitting and crochet have to offer, inspiration and advice as well as great quality yarns at incredible prices! Would you like to use our patterns for other than personal use? You can read what you are allowed to do in the Copyright text at the bottom of all our patterns. Happy crafting!
Post a comment to pattern DROPS 96-23
We would love to hear what you have to say about this pattern!
If you want to leave a question, please make sure you select the correct category in the form below, to speed up the answering process. Required fields are marked *.