
Popular categories
Looking for a yarn?


Comments / Questions (11)
![]() Carmen wrote:
Carmen wrote:
Hola, Qiiero empezar a tejer el bolso. Me puede explicar pir favor que significa p.e. ? No lo he encontrado en las lecciones. Otra cosa, en la segunda parte que quiere decir , " el grupo de 4 puntos altos?"
04.04.2026 - 09:02
![]() Schrevens Arlette wrote:
Schrevens Arlette wrote:
Hallo, staan op de teltekening alleen de heengaande naalden afgebeeld aub? Groetjes, Arlette
18.12.2024 - 10:56DROPS Design answered:
Dag Arlette,
In de telpatronen zijn zowel de heengaande als de teruggaande naalden weergegeven.
19.12.2024 - 18:13
![]() Christine wrote:
Christine wrote:
Bonjour, Je ne comprends pas comment finir les manches. J'ai rabattu 1x4m. puis 3x2m. de chaque côté tous les 2 rangs mais, en démarrant à 49cm, je suis loin d'atteindre les 55-56cm. Je ne sais pas combien de mailles ; il doit rester à rabattre en une fois. A quoi cela sert-il de faire un échantillon si vous parlez tantôt en mailles, tantôt en cm ?
19.09.2023 - 19:50DROPS Design answered:
Bonjour Christine, la hauteur (en cm donc) est ici plus importante que le nombre de mailles restant qui va dépendre de votre tension en hauteur (dans ce type de modèle, si vous n'avez pas le bon nombre de rangs en hauteur, vous pouvez ajuster facilement sur la hauteur en cm) - la tête de manche doit mesurer 7 cm au total: vous rabattez ainsi 2 mailles au début de chaque rang de chaque côté jusqu'à ce que la manche mesure 55 cm de hauteur totale (ajustez pour que la tête de manche soit bien symétrique), et rabattez ensuite 3 mailles de chaque côté, rabattez les mailles restantes. Bon tricot!
20.09.2023 - 07:42
![]() Carmen Tecklenburg wrote:
Carmen Tecklenburg wrote:
Ik heb patroon 1 al 100x proberen te breien en tekst op andere manier proberen te interpreteren, ook de door andere gestelde vragen gelezen en geprobeerd maar het wil me niet lukken om de gaatjes te creeeren. Is er een kort filmpje beschikbaar voor dit patroontje??
20.03.2022 - 16:28DROPS Design answered:
Dag Carmen,
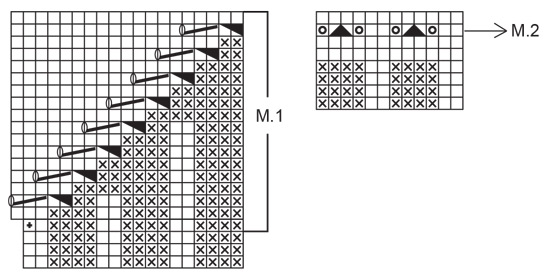
Helaas is er geen video van specifiek dit patroon. Bij de diagonale lijn brei je het 4e symbool als volgt: je zet eerst 2 steken op een kabelnaald (dit zijn 2 averechte steken en deze kabelnaald houd je aan de achterkant van het werk. Dan brei je 3 steken recht, dan brei je de 2 steken van de kabelnaald averecht samen. Tot slot maak je 2 omslagen, dus je slaat de draad 2 keer om de rechter naald. Vervolgens brei je gewoon verder in recht. Op de volgende naald laat je 1 van de 2 omslagen van de naald af glijden en de andere brei je. Dit zou een gaatje moeten creëren.
21.03.2022 - 07:28
![]() Pia Jensen wrote:
Pia Jensen wrote:
Forstår ikke helt. Skal der kun laves hulmønster i slutningen af pinden? Diagram viser ikke helt tydeligt
18.05.2021 - 16:04DROPS Design answered:
Hei Pia. Det er kun første gang det lages kast/hull på slutten av pinnen, deretter forflyttes kastet/hullet seg 2 masker bort. mvh DROPS design
19.05.2021 - 10:31
![]() Danielle Mescouez wrote:
Danielle Mescouez wrote:
Bonjour, je ne comprend pas vos explications pour la finition du col : "Pour que la bordure s’enroule joliment, tricoter 2 m toutes les 5 m environ au moment de les rabattre".
26.08.2020 - 15:35DROPS Design answered:
Bonjour Mme Mescouez, la formulation a été modifiée, il s'agit ici de tricoter 2 fois chaque 5ème maille (toutes les 5 mailles, tricotez alternativement le brin avant et le brin arrière de la même maille). Merci pour votre retour, bon tricot!
26.08.2020 - 16:17
![]() Agneta Hugosson wrote:
Agneta Hugosson wrote:
Var börjar jag om igen efter jag stickat mönstret hela rutan m-1 en gång? när m-1 är färdigstickad står det att man skall sticka 2 yttersta m i höger sida tillsammans för att kompensera den m som utökades i första omgången m-1, skall jag börja vid markeringen igen för omgång nr 2? Då skall jag ju öka 1 m igen eller?
13.09.2019 - 08:41DROPS Design answered:
Hej Agneta, du fortsätter M.1 till du har stickat hullmönstret helt ut i sidan af tröjan. Först när du är färdig med det skall du sticka de 2 yttersta m tillsammans. Lycka till :)
17.09.2019 - 14:00
![]() Jeannette Prinsen wrote:
Jeannette Prinsen wrote:
Ik ben begonnen met 82-27 maar bij mij komen de gaatjes er niet in. Volgens mij doe ik precies wat er staat, maar ze verschijnen niet. Wat zou de oorzaak kunnen zijn?
05.07.2016 - 15:22DROPS Design answered:
Hoi Jeanette. Je moet de omslagen gewoon breien en niet gedraaid, dan vormen de gaatjes zich automatisch
05.07.2016 - 15:24
![]() Katinka Erlandsen wrote:
Katinka Erlandsen wrote:
Jeg forstår ikke, den del af mønsteret, hvor der skal sættes 2 masker på en hjælppind, 3 ret og de to fra hjælppinden vrang og herefter to oms. Skal det hele stikkes på en pind?
20.07.2015 - 13:35DROPS Design answered:
Hej Katinka, Ja det strikker du efter ribben over de sidste 5 m i diagrammet, du starter da 2 m tidligere for hver gang du skal strikke det mønster. God fornøjelse!
29.07.2015 - 13:21
![]() Elly wrote:
Elly wrote:
I'm a big Drops fan and love your patterns! Am just starting #82-27 and am not clear on how to start the row with the dropped stitches after the rib. Is the first stitch 2 yo? thanks.
25.01.2015 - 13:07DROPS Design answered:
Dear Elly, you work from RS : put 2 sts on cable needle in back of work, K 3, P 2 tog from cable needle, then 2 yo. Then, on next row from WS, the first of these sts will be the double YO, drop one yo and P the 2nd yo, and continue following diagram. Happy knitting!
26.01.2015 - 11:18
|
||||||||||||||||||||||
Diagonal Lace |
||||||||||||||||||||||
|
|
||||||||||||||||||||||
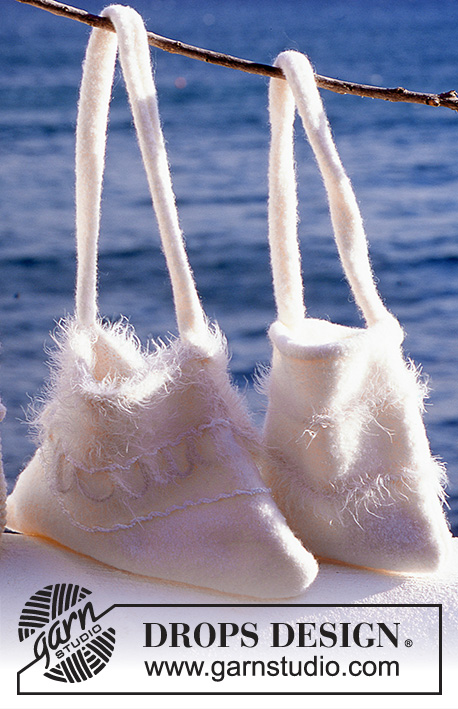
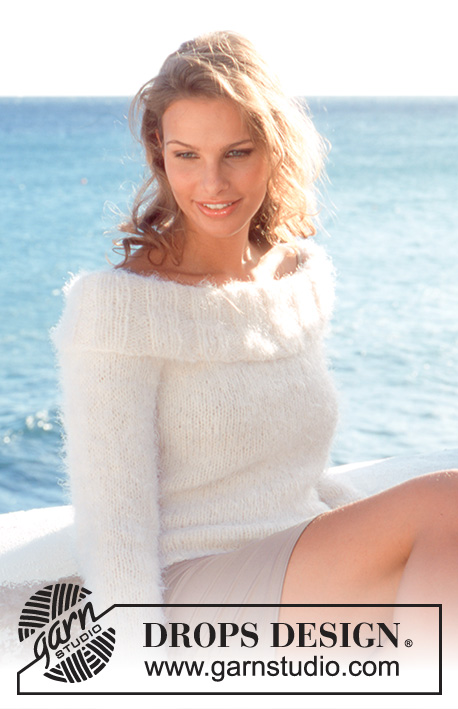
Knitted pullover in DROPS Bomull-Lin, and crocheted bag/tote bag with lace pattern in DROPS Bomull-Lin.
DROPS 82-27 |
||||||||||||||||||||||
|
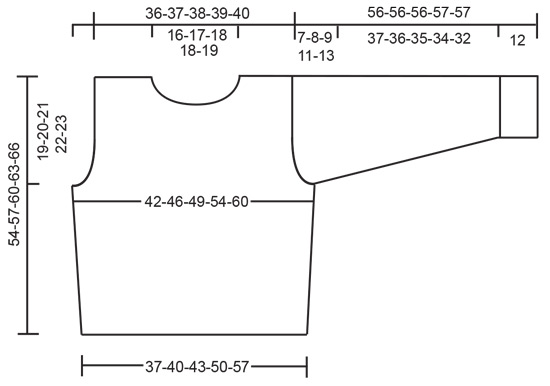
PULLOVER: Gauge: 18 sts x 24 rows on larger needles in stockinette st = 10 x 10 cm. Rib: Row 1 (right side): * P 4, K 2 *, repeat from * - *. Row 2 (wrong side): * P 2, K 4 *, repeat from * - *. Pattern: See charts. The pattern is seen from the right side. Pattern 1 starts on the 4th row of the chart – note that on the 3rd row of the chart (the row before you begin Pattern 1) you inc 1 st. This inc is only in the last st at the end of the row, it is not repeated across the row! The chart does not show the entire width of the Pattern – it shows only the last 19 sts above the rib. As you get to the top of the chart, you will continue the pattern over the remaining rib sts until all of the sts are knit in stockinette st. Front: Cast on 68-74-80-92-104 sts on smaller needles with natural. Knit rib (row 1 = right side) – start with K 1 (edge st knit in garter st), * P 4, K 2 * and finish with K 1 (edge st knit in garter st). Read the entire section before knitting: Pattern: When the rib measures 7-7-6-5-4 cm (this is the 3rd row of the chart) change to larger needles – read the instructions above – 69-75-81-93-105 sts on needles. Then knit Pattern 1 over the rib sts (the edge sts are not shown on the chart) until all rib-sts are knit in stockinette st. (The Pattern will be complete just before or just after you bind off for armholes.) When Pattern 1 is complete, K tog the 2 outermost sts at right side to compensate for the inc when Pattern 1 started. Continue in stockinette st to finished measurements. Side inc: At the same time, when the piece measures 10 cm inc 1 st at each side inside of the edge st by K 2 sts in 1 st – knit the increased sts in stockinette st. Inc at each side every 5-5-5-8-11 cm a total of 5-5-5-4-3 times. Armhole: When the piece measures 35-37-39-41-43 cm bind off for armhole at each side every other row: 4 sts 1 time, 2 sts 1-1-2-3-5 times and 1 st 1-3-3-5-5 times = 64-66-68-70-72 sts. Neck: When the piece measures 44-47-50-53-56 cm put the center 12-14-16-16-18 sts on a st holder for the neck. Then bind off at each neck edge every other row: 2 sts 2 times and 1 st 4 times = 18-18-18-19-19 sts remain on each shoulder. When the piece measures 54-57-60-63-66 cm bind off all sts. Back: Cast on and knit rib as on front. When the rib measures 7-7-6-5-4 cm change to stockinette st over all sts. Inc at the side as on front = 78-84-90-100-110 sts and bind off for armhole as on front. When the piece measures 52-55-58-61-64 cm bind off the center 24-26-28-28-30 sts for the neck. Then bind off 2 sts at each neck edge on the next row = 18-18-18-19-19 sts remain on each shoulder. Bind off when the piece measures 54-57-60-63-66 cm. Sleeve: Cast on 44-50-50-56-56 sts on smaller needles with natural. K 3 rows garter st (row 1 = right side) then change to rib. When sleeve measures 12 cm change to larger needles and knit 2 rows stockinette st – then knit Pattern 2 across row – see the chart for placement over the rib. Continue with stockinette st to finished measurements. After the rib inc 1 st at each side every 3.5-4.5-3.5-4-3 cm a total of 10-8-10-9-11 times = 64-66-70-74-78 sts. When sleeve measures 49-48-47-46-44 cm bind off for sleeve cap at each side every other row: 4 sts 1 time, 2 sts 3 times and 1 st 0-2-3-5-8 times, then bind off 2 sts at each side until the piece measures 55-55-55-56-56 cm, then bind off 3 sts 1 time at each side. Bind off the remaining sts, the piece measures approx. 56-56-56-57-57 cm. Assembly: Sew shoulder seams. Neckband: Pick up approx. 75-85 sts around the neck on smaller short circular needles with green. Join and knit 6 rows stockinette st. Bind off – so that the edge will roll nicely, K 2 sts in approx. every 5th st at the same time as binding off. Sew in sleeves. Sew sleeve and side seams using edge sts as a seam allowance. BAG Crochet tip: At the beginning of each row replace 1 treble crochet with 3 chain stitches and 1 double treble crochet with 4 chain stitches. Bag: The bag is worked in the round from the bottom upwards. Read Crochet tip! Work 4 chain stitches with hook size 4 mm and Bomull-Lin. Form them into a ring with 1 slip stitch in the first chain stitch. Round 1: 7 treble crochets around the ring. Round 2: 2 treble crochets in each treble crochet = 14 treble crochets. Round 3: 2 treble crochets in each treble crochet = 28 treble crochets. Round 4: * 1 treble crochet in first stitch, 2 treble crochets in next stitch *, repeat from *-* to end of round = 42 treble crochets. Round 5: * 1 treble crochet in each of the first 2 treble crochets, 2 treble crochets in the next treble crochet *, repeat from *-* to end of round = 56 treble crochets. Round 6: * 1 treble crochet in each of the first 3 treble crochets, 2 treble crochets in the next treble crochet *, repeat from *-* to end of round = 70 treble crochets. Round 7: * 1 treble crochet in each of the first 4 treble crochets, 2 treble crochets in the next treble crochet *, repeat from *-* to end of round = 84 treble crochets. Round 8: * 1 treble crochet in each of the first 5 treble crochets, 2 treble crochets in the next treble crochet *, repeat from *-* to end of round = 98 treble crochets. Round 9: * 1 treble crochet in each of the first 6 treble crochets, 2 treble crochets in next treble crochet *, repeat from *-* to end of round = 112 treble crochets. Round 10: 1 treble crochet in each treble crochet but 2 treble crochets in each 14th treble crochet = 120 treble crochets. Now the piece measures approx. 24 cm in diameter. Continue with 1 treble crochet in each treble crochet for 3 rounds. The next round is worked as follows: 1 treble crochet in the first treble crochet, * 1 chain stitch, skip 1 treble crochet and fasten with 1 treble crochet in the next treble crochet *, repeat from *-* to end of round. Then work 1 round of 1 treble crochet in each stitch from the previous round. The next round is worked as follows: 4 chain stitches + 2 double treble crochets in the first treble crochet, skip 3 treble crochets, 3 double treble crochets in the next treble crochet, skip 3 treble crochets *, repeat from *-* to end of round and finish with 1 slip stitch in the 4th chain stitch at the beginning of the round. Then work 3 double treble crochets between all treble crochet groups from the previous round to finished length. When the piece measures 25 cm from the edge of holes, continue working just over 4 treble crochet groups on the one side of the bag for the shoulder strap - turn every row with 4 chain stitches. Work until the strap measures approx. 80 cm, cut the strand and sew it edge to edge on the other side of the bag. |
||||||||||||||||||||||
Diagram explanations |
||||||||||||||||||||||
|
||||||||||||||||||||||
 |
||||||||||||||||||||||
 |
||||||||||||||||||||||
Have you finished this pattern?Tag your pictures with #dropspattern or submit them to the #dropsfan gallery. Do you need help with this pattern?You'll find 27 tutorial videos, a Comments/Questions area and more by visiting the pattern on garnstudio.com. © 1982-2026 DROPS Design A/S. We reserve all rights. This document, including all its sub-sections, has copyrights. Read more about what you can do with our patterns at the bottom of each pattern on our site. |
||||||||||||||||||||||


With over 40 years in knitting and crochet design, DROPS Design offers one of the most extensive collections of free patterns on the internet - translated to 17 languages. As of today we count 324 catalogues and 12290 patterns translated into English (UK/cm). 12290
We work hard to bring you the best knitting and crochet have to offer, inspiration and advice as well as great quality yarns at incredible prices! Would you like to use our patterns for other than personal use? You can read what you are allowed to do in the Copyright text at the bottom of all our patterns. Happy crafting!
Post a comment to pattern DROPS 82-27
We would love to hear what you have to say about this pattern!
If you want to leave a question, please make sure you select the correct category in the form below, to speed up the answering process. Required fields are marked *.