
Popular categories
Looking for a yarn?


Comments / Questions (12)
![]() Kathy wrote:
Kathy wrote:
I have just knitted this pattern in size small in Kid Silk exactly as per the instructions and unfortunately I have run out of wool about 30 rows short of finishing the second sleeve so will need to buy another ball of wool ( I bought 6 x 25g balls = 150g as stated in the pattern.) Please correct the pattern to show that 175g are required for the small size!
24.03.2026 - 11:15DROPS Design answered:
Dear Kathy, thanks for your feedback, a correction will come. Happy knitting!
25.03.2026 - 07:53
![]() Karen wrote:
Karen wrote:
I am trying to knit this pattern in a medium size. Casting on 199 stitches and at the beginning of the pattern side stitches ( band 6 sts, A1. 16sts, A2. 9sts, stocking stitch22, ) back( st.st 22,A1 40 sts, A2 9 sts, st. st. 22) side ( st.st. 22, A1. 16 sts, A2. 9sts, band 6 sts) the total is 181 , there are 18 stitches unaccounted for. What am I missing? Thanks in advance for your help.
21.03.2025 - 14:08DROPS Design answered:
Dear Karen, Work RIGHT BAND (= 6 sts), A.1 a total of 2 times (= 8x2 = 16), A.2 (=9 sts), work 22 stocking stitches, insert 1 marker-thread before the next stitch (= side), work 22 stocking stitches, A.1 5 times (= 8x5 = 40 sts), A.2 (= 9 sts), work 22 stocking stitches, insert 1 marker-thread before the next stitch (= side), work 22 stocking stitches, A.1 a total of 2 times (= 16 sts), A.2 (= 9 sts), work LEFT BAND (= 6 sts). That is: 6+16+9+22+22+40+9+22+22+16+9+6 = 199 stitches. The number of stitches you indicated is correct as well and adds up to 199 stitches. Happy knitting!
23.03.2025 - 14:14
![]() Françoise Roget wrote:
Françoise Roget wrote:
Bonjour Je suis étonnée de la petite quantité de laine "brushed alpaca" indiquée (150 g taille L) pour réaliser ce gilet. Pourriez-vous confirmer ? Merci d avance de votre aide, Cordialement
21.08.2024 - 17:16DROPS Design answered:
Bonjour Mme Roget, 150 g DROPS Brushed Alpaca Silk correspondent à 6 pelotes de 140 m; si votre tension est juste, à la fois en largeur et en hauteur, c'est la quantité qu'il vous faudra en taille L. Bon tricot!
22.08.2024 - 08:06
![]() SILVIA wrote:
SILVIA wrote:
Buenas tardes: para tejer la muestra indican "17 puntos de ancho y 2231 hileras de alto con punto jersey y 2 hilos DROPS Kid-Silk o 1 hilo DROPS Brushed Alpaca Silk = 10 x 10 cm." pero 2231 hileras creo que son muchas ¿serían 22 ó 31?
17.05.2024 - 19:34DROPS Design answered:
Hola Silvia, se trata de una errata, son 22 hileras. La corregiremos lo antes posible.
19.05.2024 - 23:42
![]() Annie Puigrenier wrote:
Annie Puigrenier wrote:
Merci pour votre aide . Cordialement
05.03.2024 - 00:01
![]() Bing wrote:
Bing wrote:
Annie, you have to knit both bands (Left & right) too.
03.03.2024 - 06:03
![]() Puigrenier Annie wrote:
Puigrenier Annie wrote:
Bonjour, Je ne comprends pas la répartition s des motifs pour démarrer mon tricot . Je fais la taille S. je démarre donc avec 183 mailles mais je n’arrive pas à placer tous les motifs , il me reste des mailles Bordure 5 + (2x A1)= 16, + A2 =9 + 18 jersey+ (5x A1)= 40,+A2= 9 + 18 jersey, +18 jersey ,+(2x A1) = 16,+A2= 9, + bordure 5. Merci à vous Cordialement Annie
03.03.2024 - 03:19DROPS Design answered:
Bonjour Annie, la bordure devant se tricote sur 6 mailles (5 m point mousse, 1 jeté, 1 m point mousse en début de rang et 5 m point mousse, 1 jeté, 1 m point mousse en fin de rang), vous aurez ainsi: 6+16+9+18+18+40+9+18+18+16+9+6=183 mailles. Bon tricot!
04.03.2024 - 08:52
![]() Lajla wrote:
Lajla wrote:
Är koftan på bilden stickad i kidsilk eller brushed alpaca silk?
28.02.2024 - 17:05DROPS Design answered:
Hei Laila. Den er strikket med 1 tråd DROPS Brushed Alpaca Silk. mvh DROPS Design
04.03.2024 - 13:09
![]() Viviana wrote:
Viviana wrote:
Angelic breath
20.01.2024 - 15:17
![]() Paulina wrote:
Paulina wrote:
Cornflower Nostalgia
20.01.2024 - 08:13
|
||||||||||||||||||||||
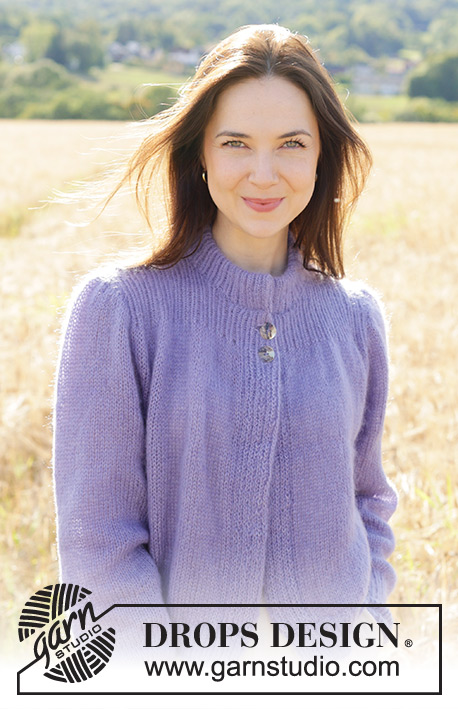
Perfectly Provence Cardigan#perfectlyprovencecardigan |
||||||||||||||||||||||
 |
 |
|||||||||||||||||||||
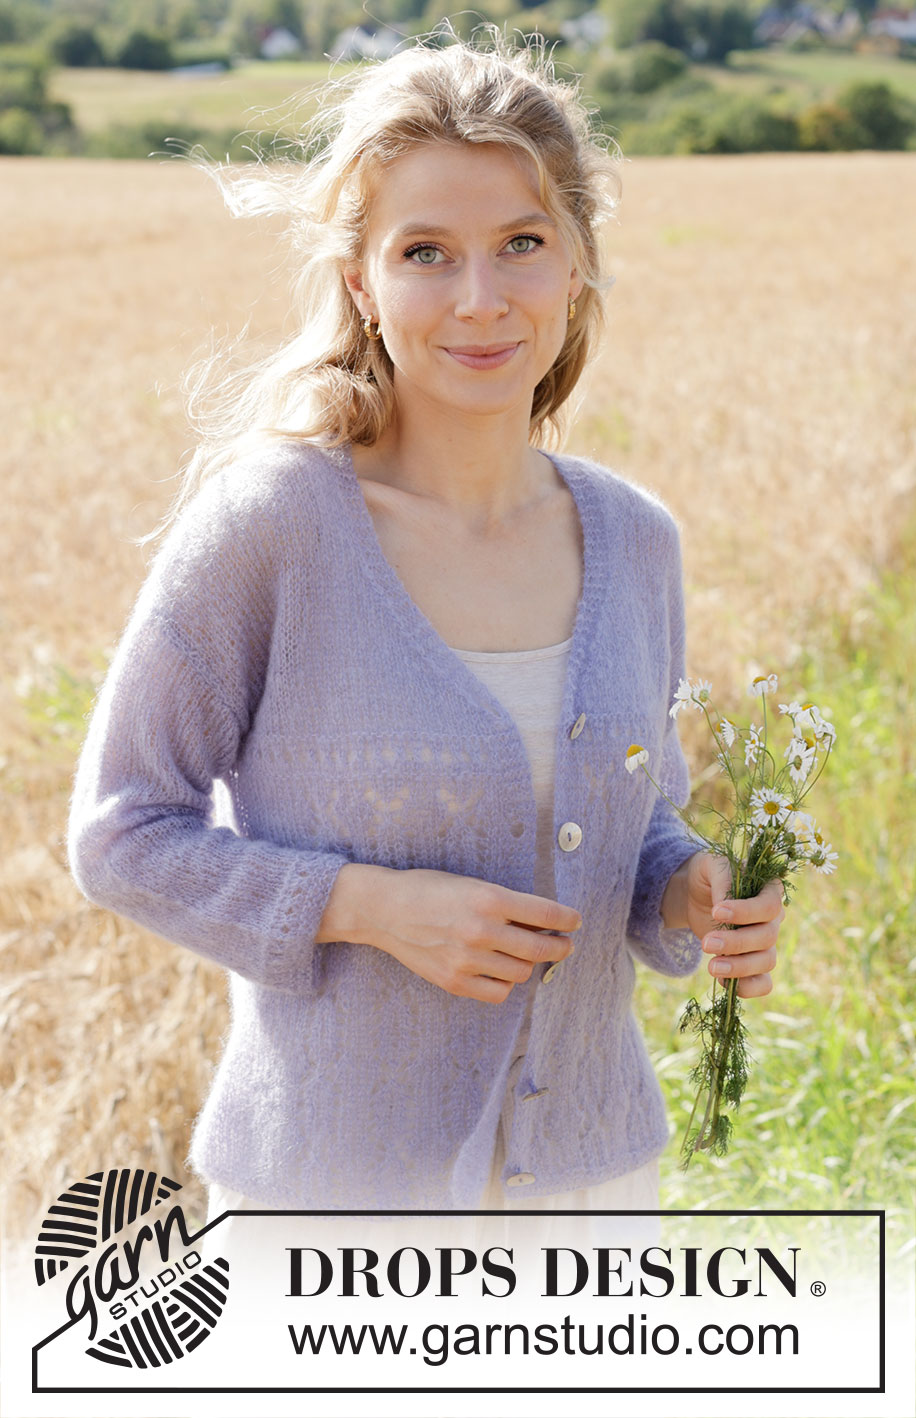
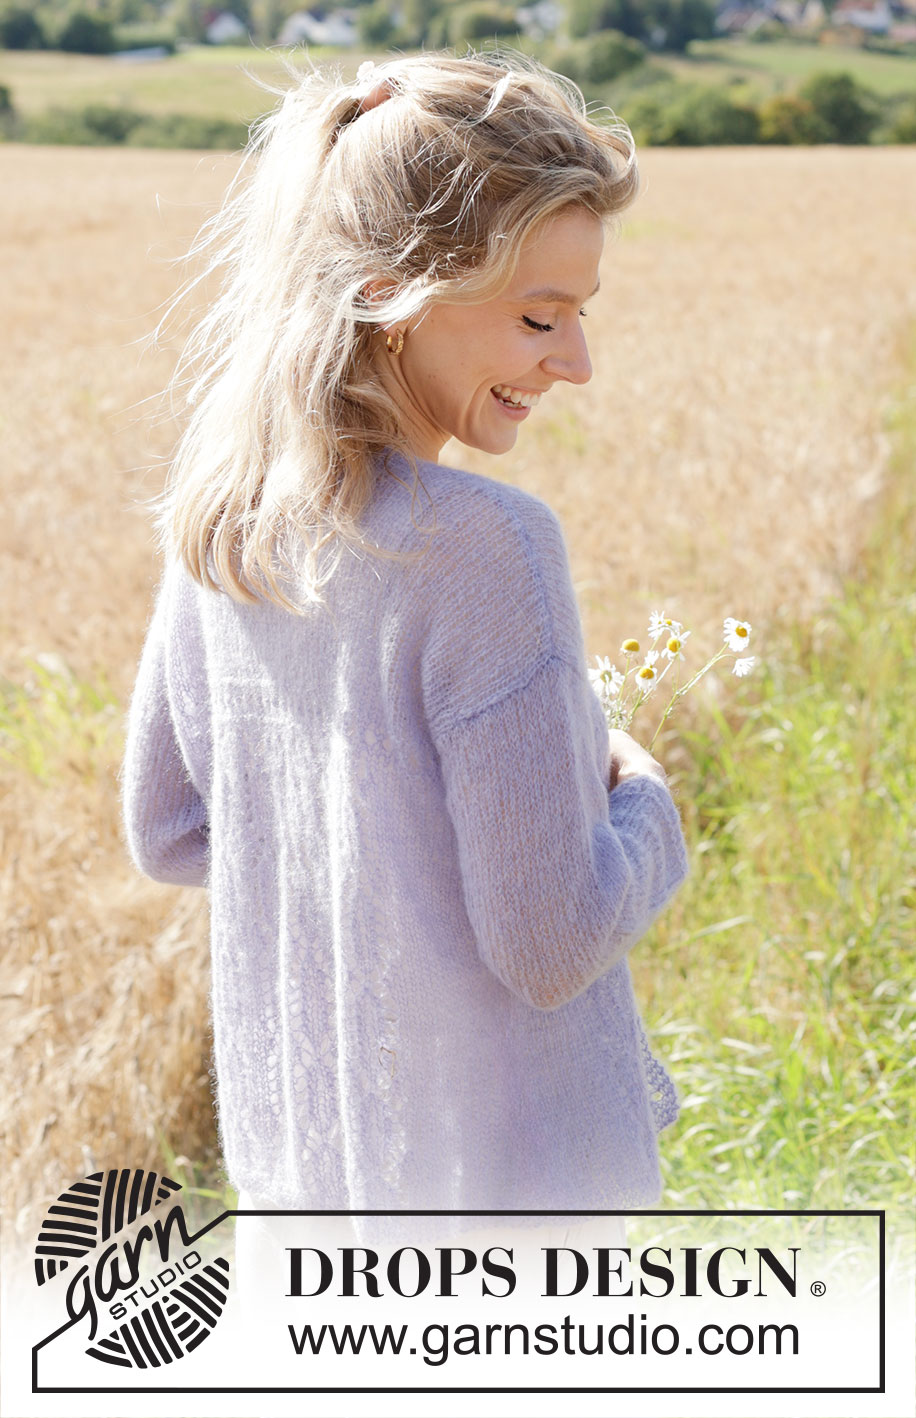
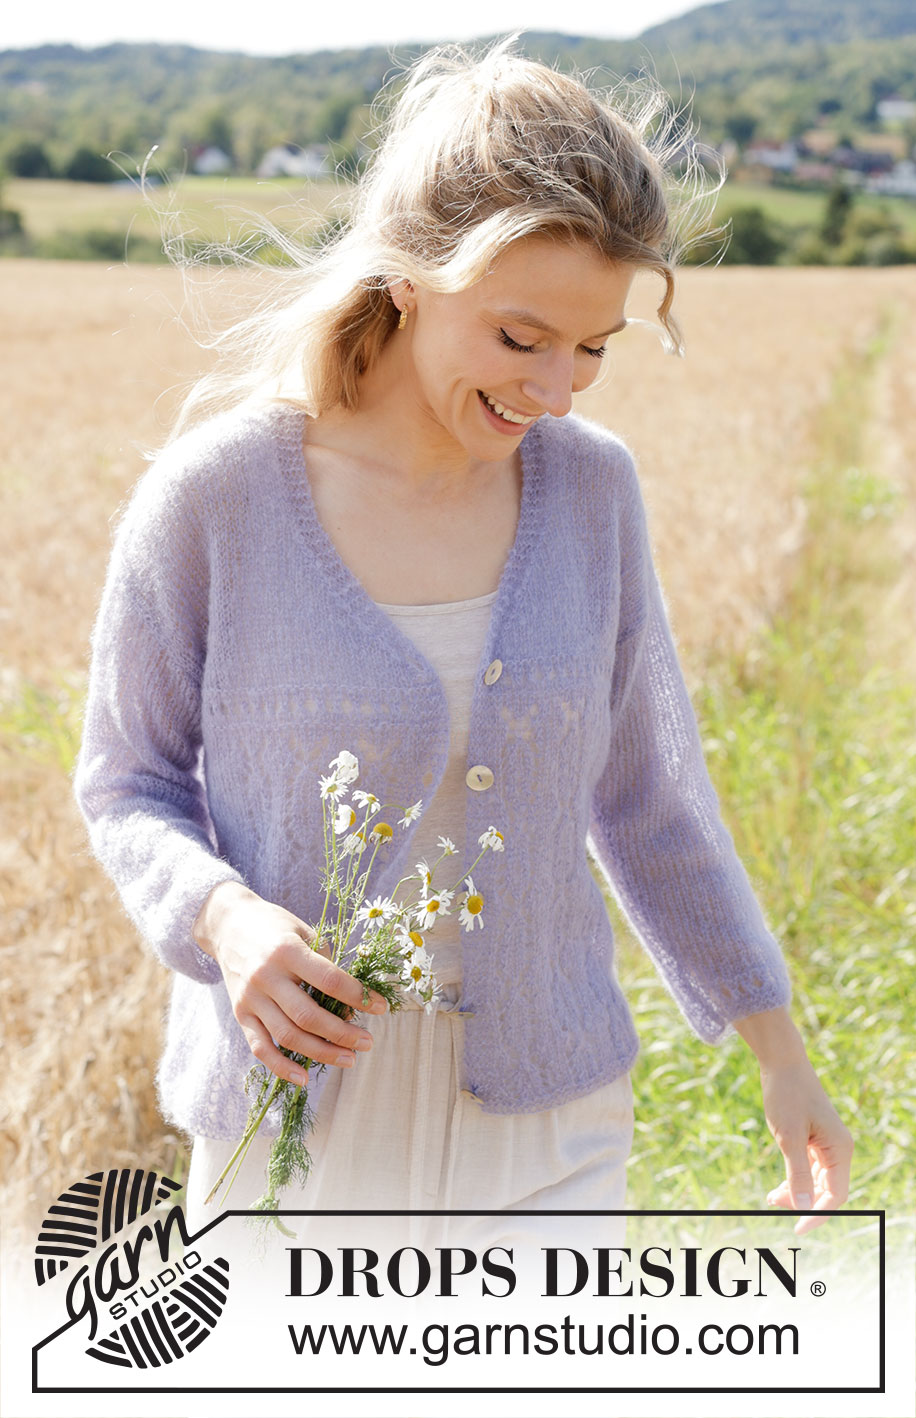
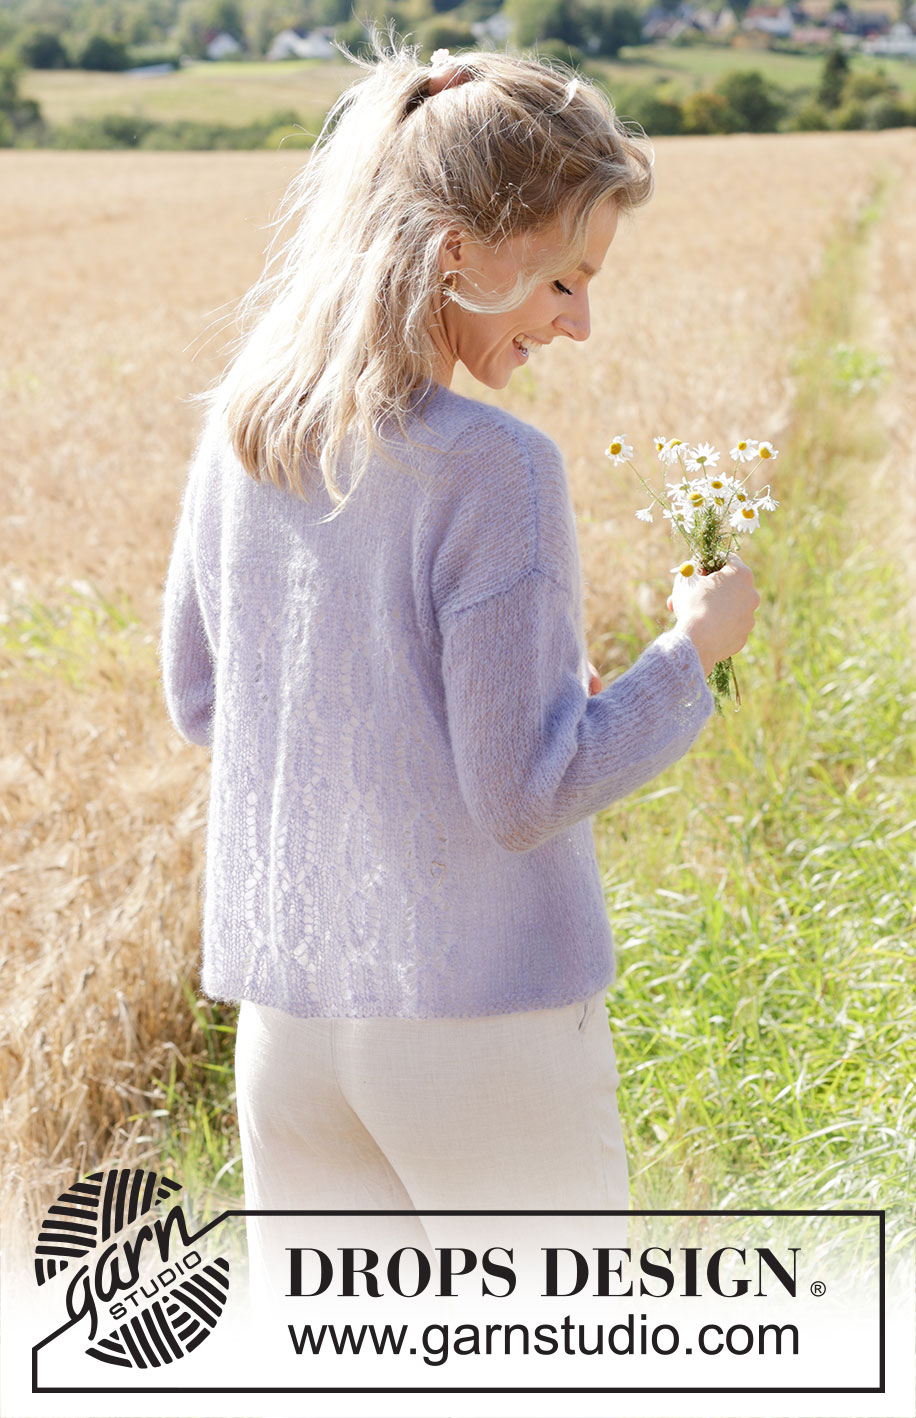
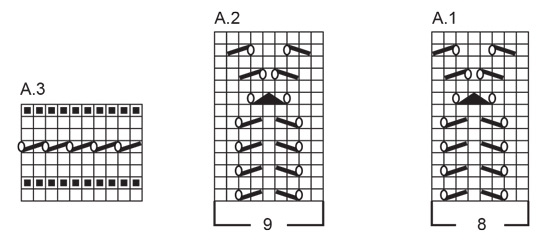
Knitted jacket in 2 strands DROPS Kid-Silk or 1 strand DROPS Brushed Alpaca Silk. The piece is worked bottom up with lace pattern, V-neck and sewn-in sleeves. Sizes S - XXXL.
DROPS 250-21 |
||||||||||||||||||||||
|
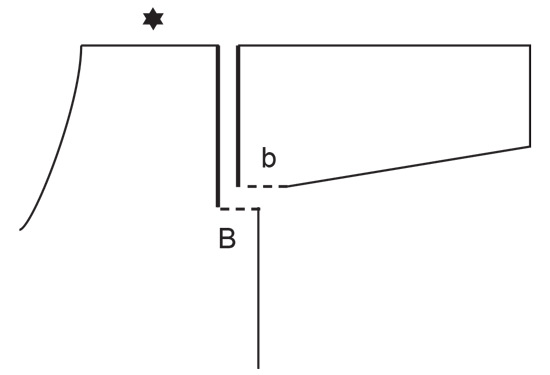
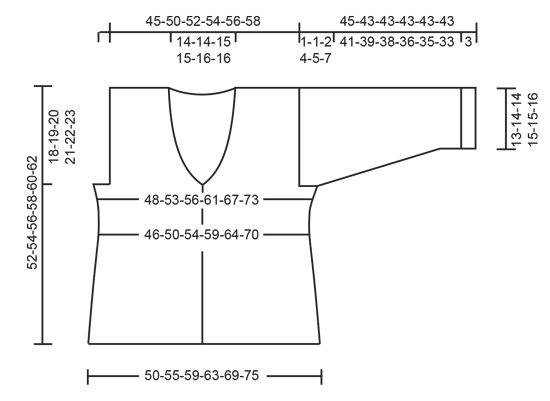
------------------------------------------------------- EXPLANATIONS FOR THE PATTERN: ------------------------------------------------------- GARTER STITCH (worked back and forth): Knit all rows, from both the right and wrong side. 1 ridge in height = knit 2 rows. GARTER STITCH (worked in the round): Alternately knit 1 round and purl 1 round. 1 ridge vertically = 2 rounds. PATTERN: The diagrams show all rows in the pattern, seen from the right side. See diagrams A.1 to A.3. DECREASE TIP-1 (for sides of body): All decreases worked from the right side! Decrease 4 stitches on the row as follows: Work until there are 4 stitches left before the marker-thread, knit 2 together, knit 4 (marker-thread sits in the middle of these 4 stitches), slip 1 stitch knit-wise, knit 1 and pass the slipped stitch over the knitted stitch. Repeat at the second marker-thread. DECREASE TIP -2 (for V-neck): All decreases worked from the right side! RIGHT FRONT PIECE: Work 6 band stitches as before, slip 1 stitch knit-wise, knit 1 and pass the slipped stitch over the knitted stitch (= 1 stitch decreased). LEFT FRONT PIECE: Work until there are 8 stitches left on the row, knit 2 together, work the 6 band stitches as before (= 1 stitch decreased). DECREASE TIP-3 (mid-under sleeve): Decrease 2 stitches on the round by decreasing 1 stitch on each side of the marker-thread as follows: Work until there are 3 stitches left before the marker-thread, knit 2 together, knit 2 (marker-thread sits between these 2 stitches), slip 1 stitch knit-wise, knit 1 and pass the slipped stitch over the knitted stitch. INCREASE TIP (for sides of body): All increases worked from the right side! Increase 4 stitches on the row as follows: Work until there are 5 stitches left before the first marker-thread, make 1 yarn over, knit 10 (marker-thread sits in the middle of these 10 stitches), make 1 yarn over. Repeat at the second marker-thread. On the next row purl the yarn overs twisted to avoid holes. Then work the new stitches in stocking stitch. RIGHT BAND: RIGHT SIDE: Work 1 garter stitch, make 1 yarn over and 5 garter stitches. WRONG SIDE: Work 5 garter stitches, knit together the yarn over and the last garter stitch. LEFT BAND: RIGHT SIDE: Work until there are 6 stitches left on the row, work 5 garter stitches, make 1 yarn over, 1 garter stitch. WRONG SIDE: Knit together the first garter stitch and yarn over, work 5 garter stitches. BUTTONHOLES: Work the buttonholes on the right band from the right side (band = 6 stitches): ROW 1: Work the first 2 stitches as before, knit together the 3rd and 4th stitch, make 1 yarn over, work to end of row ROW 2: Work the band as before, knitting the yarn over to leave a hole. Work the buttonholes when the piece measures: S: 2, 10, 18, 26 and 33 cm M: 2, 10, 18, 26 and 34 cm L: 3, 11, 19, 27 and 35 cm XL: 3, 11, 19, 27 and 36 cm XXL: 3, 11, 20, 28 and 37 cm XXXL: 3, 12, 21, 30 and 38 cm (The last buttonhole is worked just below the V-neck). ------------------------------------------------------- START THE PIECE HERE: ------------------------------------------------------- JACKET – SHORT OVERVIEW OF THE PIECE. The pattern uses both long and short needles; start with the length which fits the number of stitches and change when necessary. The piece is worked back and forth with circular needle bottom up as far as the armholes, the divided for the front and back pieces which are finished separately. The shoulder seams are sewn together and stitches knitted up around the armhole for the sleeve. The sleeve cap is worked back and forth, then the is sleeve finished in the round. BODY: Cast on 183-199-211-227-247-267 stitches with circular needle size 5 mm and 2 strands DROPS Kid-Silk or 1 strand DROPS Brushed Alpaca Silk. Change to circular needle size 4 mm and work 2 ridges – see GARTER STITCH above. Change back to circular needle size 5 mm and work as follows from the right side: Work RIGHT BAND – read description above, A.1 a total of 2-2-3-3-4-4 times, A.2, work 18-22-17-21-18-23 stocking stitches, insert 1 marker-thread before the next stitch (= side), work 18-22-17-21-18-23 stocking stitches, A.1 a total of 5-5-7-7-9-9 times, A.2, work 18-22-17-21-18-23 stocking stitches, insert 1 marker-thread before the next stitch (= side), work 18-22-17-21-18-23 stocking stitches, A.1 a total of 2-2-3-3-4-4 times, A.2, work LEFT BAND. Continue this pattern back and forth, allowing the marker-threads to follow your work onwards – they are used when decreasing/increasing in each side. REMEMBER THE KNITTING TENSION and remember the BUTTONHOLES on the right band! When the piece measures 6 cm, decrease 2 stitches by each marker-thread – read DECREASE TIP-1 (= 4 decreased stitches). Decrease like this every 5.5 cm a total of 4 times = 167-183-195-211-231-251 stitches. When the piece measures 28 cm, increase 2 stitches by each marker-thread – read INCREASE TIP (= 4 increased stitches). Repeat this increase when the piece measures 32-32-33-33-34-34 cm = 175-191-203-219-239-259 stitches. When the piece measures 31-32-33-34-35-36 cm, work as follows from the right side: Work the right band as before, A.3 until there are 7 stitches left, work the first stitch in A.3 (on row 5 this stitch is knitted), work the left band as before. Continue this pattern. When A.3 is finished in height, the piece measures approx. 34-35-36-37-38-39 cm. DIVIDE FOR FRONT AND BACK PIECES: Work as follows from the right side: Right band as before, stocking stitch until there are 2-2-3-6-9-12 stitches left before the first marker-thread (= right front piece), cast off 4-4-6-12-18-24 stitches for the armhole, work 77-85-89-91-95-99 stocking stitches (= back piece), cast off 4-4-6-12-18-24 stitches for the armhole, work stocking stitch until there are 6 stitches left, work the left band as before (= left front piece). Finish the front and back pieces separately. LEFT FRONT PIECE: = 45-49-51-52-54-56 stitches. Start from the wrong side and work stocking stitch back and forth, with the band as before. AT THE SAME TIME on the first row from the right side, start decreasing for the V-neck – read DECREASE TIP-2, at the end of every 2nd row as follows: Decrease 1 stitch 8-8-9-9-10-10 times, then decrease 1 stitch every 4th row 4-4-4-4-4-4 times = 33-37-38-39-40-42 stitches. Continue working until the piece measures 52-54-56-58-60-62 cm – finishing after a row from the wrong side. On the next row (right side) cast off the 27-31-32-33-34-36 shoulder-stitches = 6 band stitches left on the needle. Work the band back and forth for a further 8-8-8-8-9-9 cm, cast off. RIGHT FRONT PIECE: = 45-49-51-52-54-56 stitches. Start from the wrong side and work stocking stitch back and forth, with the band as before. AT THE SAME TIME on the first row from the right side, start decreasing for the V-neck – read DECREASE TIP-2, at the beginning of every 2nd row as follows: Decrease 1 stitch 8-8-9-9-10-10 times, then decrease 1 stitch every 4th row 4-4-4-4-4-4 times = 33-37-38-39-40-42 stitches. Continue working until the piece measures 52-54-56-58-60-62 cm – finishing after a row from the right side. On the next row (wrong side) cast off the 27-31-32-33-34-36 shoulder-stitches = 6 band stitches left on the needle. Work the band back and forth for a further 8-8-8-8-9-9 cm, cast off. BACK PIECE: = 77-85-89-91-95-99 stitches. Start from the wrong side and work stocking stitch back and forth. When the piece measures 50-52-54-56-58-60 cm, cast off the middle 21-21-23-23-25-25 stitches for the neckline and finish each shoulder separately. Decrease 1 stitch at the beginning of the next row from the neck = 27-31-32-33-34-36 shoulder-stitches. Work until the piece measures 52-54-56-58-60-62 cm. Cast off. Work the other shoulder in the same way. ASSEMBLY-1: Sew the shoulder seams. SLEEVES: Using circular needle size 5 mm, knit up from the right side 62-64-68-72-74-78 stitches around the armhole, starting at the bottom of the armhole and working up and around to the bottom of the armhole on the other side. Insert 1 marker in the middle of the row = mid-top of shoulder – the sleeve is measured from here. Work stocking stitch back and forth for 1-1-2-4-5-7 cm. Now continue in the round, inserting 1 marker-thread at the beginning of the round (= mid-under sleeve). Allow the marker-thread to follow your work onwards, it is used when decreasing under the sleeve. When the sleeve measures 4-4-4-6-7-9 cm from the marker, decrease 2 stitches under the sleeve – read DECREASE TIP, every 4-4-3½-3-3-2½ cm 9-9-10-11-11-12 times = 44-46-48-50-52-54 stitches. Continue working until the sleeve measures 42-40-40-40-40-40 cm from the marker. Work A.3 in the round. Change to double pointed needles size 4 mm and work 1 ridge – see GARTER STITCH above. Cast off a little loosely. The sleeve measures approx. 45-43-43-43-43-43 cm from the marker. ASSEMBLY: Sew together the bottom of the armhole – see sketch. Sew the buttons onto the left band. Sew the bands together mid-back, with the seam to the wrong side. Sew the bands to the neckline. |
||||||||||||||||||||||
Diagram explanations |
||||||||||||||||||||||
|
||||||||||||||||||||||
 |
||||||||||||||||||||||
 |
||||||||||||||||||||||
 |
||||||||||||||||||||||
Have you finished this pattern?Tag your pictures with #dropspattern #perfectlyprovencecardigan or submit them to the #dropsfan gallery. Do you need help with this pattern?You'll find 28 tutorial videos, a Comments/Questions area and more by visiting the pattern on garnstudio.com. © 1982-2026 DROPS Design A/S. We reserve all rights. This document, including all its sub-sections, has copyrights. Read more about what you can do with our patterns at the bottom of each pattern on our site. |
||||||||||||||||||||||


With over 40 years in knitting and crochet design, DROPS Design offers one of the most extensive collections of free patterns on the internet - translated to 17 languages. As of today we count 324 catalogues and 12290 patterns translated into English (UK/cm). 12290
We work hard to bring you the best knitting and crochet have to offer, inspiration and advice as well as great quality yarns at incredible prices! Would you like to use our patterns for other than personal use? You can read what you are allowed to do in the Copyright text at the bottom of all our patterns. Happy crafting!
Post a comment to pattern DROPS 250-21
We would love to hear what you have to say about this pattern!
If you want to leave a question, please make sure you select the correct category in the form below, to speed up the answering process. Required fields are marked *.