
Popular categories
Looking for a yarn?


Comments / Questions (81)
![]() Annie wrote:
Annie wrote:
Ik heb de lengte van het lijf gebreid. Het patroon geeft aan dat ik steken moet meerderen voor het breien van de boord. Het lijkt me logischer dat ik steken moet minderen i.p.v. meerderen, zodat het lijf wat smaller toe loopt. Klopt dat?
04.07.2023 - 21:48DROPS Design answered:
Dag Annie,
Om te voorkomen dat de boordsteek het werk samentrekt worden er steken gemeerderd. Als je graag wilt dat de boord strakker wordt dan het lijf kun je er natuurlijk ook voor kiezen om steken te minderen.
06.07.2023 - 20:58
![]() Maartje wrote:
Maartje wrote:
Patroon nr. bm-129-by Hallo, ik ben op het punt dat ik aan het lijf moet beginnen. Patroon zegt dat ik 132 st moet hebben voor het lijf. Maar ik kom maar op 120 st. 1e voorpand 39 st, Rugpand 42 st, 2e voorpand 39. Dit is inclusief de 2x extra 6 st.Kom ik op 120 steken Ipv 132 dus. Waar gaat het fout? Telfout? Alvast bedankt.
25.06.2023 - 12:52
![]() Kristin wrote:
Kristin wrote:
Hej! Under oket står det: "Sticka 6 framkantsmaskor i rätstickning, sticka rätmaskor över de nästa 63-69-73-79 (83-87) maskorna". Vad betyder det att sticka 6 framkantsmaskor i rätstickning? På bilden ser framkantsmaskorna ut att vara stickade avigt och inte rätt. Tack för svar!
15.05.2023 - 20:48DROPS Design answered:
Hej Kristin, rätstickning sticka såhär: RÄTSTICKNING (stickas fram och tillbaka): Alla varv stickas räta. Alla anda maskor stickas slätstickning (rät från rätsidan/avig från avigsidan) :)
17.05.2023 - 08:11
![]() Trudy wrote:
Trudy wrote:
Ik brei maat 6/9 mnd. Bij mouwen staat: “Als de mouw 8-11-12-15 (18-23) cm meet, meerder dan 4-4-4-4 (6-6) steken verdeeld = 42-44-44-46 (50-52) steken.” Dat wordt wel erg korte mouw. Ik denk dat 12 cm 22 cm moet zijn.
01.05.2023 - 10:04
![]() Catherine Papuchon wrote:
Catherine Papuchon wrote:
Bonjour Comment mesure t on l'a longueur de la manche? Sous le bras?
12.04.2023 - 11:32DROPS Design answered:
Bonjour Mme Papuchon, la longueur de la manche se mesure au milieu du dessus de la manche (pas sous le bras/la manche au niveau du début des tours). Bon tricot!
12.04.2023 - 12:55
![]() Ella wrote:
Ella wrote:
Hei, skal jeg felle av fra vrangen eller retten når jeg skal felle av bolen? 😊
14.02.2023 - 21:56DROPS Design answered:
Hei Ella, Det er best å felle av med vrang over vrang og rett over ett. Så da spiller det ingen rolle om du feller av fra retten eller vrangen. God fornøyelse!
15.02.2023 - 06:57
![]() Ane wrote:
Ane wrote:
Hey! Im knitting the size 1-3 months, and with 6cm in between button holes, i olnu have place for 4 buttons and not Five.
12.02.2023 - 21:56DROPS Design answered:
Dear Ane, the first one is worked when the neck measures 2cm. Then, work the next 4 buttonholes when the work measures: 8cm, 14cm, 20cm, 26cm. The total length of the jacket in that size is 28cm, so there should be enough space for all the buttonholes. Happy knitting!
12.02.2023 - 22:41
![]() Petra wrote:
Petra wrote:
Guten Abend, ich bräuchte Ihre Hilfe. Die raglanlinie misst bei mir nur 9cm statt 11cm bei 6/9 . Soll ich ohne Zunahme bis zum angegebenen Mass weiterstricken? Danke im voraus.
20.12.2022 - 23:19DROPS Design answered:
Liebe Petra, ja genau, stricken Sie weiter -ohne zusätzliche Zunahme- bis die Arbeit 11 cm ab der Markierung misst. Viel Spaß beim stricken!
21.12.2022 - 08:09
![]() Dominique wrote:
Dominique wrote:
Bonjour, J'ai un problème avec l'échantillon. Quand je prends les aiguilles no3 j'obtient 8,5 cm de large et quand je prends les 3,5, j'obtiens 10,75. Que me conseillez vous ? (avec des 3,25 c'est bon, malheureusement je ne trouve pas d'aiguilles double pointes 3,25 dans le commerce). Cordialement
21.11.2022 - 16:04DROPS Design answered:
Bonjour Dominique, si vous tombez juste avec les aiguilles 3,25, gardez celles-ci (pensez également à vérifier votre nombre de rangs en hauteur, c'est important pour que le raglan ne soit ni trop court, ni trop long); vous pourrez tricoter les manches en magic loop au lieu d'avec les aiguilles doubles pointes. Bon tricot!
21.11.2022 - 16:25
![]() Lulu wrote:
Lulu wrote:
Bonjour, comme je tricote très serré j'utilise une aiguille n°4 au lieu de la n°3 pour obtenir l'échantillon, du coup pour les cotes faut-il aussi que j'utilise une aiguille n°3,5 au lieu de la n°2,5 ? Merci
13.11.2022 - 11:20DROPS Design answered:
Bonjour Lulu, tout à fait, ainsi, vous avez la même différence entre les tailles des aiguilles. bon tricot!
14.11.2022 - 09:55
|
|||||||
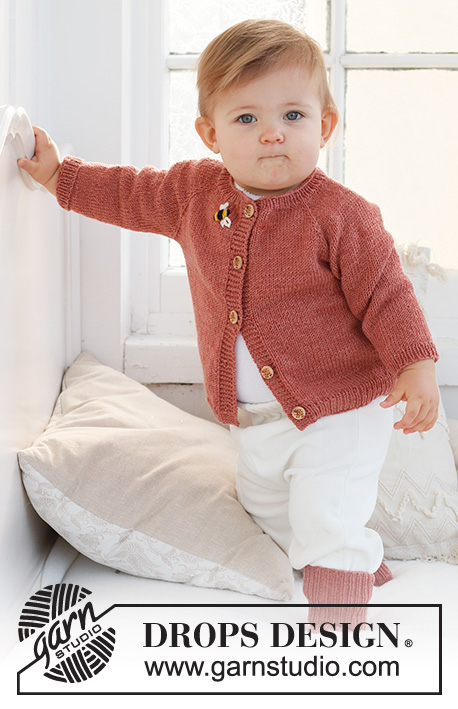
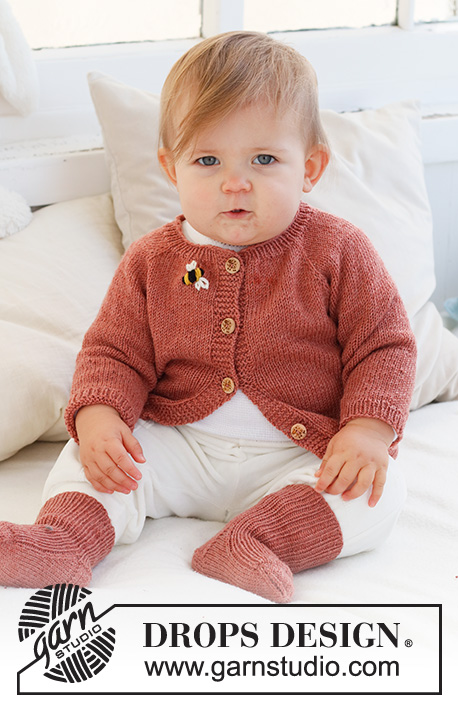
Little Bee Cardigan#littebeecardigan |
|||||||
 |
 |
||||||
Knitted jacket for babies and children in DROPS BabyMerino. The piece is worked top down, with raglan and embroidered bee. Sizes 0 - 4 years.
DROPS Baby 42-4 |
|||||||
|
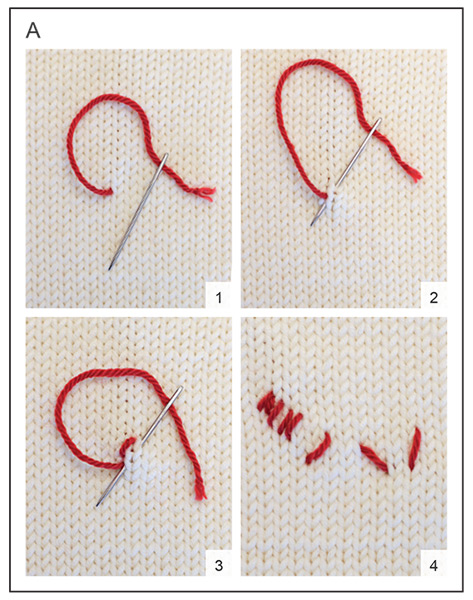
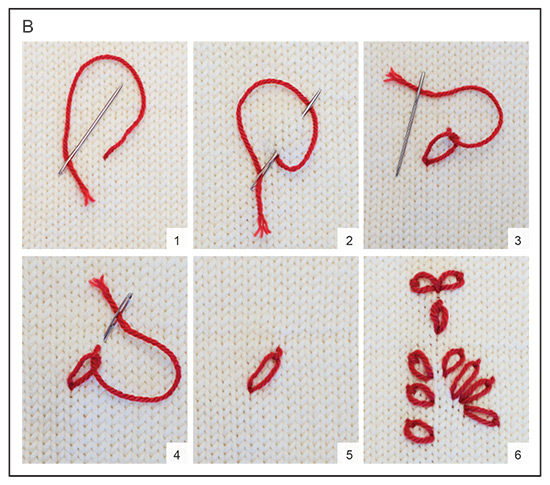
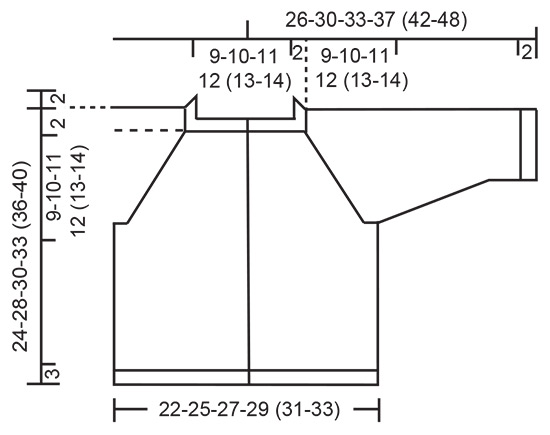
------------------------------------------------------- EXPLANATIONS FOR THE PATTERN: ------------------------------------------------------- RIDGE/GARTER STITCH (worked back and forth): Knit all rows. 1 ridge = knit 2 rows. RAGLAN: All increases are worked from the right side! Work to the marker-stitch, 1 yarn over, knit the marker-stitch, 1 yarn over. Increase like this at each marker-stitch (8 stitches increased). On the next row purl the yarn overs twisted to avoid holes. Then work the new stitches in stocking stitch. DECREASE TIP (sleeves): Decrease 1 stitch on either side of the marker as follows: Work until there are 3 stitches left before the marker, knit 2 together, knit 2 (marker sits between these 2 stitches), slip 1 stitch as if to knit, knit 1 and pass the slipped stitch over the knitted stitch. BUTTONHOLES: Work buttonholes on the right band (when the garment is worn). Work from the right side when there are 3 stitches left on the row as follows: Make 1 yarn over, knit 2 together and knit 1. On the next row, knit the yarn over to leave a hole. The first buttonhole is worked when the neck measures 2 cm. Then work the other 4-4-4-4 (5-5) buttonholes with after 5-6-6½-7 (6½-7) cm between each one. ------------------------------------------------------- START THE PIECE HERE: ------------------------------------------------------- JACKET – SHORT OVERVIEW OF THE PIECE: The yoke is worked back and forth with circular needle. It is divided for the body and sleeves and the body continued back and forth. The sleeves are worked in the round with double pointed needles. NECK: Cast on 75-81-85-91 (95-99) stitches with circular needle size 2.5 mm and DROPS Baby Merino. Purl 1 row from the wrong side with 6 band stitches in GARTER STITCH on each side – read description above. Then work rib as follows: 6 band stitches in garter stitch, * knit 1, purl 1 *, work from *-* until there are 7 stitches left, knit 1 and 6 band stitches in garter stitch. When the rib measures 2 cm, change to circular needle size 3 mm. Insert 1 marker after the band at the beginning of the row, the yoke is measured from this marker! YOKE: Work the next row from the right side: 6 band stitches in garter stitch, knit 63-69-73-79 (83-87) and increase 9-11-7-13 (13-17) stitches evenly spread and 6 band stitches in garter stitch = 84-92-92-104 (108-116) stitches. Work the first BUTTONHOLE – read description above. On the next row insert 4 markers as follows: Work 6 band stitches in garter stitch, purl 11-13-13-16 (17-19), insert 1 marker in the next stitch, purl 12, insert 1 marker in the next stitch, purl 22-26-26-32 (34-38), insert 1 marker in the next stitch, purl 12, insert 1 marker in the next stitch, purl 11-13-13-16 (17-19) and 6 band stitches in garter stitch. Continue with stocking stitch and 6 band stitches in garter stitch on each side, increasing as follows: On the next row from the right side increase 1 stitch on each side of all the markers – read RAGLAN! Increase like this every row from the right side 12-14-16-17 (18-19) times = 180-204-220-240 (252-268) stitches. REMEMBER THE KNITTING TENSION! When the piece measures 9-10-11-12 (13-14) cm from the marker, divide for the body and sleeves as follows: Work 6 band stitches in garter stitch, 23-27-29-32 (34-37) stitches in stocking stitch, place the next 38-42-46-50 (52-54) stitches on a thread for the sleeve, cast on 6 stitches, work 46-54-58-64 (68-74) stitches in stocking stitch, place the next 38-42-46-50 (52-54) stitches on a thread for the sleeve, cast on 6 stitches, work 23-27-29-32 (34-37) stitches in stocking stitch and 6 band stitches in garter stitch. BODY: = 116-132-140-152 (160-172) stitches. Continue back and forth with stocking stitch and 6 band stitches in garter stitch on each side. When the piece measures 10-13-14-16 (18-21) cm from the division, increase 13-13-15-15 (17-19) stitches evenly spaced on the next row from the right side (do not increase over the bands) = 129-145-155-167 (177-191) stitches. Change to circular needle size 2.5 mm and work rib, starting from the wrong side as follows: 6 band stitches in garter stitch, * purl 1, knit 1 *, work from *-* until there are 7 stitches left, purl 1 and 6 band stitches in garter stitch. Continue this rib for 3 cm. Cast off. SLEEVES: Place the 38-42-46-50 (52-54) stitches from the thread on the one side of the piece on double pointed needles size 3 mm and knit up 1 stitch in each of the 6 stitches cast on under the sleeve = 44-48-52-56 (58-60) stitches. Insert a marker in the middle of the new stitches under the sleeve. Start at the marker and work stocking stitch in the round. When the sleeve measures 1 cm from the division, decrease 1 stitch on each side of the marker - read DECREASE TIP! Decrease like this every 2½-2½-1½-2 (2-3) cm a total of 3-4-6-7 (7-7) times = 38-40-40-42 (44-46) stitches. When the sleeve measures 8-11-12-15 (18-23) cm, increase 4-4-4-4 (6-6) stitches evenly spaced = 42-44-44-46 (50-52) stitches. Change to double pointed needles size 2.5 mm and work rib (knit 1, purl 1) for 2 cm. Cast off. Work the other sleeve in the same way. BEE: Embroider a bee on the right front piece – see photo. The bee is worked with a single strand and flat stitch, the wings are worked with chain stitch. BEE – BLACK STRIPES: See diagram A and diagram explanations. Using black, start 3 cm below the neck and 4 cm from the band. Embroider 2 flat stitches, diagonally up to the right (towards the band), close together and 0.5 cm in length. Skip 0.5 cm diagonally up to the left and embroider 4 flat stitches close together and parallel to the first 2 stitches, 1 cm in length (= middle of body), skip 0.5 cm, work 2 flat stitches close together and parallel to the 4 stitches, 0.5 cm in length. BEE – MUSTARD STRIPES: Change to mustard. Embroider flat stitches between the black stripes - 4 stitches of the same length as the black stitches they are close to (2 mustard stripes). BEE - WINGS: Use colour off white; the wings consist of 2 chain stitches, both starting from the same hole. Work as follows: STITCH 1: Work 1 chain stitch, 1-1.5 cm in length from the middle of the bee - see diagram B and diagram explanations. STITCH 2: Work 1 chain stitch, 1-1.5 cm in length, starting from the same place. Embroider a set of wings on the other side of the bee. ASSEMBLY: Sew the buttons onto the left band. |
|||||||
Diagram explanations |
|||||||
|
|||||||
 |
|||||||
 |
|||||||
 |
|||||||
Have you finished this pattern?Tag your pictures with #dropspattern #littebeecardigan or submit them to the #dropsfan gallery. Do you need help with this pattern?You'll find 31 tutorial videos, a Comments/Questions area and more by visiting the pattern on garnstudio.com. © 1982-2026 DROPS Design A/S. We reserve all rights. This document, including all its sub-sections, has copyrights. Read more about what you can do with our patterns at the bottom of each pattern on our site. |
|||||||


With over 40 years in knitting and crochet design, DROPS Design offers one of the most extensive collections of free patterns on the internet - translated to 17 languages. As of today we count 324 catalogues and 12290 patterns translated into English (UK/cm). 12290
We work hard to bring you the best knitting and crochet have to offer, inspiration and advice as well as great quality yarns at incredible prices! Would you like to use our patterns for other than personal use? You can read what you are allowed to do in the Copyright text at the bottom of all our patterns. Happy crafting!
Post a comment to pattern DROPS Baby 42-4
We would love to hear what you have to say about this pattern!
If you want to leave a question, please make sure you select the correct category in the form below, to speed up the answering process. Required fields are marked *.