DROPS Baby Merino
DROPS Baby Merino
100% Wool
from 3.75 € /50g
Get the yarn to make this pattern from 7.50€.

The yarn cost is calculated from the pattern’s smallest size and the yarn’s cheapest product type. Looking for an even better price? You might find it on the DROPS Deals!

DROPS SS24

Little Pearl Cardigan

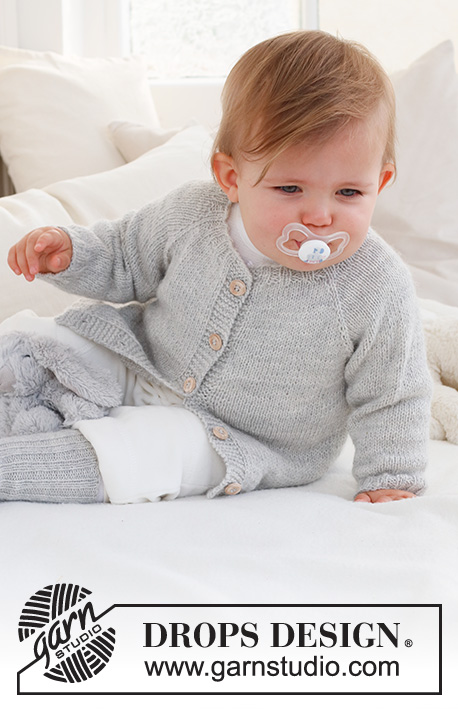
Knitted jacket for babies and children in DROPS BabyMerino. The piece is worked top down with raglan. Sizes 0 - 4 years.

DROPS Baby 42-9
DROPS Design: Pattern bm-128-by
Yarn group A
-----------------------------------------------------------

SIZES:
0/1 - 1/3 - 6/9 - 12/18 months (2 - 3/4) years
Child’s height in cm:
48/52 - 56/62 - 68/74 - 80/86 (92 - 98/104)

MATERIALS:
DROPS BABY MERINO from Garnstudio (belongs to yarn group A)
100-150-150 (150-150) g colour 22, light grey

DROPS BUTTONS NO 503: 5-5-5-5 (6-6) items.

NEEDLES:
DROPS CIRCULAR NEEDLE SIZE 3 MM: Length 80 cm.
DROPS CIRCULAR NEEDLE SIZE 2.5 MM: Length 80 cm.
DROPS DOUBLE POINTED NEEDLES SIZE 3 MM.
DROPS DOUBLE POINTED NEEDLES SIZE 2.5 MM.
The technique MAGIC LOOP can be used – you then only need circular needle of 80 cm in each size.

KNITTING TENSION:
24 stitches in width and 32 rows in height with stocking stitch = 10 x 10 cm.
NOTE: Needle size is only a guide. If you get too many stitches on 10 cm, change to a larger needle size. If you get too few stitches on 10 cm, change to a smaller needle size.

-------------------------------------------------------

Alternative Yarn – See how to change yarns here
Yarn Groups A to F – Use the same pattern and change the yarn here
Yarn usage using an alternative yarn – Use our yarn converter here

-------------------------------------------------------

DROPS Baby Merino
DROPS Baby Merino
100% Wool
from 3.75 € /50g
Get the yarn to make this pattern from 7.50€.

The yarn cost is calculated from the pattern’s smallest size and the yarn’s cheapest product type. Looking for an even better price? You might find it on the DROPS Deals!

Pattern instructions

-------------------------------------------------------

EXPLANATIONS FOR THE PATTERN:

-------------------------------------------------------

RIDGE/GARTER STITCH (worked back and forth):
Knit all rows.
1 ridge = knit 2 rows.

RAGLAN:
All increases are worked from the right side!
Work to the marker-stitch, 1 yarn over, knit the marker-stitch, 1 yarn over. Increase like this at each marker-stitch (8 stitches increased). On the next row purl the yarn overs twisted to avoid holes. Then work the new stitches in stocking stitch.

DECREASE TIP (sleeves):
Decrease 1 stitch on either side of the marker as follows: Work until there are 3 stitches left before the marker, knit 2 together, knit 2 (marker sits between these 2 stitches), slip 1 stitch as if to knit, knit 1 and pass the slipped stitch over the knitted stitch.

BUTTONHOLES:
Work buttonholes on the right band (when the garment is worn). Work from the right side when there are 3 stitches left on the row as follows: Make 1 yarn over, knit 2 together and knit 1. On the next row, knit the yarn over to leave a hole.
The first buttonhole is worked when the neck measures 2 cm. Then work the other 4-4-4-4 (5-5) buttonholes with after 5-6-6½-7 (6½-7) cm between each one.

-------------------------------------------------------

START THE PIECE HERE:

-------------------------------------------------------

JACKET – SHORT OVERVIEW OF THE PIECE:
The yoke is worked back and forth with circular needle. It is divided for the body and sleeves and the body continued back and forth. The sleeves are worked in the round with double pointed needles.

NECK:
Cast on 74-82-86-90 (94-98) stitches with circular needle size 2.5 mm and DROPS Baby Merino.
Purl 1 row from the wrong side with 6 band stitches in GARTER STITCH on each side – read description above.
Then work rib as follows:
6 band stitches in garter stitch, * knit 2, purl 2 *, work from *-* until there are 8 stitches left, knit 2 and 6 band stitches in garter stitch.
When the rib measures 2 cm, work the BUTTONHOLE – read description above, then change to circular needle size 3 mm. Insert 1 marker after the band at the beginning of the row, the yoke is measured from this marker!

YOKE:
Work the next row from the right side:
6 band stitches in garter stitch, knit 62-70-74-78 (82-86) and increase 10-10-6-14 (14-18) stitches evenly spread and 6 band stitches in garter stitch = 84-92-92-104 (108-116) stitches.
On the next row insert 4 markers as follows:
Work 6 band stitches in garter stitch, purl 11-13-13-16 (17-19), insert 1 marker in the next stitch, purl 12, insert 1 marker in the next stitch, purl 22-26-26-32 (34-38), insert 1 marker in the next stitch, purl 12, insert 1 marker in the next stitch, purl 11-13-13-16 (17-19) and 6 band stitches in garter stitch. Continue with stocking stitch and 6 band stitches in garter stitch on each side, increasing as follows:
On the next row from the right side increase 1 stitch on each side of all the markers – read RAGLAN! Increase like this every row from the right side 12-14-16-17 (18-19) times = 180-204-220-240 (252-268) stitches. REMEMBER THE KNITTING TENSION!
When the piece measures 9-10-11-12 (13-14) cm from the marker, divide for the body and sleeves as follows:
Work 6 band stitches in garter stitch, 23-27-29-32 (34-37) stitches in stocking stitch, place the next 38-42-46-50 (52-54) stitches on a thread for the sleeve, cast on 6 stitches, work 46-54-58-64 (68-74) stitches in stocking stitch, place the next 38-42-46-50 (52-54) stitches on a thread for the sleeve, cast on 6 stitches, work 23-27-29-32 (34-37) stitches in stocking stitch and 6 band stitches in garter stitch.

BODY:
= 116-132-140-152 (160-172) stitches.
Continue back and forth with stocking stitch and 6 band stitches in garter stitch on each side.
When the piece measures 10-13-14-16 (18-21) cm from the division, increase 14-14-14-14 (18-18) stitches evenly spaced on the next row from the right side (do not increase over the bands) = 130-146-154-166 (178-190) stitches.
Change to circular needle size 2.5 mm and work rib, starting from the wrong side as follows:
6 band stitches in garter stitch, * purl 2, knit 2 *, work from *-* until there are 8 stitches left, purl 2 and 6 band stitches in garter stitch.
Continue this rib for 3 cm. Cast off.

SLEEVES:
Place the 38-42-46-50 (52-54) stitches from the thread on the one side of the piece on double pointed needles size 3 mm and knit up 1 stitch in each of the 6 stitches cast on under the sleeve = 44-48-52-56 (58-60) stitches. Insert a marker in the middle of the new stitches under the sleeve. Start at the marker and work stocking stitch in the round.
When the sleeve measures 1 cm from the division, decrease 1 stitch on each side of the marker - read DECREASE TIP!
Decrease like this every 2½-2½-1½-2 (2-3) cm a total of 3-4-6-7 (7-7) times = 38-40-40-42 (44-46) stitches.
When the sleeve measures 8-11-12-15 (18-23) cm, increase 2-4-4-6 (4-6) stitches evenly spaced = 40-44-44-48 (48-52) stitches.
Change to double pointed needles size 2.5 mm and work rib (knit 2, purl 2) for 2 cm. Cast off.
Work the other sleeve in the same way.

ASSEMBLY:
Sew the buttons onto the left band.

Diagram

diagram measurements

Each of our patterns has specific tutorial videos to help you.

Do you have a question? See a list of frequently asked questions (FAQ)

Knitting tension is what determines the final measurements of your work, and is usually measured per 10 x 10 cm. It is provided like so: number of stitches in width x number of rows in height - eg: 19 stitches x 26 rows = 10 x 10 cm.

The knitting tension is very individual; some people knit/crochet loosely while others work tightly. You adjust the knitting tension with the needle size, which is why the suggested needle size is only meant as a guide! You need to adjust this (up or down) to ensure that YOUR knitting tension matches the knitting tension provided in the pattern. If you work with a different knitting tension than provided you will have a different yarn consumption, and your work will have different measurements than what the pattern suggests.

The knitting tension also determines which yarns can replace each other. As long as you achieve the same knitting tension you can replace one yarn with another.

See DROPS lesson: How to measure your tension/gauge

See DROPS video: How to make a gauge tension swatch

The required amount of yarn is provided in grams, eg: 450 g. To calculate how many balls you’ll need you first need to know how many grams are in 1 ball (25g, 50g or 100g). This information is available if you click on the individual yarn quality on our pages. Divide the amount required with the amount of each ball. For example, if each ball is 50g (the most common amount), the calculation will be as follows: 450 / 50 = 9 balls.

The important thing when changing from one yarn to another is that the knitting/crochet tension remains the same. This is so that the measurements of the finished piece will be the same as on the sketch provided. It is easier to achieve the same knitting tension using yarns from the same yarn group. It is also possible to work with multiple strands of a thinner yarn to achieve the knitting tension of a thicker one. Please try our yarn converter. We recommend you to always work a test swatch.

Please NOTE: when changing yarn the garment might have a different look and feel to the garment in the photo, due to individual properties and qualities of each yarn.

See DROPS lesson: Can I use a different yarn than the one mentioned in the pattern?

All our yarns are categorised into yarn groups (from A to F) according to thickness and knitting tension – group A contains the thinnest yarns and group F the thickest. This makes it easier for you to find alternative yarns to our patterns, should you wish to switch yarn. All yarns within the same group have a similar knitting tension and can easily replace each other. However, different yarn qualities have different structures and properties which will give the finished work a unique look and feel.

Click here for an overview of the yarns in each yarn group

At the top of all our patterns you’ll find a link to our yarn calculator, which is a helpful tool should you wish to use a different yarn than suggested. By filling in the yarn quality you wish to replace, the amount (in your size) and number of strands, the calculator will present good alternative yarns with the same knitting tension. Additionally it will tell you how much you’ll require in the new qualities and whether you’ll need to work with multiple strands. Most skeins are 50g (some are 25g or 100g).

If the pattern is worked with multiple colours, every colour will have to be calculated separately. Similarly, if the pattern is worked with several strands of different yarns (for example 1 strand Alpaca and 1 strand Kid-Silk) you will have to find alternatives for each, individually.

Click here to see our yarn calculator

Since different yarns have different qualities and textures we have chosen to keep the original yarn in our patterns. However, you can easily find options among our available qualities by using our yarn calculator, or simply pick a yarn from the same yarn group.

It is possible that some retailers still have discontinued yarns in stock, or that someone has a few skeins at home that they would like to find patterns for.

The yarn calculator will provide both alternative yarn as well as required amount in the new quality.

If you think it's hard to decide what size to make, it can be a good idea to measure a garment you own already and like the size of. Then you can pick the size by comparing those measures with the ones available in the pattern's size chart.

You'll find the size chart at the bottom of the pattern.

See DROPS lesson: How to read size chart

The needle size provided in the pattern serves only as a guide, the important thing is to follow the knitting tension. And since knitting tension is very individual, you will have to adjust the needle size to ensure that YOUR tension is the same as in the pattern – maybe you’ll have to adjust 1, or even 2 needle sizes, up or down to achieve the correct tension. For this, we recommend that you work test swatches.

Should you work with a different knitting tension than the one provided, the measurements of the finished garment might deviate from the measurement sketch.

See DROPS lesson: How to measure your tension/gauge

See DROPS video: How to make a tension/gauge swatch

Working a garment top-down provides more flexibility and room for personal adjustment. For example it is easier to try the garment on while working, as well as making adjustments to length of yoke and shoulder caps.

The instructions are carefully explaining every step, in the correct order. Diagrams are adjusted to the knitting direction and are worked as usual.

The diagram depicts all rows/rounds, and every stitch seen from the right side. It is read from bottom to top, from right to left. 1 square = 1 stitch.

When working back and forth, every other row is worked from the right side and every other row is worked from the wrong side. When working from the wrong side, the diagram will have to be worked reversed: from left to right, knit stitches are purled, purl stitches are knit etc.

When working in the round every round is worked from the right side and the diagram are worked from right to left on all rounds.

See DROPS lesson: How to read knitting diagrams

The diagram depicts all rows/rounds, and every stitch seen from the right side. It is worked from bottom to top, from right to left.

When working back and forth every other row is worked from the right side: from right to left and every other row is worked from the wrong side: from left to right.

When working in the round, every row in the diagram are worked from the right side, from right to left.

When working a circular diagram you start in the middle and work your way outwards, counter clockwise, row by row.

The rows usually start with a given number of chain stitches (equivalent to the height of the following stitch), this will either be depicted in the diagram or explained in the pattern.

See DROPS lesson: How to read crochet diagrams

Instructions for working several diagrams after each other on the same row/round, will often be written like so: “work A.1, A.2, A.3 a total of 0-0-2-3-4 times". This means you work A.1 once, then A.2 is worked once, and A.3 is repeated (in width) the number of times provided for your size – in this case like so: S = 0 times, M = 0 times, L=2 times, XL= 3 times and XXL = 4 times.

The diagrams are worked as usual: begin with the first row in A.1, then work the first row in A.2 etc.

See DROPS lesson: How to read knitting diagrams

See DROPS lesson: How to read crochet diagrams

The total width of the garment (from wrist-to-wrist) will be larger in the larger sizes, despite the actual sleeves being shorter. The larger sizes have longer sleeve caps and wider shoulders, so there will be a good fit in all sizes.

The measurement sketch/schematic drawing provides information regarding the full length of the garment. If it’s a jumper or a jacket the length is measured from the highest point on the shoulder closest to the neckline, and straight down to the bottom of the garment. It is NOT measured from the tip of shoulder. Similarly, the length of yoke is measured from the highest point on the shoulder and down to where yoke is split into body and sleeves.

On a jacket measures are never taken along bands, unless specifically stated. Always measure inside band stitches when measuring the length.

See DROPS lesson: How to read a schematic drawing

Diagrams are often repeated on the round or in height. 1 repeat is the diagram the way it appears in the pattern. If it says to work 5 repeats of A.1 in the round, then you work A.1 a total of 5 times after/next to each other in the round. If it says to work 2 repeats of A.1 vertically/in height you work the entire diagram once, then begin again at the start and work the entire diagram one more time.

Chain stitches are slightly narrower than other stitches and to avoid working the cast-on edge too tight, we simply chain more stitches to begin with. The stitch count will be adjusted on the following row to fit the pattern and measurement sketch.

The rib edge is more elastic and will contract slightly compared to, for example, stocking stitch. By increasing before the rib edge, you avoid a visible difference in width between the rib edge and the rest of the body.

It’s very easy to cast off too tightly, and by making yarn overs while casting off (and simultaneously casting these off) you avoid a too tight cast off edge.

See DROPS video: How to bind off with yarn overs (yo)

To achieve an even increase (or decrease) you can increase on, for example: every 3rd and 4th row alternately, like so: work 2 rows and increase on the 3rd row, work 3 rows and increase on the 4th. Repeat this until the increase is complete.

See DROPS lesson: Increase or decrease 1 st on every 3rd and 4th row alternately

Should you prefer to work in the round instead of back and forth, you may of course adjust the pattern. You’ll need to add steeks mid-front (usually 5 stitches), and follow the instructions. When you would normally turn and work from the wrong side, simply work across the steek and continue in the round. At the end you’ll cut the piece open, pick up stitches to work bands, and cover the cut edges.

See DROPS video: How to knit steeks and cut open

Should you prefer to work back and forth instead of in the round, you may of course adjust the pattern so you work the pieces separately and then assemble them at the end. Divide the stitches for the body in 2, add 1 edge stitch in each side (for sewing) and work the front and back pieces separately.

See DROPS lesson: Can I adapt a pattern for circular needles into straight needles?

Pattern repeats can vary slightly in the different sizes, in order to get the correct proportions. If you’re not working the exact same size as the garment in the photo, yours might deviate slightly. This has been carefully developed and adjusted so that the complete impression of the garment is the same in all sizes.

Make sure to follow instructions and diagrams for your size!

If you have found a pattern you like which is available in women’s size it’s not very difficult to convert it to men’s size. The biggest difference will be the length of sleeves and body. Start working on the women size that you think would fit across the chest. The additional length will be worked right before you cast off for the armhole/sleeve cap. If the pattern is worked top-down you can add the length right after the armhole or before the first decrease on sleeve.

Regarding additional yarn amount, this will depend on how much length you add, but it is better with a skein too many than too few.

All yarns will have excess fibres (from production) that might come off as lint or shedding. Brushed yarns (ie hairier yarns) have more of these loose, excess fibres, causing more shedding.

Shedding also depends on what is worn under or over the garment, and whether this pulls at the yarn fibres. It’s therefore not possible to guarantee that there will be no shedding

Below are some tips on how to get the best result when working with hairier yarns:

1. When the garment is finished (before you wash it) shake it vigorously so the looser hairs come off. NOTE: do NOT use a lint roller, brush or any method that pulls at the yarn.

2. Place the garment in a plastic bag and put it in your freezer - the temperature will cause the fibres to become less attached to each other, and excess fibres will come off easier.

3. Leave in the freezer for a few hours before taking it out and shaking it again.

4. Wash the garment according to the instructions on the yarn label.

Pilling is a natural process that happens to even the most exclusive of fibers. It's a natural sign of wear and tear that is hard to avoid, and that is most visible in high friction areas of your garment like a sweater's arms and cuffs.

You can make your garment look as new by removing the pilling, using a fabric comb or a pill/lint remover.

Still can't find the answer you need? Then scroll down and leave your question so one of our experts can try to help you. This will be done normally within 5 to 10 working days.
In the meantime, you can read the questions and answers that others have left to this pattern or join the DROPS Workshop on Facebook to get help from fellow knitters/crocheters!

You might also like...

Post a comment to pattern DROPS Baby 42-9

We would love to hear what you have to say about this pattern!

If you want to leave a question, please make sure you select the correct category in the form below, to speed up the answering process. Required fields are marked *.

Comments / Questions (15)

country flag Brigitte wrote:

Bonjour, J'aimerais une précision sur la longueur du tricot entre le moment où l'on arrive au 154 mailles après les 14 cm, depuis la séparation, et avant le passage aux côtes, ( dans le chapitre "dos et devant"). Merci d'avance.

14.02.2024 - 11:07

DROPS Design answered:

Bonjour Brigitte, à ce moment là, il manque les 3 cm de côtes à la longueur totale du gilet, autrement dit, en taille 6/9 mois, le gilet mesure 27 cm à partir de l'épaule (gilet posé à plat comme dans le schéma), soit 14 cm après la division. Bon tricot!

14.02.2024 - 16:24

country flag Flo wrote:

Bonjour, Faut il commencer la 1ere boutonnière dans la côte 2/2 en aiguille 2.5 ou juste après en Jersey avec les aiguilles 3? Merci,

11.02.2024 - 15:49

DROPS Design answered:

Bonjour Flo, tricotez le dernier rang du col en ouvrant la 1ère boutonnière avec les aiguilles 2,5 et continuez ensuite l'empiècement avec les aiguilles 3. Bon tricot!

12.02.2024 - 08:34

country flag Angela wrote:

Non capisco perché occorrono sempre 150 g per qualsiasi taglia , esclusa la prima 0/1, per la quale ne bastano 100. Io devo fare la taglia 9/12 mesi e non può essere che occorrano 150 grammi come per la taglia 1/3. Può chiarirmi? Grazie

28.08.2023 - 11:18

DROPS Design answered:

Buonasera Angela, non ci sono segnalazioni di errori riguardo la quantità di filato: per le prime 2 taglie sono richiesti 100 g di filato e per le altre 150 g di filato. Buon lavoro!

28.08.2023 - 23:07

country flag Janet wrote:

I am wondering what the difference is between the patterns Little Pearl and Little Bee (besides the embroidered bee). And, which if either, is appropriate for a sock knitter's first attempt at a baby sweater.

21.08.2023 - 23:36

DROPS Design answered:

Dear Janet, the biggest difference is in the ribbing edge: Little Pearl is worked with K2, P2 while Little Bee is worked with K1, P1. Just read thoroughly the pattern (both if you like to) and feel free to use this section if you have any questions. Happy knitting!

22.08.2023 - 09:35

country flag Hélène wrote:

J’ai suivi votre emplacement pour les marqueurs du 12-18 mois et ça n’arrive pas! Nous avons 104 mailles et nous utilisons seulement 100 mailles avec les bordures!

12.03.2023 - 21:48

DROPS Design answered:

Bonjour Hélène, notez que les marqueurs des raglans sont chacun placés dans une maille, ainsi vous aurez: 22 m (devant), 1 m (marqueur), 12 m (manche), 1 m (marqueur), 32 m (dos), 1 m (marqueur), 12 m (manche), 1 m (manche), 22 m (devant) soit: 22+1+12+1+32+1+12+1+22=104 mailles. Bon tricot!

13.03.2023 - 10:53

country flag Mimma wrote:

Rispetto alla domanda fatta in precedenza, riguardo al numero delle maglie, ho inserito I segnapunti tra 6 e 12 maglie e poi 16 ecc. in un intervallo tra due segnapunti ci sono le maglie indicate. Mi scuso ma non capisco come fare altrimenti. Grazie mille

25.02.2023 - 15:18

DROPS Design answered:

Buongiorno Mimma, le distanze tra i segnapunti sono corrette ma i segnapunti vanno inseriti nella maglia non nello spazio tra 2 maglie: le 4 maglie che mancano nel conteggio sono le maglie CON i segnapunti. Buon lavoro!

26.02.2023 - 09:20

country flag Mimma wrote:

Buongiorno, avrei bisogno di capire se sbaglio qualcosa o se c’è un errore nei calcoli della misura 12/18 mesi. Dopo il collo e con gli aumenti si arriva a 104 m, ma nella divisione dello sprone, 6 + 16+ 12+ 32+ 12 + 16 + 6 si hanno 100 maglie. Grazie mille per la vostra risposta.

24.02.2023 - 13:54

DROPS Design answered:

Buongiorno Mimma, ha inserito i segnapunti NELLA maglia e non TRA le maglie? Buon lavoro!

25.02.2023 - 13:57

country flag Desjardins Marie-Sophie wrote:

Bonjour. J’ai 2 questions : 1. Concernant le col, après avoir monté les mailles je suis à l’endroit. Je ne peux donc pas tricoter un rang envers sur l’envers. Faut il monter les mailles de manière à être d’emblée sur l’envers ? 2. Si tricote les manches à plat, faut il monter (et relever par la suite) les 6 mailles sous la manche ? Un grand merci pour vos réponses !

21.02.2023 - 08:25

DROPS Design answered:

Bonjour Mme Desjardins, lorsque l'on monte les mailles à la méthode continentale, les 2 côtés du montage sont différents et dans ce cas, on veut que le premier rang soit l'envers, on va donc tricoter le 1er rang ainsi: 6 m end, à l'envers jusqu'à ce qu'il reste 6 m et on termine par 6 m end. Le rang suivant se trouve ainsi sur l'endroit. Pour les manches, à vous de voir comment vous préférez procéder - cette leçon pourra vous aider; elle montre comment tricoter un pull de haut en bas (manches à partir de 18) . Bon tricot!

21.02.2023 - 10:28

country flag DESJARDINS MARIE-SOPHIE wrote:

Bonjour, je n'arrive pas à tricoter les manches en magic loop ou en doubles pointes. Est-il possible de les tricoter à plat sur des aiguilles circulaires ? Merci beaucoup

20.02.2023 - 16:31

DROPS Design answered:

Bonjour Mme Desjardins, tout à fait, vous retrouverez ici quelques astuces pour vous aider. Bon tricot!

20.02.2023 - 16:49

country flag Åsa wrote:

Efter att man gjort raglan ökningarna och fått i mitt fall 204 maskor (andra storleken) ska man fortsätta med slätstickning utan ökningar för att komma upp i 10cm då? Står inget om det.

29.11.2022 - 10:35

DROPS Design answered:

Hej Åsa, ja det stemmer, arbejdet skal måle 10 cm inden du deler det. God fornøjelse!

01.12.2022 - 14:00