
Popular categories
Looking for a yarn?


Comments / Questions (81)
![]() Sabine wrote:
Sabine wrote:
Hallo Drops Team, ich würde diese Strickanleitung gerne in einem etwas dickerem Garn (Gruppe B) und Nadeln Nr. 4 stricken. Wie verändern sich dann die Maße des fertigen Strickstückes? Breiter? Länger?
29.06.2025 - 06:56DROPS Design answered:
Liebe Sabine, hier finden Sie Anleitungen für Jacken in einer Garngruppe B gestrickt, davon können Sie sich inspirieren. Viel Spaß beim Stricken!
30.06.2025 - 08:42
![]() Charlotta Jutander wrote:
Charlotta Jutander wrote:
Jag stickar storl 6/9 mån. Antalet maskor stämmer inte när jag skall fördela de 4 markörerna i början av oket.
07.06.2025 - 14:27DROPS Design answered:
Hej Charlotta. Du har 92 maskor och sätter markörerna såhär: 6+13+1 (markör i denna maska)+12+1 (markör i denna maska)+26+1 (markör i denna maska)+12+1 (markör i denna maska)+13+6=92. Mvh DROPS Design
09.06.2025 - 12:05
![]() Susanne Birkedal wrote:
Susanne Birkedal wrote:
Jeg mener at jeg har opdaget en fejl i opskriften i afsnittet om bærestykket. Jeg mener ikke at maskeantal passer med antal udtagninger i det første afsnit Venlig hilsen Susanne Bikedal
22.05.2025 - 09:46
![]() Astrid wrote:
Astrid wrote:
Hallo, erstmal Danke für die schöne Anleitung. Allerdings stimmt meine Maschenprobe nicht mit der in der Anleitung überein. Mit der NS 3,0 bin ich auf 30 Maschen gekommen & mit 3,5 auf 27 Maschen. Habe die Anleitung umrechnen müssen. Lg.
21.04.2025 - 03:10
![]() Jutta wrote:
Jutta wrote:
Super ausführlich beschrieben, ich finde es toll das der Raglan von oben nach unten gestrickt wird. Leider stimmt bei mir die Maschenprobe mit eurer nicht überein. Ich stricke weder fest, noch locker, brauche aber mit 3er Nadel 30 Maschen für 10 cm, und mit 3,5 er Nadel brauche ich 27 Maschen. Aber trotzdem tolles Strickmuster :)
19.03.2025 - 12:46
![]() Adriana Zacco wrote:
Adriana Zacco wrote:
Sto seguendo lo schema Little bee cardigan taglia 1/3 mesi . non mi trovo con il conto delle maglie nelle vostre istruzioni dopo la prima asola. Infatti da indicazioni taglia io ho sul ferro 92 m. ma le istruzioni dicono ferro successivo: 6 legaccio +13 rovescio+12 rovescio+26 rovescio +12 rovescio+13 rovescio + 6 legaccio per un totale di 88 m. potete darmi indicazioni? sono ferma con il lavoro. Grazie Adriana
11.03.2025 - 23:27DROPS Design answered:
Buonasera Adriana, probabilmente non ha contato le 4 maglie in cui deve inserire i segnapunti. Buon lavoro!
18.03.2025 - 22:00
![]() Immanuvel Moses wrote:
Immanuvel Moses wrote:
In my case am kntting 0/1 size, in that after first raglan increase, am with 84 stitches on the needle. but placing markers after purl creates four stitches extra, or else first marker should be put band 6 stitches plus 5 purls or? how to rectify the error
26.02.2025 - 09:15DROPS Design answered:
Dear Mr Moses, the markers should be all inserted in one stitch and not between stitches, ie in first size so (from WS): 6 front band sts + 11 sts (right front piece), 1 st with a marker, 12 sts (sleeve), 1 st with a marker, 22 sts (back piece), 1 st with a marker, 12 sts (sleeve), 1 st with a marker, 11 sts + 6 front band sts (left front piece) = 6+11+1+12+1+22+1+12+1+11+6=84 sts. Happy knitting!
26.02.2025 - 17:25
![]() Mary wrote:
Mary wrote:
Please explain the instruction for sleeves: \"Knit up 1 stitch in each of the 6 stitches\" What does \"knit up\" mean?
29.11.2024 - 14:28DROPS Design answered:
Dear Mary, knit up = pick up and knit stitches. You can see how to do this in the following video: https://www.garnstudio.com/video.php?id=1634&lang=en. Happy knitting!
07.12.2024 - 19:38
![]() Anette Nødskou wrote:
Anette Nødskou wrote:
Tak for svar. Jeg er kommet til det, men pille det op 3 gange, fordi jeg gør sådan Har 81 masker, tager 11 masker ud = 92 masker. = Ok så gør jeg dette med markør 6+13+12+26+12+13+6=88 her mangler jeg så 4 masker. De 4 som du skriver troet jeg “bare” var en markør jeg skulle sætte efter hver af disse 6+13+12+26+12+13+6 Men jeg skal så sætte markør efter hver gang jeg har strikket 6+13+1+12+1+26+1+12+1+13+6 Tænker jeg det må være.
31.10.2024 - 15:12DROPS Design answered:
Hej Anette, jo men du skal tælle alle masker med, også dem med mærket i :)
01.11.2024 - 11:42
![]() Anette Nødskou wrote:
Anette Nødskou wrote:
Str 1/3 mdr allerede efter halskant og første udtagning er der en difference på 4 masker. Er der fejl i opskriften?
31.10.2024 - 14:10DROPS Design answered:
Hej Anette, du har 81 masker, tager 11 masker ud = 92 masker. 6+13+1+12+1+26+1+12+1+13+6=92 masker. Hvor langt er du kommet? Hvor mange masker har du?
31.10.2024 - 14:56
|
|||||||
Little Bee Cardigan#littebeecardigan |
|||||||
 |
 |
||||||
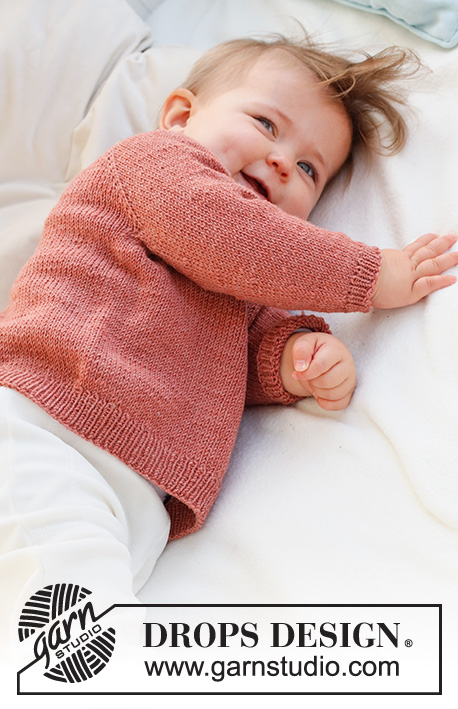
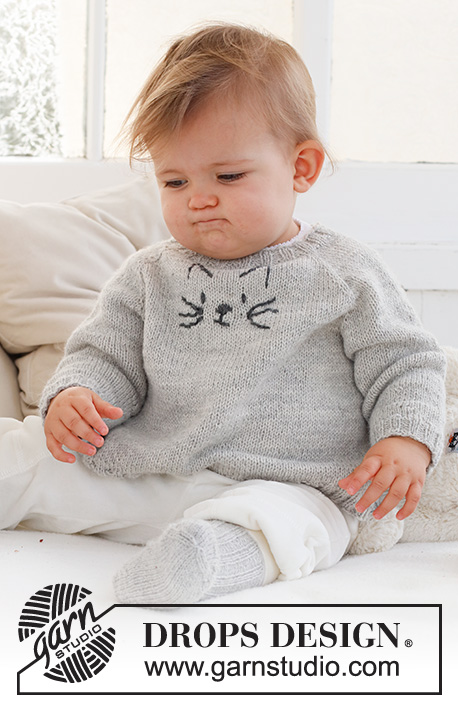
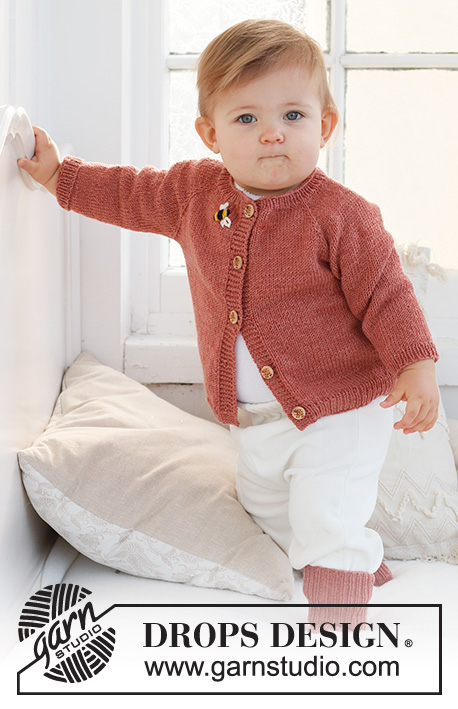
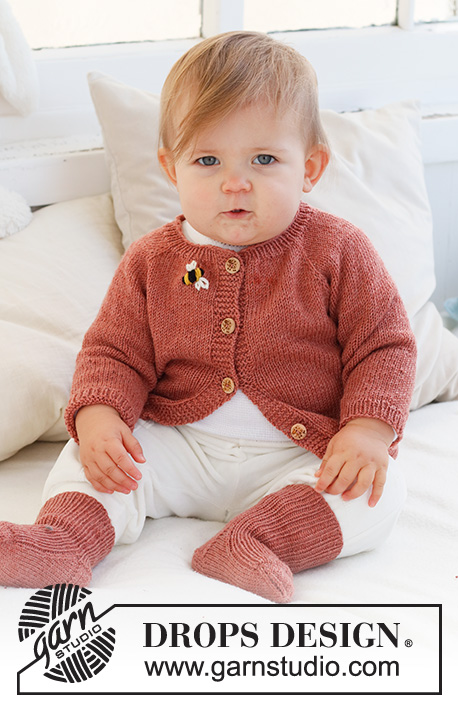
Knitted jacket for babies and children in DROPS BabyMerino. The piece is worked top down, with raglan and embroidered bee. Sizes 0 - 4 years.
DROPS Baby 42-4 |
|||||||
|
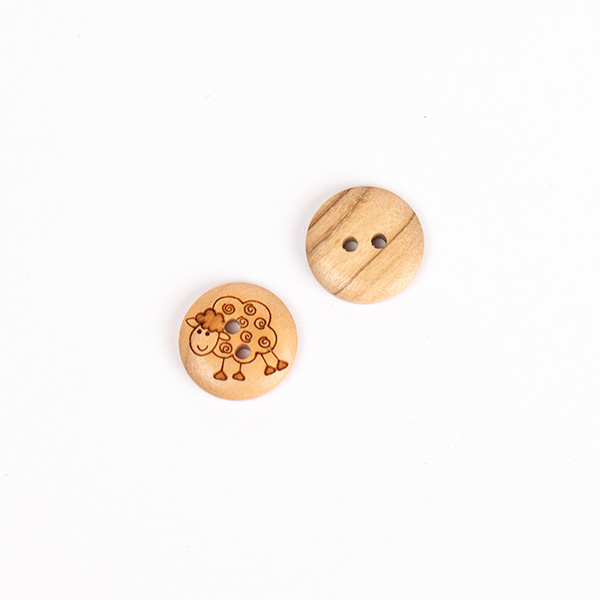
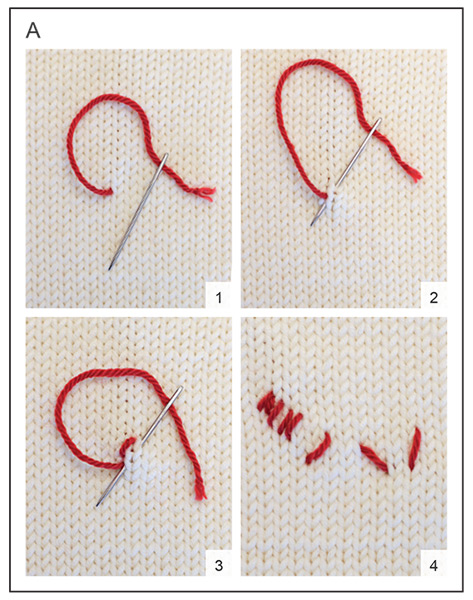
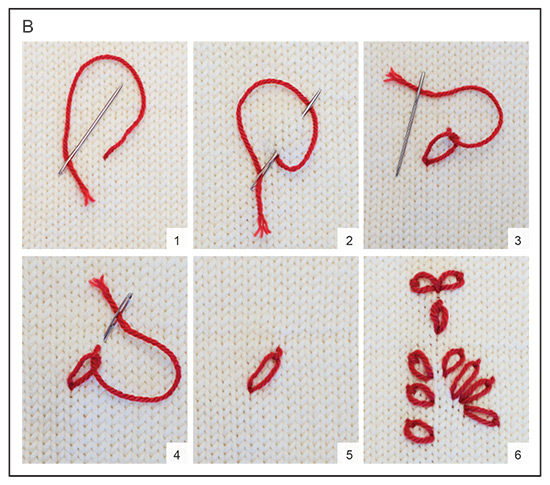
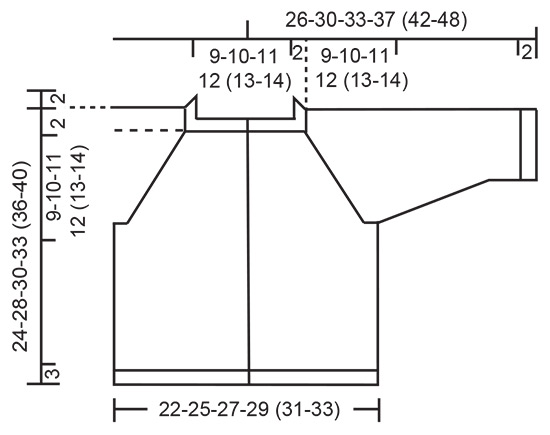
------------------------------------------------------- EXPLANATIONS FOR THE PATTERN: ------------------------------------------------------- RIDGE/GARTER STITCH (worked back and forth): Knit all rows. 1 ridge = knit 2 rows. RAGLAN: All increases are worked from the right side! Work to the marker-stitch, 1 yarn over, knit the marker-stitch, 1 yarn over. Increase like this at each marker-stitch (8 stitches increased). On the next row purl the yarn overs twisted to avoid holes. Then work the new stitches in stocking stitch. DECREASE TIP (sleeves): Decrease 1 stitch on either side of the marker as follows: Work until there are 3 stitches left before the marker, knit 2 together, knit 2 (marker sits between these 2 stitches), slip 1 stitch as if to knit, knit 1 and pass the slipped stitch over the knitted stitch. BUTTONHOLES: Work buttonholes on the right band (when the garment is worn). Work from the right side when there are 3 stitches left on the row as follows: Make 1 yarn over, knit 2 together and knit 1. On the next row, knit the yarn over to leave a hole. The first buttonhole is worked when the neck measures 2 cm. Then work the other 4-4-4-4 (5-5) buttonholes with after 5-6-6½-7 (6½-7) cm between each one. ------------------------------------------------------- START THE PIECE HERE: ------------------------------------------------------- JACKET – SHORT OVERVIEW OF THE PIECE: The yoke is worked back and forth with circular needle. It is divided for the body and sleeves and the body continued back and forth. The sleeves are worked in the round with double pointed needles. NECK: Cast on 75-81-85-91 (95-99) stitches with circular needle size 2.5 mm and DROPS Baby Merino. Purl 1 row from the wrong side with 6 band stitches in GARTER STITCH on each side – read description above. Then work rib as follows: 6 band stitches in garter stitch, * knit 1, purl 1 *, work from *-* until there are 7 stitches left, knit 1 and 6 band stitches in garter stitch. When the rib measures 2 cm, change to circular needle size 3 mm. Insert 1 marker after the band at the beginning of the row, the yoke is measured from this marker! YOKE: Work the next row from the right side: 6 band stitches in garter stitch, knit 63-69-73-79 (83-87) and increase 9-11-7-13 (13-17) stitches evenly spread and 6 band stitches in garter stitch = 84-92-92-104 (108-116) stitches. Work the first BUTTONHOLE – read description above. On the next row insert 4 markers as follows: Work 6 band stitches in garter stitch, purl 11-13-13-16 (17-19), insert 1 marker in the next stitch, purl 12, insert 1 marker in the next stitch, purl 22-26-26-32 (34-38), insert 1 marker in the next stitch, purl 12, insert 1 marker in the next stitch, purl 11-13-13-16 (17-19) and 6 band stitches in garter stitch. Continue with stocking stitch and 6 band stitches in garter stitch on each side, increasing as follows: On the next row from the right side increase 1 stitch on each side of all the markers – read RAGLAN! Increase like this every row from the right side 12-14-16-17 (18-19) times = 180-204-220-240 (252-268) stitches. REMEMBER THE KNITTING TENSION! When the piece measures 9-10-11-12 (13-14) cm from the marker, divide for the body and sleeves as follows: Work 6 band stitches in garter stitch, 23-27-29-32 (34-37) stitches in stocking stitch, place the next 38-42-46-50 (52-54) stitches on a thread for the sleeve, cast on 6 stitches, work 46-54-58-64 (68-74) stitches in stocking stitch, place the next 38-42-46-50 (52-54) stitches on a thread for the sleeve, cast on 6 stitches, work 23-27-29-32 (34-37) stitches in stocking stitch and 6 band stitches in garter stitch. BODY: = 116-132-140-152 (160-172) stitches. Continue back and forth with stocking stitch and 6 band stitches in garter stitch on each side. When the piece measures 10-13-14-16 (18-21) cm from the division, increase 13-13-15-15 (17-19) stitches evenly spaced on the next row from the right side (do not increase over the bands) = 129-145-155-167 (177-191) stitches. Change to circular needle size 2.5 mm and work rib, starting from the wrong side as follows: 6 band stitches in garter stitch, * purl 1, knit 1 *, work from *-* until there are 7 stitches left, purl 1 and 6 band stitches in garter stitch. Continue this rib for 3 cm. Cast off. SLEEVES: Place the 38-42-46-50 (52-54) stitches from the thread on the one side of the piece on double pointed needles size 3 mm and knit up 1 stitch in each of the 6 stitches cast on under the sleeve = 44-48-52-56 (58-60) stitches. Insert a marker in the middle of the new stitches under the sleeve. Start at the marker and work stocking stitch in the round. When the sleeve measures 1 cm from the division, decrease 1 stitch on each side of the marker - read DECREASE TIP! Decrease like this every 2½-2½-1½-2 (2-3) cm a total of 3-4-6-7 (7-7) times = 38-40-40-42 (44-46) stitches. When the sleeve measures 8-11-12-15 (18-23) cm, increase 4-4-4-4 (6-6) stitches evenly spaced = 42-44-44-46 (50-52) stitches. Change to double pointed needles size 2.5 mm and work rib (knit 1, purl 1) for 2 cm. Cast off. Work the other sleeve in the same way. BEE: Embroider a bee on the right front piece – see photo. The bee is worked with a single strand and flat stitch, the wings are worked with chain stitch. BEE – BLACK STRIPES: See diagram A and diagram explanations. Using black, start 3 cm below the neck and 4 cm from the band. Embroider 2 flat stitches, diagonally up to the right (towards the band), close together and 0.5 cm in length. Skip 0.5 cm diagonally up to the left and embroider 4 flat stitches close together and parallel to the first 2 stitches, 1 cm in length (= middle of body), skip 0.5 cm, work 2 flat stitches close together and parallel to the 4 stitches, 0.5 cm in length. BEE – MUSTARD STRIPES: Change to mustard. Embroider flat stitches between the black stripes - 4 stitches of the same length as the black stitches they are close to (2 mustard stripes). BEE - WINGS: Use colour off white; the wings consist of 2 chain stitches, both starting from the same hole. Work as follows: STITCH 1: Work 1 chain stitch, 1-1.5 cm in length from the middle of the bee - see diagram B and diagram explanations. STITCH 2: Work 1 chain stitch, 1-1.5 cm in length, starting from the same place. Embroider a set of wings on the other side of the bee. ASSEMBLY: Sew the buttons onto the left band. |
|||||||
Diagram explanations |
|||||||
|
|||||||
 |
|||||||
 |
|||||||
 |
|||||||
Have you finished this pattern?Tag your pictures with #dropspattern #littebeecardigan or submit them to the #dropsfan gallery. Do you need help with this pattern?You'll find 31 tutorial videos, a Comments/Questions area and more by visiting the pattern on garnstudio.com. © 1982-2026 DROPS Design A/S. We reserve all rights. This document, including all its sub-sections, has copyrights. Read more about what you can do with our patterns at the bottom of each pattern on our site. |
|||||||


With over 40 years in knitting and crochet design, DROPS Design offers one of the most extensive collections of free patterns on the internet - translated to 17 languages. As of today we count 324 catalogues and 12290 patterns translated into English (UK/cm). 12290
We work hard to bring you the best knitting and crochet have to offer, inspiration and advice as well as great quality yarns at incredible prices! Would you like to use our patterns for other than personal use? You can read what you are allowed to do in the Copyright text at the bottom of all our patterns. Happy crafting!
Post a comment to pattern DROPS Baby 42-4
We would love to hear what you have to say about this pattern!
If you want to leave a question, please make sure you select the correct category in the form below, to speed up the answering process. Required fields are marked *.