Comments / Questions (31)
![]() Monna Des Fougères wrote:
Monna Des Fougères wrote:
Bonjour, Est-il possible de ne faire ce pull qu'en Kid Silk, en doublant le fil ? Merci :-)
11.12.2022 - 14:42DROPS Design answered:
Bonjour Mme Des Fougères, 2 fils Kid-Silk risquent d'être trop peu pour obtenir la bonne tension, essayez avec 3 fils plutôt - la texture sera différente quoi qu'il en soit, il est recommandé de tricoter un échantillon au préalable (je le ferai avec 2 et 3 fils) pour bien vérifier votre échantillon mais également la texture obtenue et ainsi choisir l'alternative que vous préférez. Bon tricot!
12.12.2022 - 09:35
![]() Alicja wrote:
Alicja wrote:
Nie do końca rozumiem jak zacząć przerabiać karczek. Jestem obecnie na etapie, w którym robótka jest rozdzielona na cztery (przód, tył, 2x rękawy). Wykonałam pierwszą część rękawów saddle shoulders (dotarłam do tych 8 cm odmierzanych od markera na środku rękawa). W jaki sposób i co dokładnie mam teraz nabrać na druty?
06.11.2022 - 17:57DROPS Design answered:
Witaj Alicjo, teraz na prawej stronie robótki przerabiasz schemat A.1 ponad oczkami jednego ramienia, a następnie nabierasz oczka wzdłuż tej powstałej klapki ramienia (nabieramy oczka w odl. 2 oczek od brzegu, aby brzeg był jeszcze bardziej zwarty i sweter nie rozciągał się). To przypomina trochę nabieranie oczek wzdłuż pięty, zobacz na filmie TUTAJ. Patrz od 6-tej minuty filmu. Dalej przerabiaj jak w opisie. Pozdrawiamy!
08.11.2022 - 09:50
![]() Ket wrote:
Ket wrote:
Er staat een fout in het patroon. "Ga zo verder met de minderingen tot de mouw 34-33-32-30-29-29 cm meet vanaf de scheiding" moet "Ga zo verder ZONDER minderingen" zijn. Ik heb nu 6 keer teveel geminderd.
31.07.2022 - 14:13
![]() Dominga Dorigo wrote:
Dominga Dorigo wrote:
Buonasera, sto iniziando il lavoro delle spalle a sella. Non capisco però lo schema A1 (ma anche A3), perché le ultime due righe non hanno i primi e gli ultimi punti? Purtroppo non riesco a capire dove finiscono quei punti... Vi ringrazio tanto per i chiarimenti che potrete darmi. Dominga
27.07.2022 - 23:18DROPS Design answered:
Buonasera Dominga, abbiamo inoltrato la sua richiesta al settore design: se dovesse essere necessario troverà il modello corretto direttamente sul sito. Buon lavoro!
27.09.2022 - 21:36
![]() Nathalie H wrote:
Nathalie H wrote:
Bonjour, je tricote ce pull en taille 2 et je viens de terminer les augmentations des manches. Les explications indiquent que, depuis le fil marqueur servant à mesurer, je devrais avoir 13 cm, mais je n’ai tricoté que 10 tours (5 aug. tous les 2 tours) depuis ce marqueur et il en faut 17 pour 10 cm. Dois-je continuer droit jusqu’à 13 cm avant de commencer les augmentations manches/empiècement ? Ai-je fait une erreur quelque part ? Merci d’avance pour votre aide !
04.11.2021 - 11:17DROPS Design answered:
Bonjour Nathalie, vous avez juste effectivement, une correction a été faite pour décaler le fil marqueur, ainsi les mesures sont correctes. Merci pour votre retour, bonne continuation!
09.11.2021 - 09:38
![]() Thibaud Marjolaine wrote:
Thibaud Marjolaine wrote:
Bonjour, je viens de réaliser l'échantillon (avec les fils recommandés) et en 5,5 j'ai bien 15 mailles mais pour 20 rangs. Quand j'essaie avec des aiguilles 6 je n'ai plus assez de mailles mais toujours 19 rangs et l'ouvrage devient trop lâche je trouve. Pour une équivalence de fils C je trouve le nombre de rangs indiqué pour l'échantillon petit. Pouvez vous m'éclairer ? Merci d'avance !
18.10.2021 - 23:08DROPS Design answered:
Bonjour Mme Thibaud, vous pouvez conserver les aiguilles qui vous donnent la bonne largeur, mais n'hésitez pas à vérifier/recalculer si besoin la hauteur pour bien conserver les bonnes proportions conformes au modèle/schéma. Notez également que, comme il vous faut plus de rangs en hauteur, vous risquez d'avoir besoin de davantage de fil - cf FAQ. Bon tricot!
19.10.2021 - 08:50
![]() Ula Sabak wrote:
Ula Sabak wrote:
Czy w schemacie A1 w 5i 6 rzędzie, który ma o 2 oczka mniej z każdej strony te 2 pierwsze oczka bez przerabiania należy przełożyć na prawy drut ? Jaki to ma cel takie skrócone rzędy ?
11.10.2021 - 12:18DROPS Design answered:
Witaj Ulu, w tych miejscach co nie ma oczek (5-ty i 6-ty rząd schematu), de facto są oczka. Dalej przerabiasz boczne części schematu (te małe warkoczyki), czyli w 5-tym rzędzie zaczynasz od: 1 oczko prawe, narzut, 1 oczko prawe i kończysz rząd tak samo. Tzn. cały czas przerabiasz schemat A.1 na 22 oczkach. Pozdrawiamy!
11.10.2021 - 21:20
![]() Tanya Marquette wrote:
Tanya Marquette wrote:
This is a design that would be enjoyable to knit. Like its looseness and wide neck
26.08.2021 - 04:29
![]() Ket wrote:
Ket wrote:
Ik ben al een tijdje op zoek naar een patroon voor een leuke kabeltrui en deze is echt perfect!!
06.08.2021 - 17:59
![]() Julie wrote:
Julie wrote:
Blue songbird
05.08.2021 - 09:01
Sky Feather Sweater#skyfeathersweater |
||||||||||||||||||||||||||||||||||||||||
 |
 |
|||||||||||||||||||||||||||||||||||||||
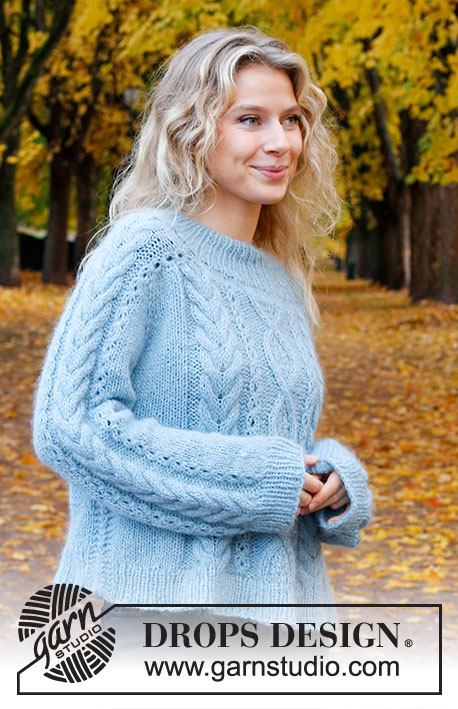
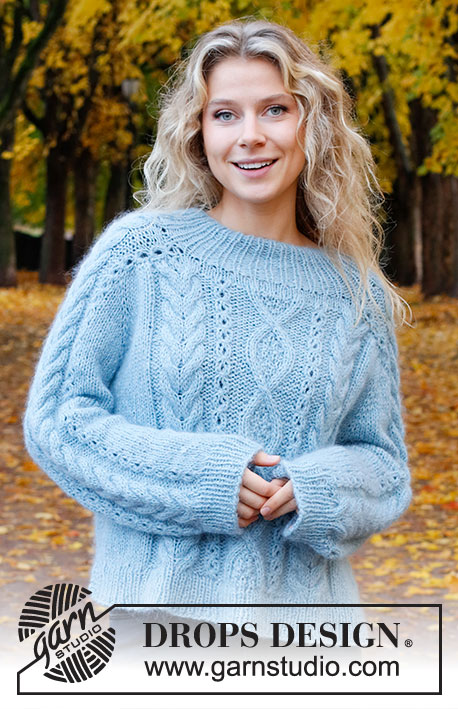
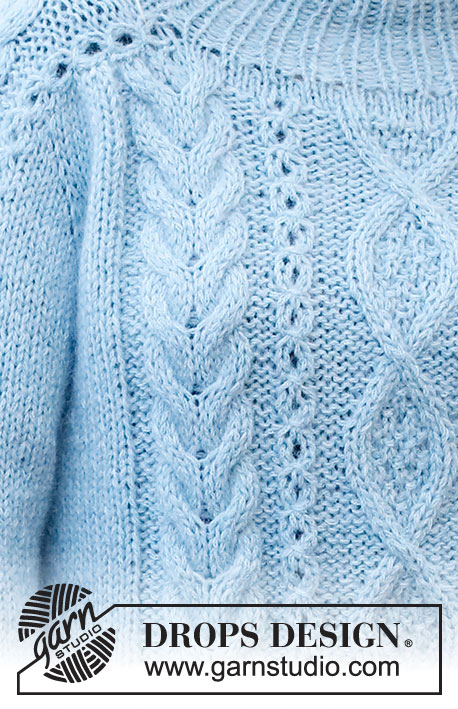
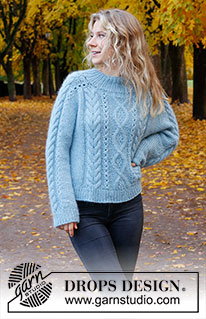
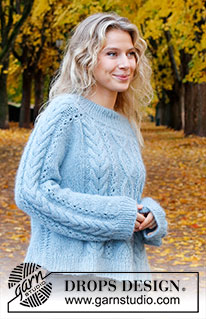
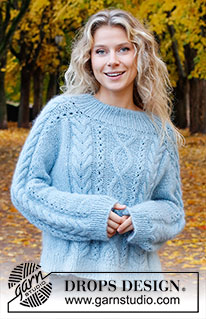
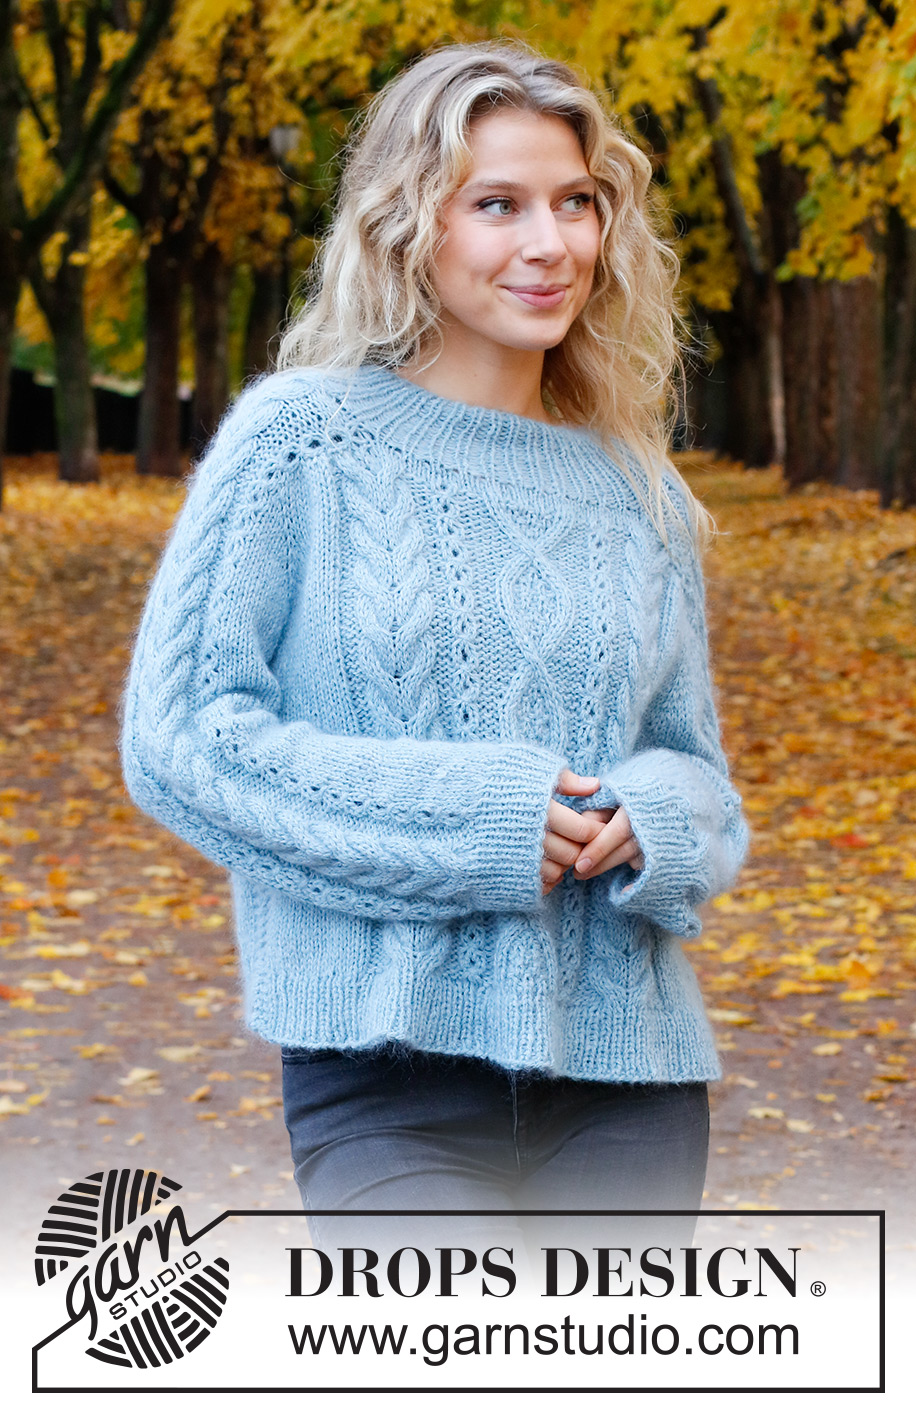
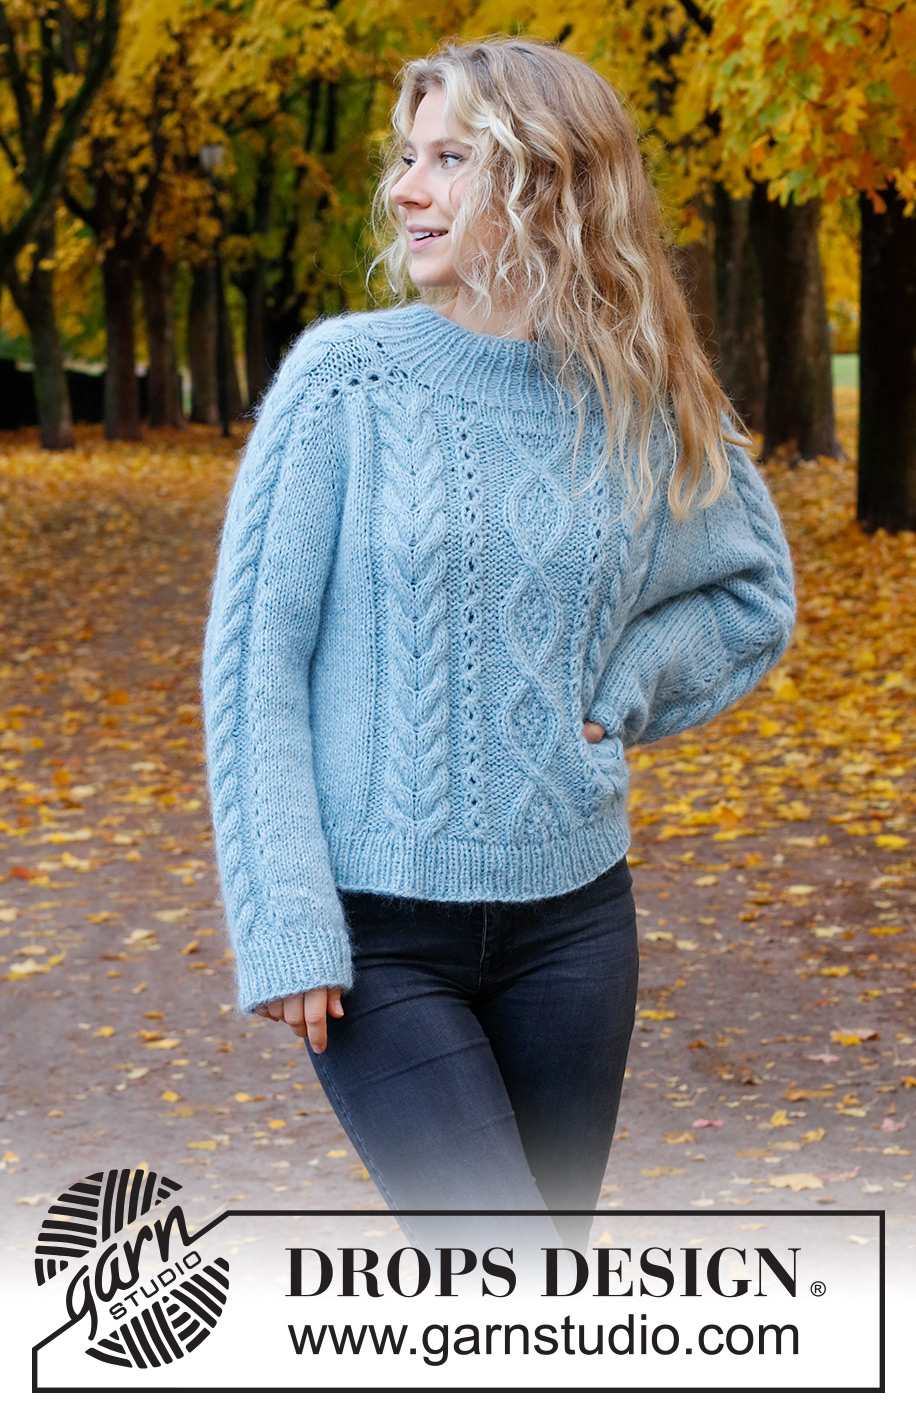
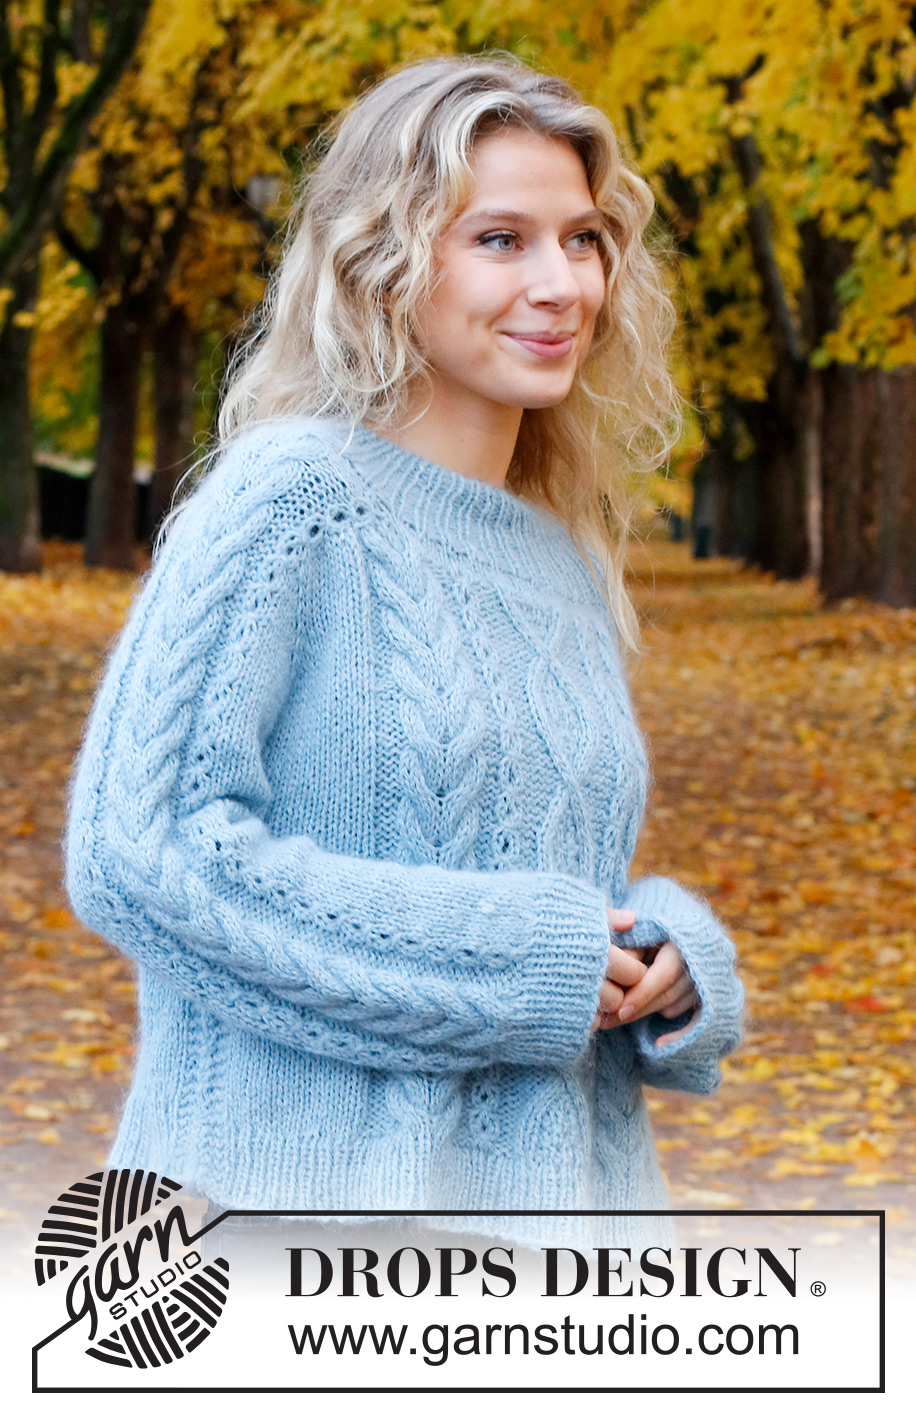
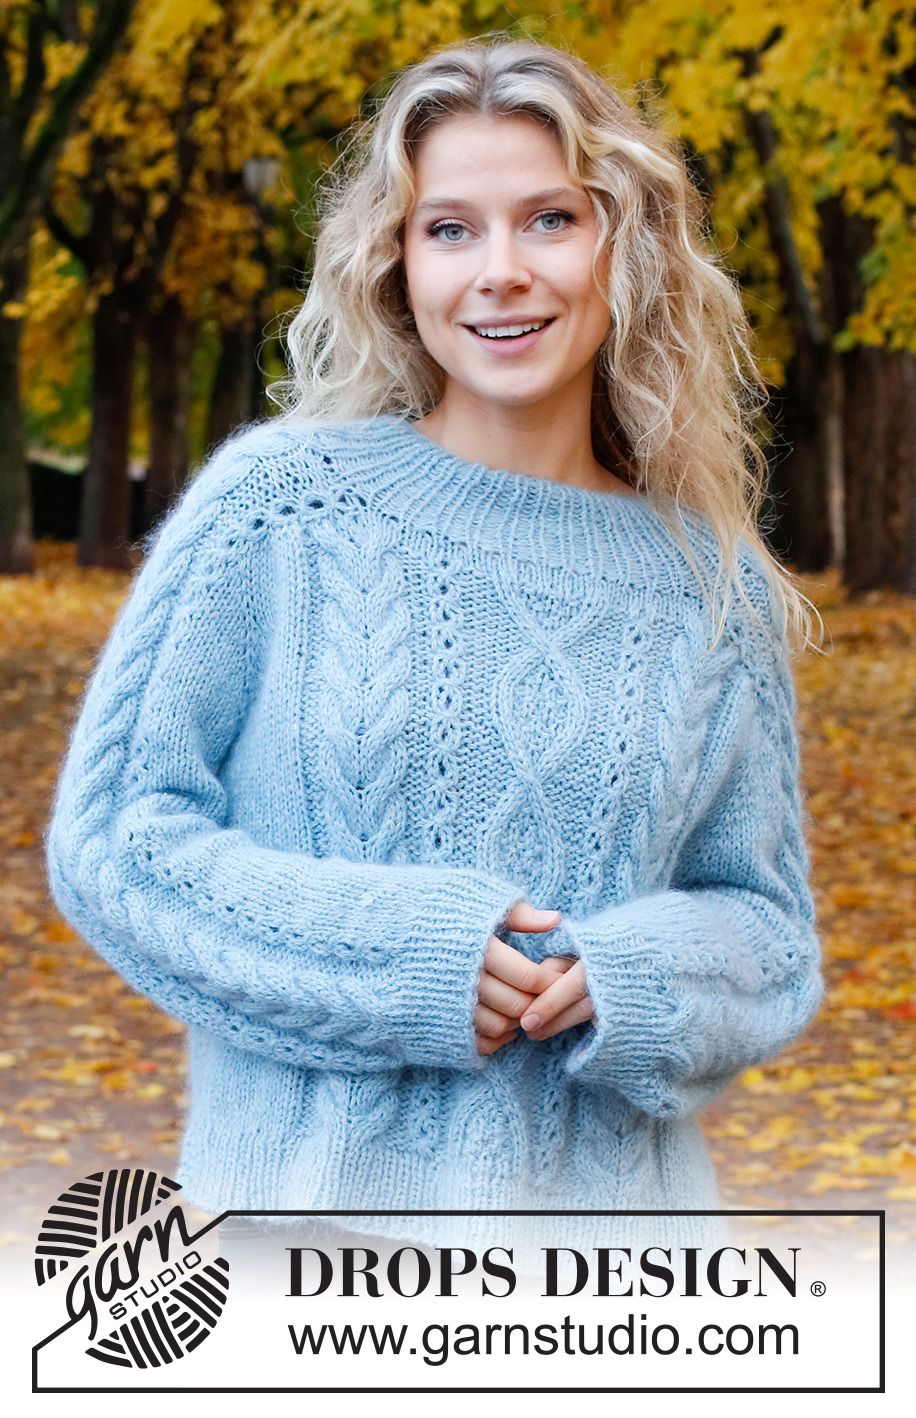
Knitted jumper in DROPS Sky and DROPS Kid-Silk. Piece is knitted top down with saddle shoulders and cables. Size: S - XXXL
DROPS 226-46 |
||||||||||||||||||||||||||||||||||||||||
|
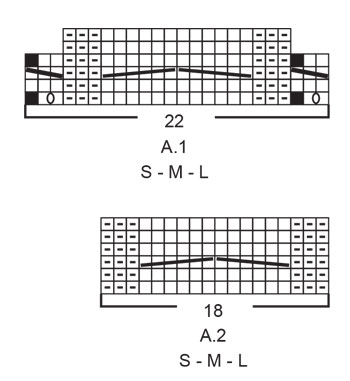
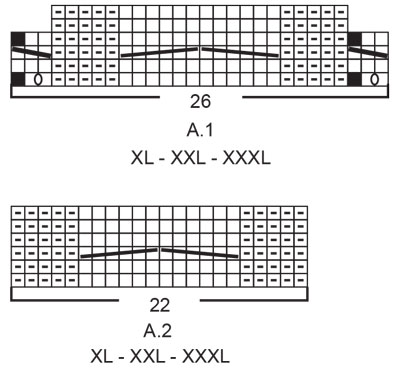
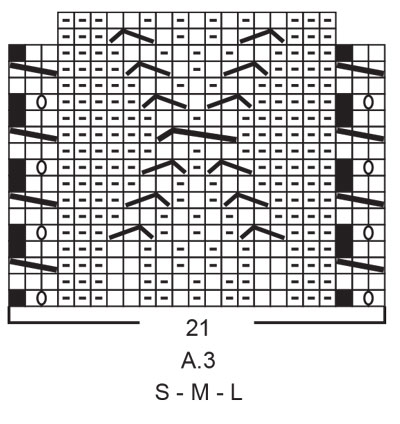
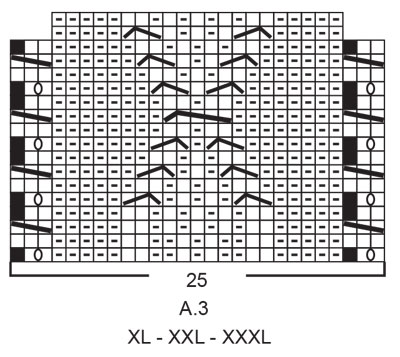
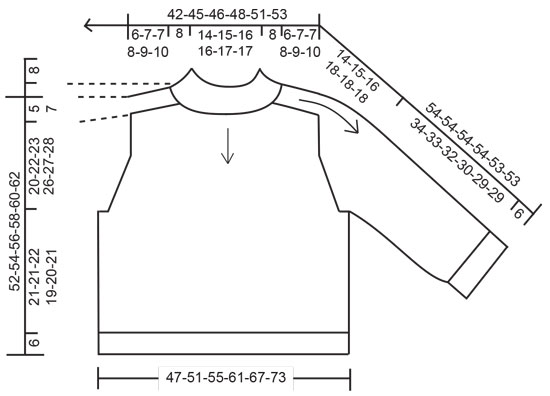
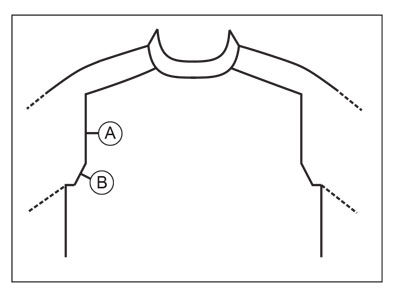
---------------------------------------------------------- EXPLANATION FOR THE PATTERN: ---------------------------------------------------------- GARTER STITCH (back and forth): Knit all rows. 1 ridge vertically = knit 2 rows. GARTER STITCH (worked in the round): 1 ridge vertically = 2 rounds, i.e. knit 1 round and purl 1 round. PATTERN: See diagrams A.1 to A.3. Choose diagram for your size. Diagrams show all rows in pattern seen from the right side. INCREASE/DECREASE TIP (evenly): To calculate how to increase/decrease evenly, use the total number of stitches increases/decreases are done over (e.g. 26 stitches) and divide by number of increases/decreases to be done (e.g. 11) = 2.4. In this example increase by making 1 yarn over after alternately approx. every 2nd and 3rd stitch. On next round work yarn overs twisted to avoid holes. If decreasing knit in this example alternately approx. every and every 2nd stitch together and every 2nd and 3rd stitch together. INCREASE TIP-1 (applies to neck edge): Increase 1 purl stitch to 2 purl stitches by making 1 yarn over before 1 purl stitch. On next round purl yarn over twisted to avoid holes. Then purl the new stitches. INCREASE TIP-2 (from right side): BEFORE MARKER: The new stitch is twisted towards the right. Use left needle to pick up yarn between 2 stitches from round below, pick up yarn from the back and knit stitch in front loop of stitch. AFTER MARKER: The new stitch is twisted towards the left. Use left needle to pick up yarn between 2 stitches from round below, pick up yarn from the front and knit stitch in back loop of stitch. DECREASE TIP (applies to mid under sleeves): Decrease 1 stitch on each side of marker thread as follows: Work until 3 stitches remain before marker thread, knit 2 together, knit 2 stitches (marker thread is between these 2 stitches), slip 1 stitch knitwise, knit 1, pass slipped stitch over stitch worked (= 2 stitches decreased). CAST-OFF TIP: To avoid a tight cast-off edge when casting off, you may use a larger needle. If this still is too tight make 1 yarn over after approx. every 6th stitch while casting off (cast off yarn overs as stitches). ---------------------------------------------------------- START THE PIECE HERE: ---------------------------------------------------------- JUMPER - SHORT OVERVIEW OF THE PIECE: Work neck edge in the round on circular needle from right shoulder at the back, top down. Then work saddle shoulders back and forth separately. Work saddle shoulder on ½ needle size smaller than the garment to give the shoulders more hold. Then pick up stitches on each side of saddle shoulder, and then work in the round over all stitches while at the same time increasing for sleeves and for yoke. Now divide yoke for body and sleeves. Work body in the round on needle, top down. Work sleeves in the round on double pointed needles/short circular needle, top down. The entire garment is worked with 1 strand of each quality (= 2 strands). NECK EDGE: Cast on 64-68-72-76-80-80 stitches on a short circular needle size 4.5 mm with 1 strand of each quality (= 2 strands). Knit 1 round. Then work rib in the round = knit 1/ purl 1. When rib measures 4 cm, increase every other 1 purl stitch to 2 purl stitches - read INCREASE TIP-1 = 80-85-90-95-100-100 stitches. When piece measures 8 cm, increase the remaining 1 purl stitches to 2 purl stitches = 96-102-108-114-120-120 stitches. Cut the yarn. Now divide the piece for saddle shoulders, front piece and back piece. Slip the first 22-22-22-26-26-26 stitches on needle size 5 mm (= saddle shoulder), slip the next 26-29-32-31-34-34 stitches on a thread for front piece, slip the next 22-22-22-26-26-26 stitches on another thread for saddle shoulder, and slip the last 26-29-32-31-34-34 stitches on another thread for back piece. Then work saddle shoulder as explained below. SADDLE SHOULDER: = 22-22-22-26-26-26 stitches. Sett Insert a marker thread in the middle of row. NOW MEASURE PIECE FROM HERE! Begin by casting on 2 new stitches at the beginning of needle size 5 mm (= 2 edge stitches), work A.1 over the 22-22-22-26-26-26 stitches on needle, and cast on 2 new stitches at the end of row (= 2 edge stitches) = 26-26-26-30-30-30 stitches. Continue A.1 back and forth with 2 edge stitches in GARTER STITCH in each side - read explanation above. Work until saddle shoulder measures 6-7-7-8-9-10 cm from marker thread – finish after a row from wrong side and cast at the same time off 2 edge stitches in each side = 22-22-22-26-26-26 stitches remain. Cut the yarn. Put these 22-22-22-26-26-26 stitches on a thread. Work the other shoulder the same way. Then work yoke as explained below. Now work shoulder stitches, front piece and back piece on same circular needle size 5.5 mm, at the same time pick up stitches along the sides of the saddle shoulders. Beginning of round = right shoulder at the back. Work as follows from right side: Continue A.1 as before over the 22-22-22-26-26-26 saddle shoulder stitches, pick up 12-14-14-16-18-18 stitches inside 2 edge stitches in garter stitch along the side on saddle shoulder (pick up inside 2 edge stitches to make the edge more solid), knit over the 26-29-32-31-34-34 stitches from thread on front piece and increase at the same time 11-12-11-12-11-11 stitches evenly over these stitches – read INCREASE/DECREASE TIP (= 37-41-43-43-45-45 stitches), pick up 12-14-14-16-18-18 stitches inside 2 edge stitches in garter stitch along the other saddle shoulder, continue A.1 as before over the 22-22-22-26-26-26 saddle shoulder stitches, pick up 12-14-14-16-18-18 stitches inside 2 edge stitches in garter stitch along the other side on saddle shoulder, knit the 26-29-32-31-34-34 stitches from thread on back piece and increase at the same time 11-12-11-12-11-11 stitches evenly over these stitches, and pick up 12-14-14-16-18-18 stitches inside 2 edge stitches in garter stitch along the side on saddle shoulder. There are now 166-182-186-202-214-214 stitches on needle. Then work yoke as explained below. YOKE: Then work as explained below at the same time as inserting 4 markers in the piece as follows: 1st marker: Insert 1st marker before first stitch on round (= right shoulder at the back). 2nd marker: Continue A.1 as before over the 22-22-22-26-26-26 saddle shoulder stitches, insert 2nd marker before next stitch. 3rd marker: Work 61-69-71-75-81-81 stitches in stocking stitch (= front piece), insert 3rd marker before next stitch. 4th marker: Continue A.1 as before over the 22-22-22-26-26-26 saddle shoulder stitches, insert 4th marker before next stitch. Work 61-69-71-75-81-81 stitches in stocking stitch (= back piece). Move these 4 markers upwards when working, increase at each of these markers later. OVERVIEW OF NEXT SECTION: On next round begin pattern on front piece and back piece while at the same time starting sleeve increase. Read therefore sections with PATTERN and SLEEVE INCREASE before continuing and REMEMBER THE KNITTING TENSION! PATTERN: Work first round as follows: * Continue A.1 as before over the 22-22-22-26-26-26 saddle shoulder stitches, work 2-6-7-3-6-6 stitches in stocking stitch, work A.2 (= 18-18-18-22-22-22 stitches), work A.3 (= 21-21-21-25-25-25 stitches), work A.2 (= 18-18-18-22-22-22 stitches), work 2-6-7-3-6-6 stitches in stocking stitch *, work from *-* one more time. Continue pattern like this. SLEEVE INCREASE: Work pattern as explained above. AT THE SAME TIME on first round increase 4 stitches for sleeves as follows: Increase AFTER 1st and 3rd marker and increase BEFORE 2nd and 4th marker – read INCREASE TIP-2. Increase now only on sleeves and number of stitches on front piece and back piece stays the same. Work the increased stitches in stocking stitch. Increase like this every other round 2-5-4-5-4-0 times in total = 174-202-202-222-230-214 stitches. Piece now measures approx. 8-13-12-14-14-10 cm from marker thread. Then increase for yoke as explained below. YOKE INCREASE: Move the 4 markers from sleeve increase so that each of the 4 markers is in the outermost stitch in each side on front piece and back piece. There are now 26-32-30-36-34-26 stitches between stitches with marker on each sleeve. On next round increase 8 stitches for yoke by increasing both before and after each of the 4 stitches with marker - remember INCREASE TIP-2. Increase stitches on front piece, back piece and both sleeves, and work the increased stitches in stocking stitch. Increase like this every other round 9-7-9-9-10-14 times in total = 246-258-274-294-310-326 stitches. When all increases are done, the piece measures approx. 19-21-22-24-25-26 cm from marker thread. Work without increases until piece measures 20-22-23-26-27-28 cm from marker thread. Now divide yoke for body and sleeves. I.e. work next round as follows: Begin 1-1-2-1-1-2 stitches before stitch with 1st marker, slip the next 48-50-54-58-58-60 stitches on a thread for sleeve, cast on 8-10-12-14-16-18 new stitches on the needle (= in the side under sleeve), work the next 75-79-83-89-97-103 stitches as before (= front piece), slip the next 48-50-54-58-58-60 stitches on a thread for sleeve, cast on 8-10-12-14-16-18 new stitches on needle (= in the side under sleeve), and work as before over the last 75-79-83-89-97-103 stitches (= back piece). Cut the yarn. Remove the old markers. Finish body and sleeves separately. NOW MEASURE PIECE FROM HERE! BODY: = 166-178-190-206-226-242 stitches. Insert 1 marker in each side on body – in the middle of the 8-10-12-14-16-18 stitches that were cast on under each sleeve. Begin round before one marker, continue in the round with stocking stitch and A.2/A.3 as before – work in addition GARTER STITCH – read explanation above, over the middle 6 stitches in each side (3 stitch in garter stitch on each side of both markers). Work until piece measures 21-21-22-19-20-21 cm from division under sleeves. 6 cm remain until finished measurements. Try the jumper and work to desired length. To avoid the rib from contracting increase stitches evenly as explained below. Knit 1 round while increasing 16-18-20-20-22-24 stitches evenly - REMEMBER INCREASE/DECREASE TIP = 182-196-210-226-248-266 stitches. Switch to circular needle size 4.5 mm. Work rib in the round (= knit 1/purl 1 ) over all stitches for 6 cm. Cast off with knit over knit and purl over purl - read CAST-OFF TIP. Piece measures approx. 52-54-56-58-60-62 cm from shoulder and down. SLEEVE: Slip the 48-50-54-58-58-60 stitches from thread in one side of piece on double pointed needles or a short circular needle size 5.5 mm and pick in addition up 1 stitch in each of the 8-10-12-14-16-18 new stitches cast on under sleeve (with 1 strand Sky and 1 strand Kid-Silk) = 56-60-66-72-74-78 stitches. Insert 1 marker thread mid under sleeve – i.e. in the middle of the 8-10-12-14-16-18 stitches. Move the marker thread upwards when working; it should be used for decrease mid under sleeve. Begin round at the marker thread, work in stocking stitch in the round and continue A.1 over the middle 22-22-22-26-26-26 stitches on top of sleeve as before. When sleeve measures 3-3-3-2-2-2 cm from division, decrease 2 stitches mid under sleeve - read DECREASE TIP. Decrease like this every 3-3-3-2½-2½-2½ cm 3-3-4-6-6-6 times in total = 50-54-58-60-62-66 stitches. Continue without decreases until sleeve measures 34-33-32-30-29-29 cm from division (shorter measurements in the larger sizes because of wider shoulders and longer sleeve caps). Knit 1 round while decreasing 10 stitches evenly in all sizes = 40-44-48-50-52-56 stitches. Switch to double pointed needles size 4.5 mm. Work rib in the round = knit 1/purl 1 for 6 cm. Cast off with knit over knit and purl over purl - read CAST-OFF TIP. Sleeve measures approx. 40-39-38-36-35-35 cm from division. Work the other sleeve the same way. |
||||||||||||||||||||||||||||||||||||||||
Diagram explanations |
||||||||||||||||||||||||||||||||||||||||
|
||||||||||||||||||||||||||||||||||||||||
 |
||||||||||||||||||||||||||||||||||||||||
 |
||||||||||||||||||||||||||||||||||||||||
 |
||||||||||||||||||||||||||||||||||||||||
 |
||||||||||||||||||||||||||||||||||||||||
 |
||||||||||||||||||||||||||||||||||||||||
 |
||||||||||||||||||||||||||||||||||||||||
Have you finished this pattern?Tag your pictures with #dropspattern #skyfeathersweater or submit them to the #dropsfan gallery. Do you need help with this pattern?You'll find 38 tutorial videos, a Comments/Questions area and more by visiting the pattern on garnstudio.com. © 1982-2025 DROPS Design A/S. We reserve all rights. This document, including all its sub-sections, has copyrights. Read more about what you can do with our patterns at the bottom of each pattern on our site. |
||||||||||||||||||||||||||||||||||||||||





Post a comment to pattern DROPS 226-46
We would love to hear what you have to say about this pattern!
If you want to leave a question, please make sure you select the correct category in the form below, to speed up the answering process. Required fields are marked *.