
Popular categories
Looking for a yarn?


Comments / Questions (31)
![]() Marry wrote:
Marry wrote:
Ik heb een vraag over de stekenverhouding. Met welke naald zou ik moeten uitkomen op 10 x 10 cm? Ik brei vrij strak dus zal waarschijnlijk grotere naalden moeten gebruiken. Het is mij alleen niet helemaal duidelijk hoeveel groter deze moeten zijn.
12.02.2025 - 15:46DROPS Design answered:
Dag Marry,
15 steken in de breedte en 17 naalden in de hoogte in tricotsteek en 1 draad van elke kwaliteit = 10 x 10 cm. Als je strak breit moet je inderdaad dikkere naalden gebruiken. Als je een proeflapje maakt en je komt nog niet op 10 cm, moet je misschien nog dikkere naalden gebruiken totdat je op 10 cm komt. Vaak is het een kwestie van uitproberen. Als je dit ergens noteert kun je het voor een volgend project er weer bij halen en een betere inschatting voor jezelf maken welke naalden je nodig hebt.
15.02.2025 - 11:05
![]() Miraelae wrote:
Miraelae wrote:
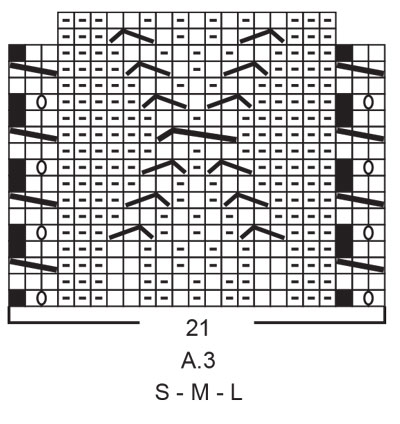
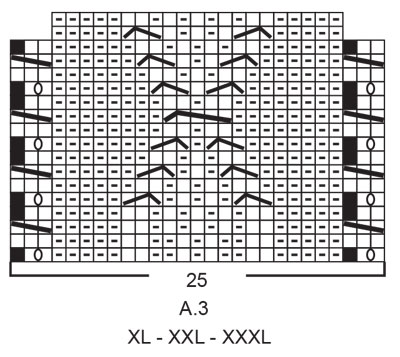
Bonjour, Dans le diagramme A.3 TAILLE S - M - L j'ai un soucis les 3 mailles premières et dernières n'étant pas annotées j'ai suivis la logique du diagramme en faisant un jeté R17 sauf que j'en suis au rang 1 et je me retrouve déjà avec 3 mailles, je dois malgré tout refaire un jeté ? Ou ne plus me fier au diagramme et modifier celui-ci ? Merci,
30.09.2024 - 16:33DROPS Design answered:
Bonjour Miraelae, les motifs du diagramme A.3 ne se répètent pas sur le même nombre de rangs, autrement dit, lorsque vous avez tricoté les 16 premiers rangs, reprenez le motif des 3 premières et des 3denrières mailles à partir du 1er rang et continuez la torsade centrale encore pendant 2 rangs comme indiqué avant de reprendre au début (au dernier rang de cette torsade centrale, vous tricotez alors le 2ème rang du diagramme pour les 3 premières et 3 dernières mailles). Bon tricot!
01.10.2024 - 08:49
![]() Ama wrote:
Ama wrote:
Hola 👋🏻 en qué momento se deben empezar con los aumentos para el cuerpo? Se deben aumentar 20 puntos pero no especifica los cm cuando aumentar. Gracias! ☺️
17.08.2024 - 22:09DROPS Design answered:
Hola Ama, en el cuerpo te indican que la labor mide 21-21-22-19-20-21 cm desde la división del cuerpo y las mangas o, si estás trabajando otras medidas, contar que quedan 6 cm hasta el final del cuerpo. En la siguiente vuelta, aumentar los 20 puntos, para que la labor no se contraiga con los 6cm de elástico que trabajarás a continuación.
18.08.2024 - 23:27
![]() Katarina wrote:
Katarina wrote:
Can you explain this part of the pattern? I don't understand it. Now divide the yoke for the body and the sleeves. That is, knit the next row as follows: Start 1-1-2-1-1-2 stitches before the stitch with the first marker.
14.08.2024 - 04:25DROPS Design answered:
Dear Katarina, the fist 1 or 2 sts (see size) of the round will belong to the sleeve, so that when working last round before dividing, work until 1-1-2-1-1-2 stitches remain before stitch with 1st marker then slip the next 48-60 sts on a thread for sleeve. Happy knitting!
14.08.2024 - 07:54
![]() Alice wrote:
Alice wrote:
In the yoke increases, I get 262 stitches instead of 294 as indicated. Is the information correct? Because I made the increases 9 times every 2 rows.
14.08.2024 - 04:20DROPS Design answered:
Dear Alice, before increasing for yoke you had 222 sts, then you increase for yoke (raglan) 8 sts (2 sts on each piece: front, back pieces and sleeve) a total of 9 times = 22+ (8x9) = 294 sts. Happy knitting!
14.08.2024 - 07:52
![]() Alice wrote:
Alice wrote:
Hello, I would like someone to explain the part about the increases in the yoke, I honestly don't understand it. It says that I need to move the 4 markers to get 36 stitches, but I already had that number of stitches: 36, 36, 75, and 75 = 222 stitches. Should I not make any changes? How should I increase the 8 stitches now? My increase didn’t turn out well, it doesn't look like the drawing.
11.08.2024 - 03:06DROPS Design answered:
Dear Alice, you can check the following video for the increases in the yoke: https://www.garnstudio.com/video.php?id=1581&lang=en. Happy knitting!
12.08.2024 - 00:33
![]() Maria wrote:
Maria wrote:
Hola, la pieza debe medir 14 cm a partir del hilo marcador de los hombros? Porque ahí luego debo comenzar los aumentos del canesú o se debe medir de otra parte los 14 cm?
03.08.2024 - 18:07DROPS Design answered:
Hola Maria, sí, la labor mide 14cm desde el hilo marcador en los hombros martillo, que se ha insertado concretamente con ese propósito. En el patrón también te indican ¡AHORA MEDIR LA PIEZA A PARTIR DE AQUÍ! para que resulte más fácil encontrar desde dónde medir en el texto.
05.08.2024 - 23:20
![]() Chloe wrote:
Chloe wrote:
Hello, can you explain how to start the sleeves in this knitting project? I'm at the shoulder stage. Should I increase on the sides of them? Is there a video that can guide me better to create the pattern design?
29.07.2024 - 00:53DROPS Design answered:
Dear Chloe, after you have worked neck edge you will work the shoulders separately slipping the stitches for front and back pieces on a thread you first work the right shoulder (first 22-26 sts on the round) then work the 2nd shoulder. Afterwards you will work in the round again picking up stitches along the length of each shoulder then increase for yoke. Happy knitting!
30.07.2024 - 08:06
![]() Laura wrote:
Laura wrote:
Hola, cuáles son los 3 puntos jersey que se tejen en el patrón? Y luego dice teje A2, A3… A2 y puntos jersey. Debo crear 3 puntos jersey o de los que ya están ? Esa parte no me queda clara y los puntos de los lados de los hombros siempre se tejen en Derecho?
29.07.2024 - 00:48DROPS Design answered:
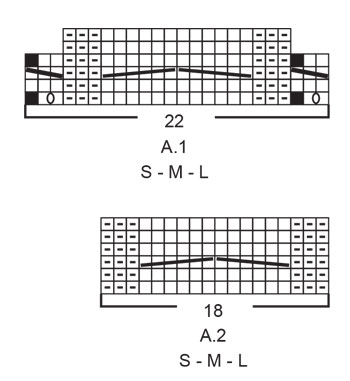
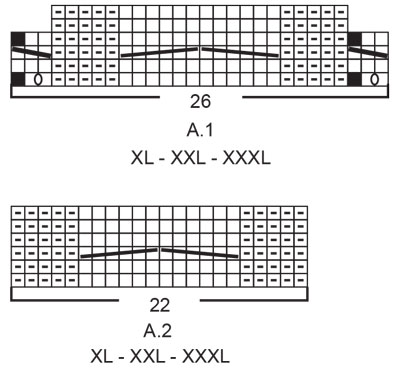
Hola Laura, en el canesú estableces el patrón en la primera vuelta; que se trabaja como sigue: *Primero trabajas 26 pts del hombro martillo según el diagrama A.1 (puedes ver los diagramas debajo). Después trabajar los siguientes 3 pts de la vuelta en pt jersey. Seguir trabajando el diagrama A.2 sobre los siguientes 22 pts. Ahora trabaja A.3 sobre los siguientes 25 pts, repite A.2 de nuevo sobre los siguientes 22 pts y trabaja 3 pts en pt jersey.* El resto de la vuelta se trabaja repitiendo de * a *. En las siguientes vueltas trabajarás las siguientes filas del diagrama donde correspondan y en pt jersey sobre los 3 pts en pt jersey como se ha indicado en esta vuelta.
06.08.2024 - 00:08
![]() Beatriz wrote:
Beatriz wrote:
No logro entender cómo continuar el canesú luego de los 202 puntos, uni las 4 partes y coloqué los marcadores. Cómo debo tejer desde aquí? Cuánto cm debo tejer en redondo? Lo único que teji fueron los hombros, espalda y frente solo una fila de 1 derecho. En qué momento se aumenta las mangas ?
28.07.2024 - 17:44DROPS Design answered:
Hola Beatriz, primero trabajas la vuelta en la que insertas los marcadores. Comenzar a trabajar al mismo tiempo el patrón y los aumentos para la manga. En la primera vuelta, trabajar como se indica en el apartado PATRÓN; en esta misma vuelta aumentar DESPUÉS de los marcapuntos 1 y 3 y ANTES de los marcapuntos 2 y 4 como se indica en TIP-2 PARA LOS AUMENTOS. Continuar trabajando las siguientes vueltas como esta primera, pero solo aumentar cada 2ª vuelta, es decir, como hemos aumentado en la primera vuelta, la segunda solo se trabaja según el patrón y en la tercera trabajas los aumentos de nuevo. Y así sucesivamente hasta tener 5 vueltas con aumentos y 14 cm desde el marcapuntos.
28.07.2024 - 18:08
|
||||||||||||||||||||||||||||||||||||||||
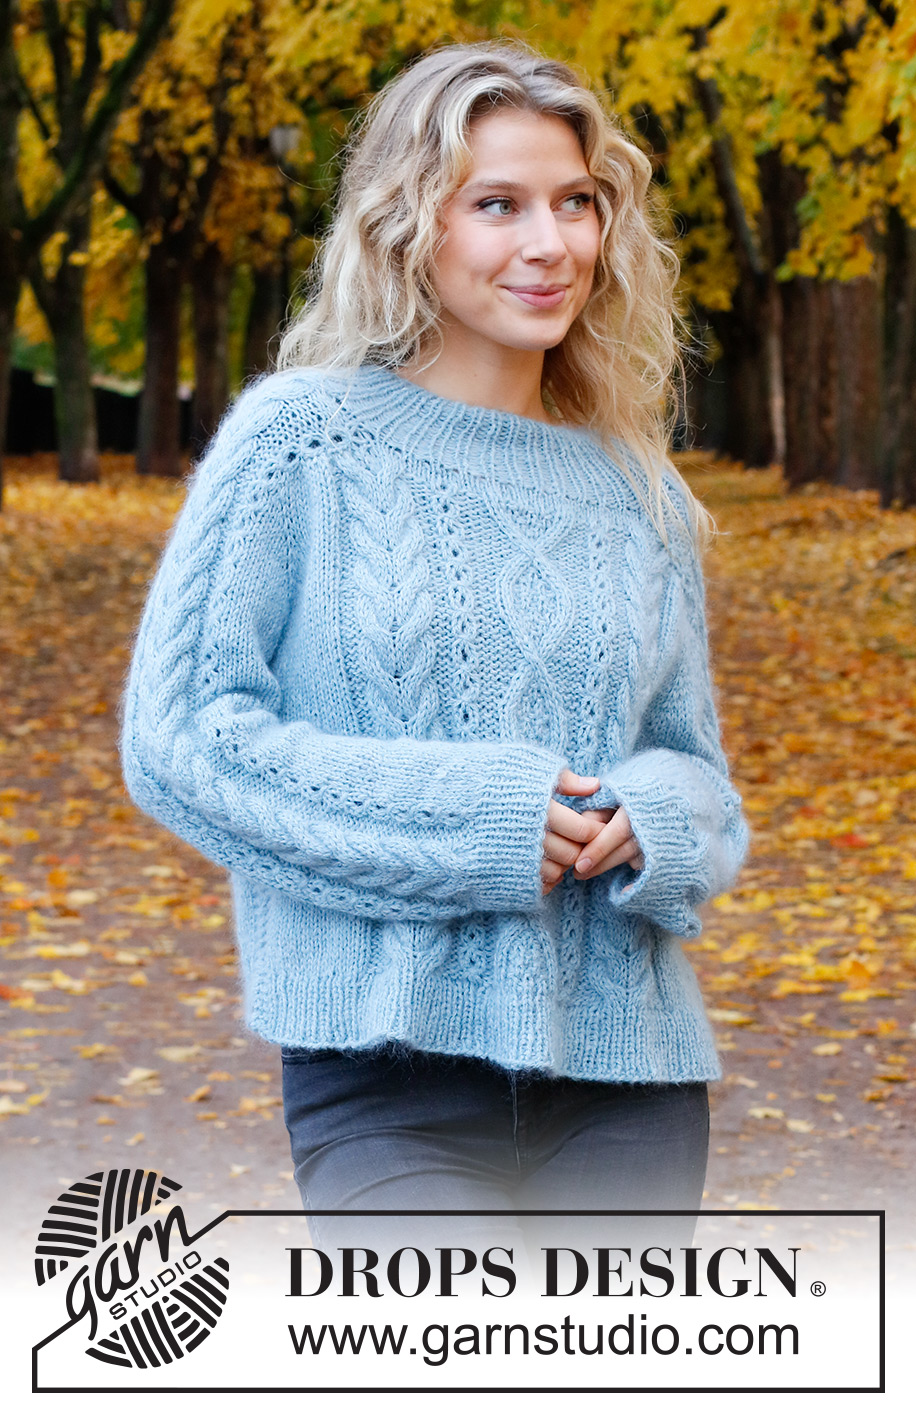
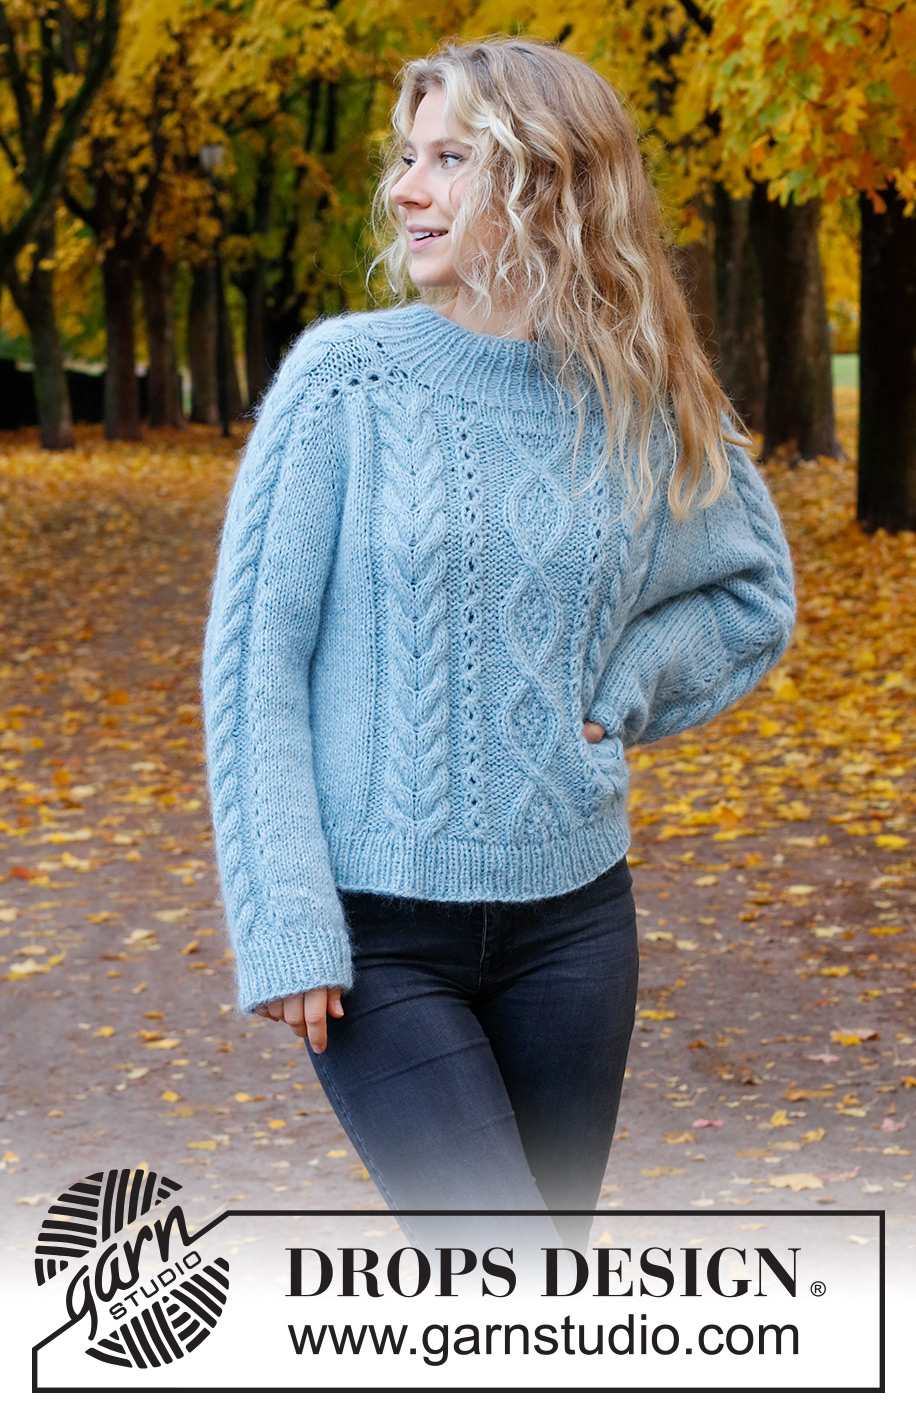
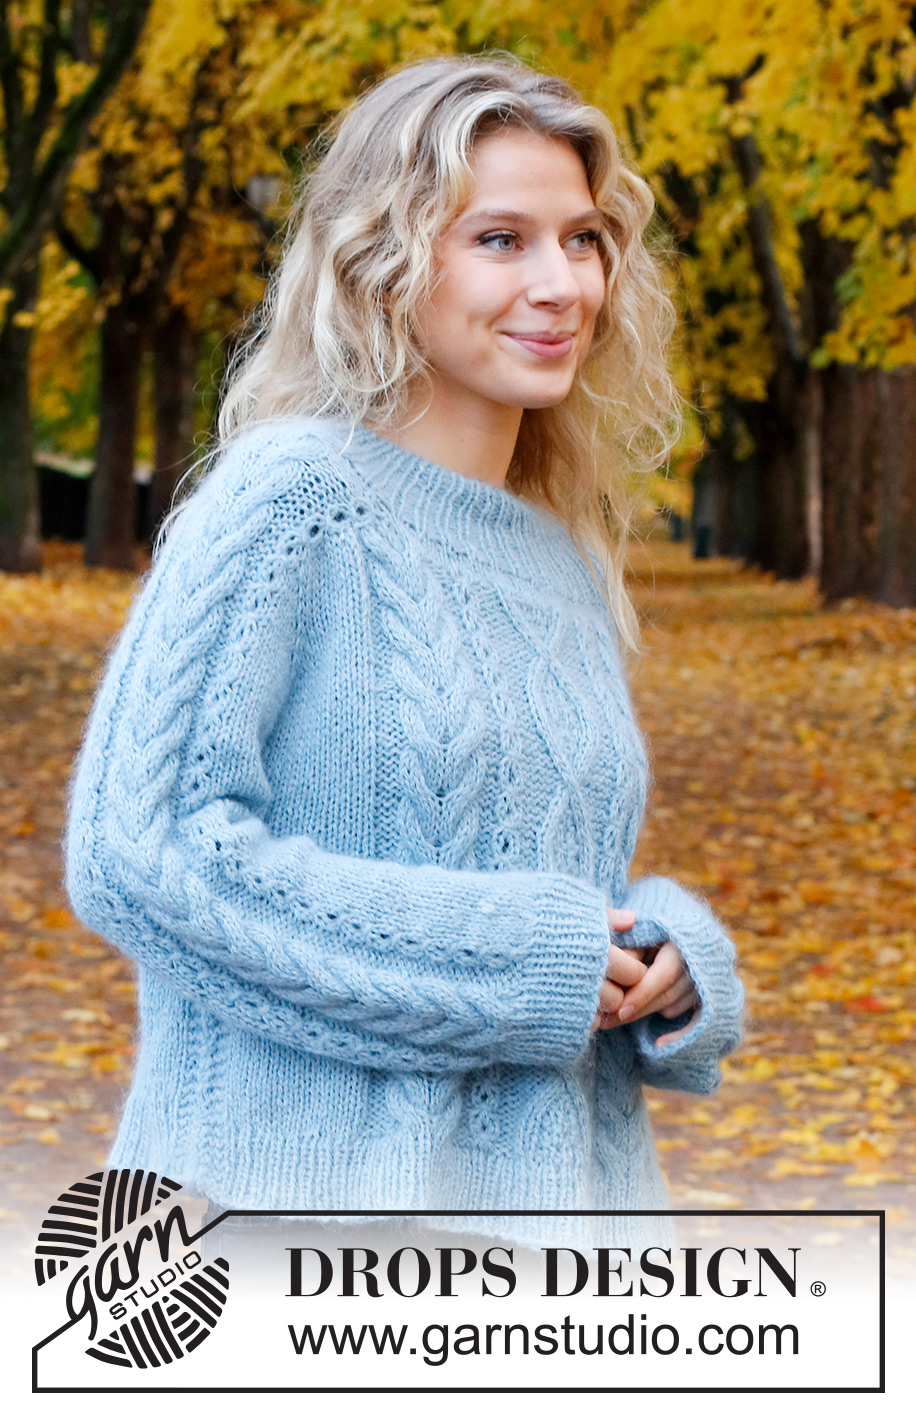
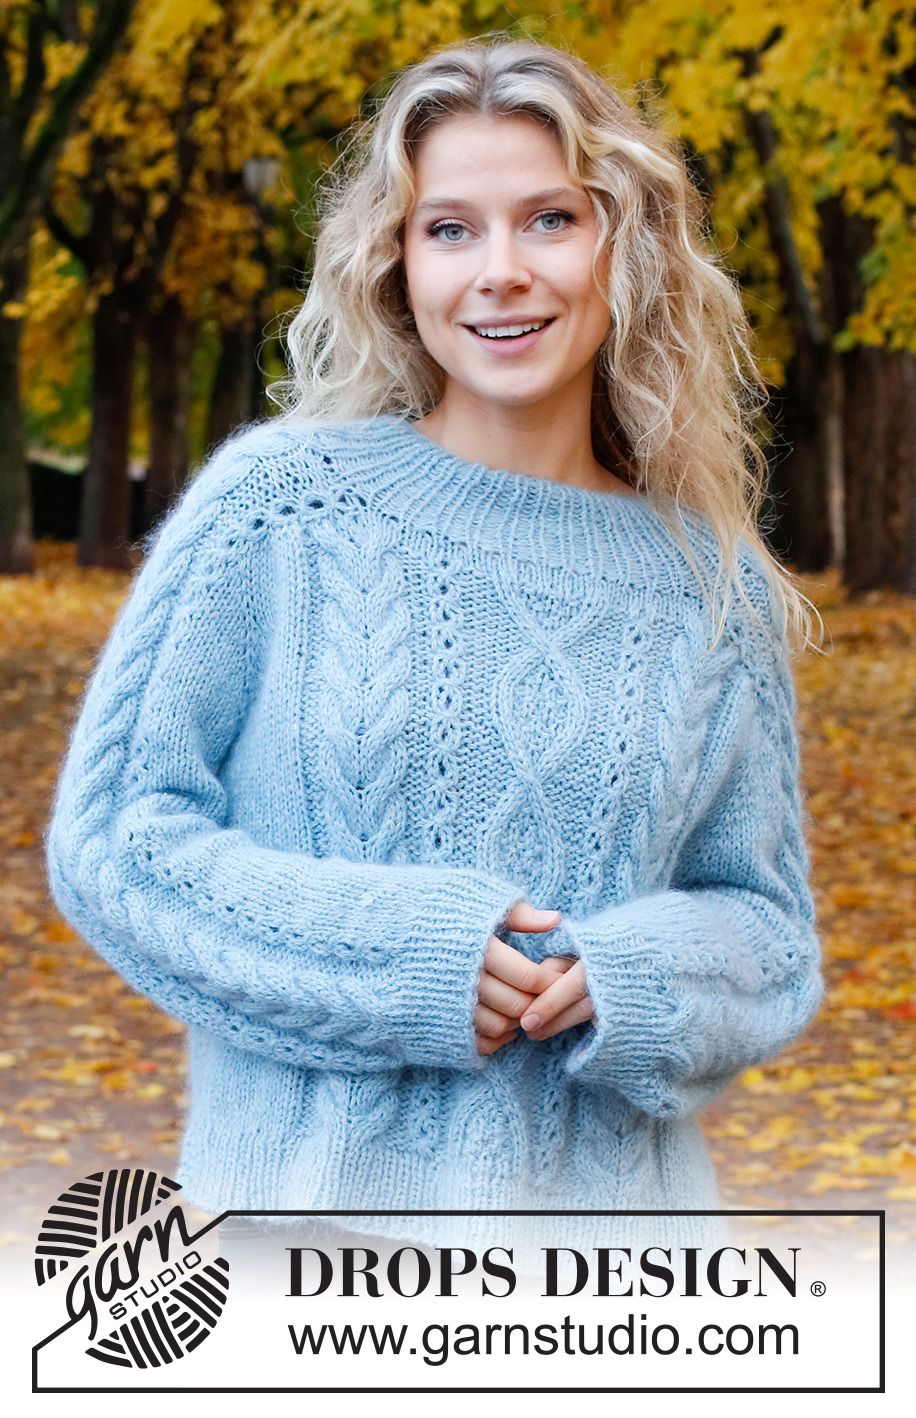
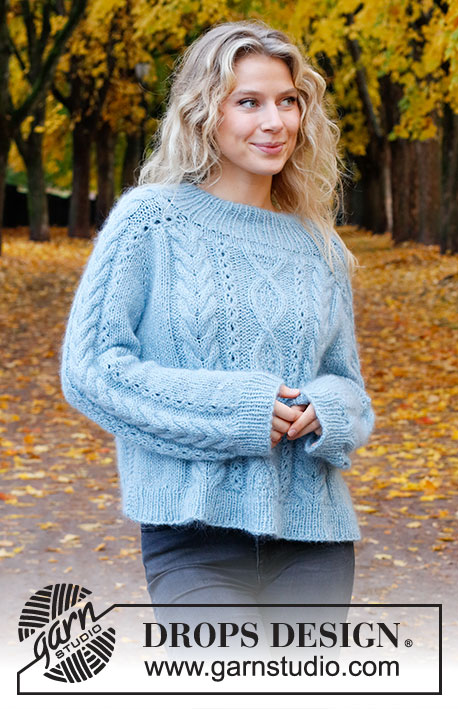
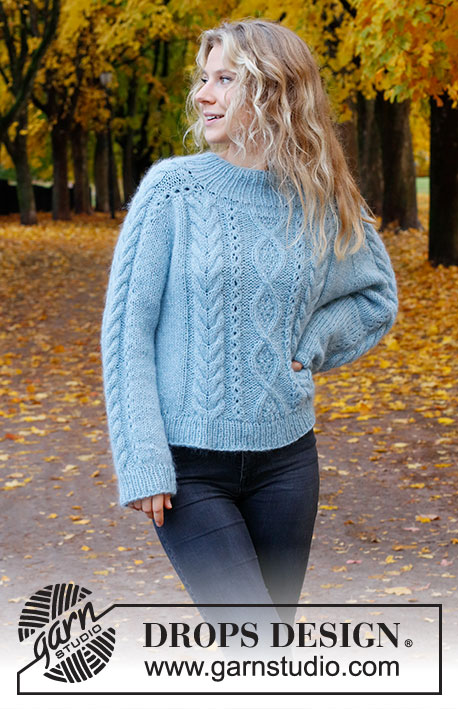
Sky Feather Sweater#skyfeathersweater |
||||||||||||||||||||||||||||||||||||||||
 |
 |
|||||||||||||||||||||||||||||||||||||||
Knitted jumper in DROPS Sky and DROPS Kid-Silk. Piece is knitted top down with saddle shoulders and cables. Size: S - XXXL
DROPS 226-46 |
||||||||||||||||||||||||||||||||||||||||
|
---------------------------------------------------------- EXPLANATION FOR THE PATTERN: ---------------------------------------------------------- GARTER STITCH (back and forth): Knit all rows. 1 ridge vertically = knit 2 rows. GARTER STITCH (worked in the round): 1 ridge vertically = 2 rounds, i.e. knit 1 round and purl 1 round. PATTERN: See diagrams A.1 to A.3. Choose diagram for your size. Diagrams show all rows in pattern seen from the right side. INCREASE/DECREASE TIP (evenly): To calculate how to increase/decrease evenly, use the total number of stitches increases/decreases are done over (e.g. 26 stitches) and divide by number of increases/decreases to be done (e.g. 11) = 2.4. In this example increase by making 1 yarn over after alternately approx. every 2nd and 3rd stitch. On next round work yarn overs twisted to avoid holes. If decreasing knit in this example alternately approx. every and every 2nd stitch together and every 2nd and 3rd stitch together. INCREASE TIP-1 (applies to neck edge): Increase 1 purl stitch to 2 purl stitches by making 1 yarn over before 1 purl stitch. On next round purl yarn over twisted to avoid holes. Then purl the new stitches. INCREASE TIP-2 (from right side): BEFORE MARKER: The new stitch is twisted towards the right. Use left needle to pick up yarn between 2 stitches from round below, pick up yarn from the back and knit stitch in front loop of stitch. AFTER MARKER: The new stitch is twisted towards the left. Use left needle to pick up yarn between 2 stitches from round below, pick up yarn from the front and knit stitch in back loop of stitch. DECREASE TIP (applies to mid under sleeves): Decrease 1 stitch on each side of marker thread as follows: Work until 3 stitches remain before marker thread, knit 2 together, knit 2 stitches (marker thread is between these 2 stitches), slip 1 stitch knitwise, knit 1, pass slipped stitch over stitch worked (= 2 stitches decreased). CAST-OFF TIP: To avoid a tight cast-off edge when casting off, you may use a larger needle. If this still is too tight make 1 yarn over after approx. every 6th stitch while casting off (cast off yarn overs as stitches). ---------------------------------------------------------- START THE PIECE HERE: ---------------------------------------------------------- JUMPER - SHORT OVERVIEW OF THE PIECE: Work neck edge in the round on circular needle from right shoulder at the back, top down. Then work saddle shoulders back and forth separately. Work saddle shoulder on ½ needle size smaller than the garment to give the shoulders more hold. Then pick up stitches on each side of saddle shoulder, and then work in the round over all stitches while at the same time increasing for sleeves and for yoke. Now divide yoke for body and sleeves. Work body in the round on needle, top down. Work sleeves in the round on double pointed needles/short circular needle, top down. The entire garment is worked with 1 strand of each quality (= 2 strands). NECK EDGE: Cast on 64-68-72-76-80-80 stitches on a short circular needle size 4.5 mm with 1 strand of each quality (= 2 strands). Knit 1 round. Then work rib in the round = knit 1/ purl 1. When rib measures 4 cm, increase every other 1 purl stitch to 2 purl stitches - read INCREASE TIP-1 = 80-85-90-95-100-100 stitches. When piece measures 8 cm, increase the remaining 1 purl stitches to 2 purl stitches = 96-102-108-114-120-120 stitches. Cut the yarn. Now divide the piece for saddle shoulders, front piece and back piece. Slip the first 22-22-22-26-26-26 stitches on needle size 5 mm (= saddle shoulder), slip the next 26-29-32-31-34-34 stitches on a thread for front piece, slip the next 22-22-22-26-26-26 stitches on another thread for saddle shoulder, and slip the last 26-29-32-31-34-34 stitches on another thread for back piece. Then work saddle shoulder as explained below. SADDLE SHOULDER: = 22-22-22-26-26-26 stitches. Sett Insert a marker thread in the middle of row. NOW MEASURE PIECE FROM HERE! Begin by casting on 2 new stitches at the beginning of needle size 5 mm (= 2 edge stitches), work A.1 over the 22-22-22-26-26-26 stitches on needle, and cast on 2 new stitches at the end of row (= 2 edge stitches) = 26-26-26-30-30-30 stitches. Continue A.1 back and forth with 2 edge stitches in GARTER STITCH in each side - read explanation above. Work until saddle shoulder measures 6-7-7-8-9-10 cm from marker thread – finish after a row from wrong side and cast at the same time off 2 edge stitches in each side = 22-22-22-26-26-26 stitches remain. Cut the yarn. Put these 22-22-22-26-26-26 stitches on a thread. Work the other shoulder the same way. Then work yoke as explained below. Now work shoulder stitches, front piece and back piece on same circular needle size 5.5 mm, at the same time pick up stitches along the sides of the saddle shoulders. Beginning of round = right shoulder at the back. Work as follows from right side: Continue A.1 as before over the 22-22-22-26-26-26 saddle shoulder stitches, pick up 12-14-14-16-18-18 stitches inside 2 edge stitches in garter stitch along the side on saddle shoulder (pick up inside 2 edge stitches to make the edge more solid), knit over the 26-29-32-31-34-34 stitches from thread on front piece and increase at the same time 11-12-11-12-11-11 stitches evenly over these stitches – read INCREASE/DECREASE TIP (= 37-41-43-43-45-45 stitches), pick up 12-14-14-16-18-18 stitches inside 2 edge stitches in garter stitch along the other saddle shoulder, continue A.1 as before over the 22-22-22-26-26-26 saddle shoulder stitches, pick up 12-14-14-16-18-18 stitches inside 2 edge stitches in garter stitch along the other side on saddle shoulder, knit the 26-29-32-31-34-34 stitches from thread on back piece and increase at the same time 11-12-11-12-11-11 stitches evenly over these stitches, and pick up 12-14-14-16-18-18 stitches inside 2 edge stitches in garter stitch along the side on saddle shoulder. There are now 166-182-186-202-214-214 stitches on needle. Then work yoke as explained below. YOKE: Then work as explained below at the same time as inserting 4 markers in the piece as follows: 1st marker: Insert 1st marker before first stitch on round (= right shoulder at the back). 2nd marker: Continue A.1 as before over the 22-22-22-26-26-26 saddle shoulder stitches, insert 2nd marker before next stitch. 3rd marker: Work 61-69-71-75-81-81 stitches in stocking stitch (= front piece), insert 3rd marker before next stitch. 4th marker: Continue A.1 as before over the 22-22-22-26-26-26 saddle shoulder stitches, insert 4th marker before next stitch. Work 61-69-71-75-81-81 stitches in stocking stitch (= back piece). Move these 4 markers upwards when working, increase at each of these markers later. OVERVIEW OF NEXT SECTION: On next round begin pattern on front piece and back piece while at the same time starting sleeve increase. Read therefore sections with PATTERN and SLEEVE INCREASE before continuing and REMEMBER THE KNITTING TENSION! PATTERN: Work first round as follows: * Continue A.1 as before over the 22-22-22-26-26-26 saddle shoulder stitches, work 2-6-7-3-6-6 stitches in stocking stitch, work A.2 (= 18-18-18-22-22-22 stitches), work A.3 (= 21-21-21-25-25-25 stitches), work A.2 (= 18-18-18-22-22-22 stitches), work 2-6-7-3-6-6 stitches in stocking stitch *, work from *-* one more time. Continue pattern like this. SLEEVE INCREASE: Work pattern as explained above. AT THE SAME TIME on first round increase 4 stitches for sleeves as follows: Increase AFTER 1st and 3rd marker and increase BEFORE 2nd and 4th marker – read INCREASE TIP-2. Increase now only on sleeves and number of stitches on front piece and back piece stays the same. Work the increased stitches in stocking stitch. Increase like this every other round 2-5-4-5-4-0 times in total = 174-202-202-222-230-214 stitches. Piece now measures approx. 8-13-12-14-14-10 cm from marker thread. Then increase for yoke as explained below. YOKE INCREASE: Move the 4 markers from sleeve increase so that each of the 4 markers is in the outermost stitch in each side on front piece and back piece. There are now 26-32-30-36-34-26 stitches between stitches with marker on each sleeve. On next round increase 8 stitches for yoke by increasing both before and after each of the 4 stitches with marker - remember INCREASE TIP-2. Increase stitches on front piece, back piece and both sleeves, and work the increased stitches in stocking stitch. Increase like this every other round 9-7-9-9-10-14 times in total = 246-258-274-294-310-326 stitches. When all increases are done, the piece measures approx. 19-21-22-24-25-26 cm from marker thread. Work without increases until piece measures 20-22-23-26-27-28 cm from marker thread. Now divide yoke for body and sleeves. I.e. work next round as follows: Begin 1-1-2-1-1-2 stitches before stitch with 1st marker, slip the next 48-50-54-58-58-60 stitches on a thread for sleeve, cast on 8-10-12-14-16-18 new stitches on the needle (= in the side under sleeve), work the next 75-79-83-89-97-103 stitches as before (= front piece), slip the next 48-50-54-58-58-60 stitches on a thread for sleeve, cast on 8-10-12-14-16-18 new stitches on needle (= in the side under sleeve), and work as before over the last 75-79-83-89-97-103 stitches (= back piece). Cut the yarn. Remove the old markers. Finish body and sleeves separately. NOW MEASURE PIECE FROM HERE! BODY: = 166-178-190-206-226-242 stitches. Insert 1 marker in each side on body – in the middle of the 8-10-12-14-16-18 stitches that were cast on under each sleeve. Begin round before one marker, continue in the round with stocking stitch and A.2/A.3 as before – work in addition GARTER STITCH – read explanation above, over the middle 6 stitches in each side (3 stitch in garter stitch on each side of both markers). Work until piece measures 21-21-22-19-20-21 cm from division under sleeves. 6 cm remain until finished measurements. Try the jumper and work to desired length. To avoid the rib from contracting increase stitches evenly as explained below. Knit 1 round while increasing 16-18-20-20-22-24 stitches evenly - REMEMBER INCREASE/DECREASE TIP = 182-196-210-226-248-266 stitches. Switch to circular needle size 4.5 mm. Work rib in the round (= knit 1/purl 1 ) over all stitches for 6 cm. Cast off with knit over knit and purl over purl - read CAST-OFF TIP. Piece measures approx. 52-54-56-58-60-62 cm from shoulder and down. SLEEVE: Slip the 48-50-54-58-58-60 stitches from thread in one side of piece on double pointed needles or a short circular needle size 5.5 mm and pick in addition up 1 stitch in each of the 8-10-12-14-16-18 new stitches cast on under sleeve (with 1 strand Sky and 1 strand Kid-Silk) = 56-60-66-72-74-78 stitches. Insert 1 marker thread mid under sleeve – i.e. in the middle of the 8-10-12-14-16-18 stitches. Move the marker thread upwards when working; it should be used for decrease mid under sleeve. Begin round at the marker thread, work in stocking stitch in the round and continue A.1 over the middle 22-22-22-26-26-26 stitches on top of sleeve as before. When sleeve measures 3-3-3-2-2-2 cm from division, decrease 2 stitches mid under sleeve - read DECREASE TIP. Decrease like this every 3-3-3-2½-2½-2½ cm 3-3-4-6-6-6 times in total = 50-54-58-60-62-66 stitches. Continue without decreases until sleeve measures 34-33-32-30-29-29 cm from division (shorter measurements in the larger sizes because of wider shoulders and longer sleeve caps). Knit 1 round while decreasing 10 stitches evenly in all sizes = 40-44-48-50-52-56 stitches. Switch to double pointed needles size 4.5 mm. Work rib in the round = knit 1/purl 1 for 6 cm. Cast off with knit over knit and purl over purl - read CAST-OFF TIP. Sleeve measures approx. 40-39-38-36-35-35 cm from division. Work the other sleeve the same way. |
||||||||||||||||||||||||||||||||||||||||
Diagram explanations |
||||||||||||||||||||||||||||||||||||||||
|
||||||||||||||||||||||||||||||||||||||||
 |
||||||||||||||||||||||||||||||||||||||||
 |
||||||||||||||||||||||||||||||||||||||||
 |
||||||||||||||||||||||||||||||||||||||||
 |
||||||||||||||||||||||||||||||||||||||||
 |
||||||||||||||||||||||||||||||||||||||||
 |
||||||||||||||||||||||||||||||||||||||||
Have you finished this pattern?Tag your pictures with #dropspattern #skyfeathersweater or submit them to the #dropsfan gallery. Do you need help with this pattern?You'll find 39 tutorial videos, a Comments/Questions area and more by visiting the pattern on garnstudio.com. © 1982-2026 DROPS Design A/S. We reserve all rights. This document, including all its sub-sections, has copyrights. Read more about what you can do with our patterns at the bottom of each pattern on our site. |
||||||||||||||||||||||||||||||||||||||||


With over 40 years in knitting and crochet design, DROPS Design offers one of the most extensive collections of free patterns on the internet - translated to 17 languages. As of today we count 324 catalogues and 12290 patterns translated into English (UK/cm). 12290
We work hard to bring you the best knitting and crochet have to offer, inspiration and advice as well as great quality yarns at incredible prices! Would you like to use our patterns for other than personal use? You can read what you are allowed to do in the Copyright text at the bottom of all our patterns. Happy crafting!
Post a comment to pattern DROPS 226-46
We would love to hear what you have to say about this pattern!
If you want to leave a question, please make sure you select the correct category in the form below, to speed up the answering process. Required fields are marked *.