
Popular categories
Looking for a yarn?


Comments / Questions (36)
![]() Karoline Petersen wrote:
Karoline Petersen wrote:
Hei, jeg har kommet til bærestykket, og opplever at økningen i A1 skaper for stor spenning i økningene under, som fører til store hull. Hvordan løser jeg dette?
03.04.2026 - 20:52DROPS Design answered:
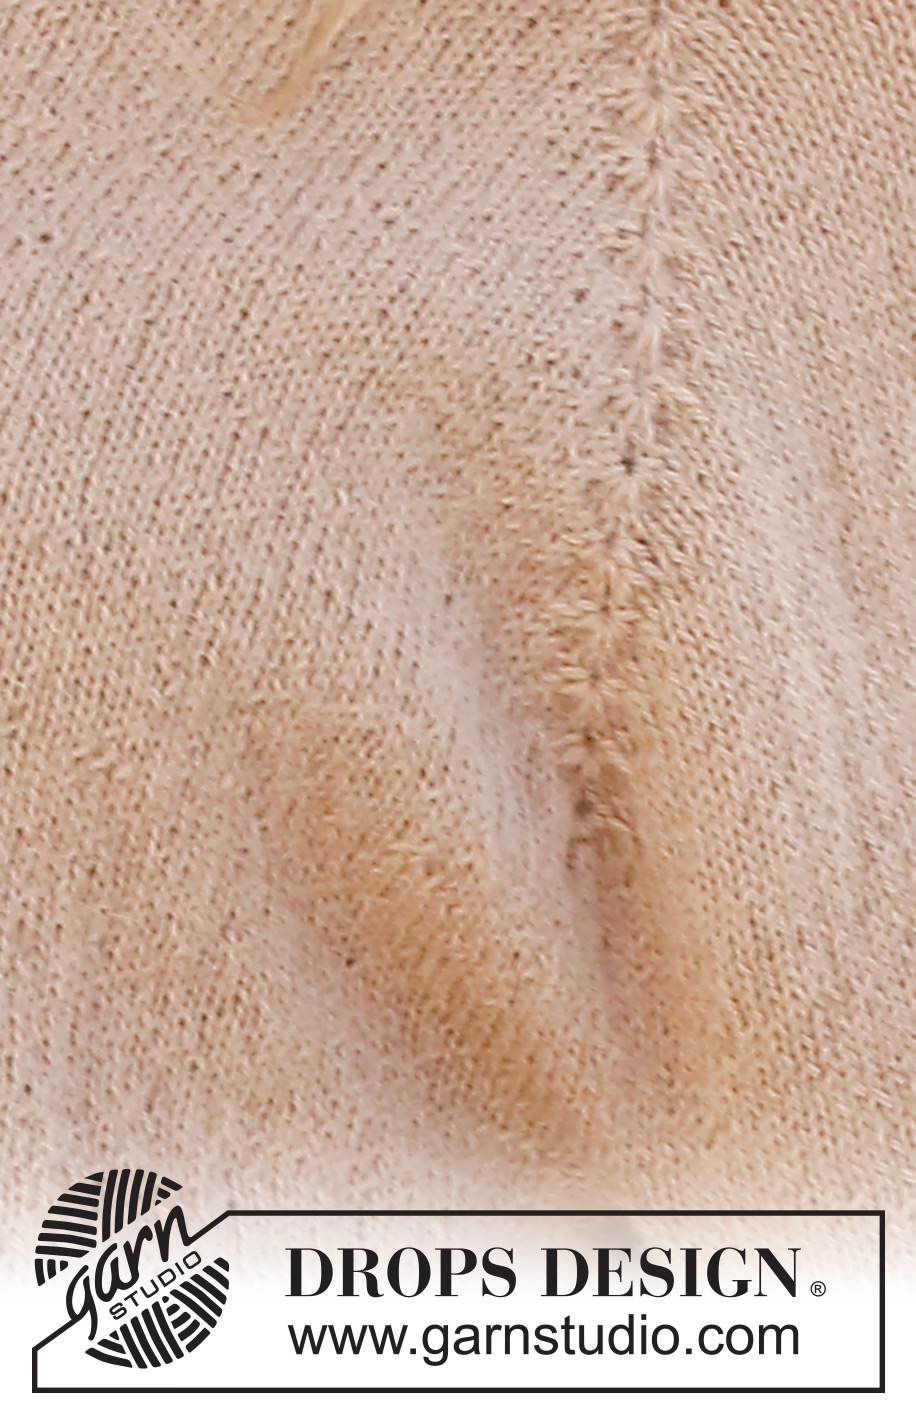
Hei Karoline. Når du skal øke 6 masker i 1 maske vil det bli et hull. Det ser du også på nærbildet av raglanøkningen. Se også videoen: Hvordan strikke 7 masker i 1 maske. Der ser man tydelig at det blir hull. Om du ønsker minst mulig hull, kan du tilslutt bruke nål og tråd og "snurpe" igjen ett og ett hull. mvh DROPS Design
07.04.2026 - 11:18
![]() Angela wrote:
Angela wrote:
Thank you. I recommend all knitters refer to your Q & A. I have knit many Drops patterns and found this helpful. Most problems already have the answers in the pattern. Again thank you for your help.
17.01.2026 - 05:30
![]() Angela wrote:
Angela wrote:
Hello, I have constructed this beautiful jumper for my daughter but have made the body longer. I am now at the final stage of casting off. Can this be cast off using the Kitchener Bind Off method? If so, where would I find detailed instructions on how to do this for a 1 x 2 rib? If I cannot use this method, what would be the best cast off method for this pattern? I would prefer YouTube instructions if at all possible. Thanking you in advance.
15.01.2026 - 01:10DROPS Design answered:
Dear Angela, cast off edge should be loose to avoid tightening pieces together, so we suggest here to cast off with a yarn over after approx. every 6th stitch, see this technique in video, here, feel free to use any other technique if you rather. Happy knitting!
16.01.2026 - 07:30
![]() Claudette Podunavac wrote:
Claudette Podunavac wrote:
Bonjour, ce modele classique et moderne a la fois me plait. j ai une laine fine echantillon 28 mailles sur 40 rangs. celle du modele est de 24 mailles 32 rangs. la taille desiree est L Si je tricote en taille XL avec 171 mailles au lieu de 159 mailles est ce que j obtiendrai la bonne taille L ? Merci
02.01.2026 - 11:16DROPS Design answered:
Bonjour Claudette, en faisant comme vous ecrivez, la largeur de votre pull sera env. 52 cm (292/28=10,4, 10,4/2=52 cm). Je ne sais pas si cela vous convient. L'autre probleme est avec les raglans: si l'échantillon n'est pas juste en hauteur et le tricot trop serré, les diminutions du raglan seront trop courtes et les emmanchures trop étroites. On peut ajuster en tricotant à intervalles réguliers 1 tour supplémentaire sans diminution entre les tours avec diminutions. N'avez-vous pas pensé à ajouter du mohair à votre fil et à tricoter avec deux fils ensemble ?
02.01.2026 - 11:55
![]() Martina wrote:
Martina wrote:
Buongiorno, volevo chiedere un consiglio... Se invece di ripiegare il collo all'interno, lo facessi come in foto all'esterno, dovrei evitare il primo giro a diritto dopo l'avvio e partire subito con le coste? Che tipo di avvio consigliate? Grazie
21.10.2025 - 15:39DROPS Design answered:
Buonasera Martina, il modello nella foto è lavorato secondo le istruzioni riportate. Buon lavoro!
23.10.2025 - 00:35
![]() Ewa wrote:
Ewa wrote:
Schemat A.1. jest prawie zrozumiały. Natomiast zastosowanie schematu A.2. stwarza problem. Korzystanie z Video jest bardzo pomocne. Czy możecie nagrać Video, specjalnie do tego wzoru? To byłoby duże ułatwienie.
17.11.2024 - 11:36
![]() Ingrid Myrstad wrote:
Ingrid Myrstad wrote:
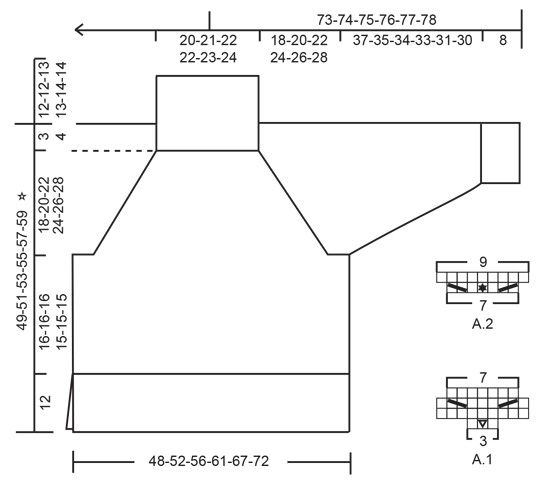
Hei! Har noen spørsmål ang strikking av raglan på denne modellen: Består A1 av 2 omganger - den ene med økning og den andre med felling? Strikker man først A1 alle ganger for deretter å begynne med A2? På A2 står det økning i en maske (maske med merking), MEN så står det at man skal starte øking 3 masker før den merka masken ??? Består A2 av 2 omganger eller øker og feller en på samme omgang?
25.10.2024 - 10:54DROPS Design answered:
Hei Ingrid. Diagram A.1 består av 4 omganger, 1. omgang økninger (fra 3 masker til 9 masker), 3. omgang fellinger (fra 9 masker til 7 masker). 2. og 4. omgang strikkes rett. Når du har strikket A.1 1 gang i høyden er det økt totalt 16 masker. Deretter strikkes A.2 ( 2 omganger), 1. omgang består både av økninger og fellinger, 2. omgang strikkes rett, og når A.2 er strikket 1 gang i høyden er det økt totalt 8 masker. Der det står: Strikk til det gjenstår 3 masker før merketråden.... er under FELLETIPS. mvh DROPS Design
28.10.2024 - 09:39
![]() Luisa wrote:
Luisa wrote:
Sto finendo il collo e devo mettere il segnapunti nel centro. devo lavorare le maglie a maglia rasata fino al centro del lavoro o devo mettere il segnapunto contando le maglie senza lavorarle? la stessa domanda per gli altri segnapunti per la divisione del lavoro. conto le maglie senza lavorarle e metto i segnapunti o conto mentre lavoro? grazie
23.10.2024 - 11:37DROPS Design answered:
Buonasera Luisa, può inserire i segnapunti anche durante il lavoro. Buon lavoro!
28.10.2024 - 00:00
![]() Izze wrote:
Izze wrote:
I don't understand: AT THE SAME TIME on the 2nd round begin to increase to RAGLAN – read description above. Increase at each marker by working A.1 over each marker-stitch (middle stitch in A.1 matches the marker-stitch – begin A.1 one stitch before the stitch with the marker).
22.05.2024 - 20:37DROPS Design answered:
Hi Izze, This is to make sure that you begin to increase for raglan at the same time as you start working round 2 of stocking stitch. Happy knitting!
23.05.2024 - 06:35
![]() Ans wrote:
Ans wrote:
Hallo, Ik wil mijn vorige opmerking omzetten naar een vraag betreffende het verschil in aantal steken. Hoeveel steken moet ik nu aanhouden?
17.12.2023 - 12:56DROPS Design answered:
Dag Ans,
De markeerdraden worden in de steken gevoegd en niet tussen de steken. Waarschijnlijk zit hier het verschil van 4 steken. 17.12.2023 - 17:17
|
|||||||||||||||||||
Chill Chaser Sweater#chillchasersweater |
|||||||||||||||||||
 |
 |
||||||||||||||||||
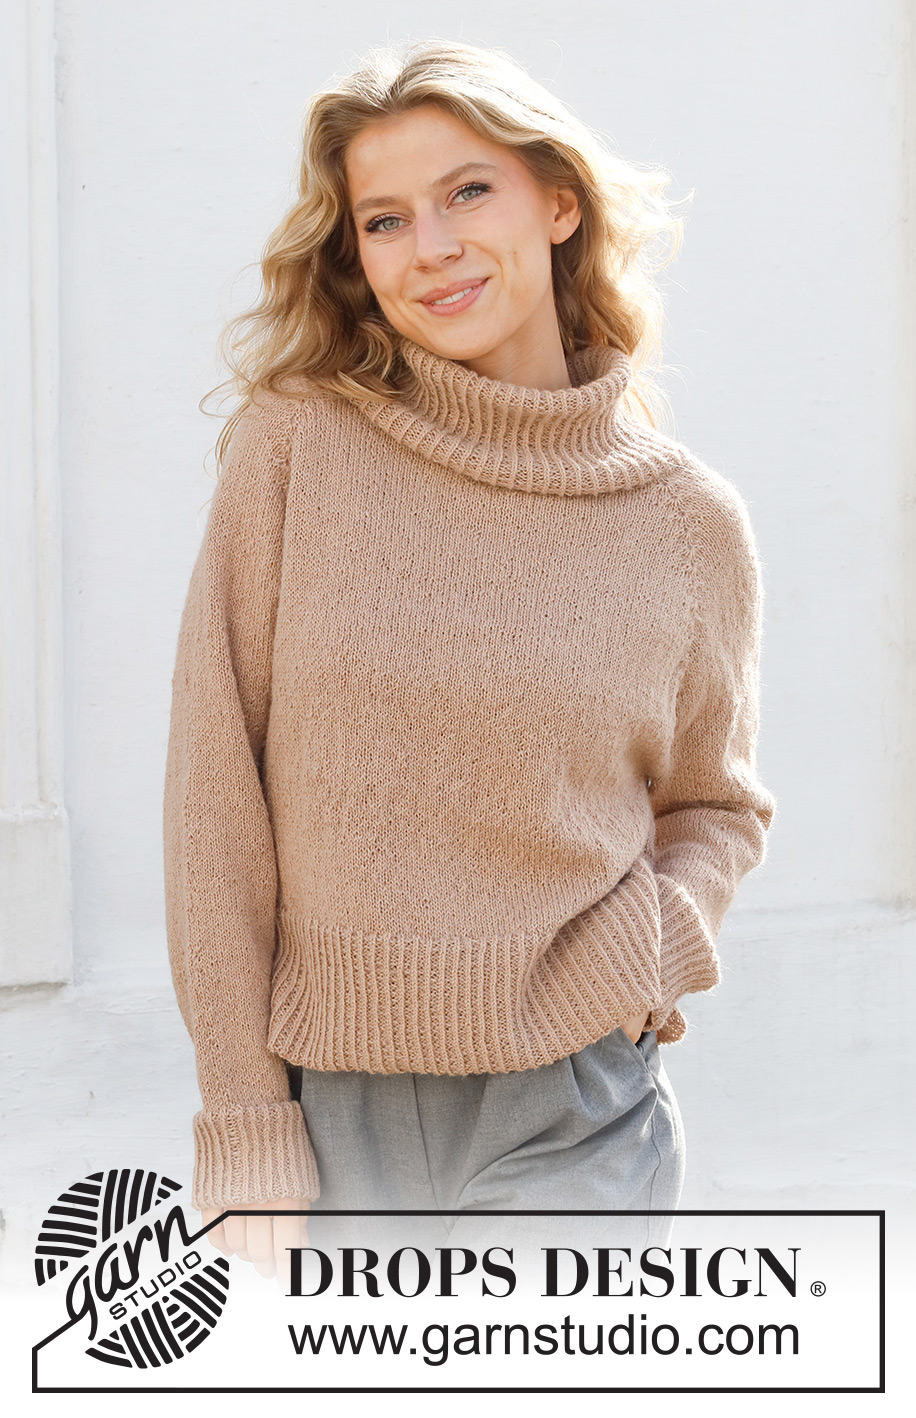
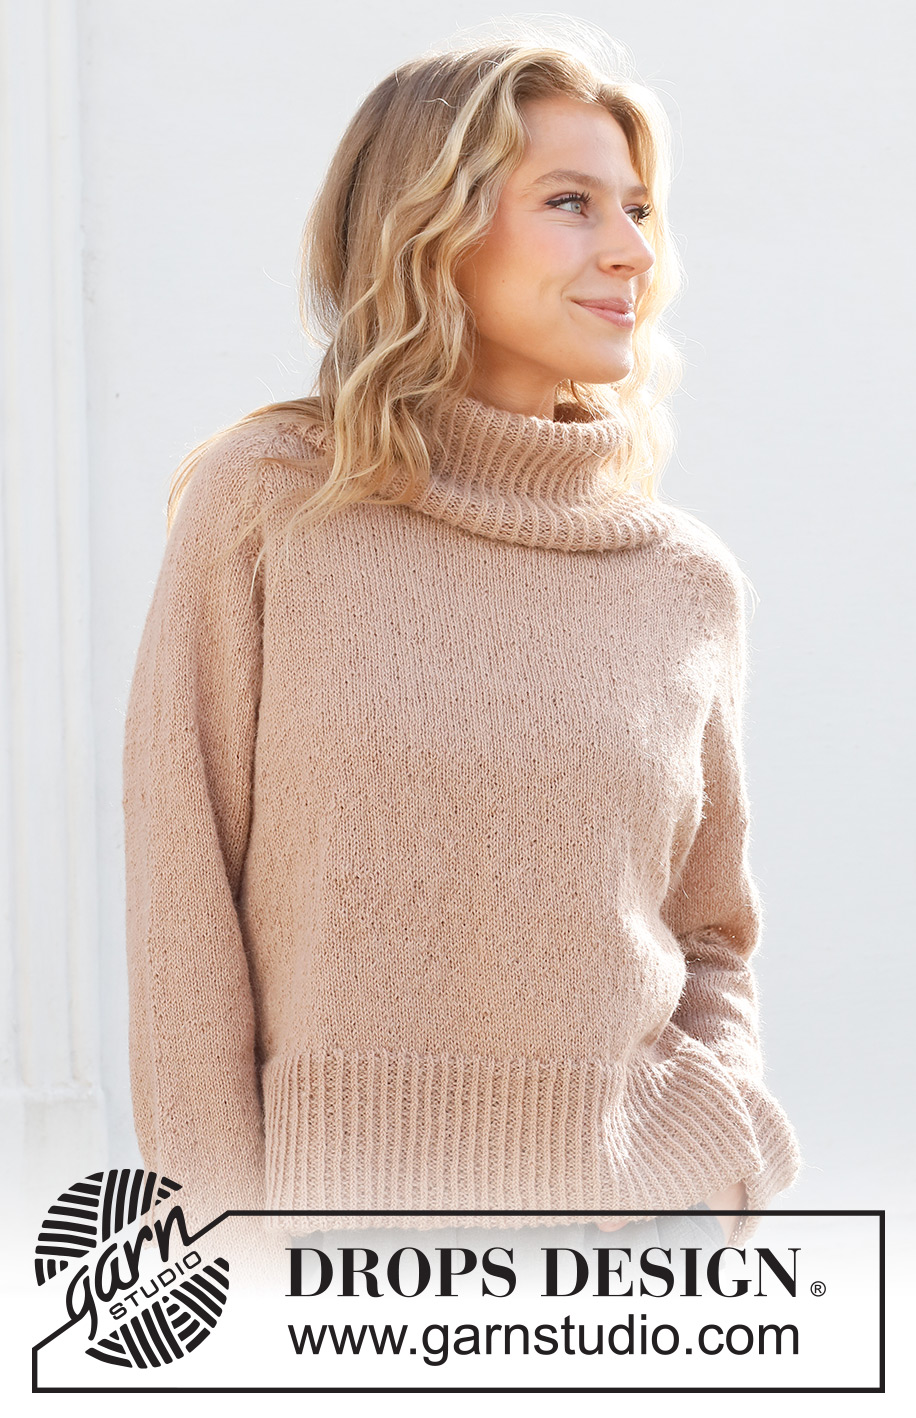
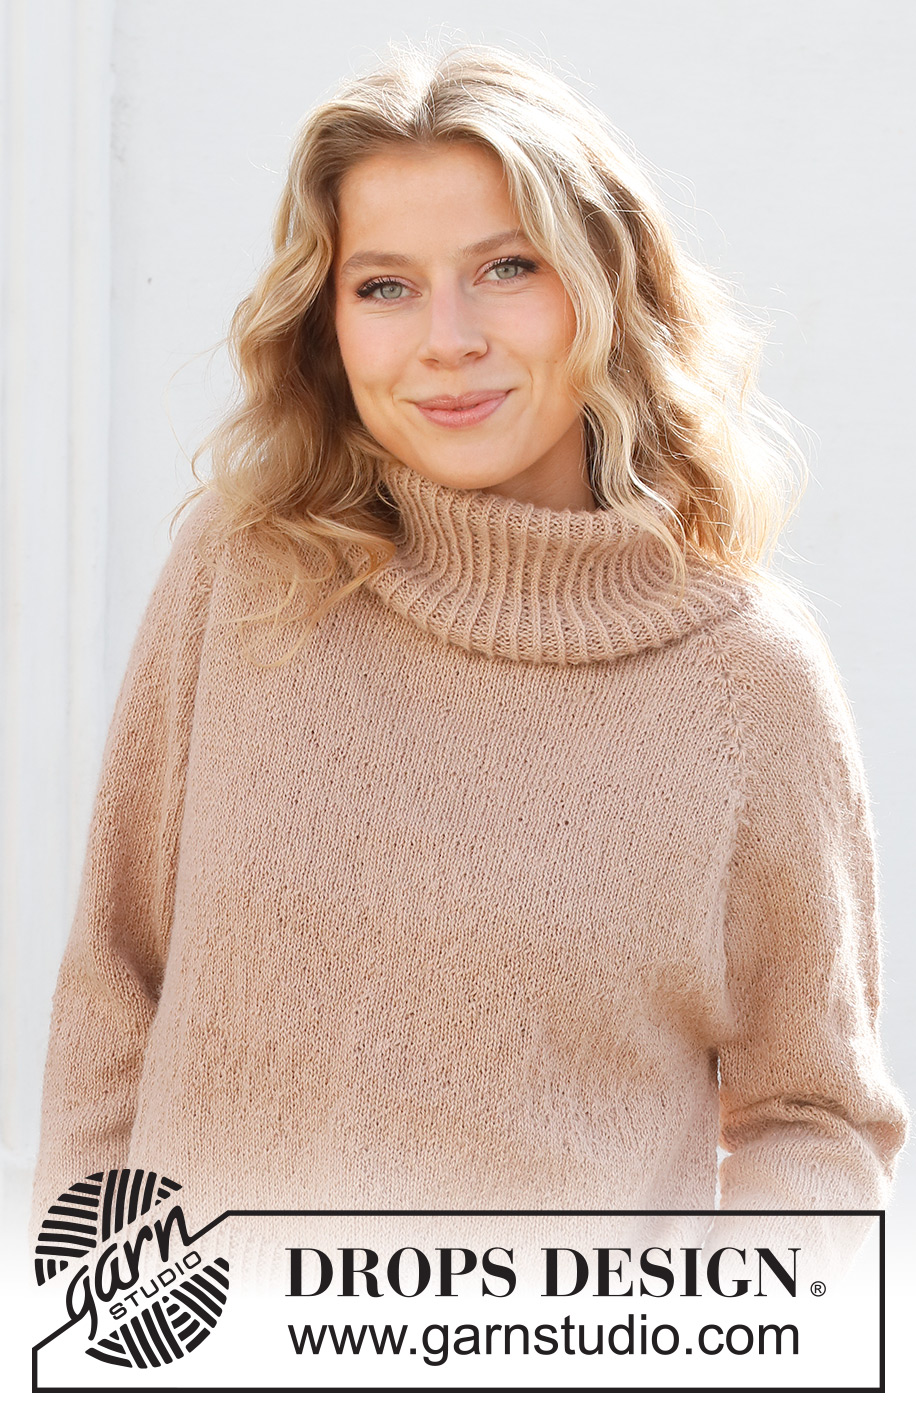
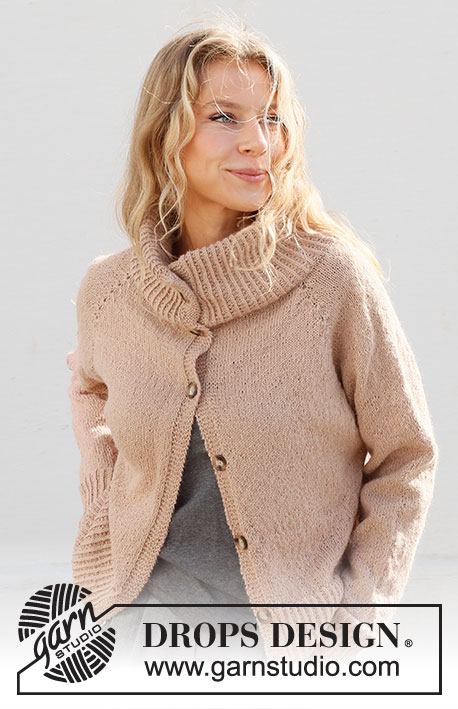
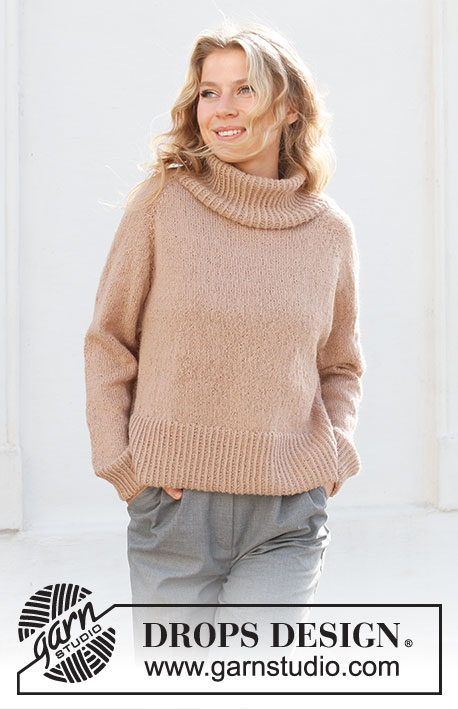
Knitted jumper in DROPS Alpaca or DROPS BabyMerino. The piece is worked top down with double neck, raglan and split in the sides. Sizes S - XXXL.
DROPS 227-35 |
|||||||||||||||||||
|
------------------------------------------------------- EXPLANATIONS FOR THE PATTERN: ------------------------------------------------------- RIDGE/GARTER STITCH (worked back and forth): Knit all rows. 1 ridge = knit 2 rows. DECREASE/INCREASE TIP (evenly spaced): To work out how to decrease/increase evenly, count the total number of stitches on needle (e.g. 147 stitches), and divide by number of decreases/increases to be made (e.g. 23) = 6.4. In this example, decrease by knitting together alternately each 5th and 6th stitch and each 6th and 7th stitch. When increasing, make 1 yarn over after alternately each 6th and 7th stitch. On the next round work the yarn overs twisted to avoid holes. PATTERN: See diagrams A.1 and A.2. RAGLAN: Increase to raglan by working A.1 over each marker-stitch as described in the text. When A.1 has been worked 1 time in height at all 4 markers, you have increased 16 stitches. Then work A.2 over each marker-stitch as described in the text. When A.2 has been worked 1 time in height at all 4 markers, you have increased 8 stitches. DECREASE TIP (for sleeves): Decrease 1 stitch on either side of the marker thread as follows: Work until there are 3 stitches left before the marker thread, knit 2 together, knit 2 (marker thread sits between these 2 stitches), slip 1 stitch as if to knit, knit 1 and pass the slipped stitch over the knitted stitch (2 stitches decreased). CASTING-OFF TIP: To avoid the cast-off edge being tight you can cast off with a larger size needle. If the edge is still tight, make 1 yarn over after approx. each 6th stitch at the same time as casting off; the yarn overs are cast off as normal stitches. ------------------------------------------------------- START THE PIECE HERE: ------------------------------------------------------- JUMPER – SHORT OVERVIEW OF THE PIECE: The neck and yoke are worked in the round from mid-back, top down. The yoke is divided for the body and sleeves. The body is continued in the round with circular needle until the rib. Then the piece is divided and the front and back pieces are finished separately, back and forth. The sleeves are worked in the round with short circular needle/double pointed needles, top down. DOUBLE NECK: Loosely cast on 147-153-159-171-177-183 stitches with short circular needle size 3 mm and DROPS Alpaca or DROPS Baby Merino. Knit 1 round. Change to circular needle size 2.5 mm and work rib in the round (knit 1 twisted, purl 2) for 25-25-27-27-29-29 cm. Knit 1 round where you decrease 23-25-27-27-29-31 stitches evenly spaced – read DECREASE/INCREASE TIP = 124-128-132-144-148-152 stitches. The neck is later folded double to give a neck height of 12-12-13-13-14-14 cm. Insert 1 marker in the middle of the round; the yoke is measured from this marker! YOKE: Change to circular needle size 3 mm. Insert 4 new markers, with a different colour from the marker on the neck. These markers are used when increasing to raglan. Count 22-23-24-25-26-27 stitches (= ½ back piece), insert 1 marker in the next stitch, count 16-16-16-20-20-20 stitches (= sleeve), insert 1 marker in the next stitch, count 44-46-48-50-52-54 stitches (= front piece), insert 1 marker in the next stitch, count 16-16-16-20-20-20 stitches (= sleeve), insert 1 marker in the next stitch. There are 22-23-24-25-26-27 stitches left on the round after the last marker (= ½ back piece). Work stocking stitch in the round. REMEMBER THE KNITTING TENSION! AT THE SAME TIME on the 2nd round begin to increase to RAGLAN – read description above. Increase at each marker by working A.1 over each marker-stitch (middle stitch in A.1 matches the marker-stitch – begin A.1 one stitch before the stitch with the marker). Increase by repeating A.1 a total of 13-14-16-18-20-21 times in height = 332-352-388-432-468-488 stitches. On the next round increase at each marker by working A.2 over each marker-stitch (middle stitch in A.2 matches the marker-stitch –begin A.2 three stitches before the stitch with the marker). Increase by repeating A.2 a total of 2-3-3-2-2-3 times in height = 348-376-412-448-484-512 stitches. On the next round increase 4-4-0-4-0-0 stitches (increase 1 stitch by knitting the front and back loop of the stitch with a marker) = 352-380-412-452-484-512 stitches. Continue with stocking stitch, but without further increases, until the piece measures 18-20-22-24-26-28 cm from the marker mid-front. On the next round divide for the body and sleeves as follows: Work 54-58-62-68-74-80 stitches in stocking stitch (= ½ back piece), place the next 68-74-82-90-94-96 stitches on 1 thread for the sleeve, cast on 8-8-10-10-12-12 stitches (= in side under sleeve), work 108-116-124-136-148-160 stitches in stocking stitch (= front piece), place the next 68-74-82-90-94-96 stitches on 1 thread for the sleeve, cast on 8-8-10-10-12-12 stitches (= in side under sleeve), work 54-58-62-68-74-80 stitches in stocking stitch. Cut the strand. The body and sleeves are finished separately. THE PIECE IS NOW MEASURED FROM HERE! BODY: = 232-248-268-292-320-344 stitches. Insert 1 marker thread in each side of the body – in the middle of the 8-8-10-10-12-12 stitches cast on under each sleeve. There are 116-124-134-146-160-172 stitches between the marker threads. Allow the threads to follow your work onwards – they are used when dividing for the split later. Start the round at one of the marker threads and continue with stocking stitch in the round until the piece measures 16-16-16-15-15-15 cm from the division. There is approx. 12 cm left to finished length – NOTE: The jumper will be approx. 3 cm longer than these measurements when worn – see measurements chart. Try the jumper on and work to desired length before working the split in each side. Now divide the piece at each marker thread and finish the front and back pieces separately. FRONT PIECE: = 116-124-134-146-160-172 stitches. Knit 1 row from the right side where you increase 29-30-32-35-39-42 stitches evenly spaced – remember DECREASE/INCREASE TIP = 145-154-166-181-199-214 stitches. Change to circular needle size 2.5 mm and work rib as follows: ROW 1 (wrong side): 3 edge stitches in garter stitch, * purl 1 twisted, knit 2 *, work from *-* until there are 4 stitches left, purl 1 twisted and finish with 3 edge stitches in garter stitch. ROW 2 (right side): 3 edge stitches in garter stitch, * knit 1 twisted, purl 2 *, work from *-* until there are 4 stitches left, knit 1 twisted and finish with 3 edge stitches in garter stitch. Repeat rows 1 and 2 until the rib measures 12 cm. Cast off with knit from the right side – read CASTING-OFF TIP! The jumper measures approx. 49-51-53-55-57-59 cm from the shoulder down – measured flat. BACK PIECE: = 116-124-134-146-160-172 stitches. Knit 1 row from the right side where you increase 29-30-32-35-39-42 stitches evenly spaced = 145-154-166-181-199-214 Change to circular needle size 2.5 mm and work rib as follows: ROW 1 (wrong side): 3 edge stitches in garter stitch, * purl 1 twisted, knit 2 *, work from *-* until there are 4 stitches left, purl 1 twisted and finish with 3 edge stitches in garter stitch. ROW 2 (right side): 3 edge stitches in garter stitch, * knit 1 twisted, purl 2 *, work from *-* until there are 4 stitches left, knit 1 twisted and finish with 3 edge stitches in garter stitch. Repeat rows 1 and 2 until the rib measures 12 cm. Cast off with knit from the right side – remember CASTING-OFF TIP! The jumper measures approx. 49-51-53-55-57-59 cm from the shoulder down – measured flat. SLEEVES: Place the 68-74-82-90-94-96 stitches from the thread on the one side of the piece on short circular needle size 3 mm and knit up 1 stitch in each of the 8-8-10-10-12-12 stitches cast on under the sleeve = 76-82-92-100-106-108 stitches. Insert 1 marker thread in the middle of the 8-8-10-10-12-12 stitches under the sleeve. Allow the thread to follow your work onwards – it is used when decreasing under the sleeve. Start at the marker thread and work stocking stitch in the round. When the piece measures 3-3-3-2-2-2 cm from the division, decrease 2 stitches under the sleeve – read DECREASE TIP. Decrease like this every 4-3-2-1½-1½-1½ cm a total of 9-11-15-18-19-19 times = 58-60-62-64-68-70 stitches. Continue working until the sleeve measures 37-35-34-33-31-30 cm from the division (shorter measurements in larger sizes due to wider neck and longer yoke). There is approx. 8 cm left to finished length; try the jumper on and work to desired length. Knit 1 round where you increase 14-12-13-14-13-14 stitches evenly spaced – remember DECREASE/INCREASE TIP = 72-72-75-78-81-84 stitches. Change to double pointed needles size 2.5 mm and work rib (knit 1 twisted, purl 2) for 8 cm. Cast off with knit. The sleeve measures approx. 45-43-42-41-39-38 cm. Work the other sleeve in the same way. ASSEMBLY: Fold the neck double to the inside and sew down. To avoid the seam being tight, it is important the seam is elastic. |
|||||||||||||||||||
Diagram explanations |
|||||||||||||||||||
|
|||||||||||||||||||
 |
|||||||||||||||||||
Have you finished this pattern?Tag your pictures with #dropspattern #chillchasersweater or submit them to the #dropsfan gallery. Do you need help with this pattern?You'll find 36 tutorial videos, a Comments/Questions area and more by visiting the pattern on garnstudio.com. © 1982-2026 DROPS Design A/S. We reserve all rights. This document, including all its sub-sections, has copyrights. Read more about what you can do with our patterns at the bottom of each pattern on our site. |
|||||||||||||||||||


With over 40 years in knitting and crochet design, DROPS Design offers one of the most extensive collections of free patterns on the internet - translated to 17 languages. As of today we count 324 catalogues and 12290 patterns translated into English (UK/cm). 12290
We work hard to bring you the best knitting and crochet have to offer, inspiration and advice as well as great quality yarns at incredible prices! Would you like to use our patterns for other than personal use? You can read what you are allowed to do in the Copyright text at the bottom of all our patterns. Happy crafting!
Post a comment to pattern DROPS 227-35
We would love to hear what you have to say about this pattern!
If you want to leave a question, please make sure you select the correct category in the form below, to speed up the answering process. Required fields are marked *.