
Popular categories
Looking for a yarn?


Comments / Questions (65)
![]() Julie wrote:
Julie wrote:
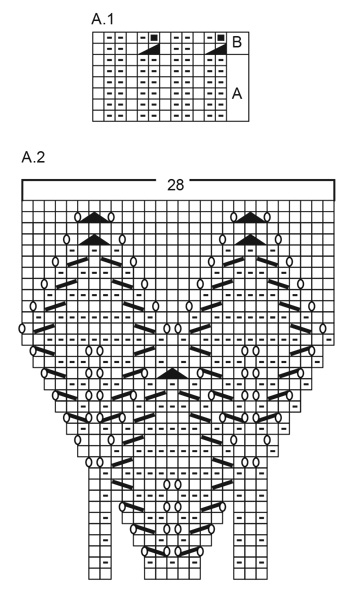
Thank you for your reply. I see where I was going wrong. I was reading A1B chart from left to right for the RS side when I should have been reading it from right to left. This is the 1st time I’ve had a pattern with a chart that is not symmetrical in its design so I didn’t know this rule. Thanks again!
06.02.2024 - 20:18
![]() Sylvie wrote:
Sylvie wrote:
Je commence A2 par un rang endroit puis le rang suivant par une maille envers et endroit et je suis sur l'envers du travail, mais ma feuille qui devrait être au point mousse sur l'endroit se retrouve à l'envers du travail, j'ai pourtant bien suivi le diagramme... faut-il faire tout de suite au-dessus de A1b un rang envers et endroit ou faire deux rangs envers et endroit pour que la feuille se retrouve à l'endroit du travail? ou fallait-il faire un aller-retour endroit? merci
06.02.2024 - 16:27DROPS Design answered:
Bonjour Sylvie, sur l'envers, tricotez les cases blanches à l'envers et celles avec un tiret à l'endroit, ainsi les feuilles seront bien au point mousse. On tricote A.2 en commençant par le 1er rang sur l'endroit aussitôt après la fin de A.1B; 1er rang se tricote à l'endroit, au 2ème rang, tricotez les mailles comme indiqué par le diagramme: 1ère m de A.2B: à l'endroit, puis A.2B (de gauche à droite): (1 m env, 2 m end, 1 m env, 1 m end, 1 m env, 2 m end, 1 m env, 1 m end), répétez de (à). Bon tricot!
07.02.2024 - 08:08
![]() Sylvie wrote:
Sylvie wrote:
Je ne comprend pas A1b ou la maille n'est pas une maille, passer à la case suivante, j'ai pourtant une maille puisque j'ai diminué deux mailles ensembles, faut-il la glisser sur l'aiguille droite ou la tricoter, merci à vous.
06.02.2024 - 11:25DROPS Design answered:
Bonjour Sylvie, dans A.1A vous commenciez par 2 m envers, au 1er rang de A.1B vous avez tricoté 2 mailles ensemble à l'envers, au 2ème rang de A.1B, il ne reste plus qu'1 m envers, autrement dit, vous tricotez le dernier rang de A.1B ainsi (1 m env, 1 m end, 2 m env, 1 m end, 1 m env, 1 m end, 2 m env, 1 m end), répétez de (à). Bon tricot!
07.02.2024 - 07:55
![]() Julie wrote:
Julie wrote:
YOKE: if I’m decreasing 2 stitches in a 9 repeat pattern, the reduction is 18 stitches, not 19. For size XXL, why is it saying I should have 103 stitches and not 104. Ie. 122 - 18 = 104
06.02.2024 - 06:46DROPS Design answered:
Dear Julie, you end the row with the first 2 sts in A.1A, this means you will decrease in the 9 repeats = 18 sts + 1 st at the end of the row when working the first 2 sts in A.1 = 19 sts decreased = 103 sts remain. Happy knitting!
06.02.2024 - 09:02
![]() Dorota wrote:
Dorota wrote:
Witam. Dlaczego nie pokazujecie zdjęć swetrów z tyłu? Byłoby to w wielu przypadkach bardzo przydatne .
29.01.2024 - 06:58DROPS Design answered:
Witaj Doroto, takie prośby już padały i zostały zgłoszone. Myślę, że wkrótce będzie to możliwe. Pozdrawiamy!
29.01.2024 - 15:00
![]() Marcia Zikan wrote:
Marcia Zikan wrote:
On the chart for the Autumn Wreath pattern do you work the rows on right side from right to left and wrong side rows from right to left?
24.01.2024 - 22:29DROPS Design answered:
Hi Marcia, Charts are read bottom up, and from right to left on the right side and from left to right on the wrong side. Happy crafting!
25.01.2024 - 06:36
![]() Marcia Zikan wrote:
Marcia Zikan wrote:
Does the leaf yoke pattern start on the right side or wrong side of the sweater. It seems like the pattern is starting on the wrong side. I do better with all row instructions given rather than a chart so I know which side I am on and what number of the row. Do you have those for the Autumn Wreath sweater?
22.01.2024 - 16:46DROPS Design answered:
Dear Marcia, the pattern you see online is the only available format of the pattern and we don't make custom patterns. If you are having trouble with the charts you can read the following lesson:https://www.garnstudio.com/lesson.php?id=68&cid=19. You start working A.2 on the right side and read the chart from the bottom up; the odd rows are worked from the right side and the even rows from the wrong side. The lowermost leaf starts in row 3 (so from the right side) and the yarn overs and knit 2 together are worked on odd rows. The other 2 leafs are started on row 11, with the 2 yarn overs for each leaf. Happy knitting!
22.01.2024 - 23:20
![]() Gitte Andersen wrote:
Gitte Andersen wrote:
Jeg kan ikke mønsteret A2 til at passe efter ribben der er en maske for meget strikker xl
28.11.2023 - 06:33DROPS Design answered:
Hej Gitte, du har 103 masker: Strik 5 m retstrik, 1 ret, A.2 over m i A.1 B (= 9 rapporter à 10 masker)=90m, afslut med første maske i A.2, 1 ret og 5 m retstrik = 5+1+90+1+1+5=103 m
28.11.2023 - 10:59
![]() Richard wrote:
Richard wrote:
J'ai tricoter le diagramme A1,sur 6rang comme sur le diagramme mais je n'ai pas ,4 cm dois je continuer Pour avoir les 4 cm ou continuer avec A1B?
25.07.2023 - 13:28DROPS Design answered:
Bonjour Richard, exactement, vous devez continuer A.1A jusqu'a 4 cm, ensuite commencer A.1B. Bon tricot!
25.07.2023 - 13:55
![]() Mira wrote:
Mira wrote:
The instructions for the yoke are very confusing and not well written. I'm knitting size M and the number of stitches are not in correspondence with the instructions and the charts.
16.07.2023 - 08:52DROPS Design answered:
Dear Mira, on the first round: 5 band stitches in garter stitch, knit 1, work 8 repeats of A.1A (=12 stitches), work the first 2 stitches in A.1A, knit 1 and 5 band stitches in garter stitch = 110 stitches. In A.1B you decrease 2 stitches per repeat plus the first 2 stitches once again so you decrease 16+1 stitches, and have a total of 93 stitches. Next you work 5 band stitches in garter stitch, knit 1, work 8 repeats of A.2 (=10 stitches), work the first stitch in A.2, knit 1 and 5 band stitches in garter stitch = 93 stitches. Increasing as indicated in the charts, you get 237 stitches + 8 increases = 245 stitches. Happy knitting!
17.07.2023 - 11:51
|
|||||||||||||||||||||||||
Autumn Wreath Jacket#autumnwreathjacket |
|||||||||||||||||||||||||
 |
 |
||||||||||||||||||||||||
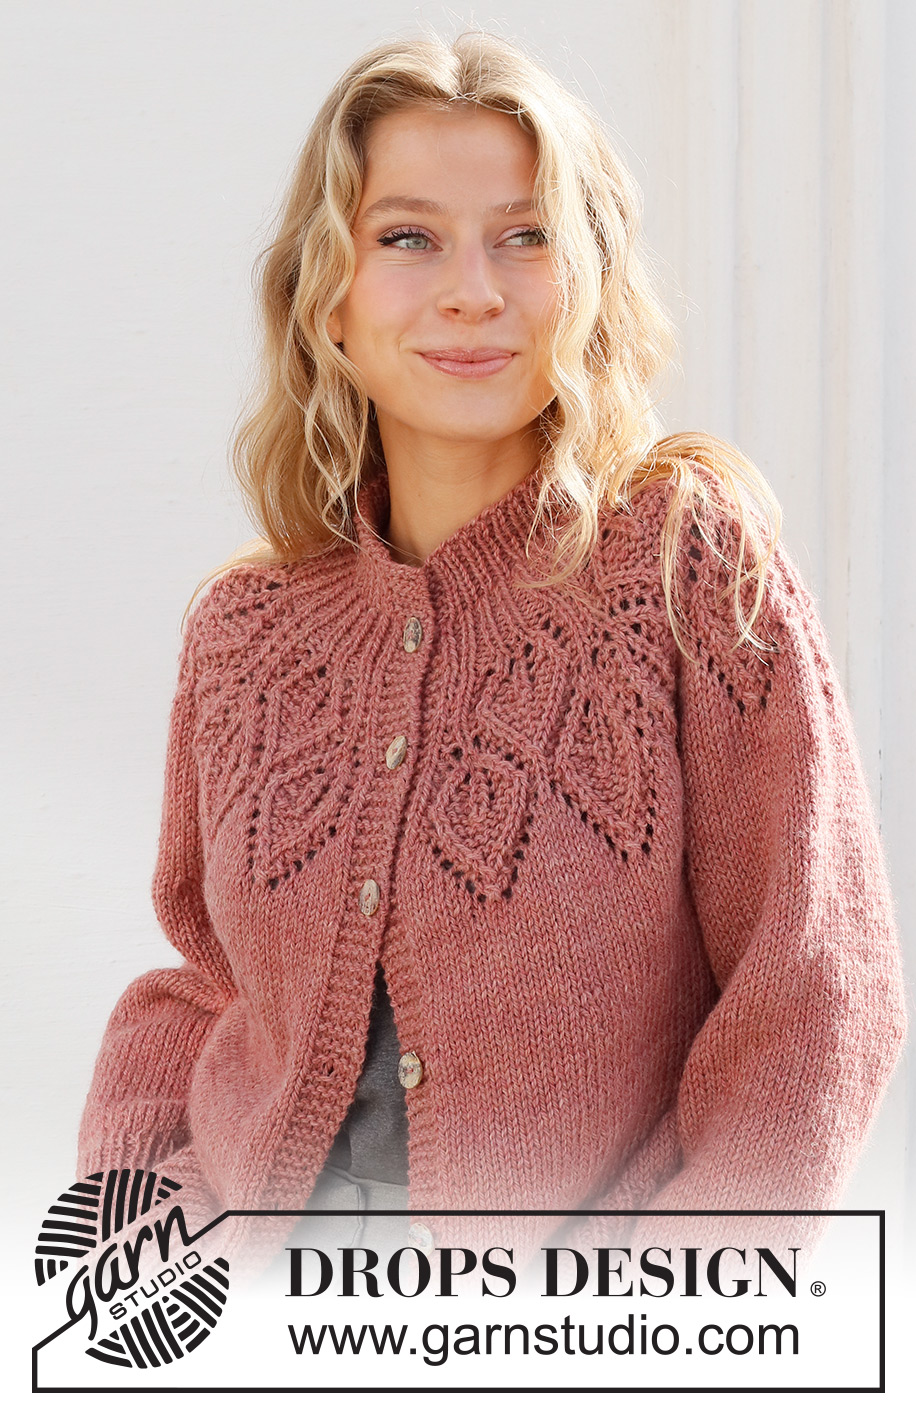
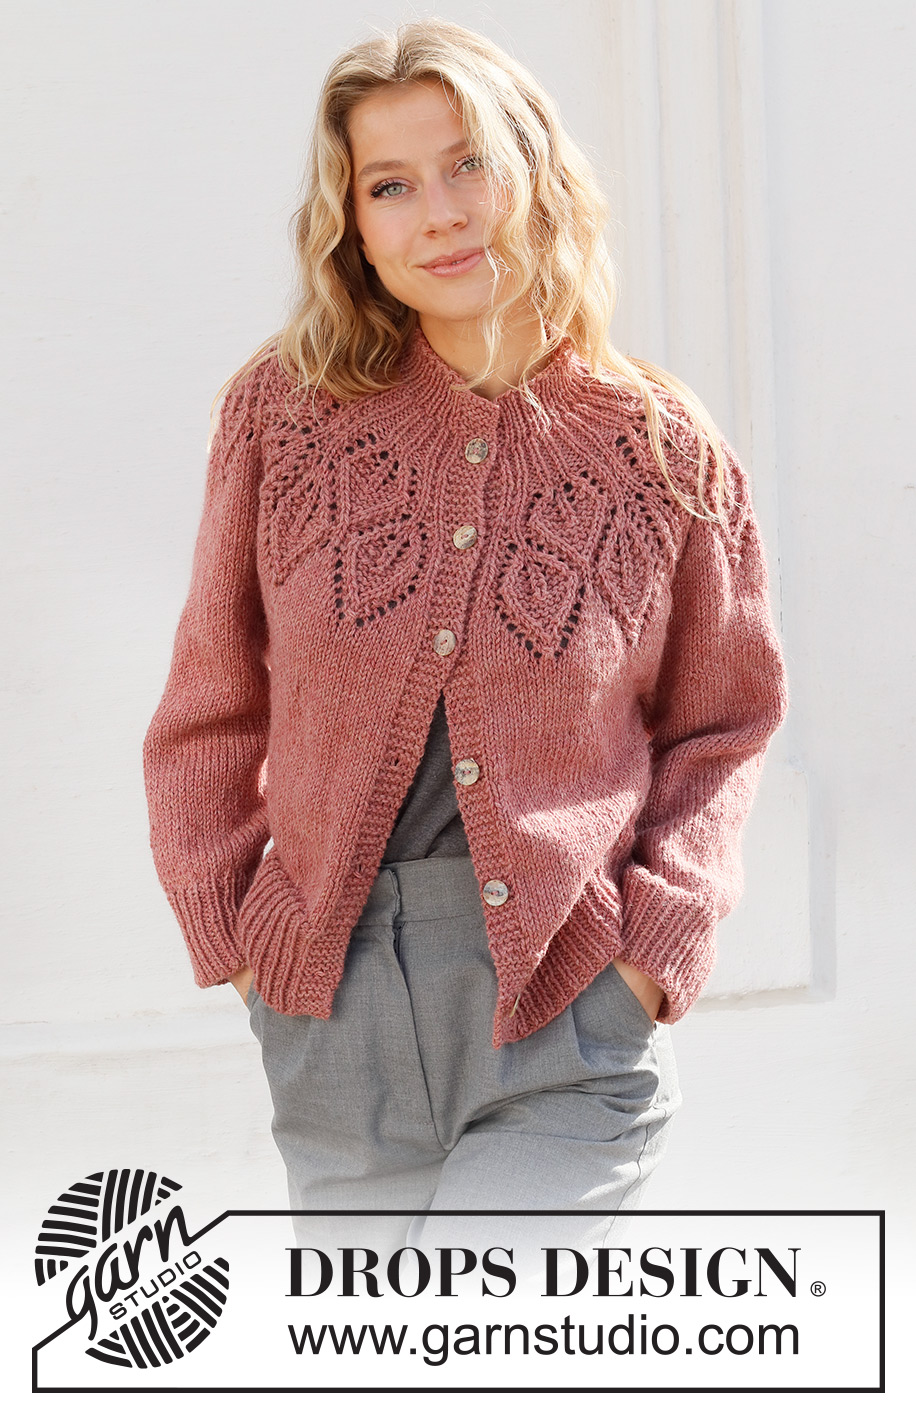
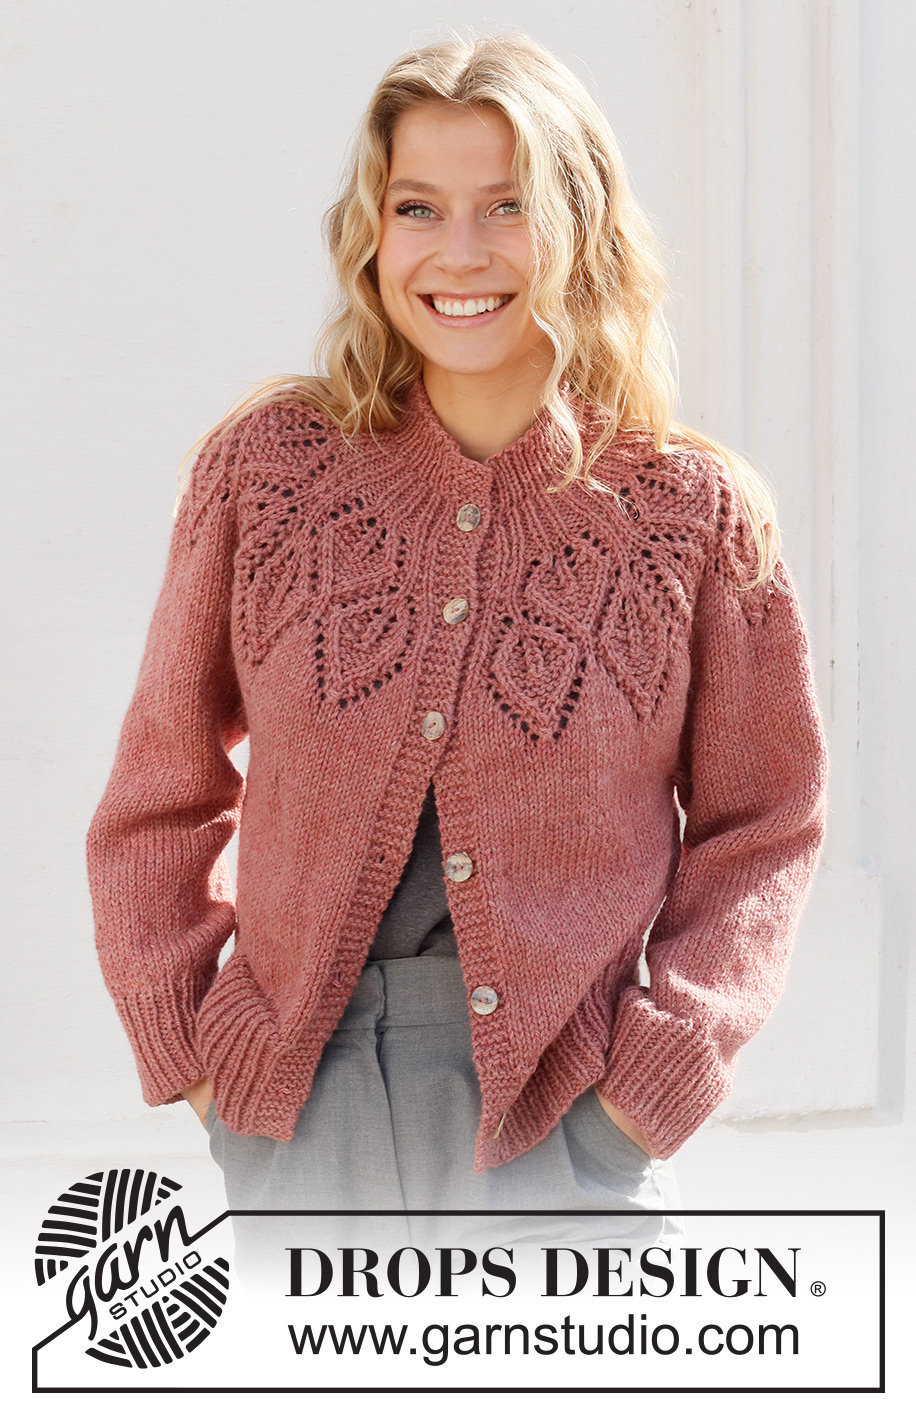
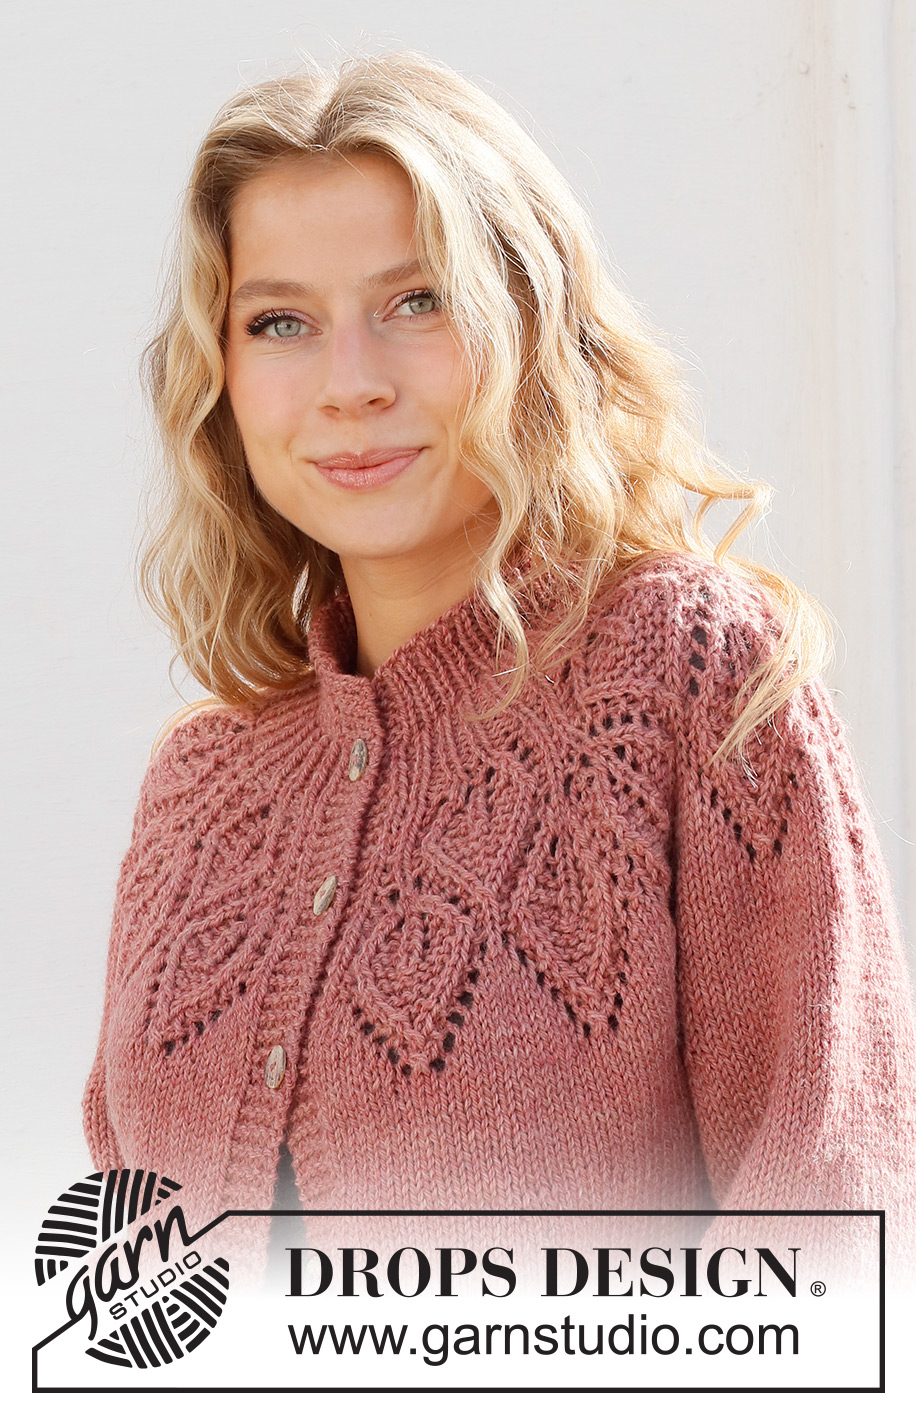
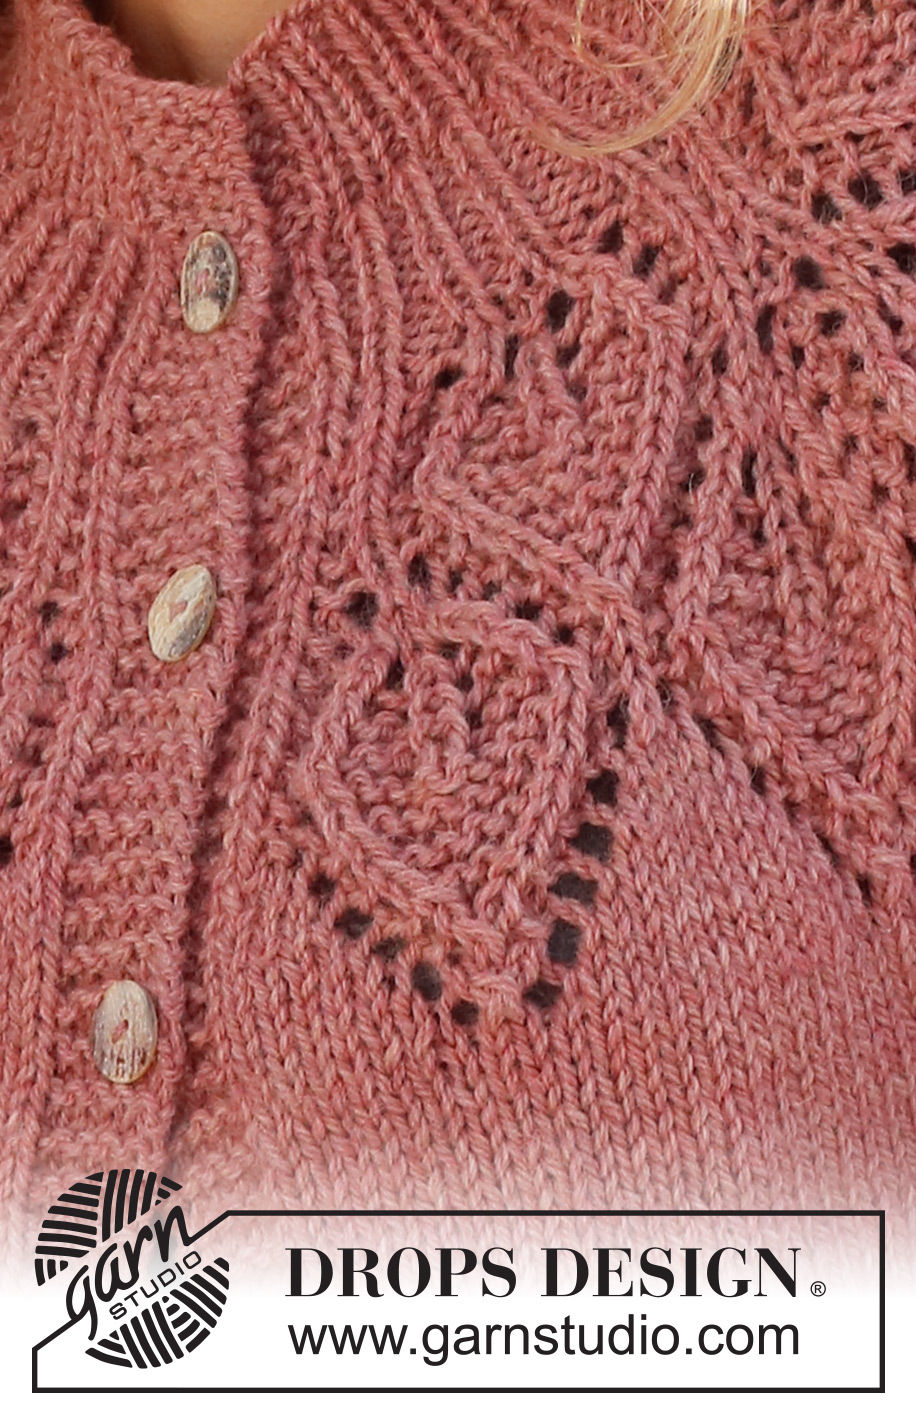
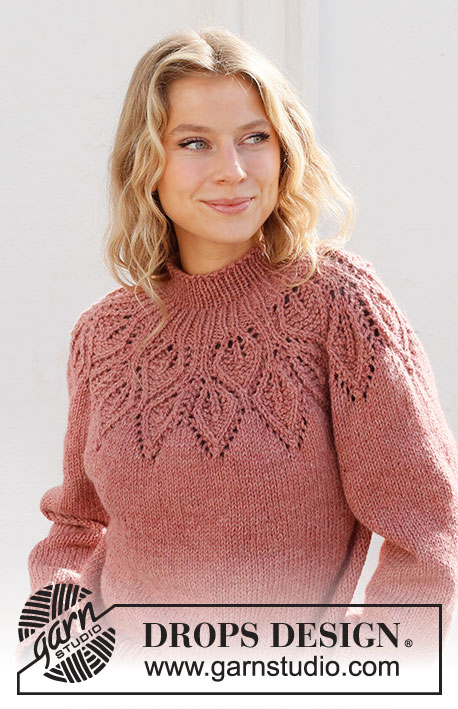
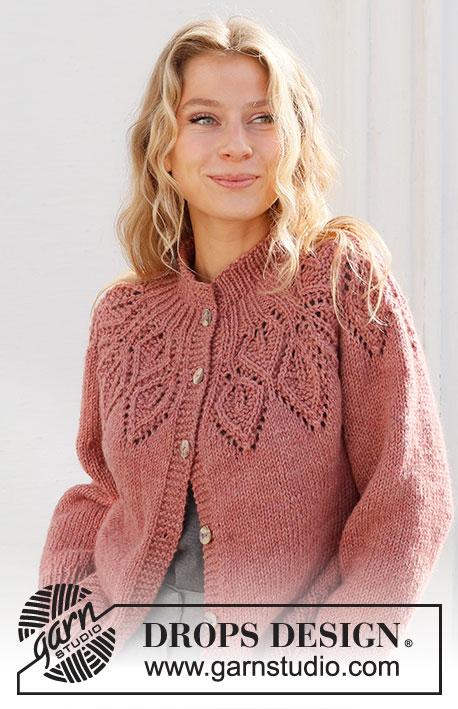
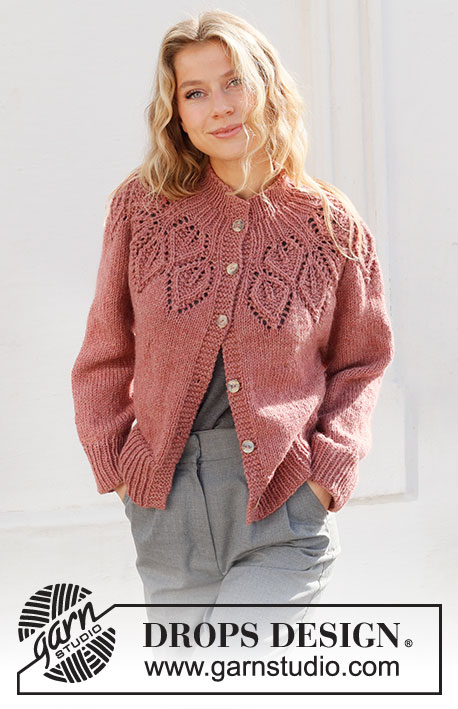
Knitted jacket in DROPS Nepal. The piece is worked top down, with round yoke and leaf pattern. Sizes S - XXXL.
DROPS 228-2 |
|||||||||||||||||||||||||
|
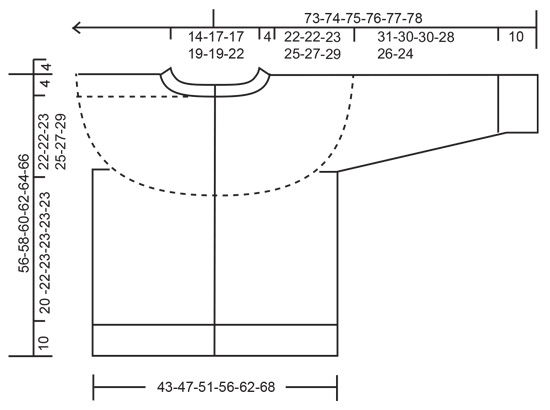
EXPLANATIONS FOR THE PATTERN: ------------------------------------------------------- RIDGE/GARTER STITCH (worked back and forth): Knit all rows. 1 ridge = knit 2 rows. PATTERN: See diagrams A.1 and A.2. The diagrams show all rows in the pattern from the right side INCREASE TIP (evenly spaced): To work out how to increase evenly, count the total number of stitches on the needle (e.g. 73 stitches) minus bands (e.g. 10 stitches) and divide the remaining stitches by the number of increases to be made (e.g. 25) = 2.5. In this example, increase by making 1 yarn over after alternately each 2nd and 3rd stitch. Do not increase on the bands. On the next row work the yarn overs twisted to avoid holes. BUTTONHOLES: Work buttonholes on the right band (when the garment is worn). Work from the right side when there are 3 stitches left on the row as follows: Make 1 yarn over, knit 2 together and knit 1. On the next row (wrong side), knit the yarn over to leave a hole. The first buttonhole is worked when the yoke measures 1 cm. Then work the other 5 buttonholes with approx. 9-9-9-9½-9½-9½ cm between each one. DECREASE TIP (for sleeves): Decrease 1 stitch on either side of the marker thread as follows: Work until there are 3 stitches left before the marker thread, knit 2 together, knit 2 (marker thread sits between these 2 stitches), slip 1 stitch as if to knit, knit 1 and pass the slipped stitch over the knitted stitch (2 stitches decreased). CASTING-OFF TIP: To avoid the cast-off edge being tight you can cast off with a larger size needle. If the edge is still tight, make 1 yarn over after approx. each 6th stitch at the same time as casting off; the yarn overs are cast off as normal stitches. ------------------------------------------------------- START THE PIECE HERE: ------------------------------------------------------- JACKET – SHORT OVERVIEW OF THE PIECE. The neck and yoke are worked back and forth with circular needle, from mid front and top down. The yoke is divided for body and sleeves and the body continued back and forth with circular needle. The sleeves are worked in the round with double pointed needles/short circular needle, top down. NECK: Cast on 73-77-81-85-89-93 stitches (including 5 band stitches on each side towards mid-front) with circular needle size 4.5 mm and DROPS Nepal. Purl 1 row (= wrong side). Then work as follows from the right side: 5 band stitches in GARTER STITCH – read description above, * knit 1, purl 1 *, work from *-* until there are 6 stitches left, knit 1 and 5 band stitches in garter stitch. Work this rib for 4 cm. Purl 1 row from the wrong side (band stitches in garter stitch), and increase 25-33-29-37-33-41 stitches evenly spaced – read INCREASE TIP = 98-110-110-122-122-134 stitches. Insert 1 marker after the band; the yoke is measured from this marker. Switch to circular needle size 5,5 mm. YOKE: The next row is worked as follows from the right side: 5 band stitches in garter stitch, knit 1, work A.1A until there are 8 stitches left (= 7-8-8-9-9-10 repeats of 12 stitches), work the first 2 stitches in A.1A (so the pattern is symmetrical), knit 1 and 5 band stitches in garter stitch. Remember the BUTTONHOLES – read description above. Continue this pattern for 4 cm, then work A.1B (= 2 rows). There are now 83-93-93-103-103-113 stitches. Now work pattern as follows from the right side: 5 band stitches in garter stitch, knit 1, work A.2 over A.1B (= 7-8-8-9-9-10 repeats of 10 stitches), work the first stitch in A.2, knit 1 and 5 band stitches in garter stitch. REMEMBER THE KNITTING TENSION! When A.2 has been completed in height there are 209-237-237-265-265-293 stitches and the piece measures approx. 20 cm from the marker. Knit 1 row from the right side where you increase 15-8-24-24-44-39 stitches evenly spaced = 224-245-261-289-309-332 stitches. Continue with stocking stitch and 5 band stitches in garter stitch on each side until the piece measures 22-22-23-25-27-29 cm from the marker. Now divide for the body and sleeves on the next row from the wrong side as follows: Work the first 35-38-40-44-48-53 stitches as before (= right front piece), place the next 46-50-54-60-62-64 stitches on a thread for the sleeve, cast on 8-8-10-10-12-12 stitches (= in side under sleeve), work the next 62-69-73-81-89-98 stitches (= back piece), place the next 46-50-54-60-62-64 stitches on a thread for the sleeve, cast on 8-8-10-10-12-12 stitches (= in side under sleeve), work the last 35-38-40-44-48-53 stitches as before (= left front piece). The body and sleeves are finished separately. THE PIECE IS NOW MEASURED FROM HERE. BODY: = 148-161-173-189-209-228 stitches. Continue back and forth with stocking stitch and 5 band stitches in garter stitch on each side until the piece measures 20-22-23-23-23-23 cm. There is approx. 10 cm left to finished length; try the jacket on and work to desired length. To avoid the following rib being tight, knit 1 row from the right side where you increase 22-24-27-29-33-35 stitches evenly spaced = 170-185-200-218-242-263 stitches. Change to circular needle size 4.5 mm and work rib as follows from the right side: 5 band stitches in garter stitch, * knit 1, purl 2 *, work from *-* until there are 6 stitches left, knit 1 and 5 band stitches in garter stitch. When the rib measures 10 cm, cast off with knit over knit and purl over purl – read CASTING-OFF TIP. The jacket measures approx. 56-58-60-62-64-66 cm from the shoulder down. SLEEVES: Place the 46-50-54-60-62-64 stitches from the thread on the one side of the piece on double pointed needles/short circular needle size 5.5 mm and knit up 1 stitch in each of the 8-8-10-10-12-12 stitches cast on under the sleeve = 54-58-64-70-74-76 stitches. Insert a marker thread in the middle of the new stitches under the sleeve and start the round at the marker thread. Work stocking stitch in the round for 4 cm, then decrease 1 stitch on each side of the marker thread – read DECREASE TIP. Decrease like this every 3½-3-2-1½-1½-1 cm a total of 8-9-11-13-15-15 times = 38-40-42-44-44-46 stitches. Continue with stocking stitch until the sleeve measures 31-30-30-28-26-24 cm. NOTE: Shorter measurements in larger sizes due to wider neck and longer yoke. Increase 4-5-6-7-7-8 stitches evenly spaced = 42-45-48-51-51-54 stitches. Change to double pointed needles size 4.5 mm and work rib (knit 1, purl 2) for 10 cm. Cast off with knit over knit and purl over purl - remember CASTING-OFF TIP. The sleeve measures approx. 41-40-40-38-36-34 cm from the division. Work the other sleeve in the same way. ASSEMBLY: Sew the buttons onto the left band. |
|||||||||||||||||||||||||
Diagram explanations |
|||||||||||||||||||||||||
|
|||||||||||||||||||||||||
 |
|||||||||||||||||||||||||
 |
|||||||||||||||||||||||||
Have you finished this pattern?Tag your pictures with #dropspattern #autumnwreathjacket or submit them to the #dropsfan gallery. Do you need help with this pattern?You'll find 31 tutorial videos, a Comments/Questions area and more by visiting the pattern on garnstudio.com. © 1982-2026 DROPS Design A/S. We reserve all rights. This document, including all its sub-sections, has copyrights. Read more about what you can do with our patterns at the bottom of each pattern on our site. |
|||||||||||||||||||||||||


With over 40 years in knitting and crochet design, DROPS Design offers one of the most extensive collections of free patterns on the internet - translated to 17 languages. As of today we count 324 catalogues and 12290 patterns translated into English (UK/cm). 12290
We work hard to bring you the best knitting and crochet have to offer, inspiration and advice as well as great quality yarns at incredible prices! Would you like to use our patterns for other than personal use? You can read what you are allowed to do in the Copyright text at the bottom of all our patterns. Happy crafting!
Post a comment to pattern DROPS 228-2
We would love to hear what you have to say about this pattern!
If you want to leave a question, please make sure you select the correct category in the form below, to speed up the answering process. Required fields are marked *.