
Categorías populares
¿Buscas un hilo?


Comentarios / Preguntas (49)
![]() Wenche Hjelseth escribió:
Wenche Hjelseth escribió:
Får overhode ikke mønster til p stemme på 3-4 år. Starte med 80 masker og felle 16 etter hals. Veldig liten hals. Må vel heller øke når en strikker ovenfra og ned. Skjønner ingenting
12.12.2020 - 18:51
![]() Karen Bell escribió:
Karen Bell escribió:
When knitting the ribbing it's k2/p2 but the number of stitches for this ribbing is supposed to be divisible by 4 which 160 is NOT...so at the end of the row in the round and the beginning of the next round you end up with 4 knit stitches together. How is that right?
05.12.2020 - 14:32DROPS Design respondió:
Hi Karen, 160 divided by 4 = 40, so it is divisible. Happy knitting!
07.12.2020 - 07:19
![]() Brigitte escribió:
Brigitte escribió:
Liebes Drops Team, ich habe den Pullover Lamb Dance Sweater in der Größe für 11/12 Jahre gestrickt. Er ist super gelungen und die Anleitung ist sehr verständlich geschrieben. Vielen Dank. Jedoch die angegebene notwendige Garnmenge ist für diese Größe nicht korrekt. Merino Extra Fine 26 Pistazie + 1 Knäuel also insgesamt 350g und Merino Extra Fine 19 hell Graublau - 1 Knäuel also insgesamt 50g anstelle von 100g wie in der Anleitung beschrieben. Viele Grüße Brigitte
26.11.2020 - 12:03
![]() Vera Kjærstad escribió:
Vera Kjærstad escribió:
Er det feil i diagram på omg 35 og 36? Hvis ikke blir det litt rart når man strikker diagrammet for andre gang. 1 rosa, grønne, en rosa. Synes ikke dette ser pent ut.
29.10.2020 - 21:37DROPS Design respondió:
Hei Vera. Diagrammet er oversendt til design avd. slik at de evnt kan rette opp i diagrammet og komme med en rettelse. mvh DROPS design
02.11.2020 - 11:41
![]() Annika escribió:
Annika escribió:
Guten Morgen, kann ich die Zunahmen durch Umschläge auch durch Zunahmen aus dem Querfaden in der nächsten Runde ersetzen? Ich habe etwas Angst, dass sonst ein größeres Loch entsteht und so das schöne Schafmuster stört. Vielen Dank
14.05.2020 - 06:44DROPS Design respondió:
Liebe Annika, es passt auch sicher so, am besten stricken Sie eine Maschenprobe mit den 2 unterschiedlichen Techniken - Maschenprobe waschen und trocknen lassen - und so sehen Sie wie es aussieht (und ob Nadelgrösse stimmt). Viel Spaß beim stricken!
14.05.2020 - 08:05
![]() Karin Seefeldt escribió:
Karin Seefeldt escribió:
Hallo! Ich möchte gerne das Modell Lamb Dance Sweater mit dem Garn Safran stricken. Kann ich dafür die Umrechnung erhalten? Vielen Dank im voraus! Liebe grüße Karin Seefeldt
30.04.2020 - 18:53DROPS Design respondió:
Liebe Frau Seefeldt, leider können wir jeder Anleitung nach jedem individuellen Frage anpassen und einzelne Modelle auf individuellen Wunsch hin umrechnen. Wenn sie Hilfe damit brauchen, wenden Sie sich bitte an Ihrem DROPS Laden, dort hilft man Ihnen gerne weiter. Viel Spaß beim stricken!
04.05.2020 - 09:43
![]() Marie-France escribió:
Marie-France escribió:
Comment joindre la première et la dernière mailles (x80) sur aiguilles circulaires de 60cm de long ??? Je n’y arrive pas. Pourquoi ?
14.01.2020 - 13:11DROPS Design respondió:
Bonjour Marie-France, vous pouvez utiliser les aiguilles doubles pointes ou bien l'aiguille de 80 cm et tricoter en magic loop. Bon tricot!
14.01.2020 - 14:34
![]() Visi escribió:
Visi escribió:
En la talla 11/12 dice montar 110 puntos y empieza con una vuelta del derecho se sigue con 2 derechos y 2 revés, no me da pues al final termina con dos derechos igual que al comienzo, o sea que serían 4 derechos seguidos. No se si lo entiendo bien, un saludo
22.12.2019 - 19:56DROPS Design respondió:
Hola Visi. Ya hemos enviado tu pregunta al departamento de diseño. Cuando recibamos una respuesta, corregiremos el patrón.
09.02.2020 - 20:00
![]() Helena escribió:
Helena escribió:
Hi, when knitting the sleeves in the round, there is a marker in the middle of the new 6 stitches. For me, this marker also marks the beginning and the end of the rows. When decreasing, it says k2tog before the marker and another decrease after the marker. As I knit from right to left, this means that my decreases will be in 2 different rows. Before the marker is end of row and after the marker is the next (new) row. I am confused. Could you please clarify? Thank you.
09.11.2019 - 09:37DROPS Design respondió:
Dear Helena, this is absolutely right - in fact you decrease at the beg and at the end of one round. But dont worry about that - just decrease on both sides of marker - and that is all :-) Happy knitting!
10.11.2019 - 20:18
![]() Inger Lise Drage escribió:
Inger Lise Drage escribió:
Hei! Har nettop strikka denne gensaren og so lure eg på når man skal slutte å auke masker på dei forsjellige str. Eg strikka etter diagrammet og enda opp med det antall masker som skulle vere på den største str og eg skulle strikke 7/8 år.
14.10.2019 - 15:52DROPS Design respondió:
Hej Inger, Du øger kun ifølge diagrammet, så når du er færdig med diagrammet, så er du færdig med udtagningerne. Husk at strikkefastheden skal stemme :)
16.10.2019 - 15:00
|
|||||||||||||||||||
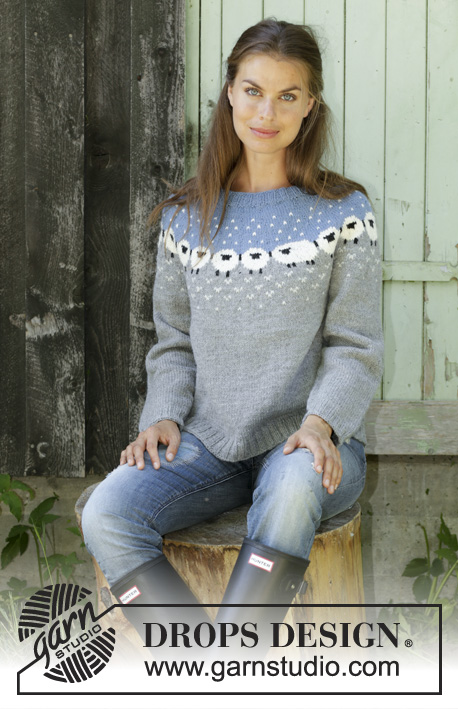
Lamb Dance Sweater#lambdancesweater |
|||||||||||||||||||
 |
 |
||||||||||||||||||
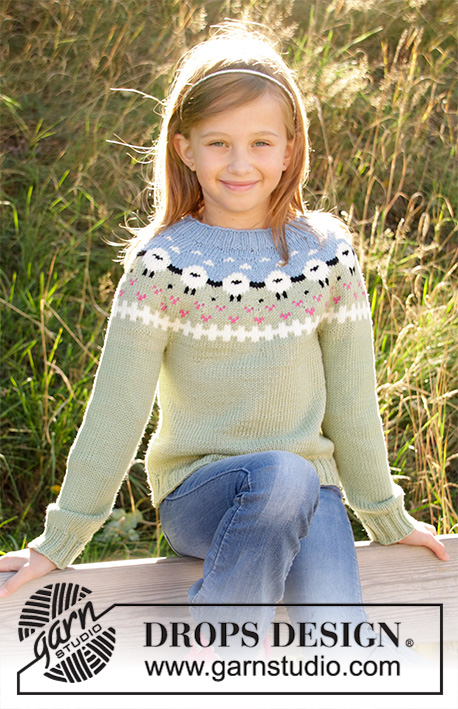
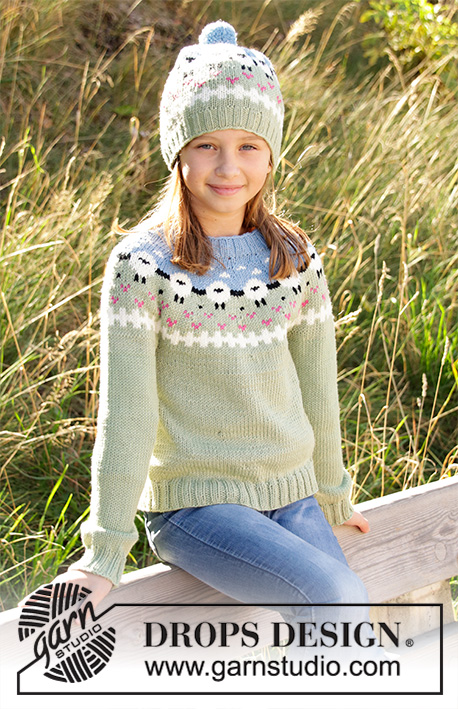
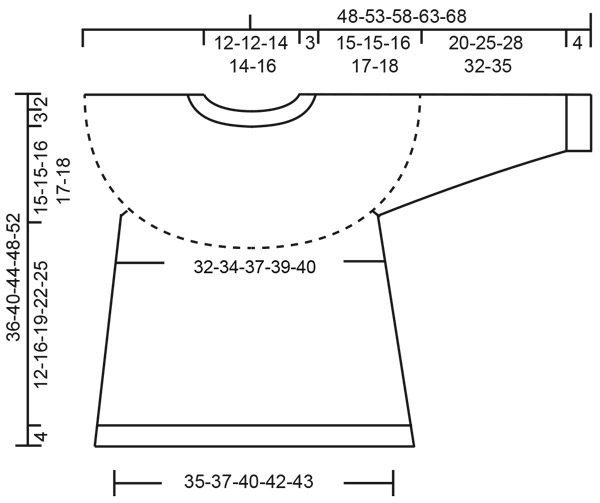
Jersey de punto para niños en DROPS Merino Extra Fine o DROPS Lima. La pieza está tejida de arriba para abajo con ovejas, patrón de colores, resortes y punto jersey. Tallas 3-12 años.
DROPS Children 34-3 |
|||||||||||||||||||
|
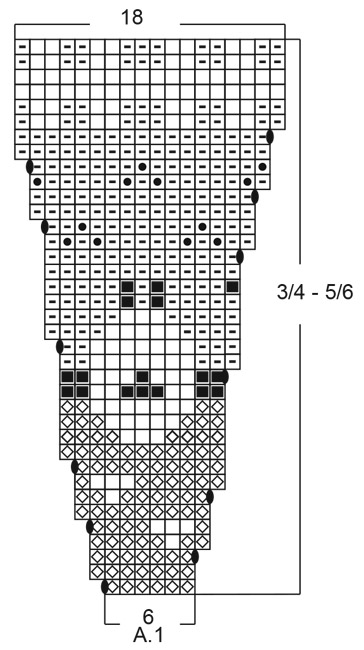
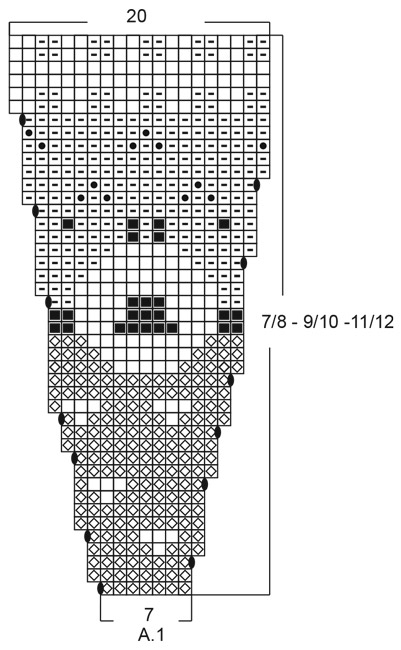
EXPLICACIONES PARA REALIZAR EL PATRÓN: ----------------------------------------------------- PATRÓN: Ver diagrama A.1. Elegir el diagrama que corresponda a la talla que estés tejiendo. Los diagramas muestran todas las hileras del patrón vistas por el lado derecho. TIP PARA DISMINUIR/AUMENTAR (equitativamente): Para calcular cómo disminuir equitativamente, usar el número total de puntos en la vuelta (p. ej. 84 puntos) y dividir los puntos entre el número de disminuciones a hacer (p. ej. 7) = 12. En este ejemplo, disminuir tejiendo juntos de derecho cada 11º y 12º punto. Para aumentar, usar el mismo cálculo pero hacer, en vez, una lazada después de cada 12º punto. Tejer las lazadas retorcidas de derecho en la vuelta siguiente para evitar agujeros. TIP-2 PARA AUMENTAR (aplica a los lados del cuerpo): Tejer hasta que reste 1 punto antes del hilo marcador, 1 lazada, tejer 2 puntos derechos (el hilo marcador está en el centro de estos puntos), 1 lazada = 2 puntos aumentados. En la vuelta siguiente, tejer la lazada retorcida para evitar un agujero. Después tejer los puntos nuevos en punto jersey. TIP-2 PARA DISMINUIR (aplica a las mangas): Disminuir 1 punto a cada lado del hilo marcador de la manera siguiente: Tejer hasta que resten 3 puntos antes del hilo marcador, tejer 2 puntos juntos de derecho, tejer 2 puntos derechos (el hilo marcador está entre estos puntos), deslizar 1 punto como de derecho, 1 derecho, pasar el punto deslizado por encima del punto tejido = 2 puntos disminuidos. ----------------------------------------------------- COMENZAR LA PIEZA AQUÍ: ----------------------------------------------------- JERSEY – RESUMEN CORTO DE LA PIEZA: La pieza se teje en redondo en aguja circular, de arriba para abajo. Cuando se divide para las mangas, tejer el cuerpo en redondo en aguja circular, tejer las mangas en redondo en agujas de doble punta/aguja circular corta. CANESÚ: Montar 80-84-96-108-112 puntos en aguja circular tamaño 3 mm con gris/azul claro. Unir para tejer en redondo y tejer 1 vuelta en punto jersey. Tejer en resorte en redondo con 2 derechos/2 reveses durante 3 cm (orilla del escote). Cambiar a aguja circular tamaño 4 mm. Tejer 1 vuelta en punto jersey disminuyendo 14-12-12-17-14 puntos distribuidos equitativamente – leer TIP PARA DISMINUIR/AUMENTAR = 66-72-84-91-98 puntos. Después tejer de acuerdo al diagrama A.1, tejer el diagrama 11-12-12-13-14 veces en la vuelta. NOTA: Elegir el diagrama correspondiente a la talla correcta. ¡RECORDARSE DE MANTENER LA MISMA TENSIÓN DE TEJIDO DE LA MUESTRA! Después de haber tejido A.1 entero, hay 198-216-240-260-280 puntos en la vuelta. En la vuelta siguiente, tejer con pistacho y punto jersey y aumentar 14-8-2-2-2 puntos distribuidos equitativamente en la vuelta = 212-224-242-262-282 puntos. Continuar con pistacho y en punto jersey hasta que la pieza mida aprox 18-18-19-20-21 cm a partir de la orilla de montaje. Tejer la vuelta siguiente de la manera siguiente: Tejer 62-64-70-77-79 puntos (= pieza de la espalda), deslizar los 44-48-51-54-62 puntos siguientes en un gancho auxiliar (= manga), montar 6 puntos nuevos bajo la manga, tejer 62-64-70-77-79 puntos en punto jersey (= pieza del frente), deslizar los 44-48-51-54-62 puntos siguientes en un nuevo gancho auxiliar (= manga), montar 6 puntos nuevos bajo la manga. CUERPO: Ahora hay 136-140-152-166-170 puntos en la vuelta. ¡AHORA MEDIR LA PIEZA A PARTIR DE AQUÍ! Insertar 1 hilo marcador en el centro de los 6 puntos nuevos montados. Continuar en punto jersey y pistacho. Cuando la pieza mida 3 cm, aumentar 1 punto a cada lado de cada marcador (= 4 puntos aumentados) - ¡leer TIP-2 PARA AUMENTAR! Repetir los aumentos 1 vez más después de 4 cm = 144-148-160-174-178 puntos en la aguja. Tejer hasta que la pieza mida aprox 12-16-19-22-25 cm (o hasta el largo deseado, resta por tejer aprox 4 cm para completar las medidas). Tejer 1 vuelta en punto jersey y aumentar 12-12-12-10-10 puntos distribuidos equitativamente = 156-160-172-184-188 puntos. Cambiar a aguja circular tamaño 3 mm y tejer en resorte con 2 derechos/2 reveses. Tejer en resorte durante 4 cm. Rematar los puntos sin apretar con derecho sobre derecho y revés sobre revés. Cortar y rematar el hilo. MANGA: Deslizar los puntos de un gancho auxiliar de vuelta en una aguja circular corta/agujas de doble punta tamaño 4 mm (= 44-48-51-54-62 puntos), levantar 1 punto en cada uno de los 6 puntos montados en el cuerpo (= 50-54-57-60-68 puntos). Insertar 1 hilo marcador en el centro de estos 6 puntos. Tejer en punto jersey en redondo hasta que la manga mida 2 cm. Ahora disminuir 1 punto a cada lado del hilo marcador – ¡leer TIP-2 PARA DISMINUIR! Continuar en punto jersey y repetir las disminuciones a cada 4-3½-4-4-3½ cm 5-7-7-8-10 veces en total = 40-40-43-44-48 puntos en la aguja. Tejer en punto jersey hasta que la manga mida 21-26-29-33-36 cm. Tejer 1 vuelta de derecho y aumentar 4-4-5-4-4 puntos en la vuelta = 44-44-48-48-52 puntos. Cambiar a agujas de doble punta tamaño 3 mm y tejer en resorte en redondo con 2 derechos/2 reveses durante 4 cm. Rematar los puntos sin apretar con derecho sobre derecho y revés sobre revés. Cortar y rematar el hilo. Tejer la otra manga de la misma manera. |
|||||||||||||||||||
Explicaciones del diagrama |
|||||||||||||||||||
|
|||||||||||||||||||
 |
|||||||||||||||||||
 |
|||||||||||||||||||
 |
|||||||||||||||||||
¿Terminaste este patrón?Entonces, etiqueta tus fotos con #dropspattern #lambdancesweater o envíalas a la galería #dropsfan. ¿Necesitas ayuda con este patrón?Encontrarás 27 videos tutoriales, un espacio para comentarios/preguntas y más visitando la página del patrón en garnstudio.com © 1982-2026 DROPS Design A/S. Todos los derechos reservados. Este documento, incluyendo todas sus sub-secciones, está protegido por los derechos de autor (copyright). Lee más acerca de lo que puedes hacer con nuestros patrones en la parte de abajo de cada patrón de nuestro sitio. |
|||||||||||||||||||


Con más de 40 años en el diseño de modelos de punto y de ganchillo, DROPS Design ofrece una de las más vastas colecciones de patrones gratuitos en el internet - traducidos en 17 idiomas. Al día de hoy, contamos con 325 catálogos y 12298 patrones - de los cuales 11726 están traducidos en español.
Nosotros trabajamos con mucho esmero para brindarte lo mejor que las labores de punto y ganchillo tienen para ofrecer,inspiración y consejos, así como hilos de magnífica calidad a precios increíbles! Te gustaría usar nuestros patrones para otro fin además del uso personal? Puedes leer acerca de lo que estás permitida a hacer en el texto de Copyright en la parte de abajo de todos nuestros patrones. Felices labores!
Escribe un comentario sobre DROPS Children 34-3
¡Nos encantaría saber qué piensas acerca de este patrón!
Si quieres escribir una pregunta referente al patrón, por favor asegúrate de elegir la categoría correcta en el formulario debajo, para acelerar el proceso de respuesta. Los campos obligatorios están marcados con un *.