
Categorías populares
¿Buscas un hilo?


Comentarios / Preguntas (38)
![]() Roberta escribió:
Roberta escribió:
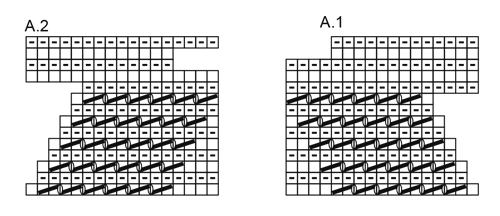
In which row of A1 does the second set of short rows begin?
25.03.2026 - 09:25DROPS Design respondió:
Dear Roberta, A.1/A.2 are 14 rows, the first set of short rows end after 16 rows over all stitches (6 rows + 10 short rows), so you will start the 2nd set of A.1/A.2 when working the short rows for the 2nd time. Happy knitting!
22.04.2026 - 08:55
![]() Eliazabeth escribió:
Eliazabeth escribió:
Hi, I love this pattern but love to knit it all in drops kidsilk if I could. How many strands off kidsilk would I use 2 or 3 strands to get the same result. Thank you
27.09.2025 - 13:53DROPS Design respondió:
Hi Elizabeth, I would say 3 strands. Make a swatch to be sure the fabric is ok for you. Happy knitting!
27.09.2025 - 22:04
![]() Mihaela escribió:
Mihaela escribió:
Hi, I enjoy your patterns very much. Thank you for the marvelous designs. I want to ask if the first stick on A1 diagram îs worked or sliped, în order to get the neat edge as în the picture. I tried both ways and I prefer the sliped version, but I wood like your advise. Thank you.
13.04.2025 - 13:14DROPS Design respondió:
Dear Mihaela, the first stitch in A.1 is the rightmost stitch of the bottom row. It's a white square, so it's a knitted stitch. Then you knit 2 together and then you work 1 yarn over. But if you prefer to work a slipped stitch you can do that. Happy knitting!
13.04.2025 - 23:52
![]() Barbara Marrs escribió:
Barbara Marrs escribió:
Hi! Are the patterns of casting on 5 new sts at the end of row 10 in A.1 and the end of row 11 in A.2, and then working only the first 13 sts in row 13 in A.1 and the first 13 sts in row 12 in A.2, are these only done once, or are they repeated over and over at end and beginning of the A.1 and A.2 sequences until you come to the second sleeve? Thankyou so much!
25.04.2024 - 17:21DROPS Design respondió:
Dear Barbara, that casting on and the off those stitches form the peaks of the edging and done at every repeat of the A.1/A.2 patterns. Happy Knitting!
25.04.2024 - 23:10
![]() Barbara Marrs escribió:
Barbara Marrs escribió:
Hi! The instructions say to work the first and last 17 sts with the A.1 and A.2 patterns. However, Row 1 for each of these patterns shows only 16 sts. What is done for the 17th stitch? Thank you so much!
24.04.2024 - 17:47DROPS Design respondió:
Dear Barbara, Both pattern has 17 stitches. A.1 starts with a knit stitch, then K2TOGs and yarnovers, and finishes woth 4 knit stitches. A.2 is the mirror image of A.1. Happy Knitting!
24.04.2024 - 22:54
![]() Barbara Marrs escribió:
Barbara Marrs escribió:
Hi! Once I have casted the new sts on each side of the sleeve and have inserted the 2 markers 30 sts in each side, do I begin the short rows with first knitting 6 rows over all the sts (starting the A1 and A2 patterns) and then the short return rows, followed by 5 rows over all sts, and then repeat the short return rows, then back to 5 rows over all, etc.? Thank you!
16.04.2024 - 17:03DROPS Design respondió:
Dear Mrs Mars, yes work first 6 rows over all stitches, then repeat from * to * for the short rows to the required measurements for your size. Happy knitting!
17.04.2024 - 08:24
![]() Tove Rosland escribió:
Tove Rosland escribió:
Hvor mange ganger skal man gjenta rapportene med forkortede omganger? I oppskriften virker det som det bare er én gjentakelse. Stemmer dette?
10.04.2024 - 19:59DROPS Design respondió:
Hei Tove. Forkortede pinner står forklart bare 1 gang (øverst i oppskriften), men det strikkes flere ganger. Antall ganger avhenger av hvilken str. du strikker / hvor mange cm det skal strikkes. mvh DROPS Design
15.04.2024 - 09:26
![]() Essi escribió:
Essi escribió:
Hei! Tein tuon boleron XL/XXL kokoisena. Neuloin ilman kid silk- lankaa. Ohjeen mukaan 200g lankaa ois pitänyt riittää, mutta se ei riittänytkään. Piti ostaa yks kerä lisää.
31.10.2023 - 09:25
![]() Dominique escribió:
Dominique escribió:
Bonjour Drops design Je ne comprends pas bien comment faire sur les mêmes rangs le raccourci à 30 mailles et le raccourci à 13 mailles. J'ai fait un premier rang raccourci au sixième rang puis au douzième rang et c'est au rang de retour , le treizième que je ne sais comment faire le raccourci sur A1 Merci de votre réponse Cordialement
11.08.2023 - 20:58DROPS Design respondió:
Bonjour Dominique, tricotez les rangs raccourcis comme indiqué, autrement dit, après 6 rangs sur toutes les mailles, *tricotez 30 m, tournez, et tricotez ces 30 m à nouveau; tournez et tricotez toutes les mailles, tournez, tricotez 30 m, tournez, tricotez ces 30 m, tournez et tricotez 5 rangs sur toutes les mailles*, en même temps, tricotez les diagrammes A.1 et A.2 de chaque côté; les rangs raccourcis de A.1/A.2 sont indiqués dans les diagrammes, ils ne comptent pas dans le nombre de rangs des rangs raccourcis mais se font en plus. Bon tricot!
14.08.2023 - 08:43
|
|||||||||||||
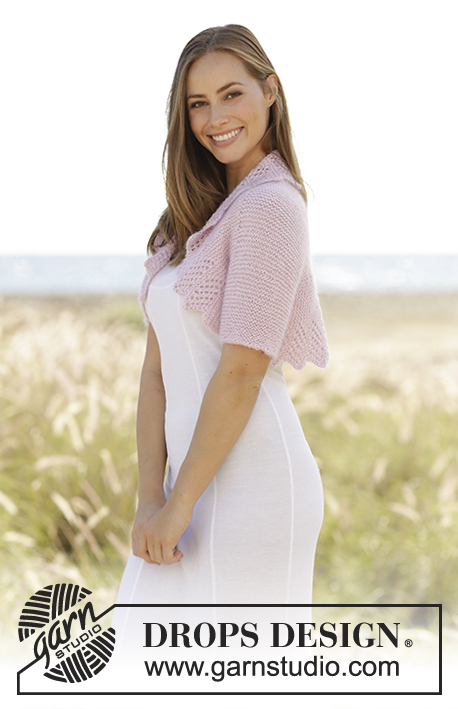
Henrietta#henriettabolero |
|||||||||||||
 |
 |
||||||||||||
Bolero de punto con filas acortadas, patrón de calados y punto musgo en DROPS BabyMerino y DROPS Kid-Silk. Tallas XS – XXL.
DROPS 178-58 |
|||||||||||||
|
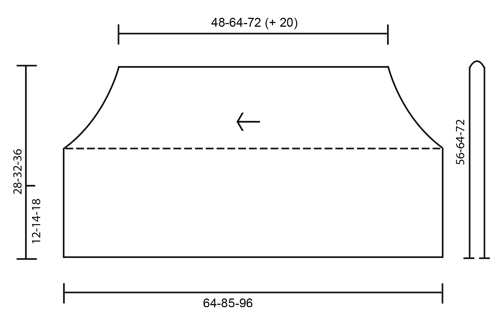
PUNTO MUSGO (de ida y vuelta ): 1 pliegue = trabajar 2 filas de derecho. FILAS ACORTADAS: Trabajar 6 filas sobre todos los puntos. *Trabajar 30 puntos (hasta primer marcapuntos), girar, estirar el hilo y trabajar vuelta. Trabajar 1 fila sobre todos los puntos, girar, trabajar 30 puntos (hasta el siguiente marcapuntos), girar, estirar el hilo y trabajar la vuelta. Trabajar 5 filas sobre todos los puntos*, repetir de *a*. 1 repetición de filas acortadas = 6 filas (= 3 pliegues) sobre los 35-48-62 puntos centrales y 8 filas (= 4 pliegues) sobre los pts a cada lado. PATRÓN: Ver los diagramas A.1 y A.2. ATENCIÓN: Al final de la fila 10 de A.1 y el final de la fila 11 de A.2 montar 5 pts nuevos. En la fila 13 de A.1 trabajar solo los primeros 13 pts del diagrama, girar y trabajar 13 pts. En la fila de A.2 trabajar sólo los primeros 13 pts del diagrama, girar y trabajar 13 pts. ATENCIÓN: Estos giros trabajados en A.1 y A.2 son adicionales a las filas acortadas. -------------------------------------------------------- BOLERO: La labor se trabaja de ida y vuelta con aguja circular. El borde de montaje está en la parte inferior de una manga y el de remate en la parte inferior de la otra. Después de finalizar el bolero, doblar y hacer la costura de mangas y lados. Montar 45-50-52 puntos con aguja circular tamaño 5 mm y 1 hilo de cada calidad (= 2 hilos). Trabajar en PUNTO MUSGO - ver explicación arriba. Cuando la manga mida 2 cm aumentar 1 pt a cada lado, repetir los aumentos cada 2 cm un total de 5 veces = 55-60-62 puntos. Cuando la manga mida 10 cm, montar 20-24-30 puntos nuevos a cada lado para la costura del lado derecho = 95-108-122 puntos. Insertar 2 marcapuntos en la labor, a 30 puntos de cada lado (= 35-48-62 puntos entre los marcapuntos). Trabajar como sigue - por el lado derecho: A.1 sobre los primeros 17 pts, PUNTO MUSGO - ver explicación arriba, sobre los siguientes 61-74-88 puntos, A.2 sobre los últimos 17 pts. RECUERDE MANTENER LA MISMA TENSIÓN DEL TEJIDO. Continuar con punto musgo en el centro de la labor y el patrón sobre los 17 pts más externos a cada lado - ver explicación arriba - AL MISMO TIEMPO trabajar FILAS ACORTADAS - ver explicación arriba. Cuando la labor mida aprox 58-74-82 cm (medir en el centro de la labor incluyendo la manga) cerrar 20-24-30 puntos a cada lado = costura del lado izquierdo = 55-60-62 puntos. Ahora trabajar la manga izquierda. Continuar con punto musgo, cuando la labor mida 2 cm después de cerrar los pts, disminuir 1 pt a cada lado, repetir las disminuciones cada 2 cm un total de 5 veces = 45-50-52 puntos. Rematar cuando la labor mida 68-84-92 cm desde el borde de montaje. TERMINACIÓN: Doblar el bolero por la mitad – el diagrama muestra la labor una vez doblada. Hacer la costura de las mangas y coser los 20-24-30 puntos de cada lado. |
|||||||||||||
Explicaciones del diagrama |
|||||||||||||
|
|||||||||||||
 |
|||||||||||||
 |
|||||||||||||
¿Terminaste este patrón?Entonces, etiqueta tus fotos con #dropspattern #henriettabolero o envíalas a la galería #dropsfan. ¿Necesitas ayuda con este patrón?Encontrarás 18 videos tutoriales, un espacio para comentarios/preguntas y más visitando la página del patrón en garnstudio.com © 1982-2026 DROPS Design A/S. Todos los derechos reservados. Este documento, incluyendo todas sus sub-secciones, está protegido por los derechos de autor (copyright). Lee más acerca de lo que puedes hacer con nuestros patrones en la parte de abajo de cada patrón de nuestro sitio. |
|||||||||||||


Con más de 40 años en el diseño de modelos de punto y de ganchillo, DROPS Design ofrece una de las más vastas colecciones de patrones gratuitos en el internet - traducidos en 17 idiomas. Al día de hoy, contamos con 324 catálogos y 12290 patrones - de los cuales 11685 están traducidos en español.
Nosotros trabajamos con mucho esmero para brindarte lo mejor que las labores de punto y ganchillo tienen para ofrecer,inspiración y consejos, así como hilos de magnífica calidad a precios increíbles! Te gustaría usar nuestros patrones para otro fin además del uso personal? Puedes leer acerca de lo que estás permitida a hacer en el texto de Copyright en la parte de abajo de todos nuestros patrones. Felices labores!
Escribe un comentario sobre DROPS 178-58
¡Nos encantaría saber qué piensas acerca de este patrón!
Si quieres escribir una pregunta referente al patrón, por favor asegúrate de elegir la categoría correcta en el formulario debajo, para acelerar el proceso de respuesta. Los campos obligatorios están marcados con un *.