
Categorías populares
¿Buscas un hilo?


Comentarios / Preguntas (237)
![]() Susanne escribió:
Susanne escribió:
Müssen für die Markierungen die Randmaschen mitgezählt werden oder werden diese ausgeschlossen??
17.12.2012 - 22:07DROPS Design respondió:
Liebe Susanne, bei unseren Anleitungen werden die Randmaschen immer mitgezählt, wenn nichts anderes erwähnt ist.
18.12.2012 - 07:27
![]() Molly escribió:
Molly escribió:
Hi, Just making sure you received my previous question: "Then dec on each side of the 2nd, 4th, 6th markers until 15 sts remain." Does this mean I'm to continue in stockinette stitch? Decreasing on BOTH RS/WS? And approx. how many rows will I knit until 15 sts remain? Thanks!
14.12.2012 - 11:46DROPS Design respondió:
Dear Molly, you will dec on each side of the 2nd, 4th and 6th markers from RS until 15 sts remain. Happy knitting !
14.12.2012 - 14:15
![]() Molly escribió:
Molly escribió:
Hi, Needing more clarification (ha!)... "Then dec on each side of the 2nd, 4th, 6th markers until 15 sts remain." Am I to continue in stockinette stitch for this part? While decreasing on both RS/WS? And approx. how many rows will I knit until 15 sts remain? Thanks!
12.12.2012 - 23:34
![]() Molly escribió:
Molly escribió:
Where the increase tip reads: "On next round P YO twisted...", what exactly is the "next round?" Thanks!
09.12.2012 - 00:30DROPS Design respondió:
Dear Molly, you inc from RS with a YO, on next row = from WS you will work the YO twisted (= into back of loop) to avoid holes. Happy knitting !
09.12.2012 - 22:05
![]() Molly escribió:
Molly escribió:
...and is the 9th row worked in knit or purl (for continuing in stockinette)? Thanks!
09.12.2012 - 00:28DROPS Design respondió:
Dear Molly, you work in st st (after the K8 rows from the start), first row = RS, so 1st, 3rd, 5th, 7th .... will be from RS = K and all even rows 2,4,6, 8 ... will be P from WS. happy knitting !
09.12.2012 - 22:04
![]() Molly escribió:
Molly escribió:
Hi, Am I correct that the increase/decrease work happens together on the 9th, 11th, 13th, 15th, 17th, 19th rows and not on the even number rows (10th, 12th, etc.)? Thanks!
09.12.2012 - 00:21DROPS Design respondió:
Dear Molly, yes you are correct : you start ind/dec on 1st row from RS, and repeat every other row, so that they will always be on uneven numbered rows= from RS. Happy Knitting !
09.12.2012 - 22:01
![]() Molly escribió:
Molly escribió:
Thank you!! This is very helpful :)
03.12.2012 - 12:17
![]() Molly escribió:
Molly escribió:
Hi, Another part I'm confused about is: "At the same time on 1st row begin to increase and decrease on every other row..." Does this mean I'm to start increasing and decreasing on the very 1st row of the entire project, or after the first 8 rows (starting on the 9th row effectively)? Thanks - Molly
02.12.2012 - 17:18DROPS Design respondió:
Dear Molly, you will start with inc/dec on the 9th row of the whole hat, ie, after the K8 rows. Happy knitting !
03.12.2012 - 09:27
![]() Molly escribió:
Molly escribió:
Hi, I'm sorry, I don't know what you mean by "insert markers seen from RS". Does this mean that the markers are to be placed on the RS needle itself? And at what point am I to place the markers? Am I to knit 8 rows (garter stitch?) before inserting the markers? Thank you again for your help!! Molly
02.12.2012 - 17:18DROPS Design respondió:
Dear Molly, you first work 8 rows K (1st row = RS), after the K8 rows, place markers when sts are on the left needle, and start first row from RS as indicated. Happy knitting!
03.12.2012 - 09:26
![]() Molly escribió:
Molly escribió:
Are all the markers meant to be placed on the RS needle or into the knit work itself? Also, I'm very confused about how the increasing and decreasing is supposed to work in this pattern. Any helps would be greatly appreciated!! Molly
30.11.2012 - 17:39DROPS Design respondió:
Dear Molly, insert markers seen from RS, without working them. Please note both tips at the beginning of the pattern to know how to increase and how to decrease. Happy knitting!
01.12.2012 - 11:22
|
|
Alladin#alladinhat |
|
|
|
|
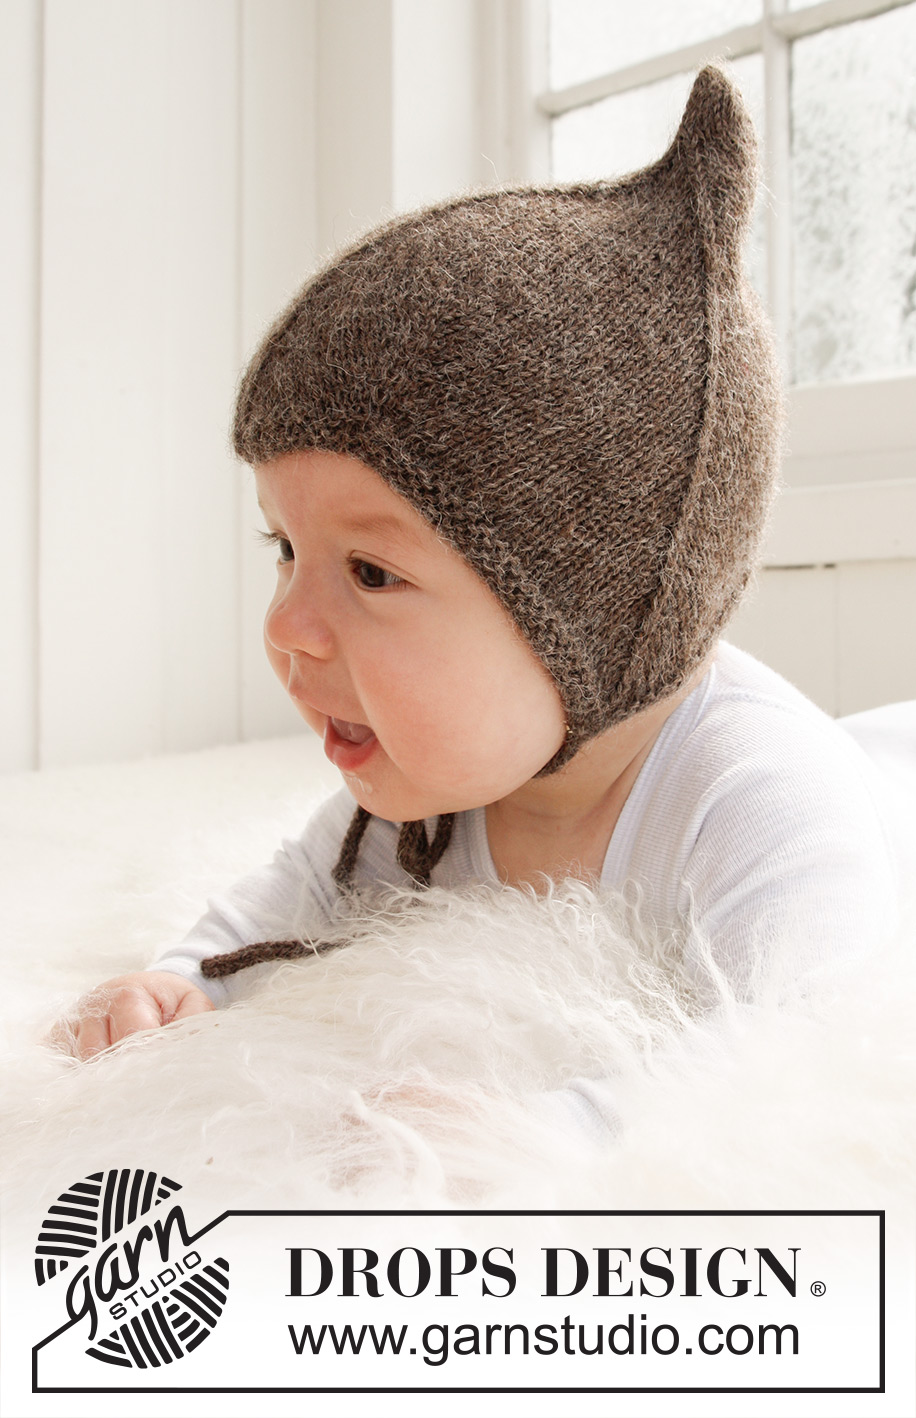
Gorro de punto para bebé y niños en DROPS Alpaca
DROPS Baby 21-34 |
|
|
TIP PARA AUMENTO: Todos los aum son hechos por el LD. Aum 1 pt antes y después del pt con marcapuntos (MP) haciendo 1 HEB (lazada). En la vta sig tejer las HEB retorcidas de revés (es decir, tejer por atrás de la HEB en vez de adelante) para evitar que se formen agujeros. TIP PARA DISMINUCIÓN: Todas las dism son hechas por el LD. Dism 1 pt en cada lado del pt con MP. Empezar 1 pt antes del pt con MP. Deslizar 1 pt en una ag aux por detrás de la labor, deslizar 1 pt (= pt con MP), tejer juntos de derecho el pt sig y el pt en la ag aux, pasar el pt desl por encima. ------------------------------------------------------ GORRO: Tejido de ida y vuelta en la ag. Mon 117-123-129 (135-141) pts (incl 1 pt de orillo en cada lado) en ag tamaño 2.5 mm con Alpaca. Tejer 8 vtas de derecho (1ª vta = LD). Insertar 7 MP en la pieza, por el LD, de la manera sig: 1er MP en el 2º pt en la ag, 2º MP en el 24º-25º-26º (27º-28º) pt, 3er MP en el 48º-50º-52º (54º-56º) pt, 4º MP en el 59º-62º-65º (68º-71º) pt, 5º MP en el 70º-74º-78º (82º-86º) pt, 6º MP en el 94º-99º-104º (109º-114º) pt, y el 7º MP en el penúltimo pt en la ag. Continuar en pt jersey, con 1 pt de orillo en pt musgo en cada lado de la pieza – AL MISMO TIEMPO, en la 1ª vta, empezar a aum y dism – Leer TIP PARA AUMENTO y TIP PARA DISMINUCIÓN arriba – en vtas alternas, de la manera sig: Aum 1 pt después del 1er MP. Dism 1 pt en cada lado del 2º MP. Aum 1 pt en cada lado del 3er MP. Dism 1 pt en cada lado del 4º MP. Aum 1 pt en cada lado del 5º MP. Dism 1 pt en cada lado del 6º MP. Aum 1 pt antes del 7º MP. Continuar a aum y dism por el LD de esta manera en vtas alternas (es decir, en cada vta por el LD) un total de 6 veces. La pieza mide aprox 6 cm a partir de la orilla de montaje – si la tensión en altura no está correcta, se puede tejer como antes con los aumentos/disminuciones. Después dism a cada lado del 2º, 4º y 6º MP hasta que resten 15 pts en la ag (= 17-18-19 (20-21 veces). La pieza mide aprox 16-17-17 (18-19) cm a partir de la punta inferior en el 2º o 6º MP = orejera. Tejer la vta sig por el LD de la manera sig: 1d, 2 pjd, 9d, 2 pjd, 1d = 13 pts. Repetir las dism en cada lado, en cada vta (por el LR tejer juntos de revés los 2 pts antes y después del pt de orillo) hasta que resten 5 pts. En la última vta por el L tejer 1 pt de orillo, tejer 3 pts juntos de revés y tejer 1 pt de orillo. Pasar el hilo a través de los pts restantes. ENSAMBLAJE: Unir el gorro con una costura en el centro de la parte de atrás, en el interior de 1 pt de orillo. El centro de las 3 puntas enteras de la orilla de montaje cae sobre el frente de la cabeza. CORDONES: Mon 4 pts en ag tamaño 2.5 mm. Tejer de la manera sig: * 1d, colocar el hilo hacia el frente de la pieza (hacia usted), desl 1 pt de revés, colocar el hilo hacia atrás de la pieza (retirado de usted) *, repetir de *a* una vez más y en todas las vtas. Esto resulta en un cordón redondo. Rem cuando el cordón mida aprox 20-22-24 (26-28) cm. Tejer otro cordón igual. Coser un cordón en la parte de abajo de cada punta de la orejera a cada lado de la pieza. |
|
¿Terminaste este patrón?Entonces, etiqueta tus fotos con #dropspattern #alladinhat o envíalas a la galería #dropsfan. ¿Necesitas ayuda con este patrón?Encontrarás 17 videos tutoriales, un espacio para comentarios/preguntas y más visitando la página del patrón en garnstudio.com © 1982-2026 DROPS Design A/S. Todos los derechos reservados. Este documento, incluyendo todas sus sub-secciones, está protegido por los derechos de autor (copyright). Lee más acerca de lo que puedes hacer con nuestros patrones en la parte de abajo de cada patrón de nuestro sitio. |


Con más de 40 años en el diseño de modelos de punto y de ganchillo, DROPS Design ofrece una de las más vastas colecciones de patrones gratuitos en el internet - traducidos en 17 idiomas. Al día de hoy, contamos con 325 catálogos y 12298 patrones - de los cuales 11698 están traducidos en español.
Nosotros trabajamos con mucho esmero para brindarte lo mejor que las labores de punto y ganchillo tienen para ofrecer,inspiración y consejos, así como hilos de magnífica calidad a precios increíbles! Te gustaría usar nuestros patrones para otro fin además del uso personal? Puedes leer acerca de lo que estás permitida a hacer en el texto de Copyright en la parte de abajo de todos nuestros patrones. Felices labores!
Escribe un comentario sobre DROPS Baby 21-34
¡Nos encantaría saber qué piensas acerca de este patrón!
Si quieres escribir una pregunta referente al patrón, por favor asegúrate de elegir la categoría correcta en el formulario debajo, para acelerar el proceso de respuesta. Los campos obligatorios están marcados con un *.