
Categorías populares
¿Buscas un hilo?


Comentarios / Preguntas (59)
![]() Kayla escribió:
Kayla escribió:
It looks like there's a typo in the dimensions. Instead of 16 1/2", should it not say 46 1/2"?
04.04.2014 - 22:42DROPS Design respondió:
Dear Kayla, you are correct, this will be updated asap. Thank you. Happy knitting!
05.04.2014 - 10:08
![]() Melanie escribió:
Melanie escribió:
I'm starting row 34, a WS row, in M.1 and I am confused about moving the thread forward and back as directed. Since it's a WS row I should be purling and slipping every other stitch but the part about placing thread towards me, it's already there because I'm purling the stitch before and then place it away from me after I slip the stitch, but the next stitch is a purl so it needs to be in front again and nothing is accomplished? Also, should the stitches be slipped knitwise or purlwise?
05.09.2013 - 15:41DROPS Design respondió:
Dear Melanie, text to this last symbol has been edited so that you should slip 1 st as if to P. Thank you, happy knitting!
06.09.2013 - 09:45Nashwaahmed escribió:
Sorry again but the video u posted is for sleeves knitted back and forth in a needle, this pattern calls for sleeves knitted in the round so when i do what u shown in the video those bounded off stitches "in the round" kinda tighten the work while knitting and they are not smooth in that specific part of the jacket so kindly i need a way to make the knitting smoother at this area thanks :)
26.08.2013 - 19:46DROPS Design respondió:
Dear Mrs Nashwaahmed, sorry for bad video in last answer, the correct one has been added under the tab "videos" on the right side of the picture. To help you on the first rows, you may like to let sts for sleeves on another circular needle or dpn and let them then take all on the same after some more rows. Happy knitting!
28.08.2013 - 10:43
![]() Sara escribió:
Sara escribió:
This would be easier as a seamless top-down construction.
10.08.2013 - 05:32Nashwaahmed escribió:
I want to ask a question about the M.1 pattern there is a symbol for p2tog which is an X over two squares if i worked on the right side does this mean if i worked on the wrong side it will be K2tog?
08.08.2013 - 22:51DROPS Design respondió:
Dear Mrs Nashwaahmed, you are correct, from WS it should be K2 tog, diagram text has been edited, thank you. Happy knitting!
09.08.2013 - 11:04Nashwaahmed escribió:
In the body piece, when i cast off for the arm hole for the small size, 34 sts left for the left front part, and 36 sts were left for the right front part is that ok or there is something wrong and i didn't cast off right ?
04.08.2013 - 23:33DROPS Design respondió:
Dear Mrs Nashwaahmed, in the small size you should have before binding off for armhole : 39 sts for each front piece + 69 sts for back piece (=147 sts), and after binding off for armhole : 35 sts for each front piece + 61 sts for back piece = a total of 131 sts. Happy knitting !
05.08.2013 - 09:27
![]() Debbie Russell escribió:
Debbie Russell escribió:
In the key for pattern #113-17 there is a symbol that means "work 2 stitches in 1 stich." Is this a knit front and back? Or a make 1? And if not, can anyone tell me how you're supposed to work it? Thanks!
07.01.2013 - 21:26DROPS Design respondió:
Dear Mrs Russel, you are correct, it means to work st first in front loop then in back loop. Happy knitting!
08.01.2013 - 08:43
![]() Vicki escribió:
Vicki escribió:
In drops pattern 113-17 does 'wk 2sts in one' mean the same as increase 1st? Thanks
11.09.2012 - 01:48
![]() Nancy Beamer escribió:
Nancy Beamer escribió:
I have just completed the sleeves and I'm not sure how the bind off is done. I am doing the magic loop.
22.08.2012 - 23:46
![]() Ballardtoad escribió:
Ballardtoad escribió:
Oh! Thank you so much for the help and for responding so quickly!! Best wishes -
14.07.2012 - 17:36
|
||||||||||||||||||||||||||||||||||
Avery#averycardigan |
||||||||||||||||||||||||||||||||||
|
|
||||||||||||||||||||||||||||||||||
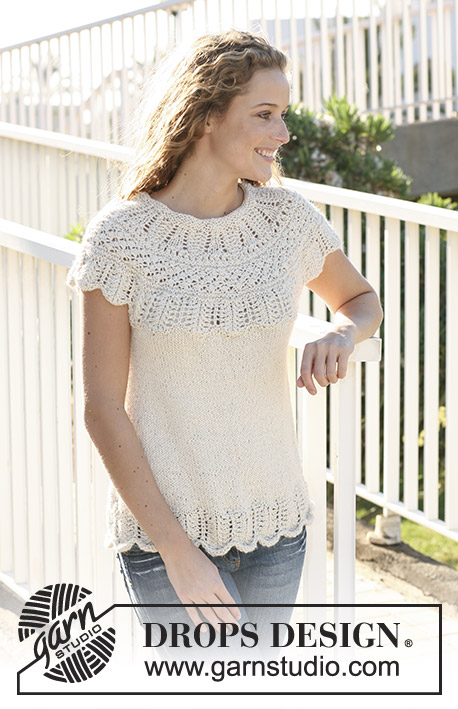
Chaqueta DROPS con canesú redondo y patrón en el canesú en ”Silke Alpaca”. Talla S - XXXL.
DROPS 113-17 |
||||||||||||||||||||||||||||||||||
|
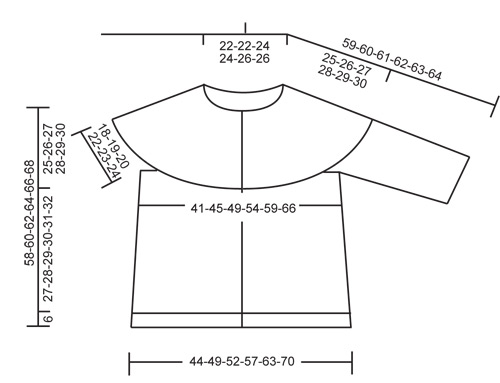
PT ARROZ: FILA 1: *1r., 1d.*, repetir de * a * y finalizar con 1 r. FILA 2: Derecho sobre revés, revés sobre derecho. Repetir fila 2. PT MUSGO (de ida y vta en ag): Todas las filas del derecho. PT MUSGO (en redondo): 1 vuelta del derecho, 1 vta del revés. TIP PARA TOMAR LAS MEDIDAS: Debido al peso de la lana, se aconseja tomar todas las medidas con la prenda suspendida. OJALES:Hacer los ojales en la cenefa del delantero derecho. 1 ojal = cerrar el 3er pt desde el centro del delantero y mon 1 pt nuevo en la hilera de retorno. Hacer los ojales cuando la labor mida: TALLA S: 7, 16, 26, 36, 46 y 56 cm. TALLA M: 7, 15, 23, 31, 40, 49, y 58 cm. TALLA L: 7, 15, 24, 33, 42, 51 y 60 cm. TALLA XL: 7, 16, 25, 34, 43, 52 y 62 cm. TALLA XXL: 7, 15, 23, 31, 39, 47, 55 y 64 cm. TALLA XXXL: 7, 15, 23, 31, 39, 47, 55 y 64 cm. PATRÓN: Ver diagrama M.1. El diagrama muestra el patrón del lado derecho. Ver el diagrama para la talla. ------------------------------------------------------------------------------- CUERPO: Se trabaja de ida y vta en ag circular. Mont 159-173-187-203-223-245 pts ( incl 5 pts de la cenefa a cada lado hacia el centro del delantero) en ag circular tamaño 4.5 mm y Silke Alpaca. Trabajar 1 fila del revés por el LR y continuar en PT ARROZ - ver arriba - con 5 pts para la cenefa a cada lado en PT MUSGO - ver arriba. La cenefa se trabaja en pt musgo hasta finalizar el trabajo. Cuando la labor mida 6 cm continuar en pt jersey con la cenefa como antes. Insertar 2 marcapuntos (MP) en la labor, a 42-45-49-53-58-63 pts de cada lado ( espalda = 75-83-89-97-107-119 pts) Recuerde los OJALES en la cenefa derecha - ver arriba. Cuando la labor mida 10 cm dism 1 pt a cada lado de ambos MP (=4 dism por fila) y repetir la dism cada 9-9.5-10-10.5-11-11.5 cm un total de 3 vcs = 147-161-175-191-211-233 pts. Trabajar las dism con 2 pjd. Continuar hasta que la labor mida 33-34-35-36-37-38 cm - VER TIP PARA TOMAR LAS MEDIDAS. Ahora cerrar 8 pts a cada lado (= 4 pts a cada lado del MP) = 131-145-159-175-195-217 pts quedan en la ag. Dejar en espera la labor y tejer las mangas. MANGA: Se trabaja en redondo en ag de doble punta. Mont 49-51-51-55-57-59 pts en ag de doble punta tamaño 4.5 mm y Silke Alpaca. Trabajar 6 vts en pt musgo - ver arriba. Insertar un MP al inicio de la vta (=centro bajo la manga). Cuando la labor mida 10 cm aum 1 pt a cada lado del MP y repetir el aum cada 9-4.5-2-1.5-1.5-1 cm un total de 2-3-5-6-7-8 vcs = 53-57-61-67-71-75 pts. Cuando la labor mida 23-23-22-22-21-21 cm (medidas más cortas en las tallas más grandes debido a una mayor longitud del copete de la manga y una mayor anchura de hombros ) cerrar 4 pts a cada lado del MP para la sisa = 45-49-53-59-63-67 pts. Dejar en espera la labor y tejer la otra manga. CANESÚ: Desl las mangas a la misma ag circular tamaño 4.5 mm en la que está el cuerpo, donde se remató para las sisas = 221-243-265-293-321-351 pts. Trabajar 1 fila del derecho por el LD (con la cenefa como antes), AL MISMO TIEMPO dism 11-13-15-3-11-21 pts repartidos = 210-230-250-290-310-330 pts. Tejer 1 fila del derecho por el LR y ahora continuar en M.1 por el LD ( ver diagrama para su talla) con 5 pts en pt musgo a cada lado. Después de 1 repetición en vertical de M.1 hay 100-109-118-122-130-138 pts en la fila. Trabajar 1 fila del derecho por el LD, AL MISMO TIEMPO dism 8-17-20-24-24-32 pts repartidos = 92-92-98-98-106-106 pts. Trabajar 5 filas del derecho en todos los pts y rem flojo. TERMINACIÓN: Coser las aberturas bajo la manga. Coser los botones. |
||||||||||||||||||||||||||||||||||
Explicaciones del diagrama |
||||||||||||||||||||||||||||||||||
|
||||||||||||||||||||||||||||||||||
 |
||||||||||||||||||||||||||||||||||
 |
||||||||||||||||||||||||||||||||||
¿Terminaste este patrón?Entonces, etiqueta tus fotos con #dropspattern #averycardigan o envíalas a la galería #dropsfan. ¿Necesitas ayuda con este patrón?Encontrarás 25 videos tutoriales, un espacio para comentarios/preguntas y más visitando la página del patrón en garnstudio.com © 1982-2026 DROPS Design A/S. Todos los derechos reservados. Este documento, incluyendo todas sus sub-secciones, está protegido por los derechos de autor (copyright). Lee más acerca de lo que puedes hacer con nuestros patrones en la parte de abajo de cada patrón de nuestro sitio. |
||||||||||||||||||||||||||||||||||


Con más de 40 años en el diseño de modelos de punto y de ganchillo, DROPS Design ofrece una de las más vastas colecciones de patrones gratuitos en el internet - traducidos en 17 idiomas. Al día de hoy, contamos con 324 catálogos y 12291 patrones - de los cuales 11689 están traducidos en español.
Nosotros trabajamos con mucho esmero para brindarte lo mejor que las labores de punto y ganchillo tienen para ofrecer,inspiración y consejos, así como hilos de magnífica calidad a precios increíbles! Te gustaría usar nuestros patrones para otro fin además del uso personal? Puedes leer acerca de lo que estás permitida a hacer en el texto de Copyright en la parte de abajo de todos nuestros patrones. Felices labores!
Escribe un comentario sobre DROPS 113-17
¡Nos encantaría saber qué piensas acerca de este patrón!
Si quieres escribir una pregunta referente al patrón, por favor asegúrate de elegir la categoría correcta en el formulario debajo, para acelerar el proceso de respuesta. Los campos obligatorios están marcados con un *.