
Categorías populares
¿Buscas un hilo?


Comentarios / Preguntas (184)
![]() Ute escribió:
Ute escribió:
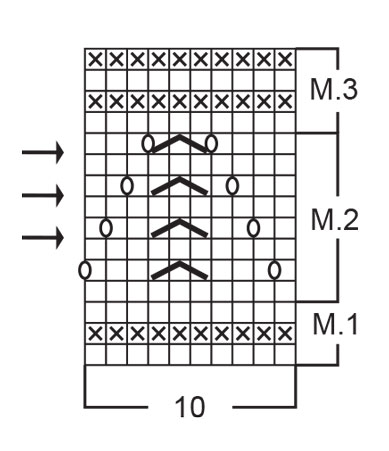
Hallo, das Diagramm zeigt das Muster von der Vorderseite. Wie stricke ich die Rückreihen? Links oder lese ich das Diagramm dann von links nach rechts? Vielen Dank im Voraus Liebe Grüße Ute
01.04.2026 - 18:01DROPS Design respondió:
Liebe Ute, die Rücikreihen lesen Sie links nacch rechts, die kreuzchen stricken Sie rechts bei den Rückreihen und links bei den Hinreihen; die leere Kästchen stricken Sie glattrechts (rechts bei den Hinreihen und links bei den Rückreihen); Viel Spaß beim Stricken!
07.04.2026 - 16:35
![]() Maria escribió:
Maria escribió:
Ciao, per il cappellini non mi è chiaro come procedere con l'ultima ripetizione di M2. Come faccio a rispettare il diagramma diminuendo contemporaneamente le maglie tra i segnapunti? Grazie
18.03.2026 - 09:23DROPS Design respondió:
Buonasera Maria, con le diminuzioni, ci saranno meno maglie e i diagrammi si avvicineranno. Buon lavoro!
15.04.2026 - 22:46
![]() Eva-Lena escribió:
Eva-Lena escribió:
Hej, Ska det vara samma antal maskor 189 hela M2? Jag får ibland fler på ett varv. Tacksam för svar
06.03.2026 - 16:36DROPS Design respondió:
Hei Eva-Lena. Du skal ha samme maskeantall hele tiden når du strikker M.2. Har du for mange, har du kanskje økt, men ikke strikket 2 masker sammen når du har strikket hulmønstret? mvh DROPS Design
23.03.2026 - 11:22
![]() Weronika escribió:
Weronika escribió:
Do kapelusza: do których rzędów należą strzałki dotyczące zwężania? Są one pomiędzy rzędami, dlatego nie wiem, w których rzędach robić zmniejszenia.
15.09.2025 - 10:56DROPS Design respondió:
Witaj Weroniko, zmniejszania rób w rzędach na prawo. Pozdrawiamy!
29.09.2025 - 08:55
![]() Marianne Palm escribió:
Marianne Palm escribió:
Är det rätstickning tills M3 är klart och sedan slätstickning,?
31.08.2025 - 10:10DROPS Design respondió:
Hej. Se svar under. Mvh DROPS Design
01.09.2025 - 07:46
![]() Marianne escribió:
Marianne escribió:
Är det rätstickning till M 3 är färdigt Sedan slätstickning?
31.08.2025 - 10:07DROPS Design respondió:
Hej Marianne. Du stickar först enligt diagram och när M.3 är klart stickar du i slätstickning. Mvh DROPS Design
01.09.2025 - 07:45
![]() Sylvie Cloutier escribió:
Sylvie Cloutier escribió:
Bonjour, le M1 vous dite une maille env sur l\'endroit et une maille end sur envers. Mais part les 4 mailles au point mousse il n\'y a rien de fait. Esce plûtot un rang envers sur endroit et un rang endroit sur envers
14.06.2025 - 01:39
![]() Susan escribió:
Susan escribió:
I am having an issue with the stitch gauge. I can’t get 6 stitches per inch on 3mm needles with this yarn. I will need to use a 3.75 mm or 4 mm to get close to the gauge. My question is how will the larger needles affect the drape of the dress?
11.06.2025 - 00:05DROPS Design respondió:
Dear Susan, as long as you get the correct tension in both width and height you should get the finished measurements as in the chart. Read more about tension here. Happy knitting!
11.06.2025 - 08:09
![]() Yulia escribió:
Yulia escribió:
Dear Drops Team, does the pattern show only right side rows or wrong side also? If M2 is knitted all in knit rows including the wrong side, we will end up with garter stichels and not stocking.
17.05.2025 - 21:37DROPS Design respondió:
Dear Yulia, the charts show all rows (from both the right side and wrong side) as seen from the right side. That means that, from the bottom up, the even rows are worked opposite from what's shown; if we see knit stitches from the right side, we need to purl them from the wrong side, and viceversa; if we see purl stitches from the right side we need to knit them from the wrong side. So in M.1 we have garter stitch and in M.2 we have stocking stitch. Remember that these wrong side rows are read from left to right. Happy knitting!
18.05.2025 - 12:52
![]() Jennifer Long escribió:
Jennifer Long escribió:
I am confused about the bind off at neck for left front please explain
09.05.2025 - 21:21DROPS Design respondió:
Dear Jennifer, after casting off the mid-front stitches for the neck, you will start decreasing stitches at the begginning of rows starting from the mid front. So you will work: 4 sts in garter stitch, decrease the next stitch, work the rest of the row in stocking stitch. Work back from the side. In the next row, decrease the 1st stitch after the 4 sts in garter stitch as before. Continue decreasing like this until you have decreased 4 stitches in total by the neck. Happy knitting!
11.05.2025 - 00:32
|
||||||||||||||||
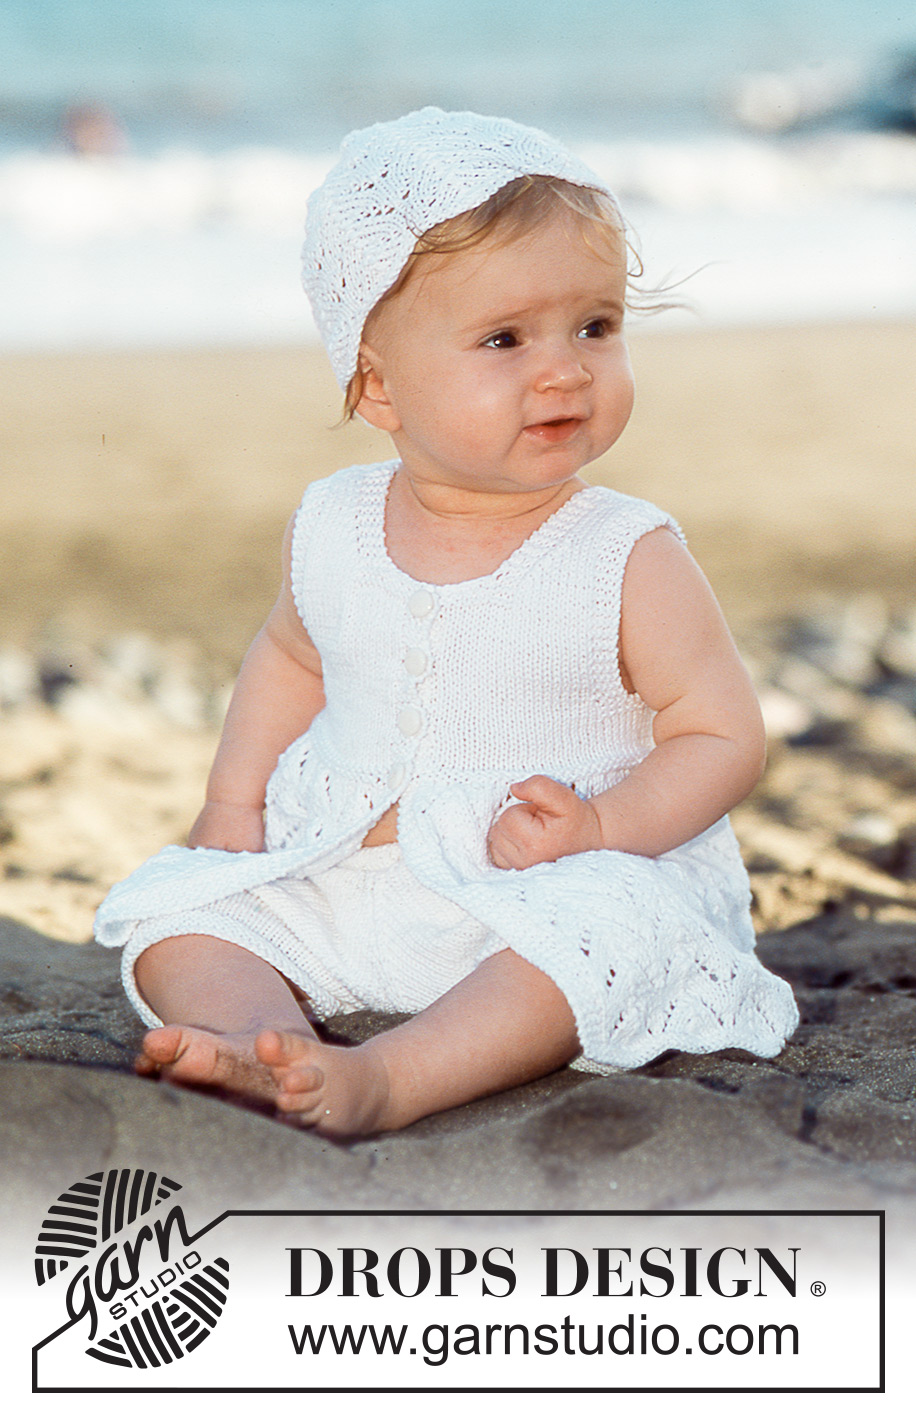
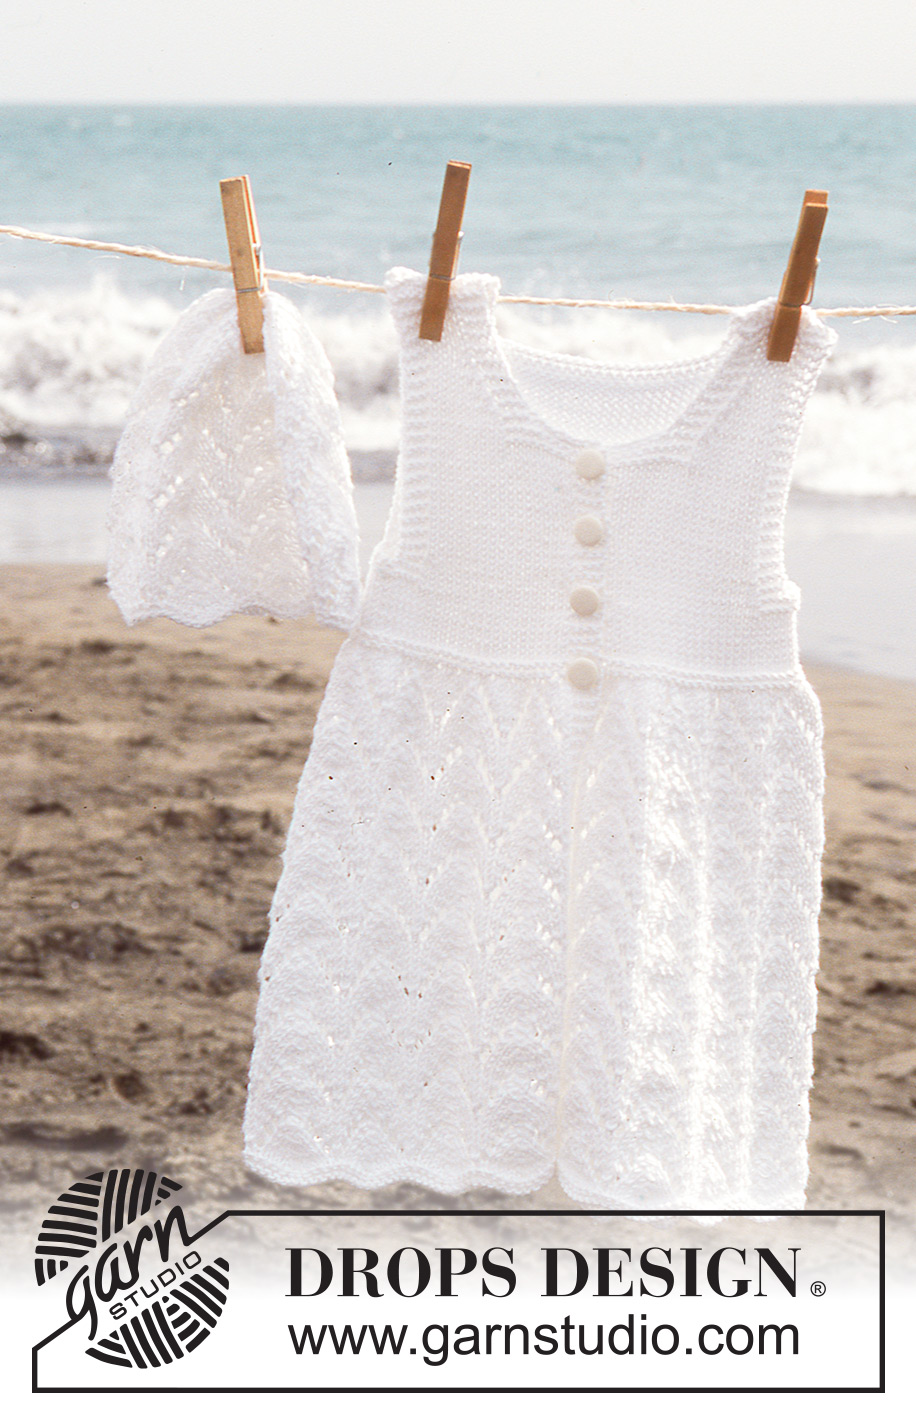
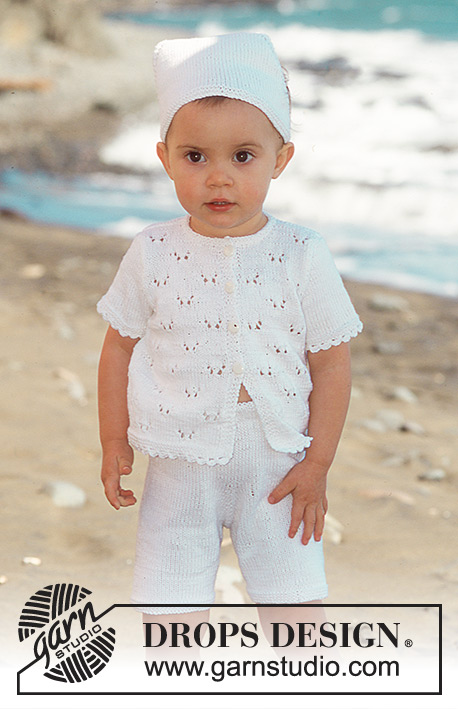
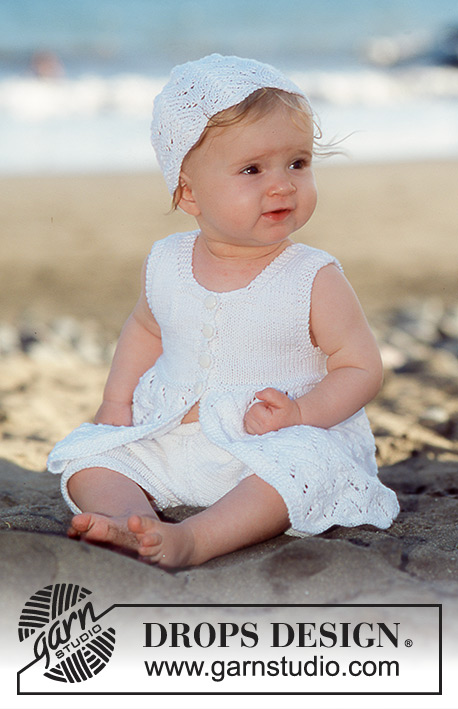
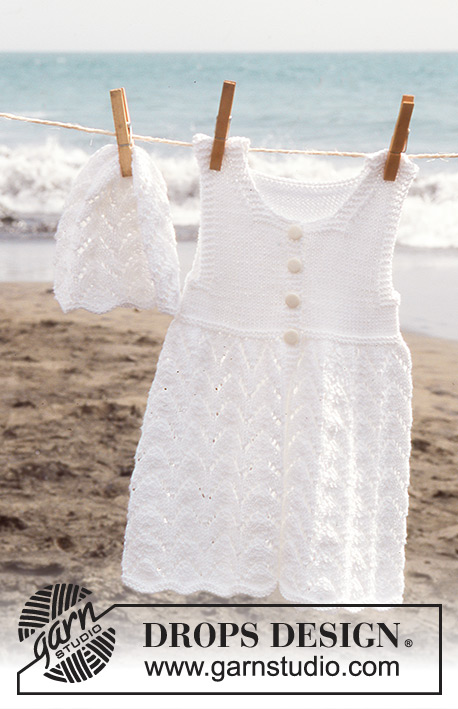
Beach Baby#beachbabydress |
||||||||||||||||
 |
 |
|||||||||||||||
Vestido DROPS sin mangas y gorro en “Safran”
DROPS Baby 10-7 |
||||||||||||||||
|
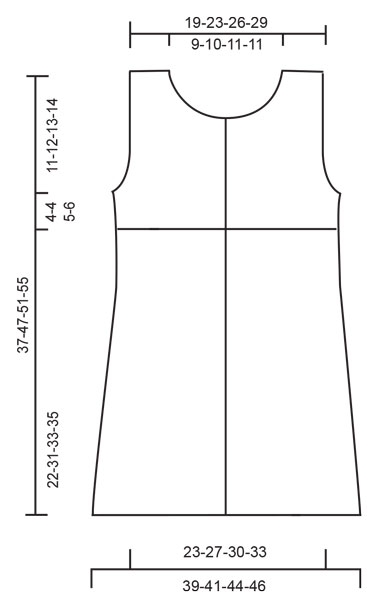
Muestra: 24 pts x 32 hileras con ag tamaño 3 mm en pt jersey = 10 x 10 cm. Pt musgo (de ida y vuelta): Tejer todas las hileras de derecho. Patrón: Ver diagramas M.1-M.3. Los diagramas muestran el patrón por el lado derecho. Ojales: Hacer los ojales en el borde delantero derecho, en la pechera, por el LD, de la manera siguiente: rematar el 3er pt a partir de la orilla y, en la hilera siguiente, hacer 1 HEB (lazada) sobre el pt rematado. Hacer los ojales cuando la pieza mida: Talla 6/9 meses: 22, 25, 28 y 31 cm Talla 12/18 meses: 31, 34.5, 38 y 41 cm Talla 2 años: 33, 37, 40.5 y 44 cm Talla 3/4 años: 36, 39.5, 44 y 48 cm Tips para disminuir (aplica a las sisas y al escote): Todas las disminuciones son hechas por el LD. Disminuir de la manera siguiente antes de los 4 pts en pt musgo: tejer 2 pjd. Disminuir de la manera siguiente después de los 4 pts en pt musgo: deslizar 1 pt como de derecho, 1 d, pasar el pt desl por encima VESTIDO: El vestido es tejido de ida y vuelta en ag circular a partir del centro del frente. Montar 189-199-209-219 pts (incl. 4 pts de orillo de cada lado = centro del frente, tejidos en pt musgo hasta el fin) en ag tamaño 3 mm. Tejer M.1 y continuar en M.2. Cuando la pieza mida 22-31-33-35 cm, tejer M.3, al mismo tiempo disminuir 79-69-65-61 pts distribuidos equitativamente en la primera hilera (no disminuir sobre los pts de orillo de cada lado) = 110-130-144-158 pts. Después de M.3, terminar la pieza en pt jersey – con los pts de orillo en pt musgo y recordarse de los ojales en el borde delantero derecho, ver arriba. Cuando la pieza mida 25-34-37-40 cm, insertar 2 hilos marcadores, a 28-33-37-40 pts a partir de cada lado = 54-64-70-78 pts entre los hilos marcadores = pieza de la espalda. Continuar con 4 hileras en pt musgo sobre 6 pts de cada lado de ambos hilos marcadores (los pts restantes en pt jersey) = 12 pts en pt musgo de cada lado. En la hilera siguiente, rematar los 4 pts centrales de estos 12 pts para la sisa y terminar cada parte separadamente. Frente izquierdo: = 26-31-35-38 pts. Continuar en pt jersey con 4 pts en pt musgo del lado del centro del frente y en el lado de la sisa. Rematar para la sisa en el lado a cada 2 hileras: 1 pt 2-2-2-2 veces = 24-29-33-36 pts (continuar con 4 pts en pt musgo del lado de la sisa). Cuando la pieza mida 31-41-44-48 cm, tejer 4 hileras en pt musgo sobre 12-13-14-15 pts al centro del frente (los pts restantes en pt jersey). En la hilera siguiente, rematar 8-9-10-11 pts al centro del frente para el escote, continuar con 4 pts en pt musgo del lado del centro del frente y disminuir para formar la línea del escote a cada 2 hileras: 1 pt 4 veces = 12-16-19-21 pts restantes en el hombro. Rematar cuando la pieza mida 37-47-51-55 cm. Frente derecho: Como la pieza del frente izquierdo, pero en sentido inverso. Recordarse de los ojales en el borde delantero. Espalda: = 50-60-66-74 pts. Rematar para la sisa de cada lado como está descrito para la pieza del frente = 46-56-62-70 pts. Cuando la pieza mida 35-45-49-53 cm, tejer 4 hileras en pt musgo sobre los 30-32-32-36 pts centrales (los pts restantes en pt jersey). En la hilera siguiente, rematar los 22-24-24-28 pts centrales para el escote = 12-16-19-21 pts restantes en cada hombro. Continuar con 4 pts en pt musgo de cada lado hasta que la pieza mida 37-47-51-55 cm y rematar. Ensamblaje: Hacer la costura de los hombros y coser los botones. GORRO: Talla: 6/12 meses – 2/4 años Circunferencia de la cabeza: 42-46 cm Montar 90-100 pts en una ag circular corta tamaño 3 mm. Tejer 4 hileras en pt musgo y continuar en M.2. Tejer 5-6 repeticiones verticales de M.2 y ahora insertar un hilo marcador en el primer pt de cada repetición horizontal = 9-10 hilos marcadores. Tejer 1 repetición vertical más de M.2 y disminuir en las hileras marcadas con una flecha en el diagrama. Disminuir de la manera siguiente: deslizar el pt antes del pt con hilo marcador como si se fuese a tejer de derecho, tejer juntos de derecho el pt con el hilo marcador y el pt siguiente, pasar el pt desl por encima. Repetir estas disminuciones en todas las repeticiones horizontales con las 3 flechas en el diagrama, es decir, 54-60 pts disminuidos en total = 36-40 pts restantes en la ag. Después de la última vta de M.2, tejer 1 vta en pt jersey y, al mismo tiempo, tejer todos los pts juntos, de 2 en 2 = 18-20 pts restantes. Cortar el hilo y pasarlo a través de los pts restantes, fruncir y rematar bien. |
||||||||||||||||
Explicaciones del diagrama |
||||||||||||||||
|
||||||||||||||||
 |
||||||||||||||||
 |
||||||||||||||||
¿Terminaste este patrón?Entonces, etiqueta tus fotos con #dropspattern #beachbabydress o envíalas a la galería #dropsfan. ¿Necesitas ayuda con este patrón?Encontrarás 22 videos tutoriales, un espacio para comentarios/preguntas y más visitando la página del patrón en garnstudio.com © 1982-2026 DROPS Design A/S. Todos los derechos reservados. Este documento, incluyendo todas sus sub-secciones, está protegido por los derechos de autor (copyright). Lee más acerca de lo que puedes hacer con nuestros patrones en la parte de abajo de cada patrón de nuestro sitio. |
||||||||||||||||


Con más de 40 años en el diseño de modelos de punto y de ganchillo, DROPS Design ofrece una de las más vastas colecciones de patrones gratuitos en el internet - traducidos en 17 idiomas. Al día de hoy, contamos con 324 catálogos y 12290 patrones - de los cuales 11675 están traducidos en español.
Nosotros trabajamos con mucho esmero para brindarte lo mejor que las labores de punto y ganchillo tienen para ofrecer,inspiración y consejos, así como hilos de magnífica calidad a precios increíbles! Te gustaría usar nuestros patrones para otro fin además del uso personal? Puedes leer acerca de lo que estás permitida a hacer en el texto de Copyright en la parte de abajo de todos nuestros patrones. Felices labores!
Escribe un comentario sobre DROPS Baby 10-7
¡Nos encantaría saber qué piensas acerca de este patrón!
Si quieres escribir una pregunta referente al patrón, por favor asegúrate de elegir la categoría correcta en el formulario debajo, para acelerar el proceso de respuesta. Los campos obligatorios están marcados con un *.