
Categorías populares
¿Buscas un hilo?


Comentarios / Preguntas (88)
![]() Camilla escribió:
Camilla escribió:
Hejsan Jag har problem med minskningen på mössan! Vilka maskor ska stickas tillsammans? Slutar jag med mönstret vid 11 cm och bara stickar aviga? Kanske lite förvirrad fråga :) Hälsningar Camilla
13.12.2015 - 09:02DROPS Design respondió:
Hej Camilla, Ja när arb mäter ca 11-12-13 (14-15) cm stickas avigt över alla m. Lycka till!
17.12.2015 - 09:43
![]() Betti Naumann escribió:
Betti Naumann escribió:
Hallo, diese Babydecke ist wunderschön, kann ich sie nicht auch am Stück stricken, wenn ich die Zu- und Abnahmen bedenke? Freue mich schon riesig sie zu stricken,möchte ungern nähen. Vielen Dank im Voraus für eine Antwort. Liebe Grüße Betti
22.10.2015 - 19:25DROPS Design respondió:
Ja, es ist möglich, sie am Stück zu stricken, an Ihrer Stelle würde ich mir dazu aber die Anleitung neu notieren, damit Sie nichts übersehen oder vergessen.
30.10.2015 - 10:24
![]() Betti Naumann escribió:
Betti Naumann escribió:
Hallo, ich möchte gerne diese Babydecke st
22.10.2015 - 19:22
![]() Edith escribió:
Edith escribió:
Ich habe diese Baby-decke für meine Enkel gestrickt. Einfach super und sehr kuschlig.
07.03.2015 - 09:48Gulnaz escribió:
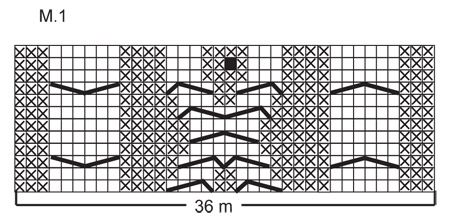
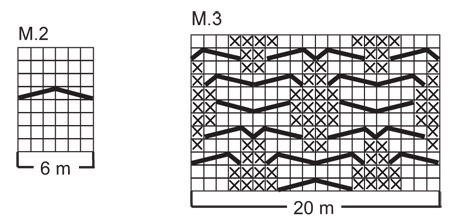
I can't read graphs well, trying to decipher and confused y M2 has only 8 rows while M3 has 12? also when m2 or m3 is repeated in each row, is it the same row that needs to be repeated and or, say, repeat m2 is meant to be line 2 of the graph and thereon?
12.12.2014 - 16:53DROPS Design respondió:
Dear Mrs Gulnaz, when working M2 and M3 on a same row, work first 1st row in each diagram, then 2nd and so on, and when you have worked the 8th row in M2, start again M2 from row 1, and same for M3: work until row 12 then start again from row 1. click here to read more about diagrams. Happy knitting!
13.12.2014 - 17:53Victoria Hardman escribió:
Can anyone please explain on what stitches I am supposed to knit the increased stitches for the blanket. The instructions are very vague on this and as I am a beginner I don't want to guess and make a mess of it. The specific section of the pattern I am querying is "K 1 row from RS, AT THE SAME TIME inc 10 sts evenly on the middle 26 sts = 46 sts." Thanks
10.11.2014 - 16:06DROPS Design respondió:
Dear Mrs Hardman, after the 8 rows worked in garter st, work next row as follows: 5 sts in garter st, knit the next 26 sts while inc 10 sts evenly (= you will then get 36 sts), and finish with 5 sts in garter st = you have now a total of 46 sts. The first and last 5 sts are edge sts, there shouldn't be any inc over these sts. Happy knitting!
10.11.2014 - 16:10Petra escribió:
Die Verbrauchsangabe ist sehr knapp bemessen. Bei einer Mützengröße für ein 6 Monate altes Kind, reicht mein Knäuel leider nicht. Muss nun nachkaufen. Habe sowohl die Wolle als auch die Stricknadeln wie angegeben genommen.
04.12.2013 - 10:21
![]() DROPS Design NL escribió:
DROPS Design NL escribió:
Hoi Lotte. We hebben het patroon bekeken en het is correct. Helaas toont de foto hier niet het mutsje helemaal, maar het is hetzelfde mutsje als op 17-5. Hier zie je ook een stukje M.3.
09.07.2013 - 17:52
![]() Lotte escribió:
Lotte escribió:
Superschattig mutsje, maar het patroon klopt niet. Je hebt alleen teltekening M2 nodig. De muts die in het patroon staat, ziet er anders uit en staat ook op de website.
30.06.2013 - 11:17DROPS Design respondió:
Hoi Lotte. Volgens mij heb je inderdaad gelijk. Ik zal het doorgeven aan ons Design Team en we maken zo snel mogelijk een aanpassing.
02.07.2013 - 12:45
![]() Silke escribió:
Silke escribió:
Das Diagramm Nr.2 zeigt nur 8 Reihen an, das Diagramm 3 allerdings 12 Reihen. Muss ich bei Nr 2 einfach noch 4 Reihen rechte Maschen weiter hoch stricken?, oder wie funktioniert es?
02.06.2013 - 23:24DROPS Design respondió:
Liebe Silke, die Diagramme müssen nicht gleich hoch sein. Sie stricken jedes Diagramm fortlaufend, beginnen also wieder bei der 1. R, sobald Sie oben angelangt sind.
03.06.2013 - 10:08
|
||||||||||||||||||||||
Cables and Cuddles#cablesandcuddlesblanket |
||||||||||||||||||||||
 |
 |
|||||||||||||||||||||
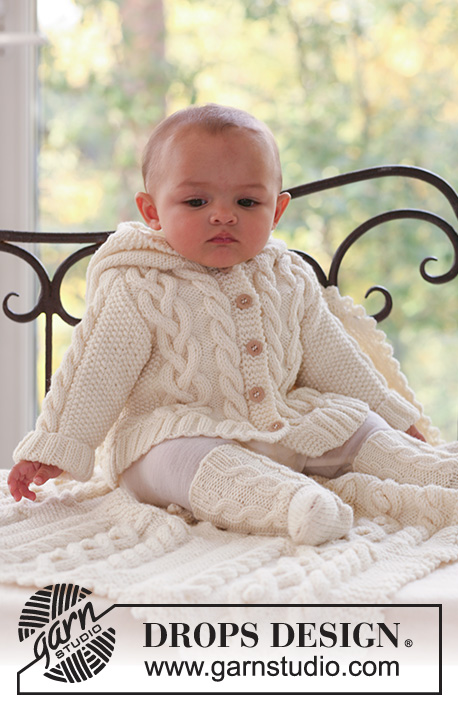
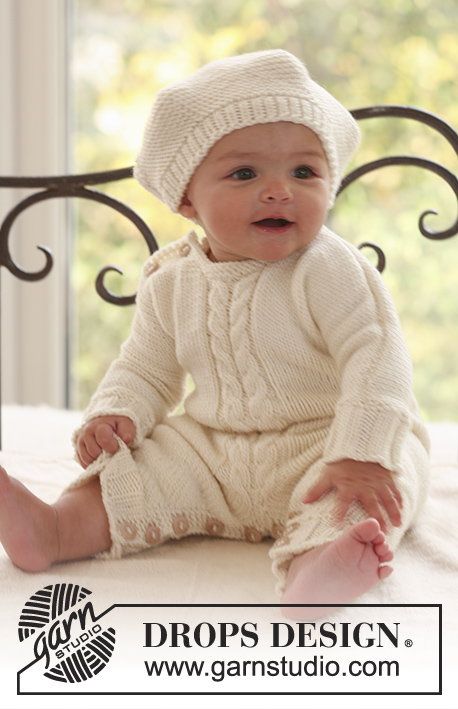
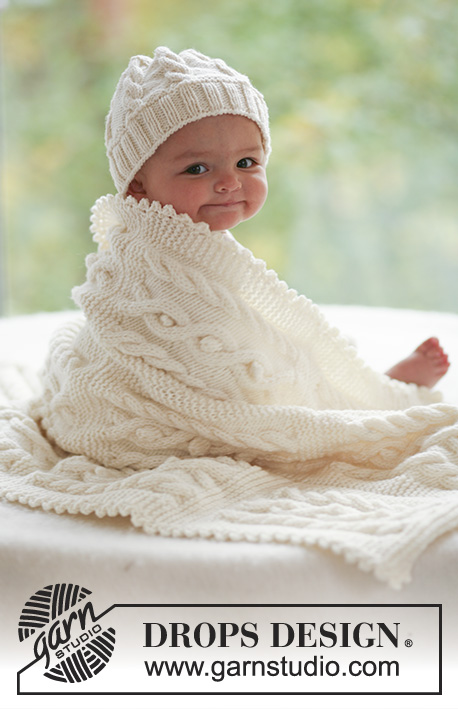
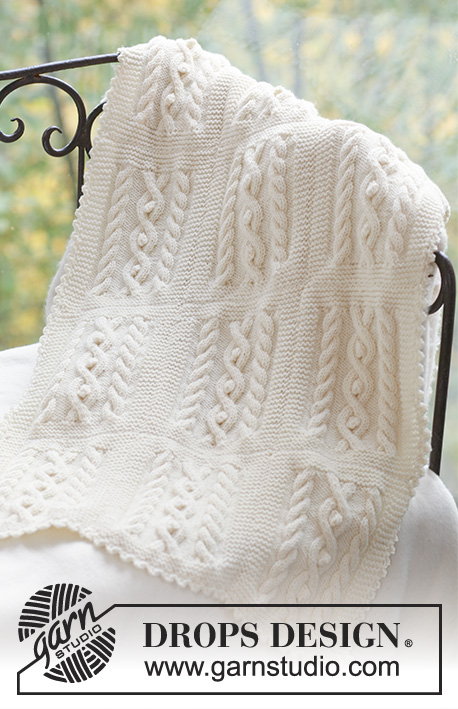
Conjunto de gorro de punto y manta con torsadas para bebé y niños en DROPS Merino Extra Fine. Tema: Manta para bebé
DROPS Baby 17-28 |
||||||||||||||||||||||
|
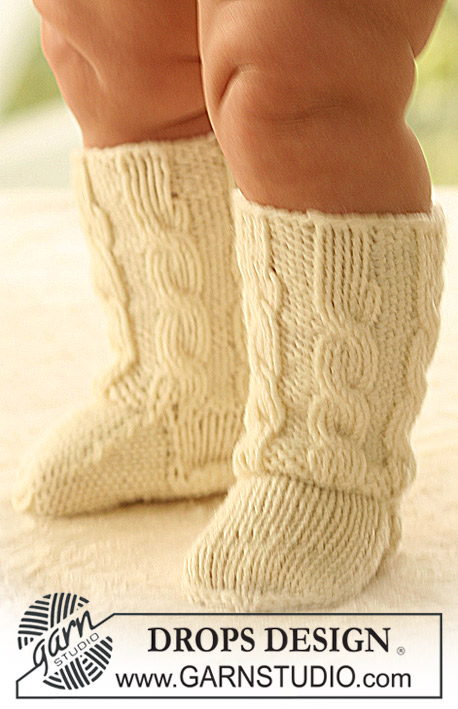
GORRO: PATRÓN: Ver diagramas M.2 y M.3. Los diagramas muestran el patrón del lado derecho ---------------------------------------------------------- GORRO: Trabajar en redondo en ag circular. Mont 96-100-100 (104-112) pts en ag circular tamaño 3.5 mm con Merino Extra Fine. 1 vta del derecho y continuar en pt elástico 2d./2r.. Cuando el elástico mida 4-4-5 (5-5) cm cambiar a ag circular tamaño 4 mm, trabajar 1 vuelta del derecho, 1 vta del revés y después 1 vta del derecho, AL MISMO TIEMPO aum 4-4-8 (8-8) pts repartidos = 100-104-108 (112-120) pts. Continuar como sigue: 3-3-3 (4-5) r., M.2, 6-7-8 (8-9) r., M.3, 6-7-8 (8-9) r., M.2, 6-6-6 (8-10) r., M.2, 6-7-8 (8-9) r., M.3, 6-7-8 (8-9) r., M.2, 3-3-3 (4-5) r. Cuando la labor mida aprox 11-12-13 (14-15) cm trabajar la sig vta como sigue: * 3 r., 2 pjr *, repetir de *a* hasta que queden 0-4-3 (2-0) pts, que se trabajan de revés. = 80-84-87 (90-96) pts. Continuar tejiendo todos los pts del revés, AL MISMO TIEMPO dism 17-18-19 (20-21) pts repartidos en cada 2ª vta un total de 4 vcs = 12-12-11 (10-12) pts. Cambiar a ag de doble punta cuando no se pueda trabajar con ag circular. Cortar el hilo, pasar por los pts restantes y asegurar. El gorro mide aprox 14-15-16 (17-18) cm. ---------------------------------------------------------- MANTA: PT MUSGO (ida y vta en ag): Todas las filas del derecho. TIP PARA LOS AUMENTOS: Hacer todos los aum por el LD. Aum 1 pt haciendo una HEB. En la fila de vta trabajar la HEB retorcida para evitar que se forme un agujero PATRÓN: Ver diagrama M.1. El diagrama muestra el patrón del lado derecho. ---------------------------------------------------------------------------- MANTA: La manta está compuesta por 12 cuadrados, que se cosen después 3 x 4. 1 CUADRADO: Mont 36 pts en ag tamaño 5 mm con Merino Extra Fine. Trabajar 8 filas en pt musgo - VER ARRIBA. Tejer 1 fila del derecho por el LD, AL MISMO TIEMPO aum 10 pts repartidos en los 26 pts centrales = 46 pts. Trabajar la sig fila por el LR como sigue: 5 pts en pt musgo, 3 d., 6 r., 4 d., 3 r., 4 d., 3 r., 4 d., 6 r., 3 d. y 5 pts en pt musgo. Continuar como sigue por el LD: 5 pts en pt musgo, M.1 en los sig 36 pts, 5 pts en pt musgo. Trabajar 4 repeticiones en vertical de M.1 de la misma manera, pero en la última repetición finalizar cuando queden 2 filas del diagrama. Tejer 1 fila del derecho por el LD en todos los pts, AL MISMO TIEMPO dism 10 pts en los 36 pts centrales = 36 pts. Trabajar 8 filas en pt musgo en todos los pts y rem flojo. Atención: Puedes trabajar los 4 cuadrados de la fila sin rem, es decir comenzar el nuevo cuadrado después de las últimas 8 filas en pt musgo. TERMINACIÓN: Coser los cuadrados 3 x 4. Coser en el bucle exterior del pt para evitar una costuras abultadas. REMATE A GANCHILLO: Trabajar el remate alrededor de la manta con ag de ganchillo tamaño 5 mm como sigue: 1 p.b. en el 1er pt, * 1 picot (= 3 p.de cad., 1 p.b. en el 1er p.de cad.), saltar 1 cm, 1 p.b. en el sig pt*, repetir de * a *, y finalizar la vta con 1 picot y 1 p.e. en el 1er p.b. del inicio de la vta. |
||||||||||||||||||||||
Explicaciones del diagrama |
||||||||||||||||||||||
|
||||||||||||||||||||||
 |
||||||||||||||||||||||
 |
||||||||||||||||||||||
¿Terminaste este patrón?Entonces, etiqueta tus fotos con #dropspattern #cablesandcuddlesblanket o envíalas a la galería #dropsfan. ¿Necesitas ayuda con este patrón?Encontrarás 19 videos tutoriales, un espacio para comentarios/preguntas y más visitando la página del patrón en garnstudio.com © 1982-2026 DROPS Design A/S. Todos los derechos reservados. Este documento, incluyendo todas sus sub-secciones, está protegido por los derechos de autor (copyright). Lee más acerca de lo que puedes hacer con nuestros patrones en la parte de abajo de cada patrón de nuestro sitio. |
||||||||||||||||||||||


Con más de 40 años en el diseño de modelos de punto y de ganchillo, DROPS Design ofrece una de las más vastas colecciones de patrones gratuitos en el internet - traducidos en 17 idiomas. Al día de hoy, contamos con 324 catálogos y 12290 patrones - de los cuales 11683 están traducidos en español.
Nosotros trabajamos con mucho esmero para brindarte lo mejor que las labores de punto y ganchillo tienen para ofrecer,inspiración y consejos, así como hilos de magnífica calidad a precios increíbles! Te gustaría usar nuestros patrones para otro fin además del uso personal? Puedes leer acerca de lo que estás permitida a hacer en el texto de Copyright en la parte de abajo de todos nuestros patrones. Felices labores!
Escribe un comentario sobre DROPS Baby 17-28
¡Nos encantaría saber qué piensas acerca de este patrón!
Si quieres escribir una pregunta referente al patrón, por favor asegúrate de elegir la categoría correcta en el formulario debajo, para acelerar el proceso de respuesta. Los campos obligatorios están marcados con un *.