
Popular categories
Looking for a yarn?


Comments / Questions (97)
![]() Minke wrote:
Minke wrote:
Hallo, Mein Rumpfteil zählt nach dem Zusammen der Teileins gesamt schon 296 Maschen,,obwohl die Zunahen für dem B-Ausschnitt noch nicht abgeschlossen sind. Was habe ich da falsch gemacht? Könnte es auch ein Fehler der Angabe sein?
05.01.2021 - 20:02DROPS Design answered:
Liebe Minke, könnten Sie uns bitte sagan, welche Größe Sie stricken ?
06.01.2021 - 07:24
![]() Martina wrote:
Martina wrote:
Buongiorno, nel collo a V non capisco cosa vuol dire aumentare fino a 20 volte. HO scelto la misura XL, quanto deve misurare il lavoro quando finisco gli aumenti del collo? 22 cm come c'è scritto nel disegno? Grazie
01.01.2021 - 13:53DROPS Design answered:
Buonasera Martina, deve aumentare ogni 2 e 4 ferri in modo alternato per 20 volte. Buon lavoro!
01.01.2021 - 22:06
![]() Martina wrote:
Martina wrote:
In the italian version there is an error in the istruction about COLLO a V and SCALFO in the front of the work about the increase
31.12.2020 - 00:22DROPS Design answered:
Dear Martina, thanks for the suggestion: we've updated the Italian version. Happy knitting!
31.12.2020 - 09:30
![]() Ulla Byholm wrote:
Ulla Byholm wrote:
” När arbetet mäter 5 cm, minskas det på varje sida av markören i varje sida – läs MINSKNINGSTIPS (= 4 maskor minskade). Minska så med ca 9-9-10-10-10-11 cm totalt 4 gånger = ....” Vad betyder ”minska så med 9cm ..? Ska det vara 9cm på höjden mellan varje minskning? Med vänlig hälsning, Ulla
29.12.2020 - 16:49DROPS Design answered:
Hej Ulla, ja du minskar så med 9 cm mellan varje minskning :)
14.01.2021 - 12:41
![]() Joan wrote:
Joan wrote:
When constructing the armhole ribbing. How many stitches for each size?
17.12.2020 - 03:46DROPS Design answered:
Dear Joan, this will depends on the size and the number of rows you required to get the height on the armhole - pick up stitches along the armholes as shown in this video, you should have between 88 and 132 sts - just make sure number of sts is divisible by 4. Happy knitting!
17.12.2020 - 09:03
![]() Jo wrote:
Jo wrote:
Button holes on mens clothing is on the left front, not the right as per these instructions.
14.12.2020 - 01:32
![]() Joan wrote:
Joan wrote:
When adding stitches for the armhole, left and right bands: How many stitches for each size?
13.12.2020 - 21:00DROPS Design answered:
Dear Joan, I'm sorry I'm afraid I don't understand your question, could you please tell us more?
14.12.2020 - 09:28
![]() Joan wrote:
Joan wrote:
The english translation of this pattern is very confusing. It is very difficult to follow.
12.12.2020 - 22:41
![]() Manuela wrote:
Manuela wrote:
Hola, al aumentar para el escote en V se aumenta un punto cuando quedan dos, o en cada uno de los dos últimos puntos? Y para la sisa en el tamaño S se aumenta solo del lado en que se estaba aumentando para el escote en V? Muchas gracias
01.12.2020 - 22:11DROPS Design answered:
Hola Manuela! Hola, Frente derecho: para el escote en V se aumenta un punto cuando quedan dos (hacer 1 lazada entre 2 puntos, es decir tercer y secundo punto) al final de hilera. Para la sisa en el tamaño S tienes que aumentar un punto después de 2 primeros puntos en cada hilera por el lado derecho 2 veces. Buen trabajo!
02.12.2020 - 10:30
![]() Joan wrote:
Joan wrote:
The directions are confusing and make no sense. In working v neck the number of increase doesn't equate. What is Increase on every 2nd and 4th row? No totals. Very vague and inaccurate.
26.11.2020 - 07:30DROPS Design answered:
Dear Joan, to increase alternately on every other row and every 4th row work as follows: work 1 row with increase, 1 row without increase, 1 row with increase, 3 rows without increase and repeat these 6 rows until the number of stitches for the size have been worked. Happy knitting!
26.11.2020 - 10:27
|
||||
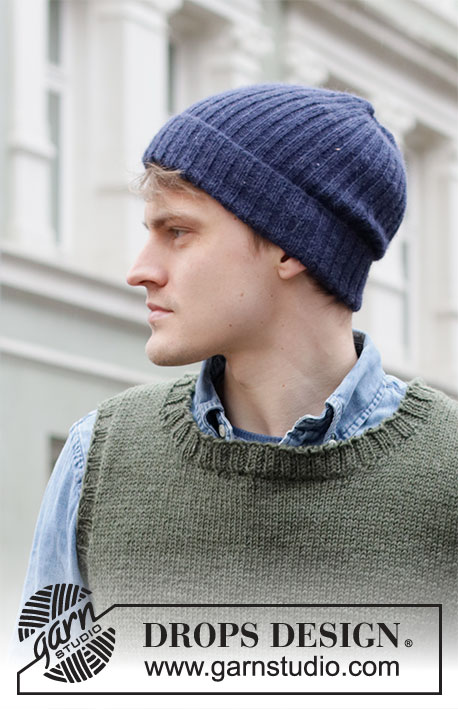
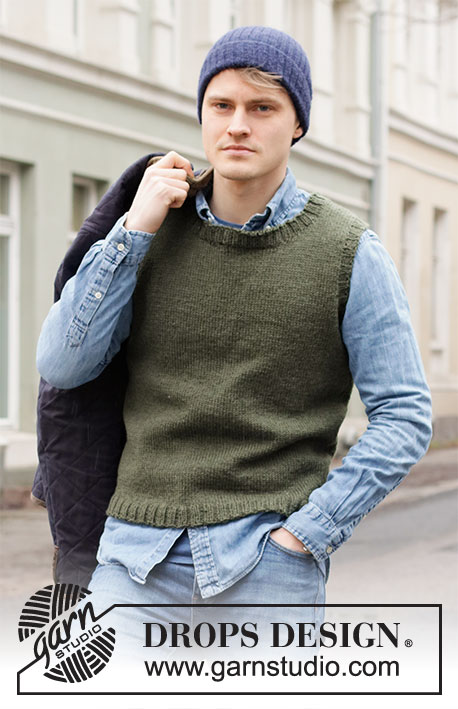
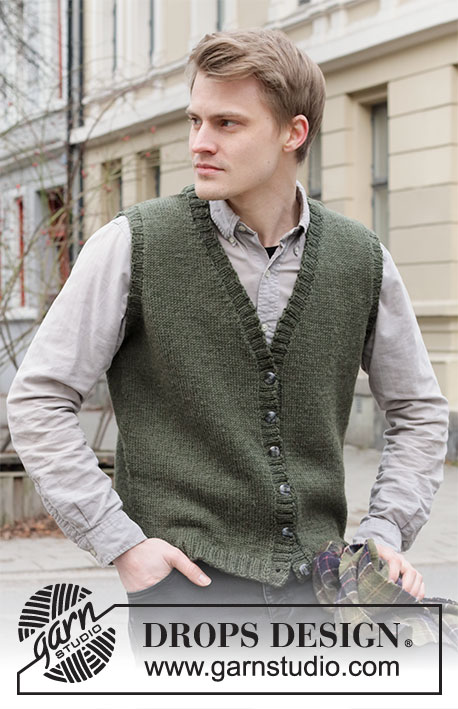
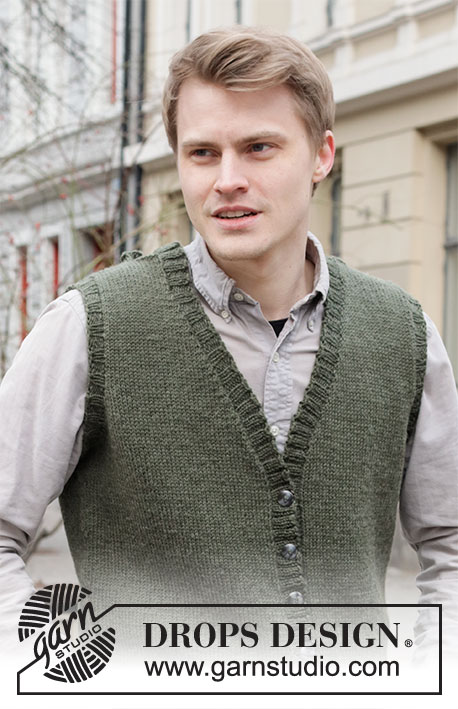
Boston Vest#bostonvest |
||||
 |
 |
|||
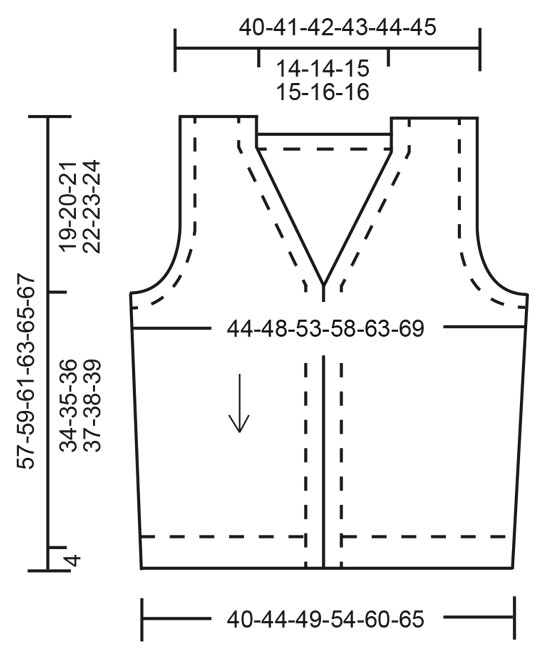
Knitted vest for men in DROPS Karisma or DROPS Soft Tweed. The piece is worked top down with V-neck and ribbed edges. Sizes S - XXXL.
DROPS 219-3 |
||||
|
------------------------------------------------------- EXPLANATIONS FOR THE PATTERN: ------------------------------------------------------- RIDGE/GARTER STITCH (worked back and forth): Knit all rows. 1 ridge in height = Knit 2 rows. INCREASE TIP (for V-neck): Make 1 yarn over between 2 stitches. On the next row, work the yarn over twisted to avoid a hole. DECREASE TIP (for sides of body): Decrease 1 stitch on each side of the stitch with the marker thread as follows: Work until there are 3 stitches left before the stitch with the marker thread, knit 2 together, knit 2, slip 1 stitch as if to knit, knit 1 and pass the slipped stitch over the knitted stitch. BUTTONHOLES: Work buttonholes from the right side and on the right band. The bottom buttonhole is worked approx. 2 cm from the bottom edge, the top buttonhole approx.1 cm from the beginning of the v-neck (approx. 32-33-34-35-36-37 cm measured from the bottom of the vest). Work a total of 6 buttonholes with approx. 6-6-6½-6½-7-7 cm between each one. Position them in the purled sections (seen from the right side). 1 buttonhole = purl 2 together, 1 yarn over. On the next row (wrong side) knit the yarn to leave a hole. CASTING-OFF TIP: To avoid the cast-off edge being tight you can cast off with a larger size needle. If the edge is still tight, make 1 yarn over after approx. each 4th stitch at the same time as casting off; the yarn overs are cast off as normal stitches. ------------------------------------------------------- START THE PIECE HERE: ------------------------------------------------------- VEST – SHORT OVERVIEW OF THE PIECE: The vest is worked top down. Each shoulder is worked separately, back and forth, and stitches are increased/cast on for the V-neck and armholes. Then all pieces are joined together and the body finished working back and forth. Stiches are picked up for the neck, sleeve edges and bands, which are worked in rib to finish. FRONT PIECES: Right front piece: Cast on 20-21-21-22-22-23 stitches (including 1 edge stitch on each side) using circular needle size 4 mm and Karisma or Soft Tweed. Work 1 edge stitch in GARTER STITCH – read description above, work stocking stitch until there is 1 stitch left on the row and then 1 edge stitch in garter stitch. Continue like this back and forth. When the piece measures 4-5-5-6-6-7 cm, start to increase for the V-neck and when the piece measures 18-18-18-17-17-16 cm, increase for the armholes, read description below: V-neck: Increase 1 stitch inside the last 2 stitches on the next row from the right side – read INCREASE TIP. Increase like this alternately every 2nd and 4th row a total of 19-19-20-20-21-21 times (increases for the V-neck are not finished when the armhole is finished, but are continued on the body). REMEMBER THE KNITTING TENSION! Armhole: Increase 1 stitch inside the first 2 stitches on every row from the right side 2-1-1-3-4-4 times, then cast on new stitches at the end of every row from the wrong side as follows: Cast on 2 stitches 0-2-2-3-3-4 times and 3 stitches 0-0-1-1-2-3 times (= a total of 2-5-8-12-16-21 stitches increased). Lay the piece to one side and work the left front piece. Left front piece: Cast on 20-21-21-22-22-23 stitches (including 1 edge stitch on each side) using circular needle size 4 mm and Karisma or Soft Tweed. Work 1 edge stitch in garter stitch, stocking stitch until there is 1 stitch left on the row and then 1 edge stitch in garter stitch. Continue like this back and forth. When the piece measures 4-5-5-6-6-7 cm, start to increase for the V-neck and when the piece measures 18-18-18-17-17-16 cm, increase for the armholes, read description below: V-neck: Increase 1 stitch inside the first 2 stitches on the next row from the right side – remember INCREASE TIP. Increase like this alternately every 2nd and 4th row a total of 19-19-20-20-21-21 times. Armhole: Increase 1 stitch inside the last 2 stitches on each row from the right side 2-1-1-3-4-4 times, then cast on new stitches at the end of every row from the right side as follows: Cast on 2 stitches 0-2-2-3-3-4 times and 3 stitches 0-0-1-1-2-3 times (= a total of 2-5-8-12-16-21 stitches increased). Lay the piece to one side and work the back piece. BACK PIECE: Each shoulder is worked separately before being joined together. Right shoulder: Cast on 20-21-21-22-22-23 stitches (including 1 edge stitch on each side) using circular needle size 4 mm and Karisma or Soft Tweed. Work 1 edge stitch in garter stitch, stocking stitch until there is 1 stitch left on the row and then 1 edge stitch in garter stitch. Continue like this back and forth. When the piece measures 4 cm increase 1 stitch inside the first 2 stitches on the next row from the right side = 21-22-22-23-23-24 stitches. Work 1 row back from the wrong side. Lay the piece to one side and work the left shoulder. Left shoulder: Cast on 20-21-21-22-22-23 stitches (including 1 edge stitch on each side) using circular needle size 4 mm and Karisma or Soft Tweed. Work 1 edge stitch in garter stitch, stocking stitch until there is 1 stitch left on the row and then 1 edge stitch in garter stitch. Continue like this back and forth. When the piece measures 4 cm increase 1 stitch inside the last 2 stitches on the next row from the right side = 21-22-22-23-23-24 stitches. Work 1 row back from the wrong side. Now work the 2 shoulders together as follows: Work the 21-22-22-23-23-24 stitches from the left shoulder as before, cast on 36-36-38-38-40-40 stitches (= neck) work the 21-22-22-23-23-24 stitches from the right shoulder as before = 78-80-82-84-86-88 stitches. Work stocking stitch back and forth with 1 stitch in garter stitch on each side. When the piece measures 18-18-18-17-17-16 cm, increase/cast on stitches on each side of the piece for the armholes, in the same way as on the front pieces (= a total of 2-5-8-12-16-21 stitches increased for each armhole) = 82-90-98-108-118-130 stitches. When all the increases are finished, work the body. THE PIECE IS NOW MEASURED FROM HERE! BODY: Now join all the pieces together from the right side as follows: Starting with the left front piece, work 1 edge stitch in garter stitch and stocking stitch as before, then cast on 11-11-13-13-15-15 new stitches (= in side under sleeve), stocking stitch over the 82-90-98-108-118-130 stitches on the back piece, cast on 11-11-13-13-15-15 new stitches (= in side under sleeve), stocking stitch over the right front piece until there is 1 stitch left and finish with 1 edge stitch in garter stitch. The number of stitches on the needle is dependent on how many increases still remain for the V-neck. Insert 1 marker in the middle stitch of the 11-11-13-13-15-15 new stitches in each side. Allow the markers to follow your work onwards; stitches will later be decreased on each side of both markers. When all the increases for the V-neck are finished there are = 186-202-222-242-266-290 stitches on the needle. When the piece measures 5 cm, decrease on both sides of each marker – read DECREASE TIP (= 4 stitches decreased). Decrease like this every 9-9-10-10-10-11 cm a total of 4 times = 170-186-206-226-250-274 stitches. When the piece measures 34-35-36-37-38-39 cm increase 26-26-30-34-38-42 stitches evenly spaced = 196-212-236-260-288-316 stitches. Change to circular needle size 3 mm and work rib, starting from the right side (= knit 2 / purl 2) with 1 edge stitch in garter stitch on each side until the rib measures 4 cm. Cast off with knit over knit and purl over purl – read CASTING-OFF TIP. The vest measures approx.57-59-61-63-65-67 cm from the shoulder down. ASSEMBLY: Sew the shoulder seams with grafting stitches. ARMHOLE EDGE: Knit up 88-132 stitches inside the 1 edge stitch around the armhole with short circular needle size 3 mm and Karisma or Soft Tweed; adjust so the number of stitches is divisible by 4. Work rib in the round (= knit 2 / purl 2) for 2 cm. Cast off with knit over knit and purl over purl – remember CASTING-OFF TIP! Work the other sleeve edge in the same way. RIGHT BAND AND NECK: Starting from the right side at the bottom of the right front piece, knit up 144-172 stitches with short circular needle size 3 mm and Karisma or Soft Tweed, inside the 1 edge stitch, and as far as mid-back of the neck. Adjust so the number of stitches is divisible by 4. Purl 1 row from the wrong side and increase using yarn overs just where the V-neck finishes (i.e. the point, approx. 33-34-35-36-37-38 cm from the cast-off edge upwards), * purl 1, 1 yarn over *, work from *-* a total of 4 times (= 4 stitches increased). On the next row from the right side work as follows: 2 edge stitches in garter stitch, then rib (= knit 2 / purl 2) to end of row (yarn overs worked twisted to avoid holes). Make sure the band is neither too tight nor too loose for the length of the front piece; knit up more/less stitches if necessary. When the band measures 1 cm work the BUTTONHOLES – read description above. When the band/neck measures 2½ cm, Cast off with knit over knit and purl over purl – remember CASTING-OFF TIP. LEFT BAND AND NECK: Starting mid-back of neck with circular needle size 3 mm and Karisma or Soft Tweed and working from the right side, knit up the same number of stitches as on the right band and neck inside the 1 edge stitch down the left front piece. Purl 1 row from the wrong side and increase with yarn overs just where the V-neck finishes (i.e. the point, approx. 33-34-35-36-37-38 cm from the cast-off edge upwards), * purl 1, 1 yarn over *, work from *-* a total of 4 times (= 4 stitches increased). On the next row from the right side work as follows: Work rib (= knit 2 / purl 2) until there are 2 stitches left and finish with 2 stitches in garter stitch (yarn overs worked twisted to avoid holes). When the band/neck measures 2½ cm, Cast off with knit over knit and purl over purl – remember CASTING-OFF TIP. ASSEMBLY: Sew buttons onto the left band. |
||||
Diagram explanations |
||||
|
||||
 |
||||
Have you finished this pattern?Tag your pictures with #dropspattern #bostonvest or submit them to the #dropsfan gallery. Do you need help with this pattern?You'll find 26 tutorial videos, a Comments/Questions area and more by visiting the pattern on garnstudio.com. © 1982-2026 DROPS Design A/S. We reserve all rights. This document, including all its sub-sections, has copyrights. Read more about what you can do with our patterns at the bottom of each pattern on our site. |
||||


With over 40 years in knitting and crochet design, DROPS Design offers one of the most extensive collections of free patterns on the internet - translated to 17 languages. As of today we count 324 catalogues and 12290 patterns translated into English (UK/cm).
We work hard to bring you the best knitting and crochet have to offer, inspiration and advice as well as great quality yarns at incredible prices! Would you like to use our patterns for other than personal use? You can read what you are allowed to do in the Copyright text at the bottom of all our patterns. Happy crafting!
Post a comment to pattern DROPS 219-3
We would love to hear what you have to say about this pattern!
If you want to leave a question, please make sure you select the correct category in the form below, to speed up the answering process. Required fields are marked *.