
Popular categories
Looking for a yarn?


Comments / Questions (13)
![]() Bev wrote:
Bev wrote:
Is the wool that is shown for this sweater available. What would the cost be for a medium size sweater in Canadian dollars? Thank you.
20.10.2024 - 05:09DROPS Design answered:
Dear Bev, please see the yarns just below the pictures, and click on the "Canada" tab, where you can see the prices for the yarns used in the pattern and by clicking the "order now" button, also can find supplyers that ship to Canadian addresses. Happy Knitting!
20.10.2024 - 10:34
![]() Ángeles Pascual wrote:
Ángeles Pascual wrote:
Quiero hacer este jersey sin utilizar DROPS KID-SILK, es decir, utilizando solamente la lana DROPS ALPACA. ¿Tengo que comprar más cantidad de ovillos DROPS ALPACA para sustituir los no usados DROPS KID-SILK? Muchas gracias por la ayuda.
11.10.2024 - 16:51DROPS Design answered:
Hola Ángeles, este patrón requiere 2 hilos del grosor del grupo de lanas A o 1 hilo de una calidad del grupo de lanas C. Como Alpaca es 1 hilo del grupo de lanas A, necesitarías trabajar con 2 hilos de Alpaca para obtener el grosor adecuado y la tensión adecuada para usar este patrón. Por lo tanto, necesitarías el doble de hilo de DROPS Alpaca que lo que se indica en el patrón.
13.10.2024 - 20:36
![]() Iza wrote:
Iza wrote:
Dzień dobry, chciałabym wykonać ten sweter, ale w jednym kolorze (fason jest rewelacyjny). Ile włóczki Alpaca i Kid-Silk powinnam kupić? Zdaję sobie sprawę, że kolorowe paski wymagają osobnych motków, ale w przypadku jednego odcienia ilość motków może być inna. Serdecznie pozdrawiam!
27.04.2024 - 14:49DROPS Design answered:
Witaj Izo, będziesz potrzebować 350-450 g Alpaki DROPS i 127-175 g Kid-Silka > dokładna ilość włóczki zależy od wykonywanego rozmiaru. W naszej wyszukiwarce na głównej stronie poszukaj jednokolorowych swetrów z Alpaki, wiele z nich jest z Kid-Silkiem (2 nitki), porównaj ich wymiary do wybranego swetra i na tej podstawie lepiej dopasujesz ilość potrzebnej włóczki do swojego projektu. Pozdrawiamy!
29.04.2024 - 08:38
![]() Kirsten Marie Sørensen wrote:
Kirsten Marie Sørensen wrote:
Jeg bruger Anna & Claras TWEED YARN fasthed 17 m x som i opskriften . Mit brystmål er 126 cm . Så jeg er meget i tvivl om størrelsen ? Jeg kan godt lide en oversize , men bliver den største str. ikke for stor til det ?
22.10.2023 - 18:34
![]() Ewa wrote:
Ewa wrote:
Nie zgadza mi się liczba oczek w reglanie. Rozmiar L: na początek nabieram 84 oczka, później po ukończeniu ściągacza dodaję 8 oczek. I mam na drutach 92 oczka. Przy rozdzielaniu markerów w przepisie mam : 10 oczek na rękaw, 36 na przód, 10 na rękaw i 32 na tył. Co w sumie daje 88 oczek. 92-88=4. Co mam zrobić z tymi 4 oczkami?
23.02.2023 - 22:52DROPS Design answered:
Witaj Ewo, zapomniałaś o 4 oczkach na początku, i już wszystko się zgadza :) Pozdrawiamy!
24.02.2023 - 09:01
![]() Lesley Childs wrote:
Lesley Childs wrote:
Sunsets Glow Jumper by DROPS Design I live in Melbourne, Australia. Please inform me if the yarn is available here, or if it must be purchased online Many Thanks Lesley Childs
26.06.2022 - 03:44DROPS Design answered:
Dear Lesley, we don't have any physical stores in Australia. You can find here the DROPS stores that ship to Australia: https://www.garnstudio.com/findastore.php?id=19&w=1&cid=19. Happy knitting!
26.06.2022 - 13:37
![]() Bianca wrote:
Bianca wrote:
Hallo, ich würde den Pulli gerne in den Farben stricken, wie sie oben abgegeben sind. Allerdings kann ich die Farbe Lavendel Mix (8120)nicht auf den Farbtafeln finden. Welche Alternativen kann ich farblich nehmen? Das Ganze ist am Bildschirm immer etwas schwierig.
30.05.2022 - 19:55DROPS Design answered:
Liebe Bianca, am besten wenden Sie sich an Ihrem DROPS Laden, dort wird man Ihnen gerne damit auch telefonisch oder per E-Mail helfen, die beste passende Farbe zu wählen. Viel Spaß beim stricken!
31.05.2022 - 08:34
![]() Bea wrote:
Bea wrote:
Ich mag die Farbwechsel bei diesem Pulli sehr, trage aber grundsätzlich nur Blau, Beige und Braumtöne. Leider reicht mein Gefühl für Farben nicht, um mir einen passende Kombination selbst zusammenzustellen. Haben Sie Vorschläge für andere Farb-Varianten?
06.03.2022 - 08:10DROPS Design answered:
Liebe Bea, wenden Sie sich bitte direkt an Ihrem DROPS Laden, dort wird man Ihnen am besten mit den Farben weiterhelfen - auch telefonisch oder per E-Mail. Viel Spaß beim stricken!
07.03.2022 - 08:50
![]() Bernie Courtney wrote:
Bernie Courtney wrote:
I\'m sorry, the bulk of my question got lost along the way. I was asking whether there is a mistake at the end of the yoke in the length from neck marker to the finish of the increases. My tension is correct and I have checked many times my increase rows (xl size) and it is a lot longer than the length stated in the pattern. Thank you
23.07.2021 - 19:40DROPS Design answered:
Dear Mrs Bernie, if your tension is correct, the yoke should measure 25 cm after all increase for yoke are done: 15 times on every 2nd row (= 30 rows) + 12 times on every 4th row (= 12 x 4 rows - 3 rows after last decrease = 45 rows) = 75 rows with 33 rows garter stitch = 10 cm piece should measure ca 23 cm from marker on mid front. Hope this will help. Happy knitting!
26.07.2021 - 08:18
![]() Bernie Courtney wrote:
Bernie Courtney wrote:
Rest of the pattern. What is correct?
23.07.2021 - 14:02DROPS Design answered:
Dear Mrs Courtney, I'm sorry, I'm not sure to understand your question, can you please give us more details?Thank you!
23.07.2021 - 16:00
|
||||||||||
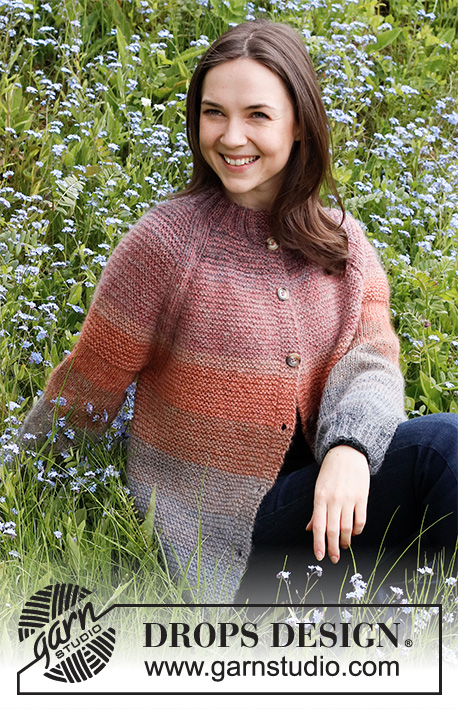
Sunsets Glow Jumper#sunsetsglowjumper |
||||||||||
 |
 |
|||||||||
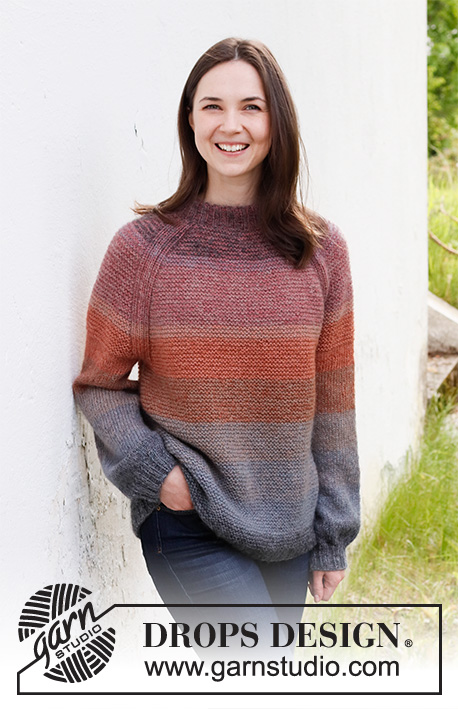
Knitted jumper in DROPS Alpaca and DROPS Kid-Silk. The piece is worked top down with folded neck edge, raglan, garter stitch and stripes. Sizes S - XXXL.
DROPS 217-26 |
||||||||||
|
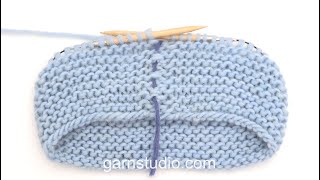
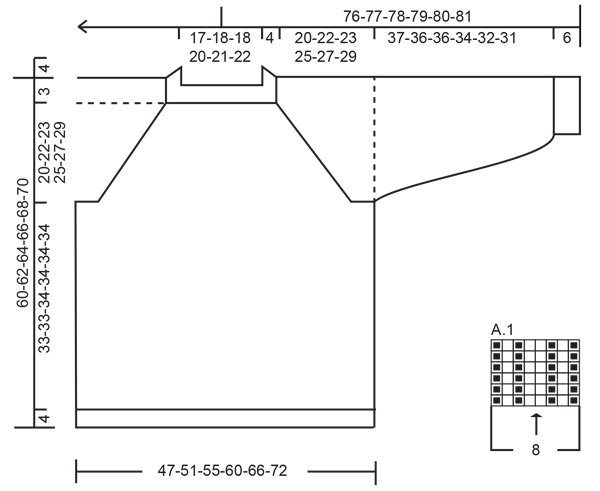
------------------------------------------------------- EXPLANATIONS FOR THE PIECE: ------------------------------------------------------- INCREASE TIP (evenly spaced): To work out how to increase evenly, count the total number of stitches on the needle (e.g. 76 stitches) and divide by the number of increases to be made (e.g. 8) = 9.5. In this example, increase by making 1 yarn over after alternately each 9th and 10th stitch. On the next round work the yarn overs twisted to avoid holes. KNITTING TIP: In this pattern garter stitch is worked in the round on the yoke and body as described in the text. If you would like to work garter stitch back and forth on the yoke (after the neck) and body (as far as the rib at the bottom) you can knit each row, but then you need to add an edge stitch on each side for the seam. Make sure you always increase for raglan from the right side. RIDGE/GARTER STITCH (worked in the round): 1 ridge in height = 2 rounds; Knit 1 round and purl 1 round. STRIPES ON YOKE AND BODY (worked in garter stitch): 6-6-7-7-7-8 cm with 1 strand ash grey Kid-Silk and 1 strand old pink Alpaca. 2-2-2-2-2-2 cm with 1 strand grey Kid-Silk and 1 strand old pink Alpaca. 9-9-10-10-10-11 cm with 1 strand beige Kid-Silk and 1 strand old pink Alpaca. 2-2-2-2-2-2 cm with 1 strand beige Kid-Silk and 1 strand blush Alpaca. 6-6-6-7-7-7 cm with 1 strand rust Kid-Silk and 1 strand blush Alpaca. 6-6-6-7-7-7 cm with 1 strand rust Kid-Silk and 1 strand nougat Alpaca. 6-6-6-7-7-7 cm with 1 strand grey Kid-Silk and 1 strand nougat Alpaca. 6-6-6-7-7-7 cm with 1 strand beige Kid-Silk and 1 strand lavender mix Alpaca. 6-6-6-7-7-7 cm with 1 strand grey Kid-Silk and 1 strand lavender mix Alpaca. Then work with 1 strand ash grey Kid-Silk and 1 strand lavender mix Alpaca to finished length. STRIPES ON SLEEVE (worked in stocking stitch): 6-6-5-3-3-1 cm with 1 strand rust Kid-Silk and 1 strand blush Alpaca (this stripe continues from the yoke and will measure 7 cm in total in all sizes). 7-7-7-7-7-7 cm with 1 strand rust Kid-Silk and 1 strand nougat Alpaca. 7-7-7-7-7-7 cm with 1 strand grey Kid-Silk and 1 strand nougat Alpaca. 7-7-7-7-7-7 cm with 1 strand beige Kid-Silk and 1 strand lavender mix Alpaca. 7-7-7-7-7-7 cm with 1 strand grey Kid-Silk and 1 strand lavender mix Alpaca. Then work with 1 strand ash grey Kid-Silk and 1 strand lavender mix Alpaca to finished length. RAGLAN: Increase 1 stitch in the stitch before A.1 and in the stitch after A.1 – in each transition between front/back pieces and the sleeves (= 8 stitches increased on each increase-round). Marker thread sits in the middle of each A.1. Increase 1 stitch by knitting in both the front and back loop of the same stitch. The new stitches are worked in garter stitch. DECREASE TIP (for sleeves): Decrease 1 stitch on either side of the marker thread as follows: Work until there are 3 stitches left before the marker thread, knit 2 together, knit 2 (marker thread sits between these 2 stitches), slip 1 stitch as if to knit, knit 1 and pass the slipped stitch over the knitted stitch (= 2 stitches decreased). CASTING-OFF TIP: To avoid the cast-off edge being tight you can cast off with a larger size needle. If the edge is still tight, make 1 yarn over after approx. each 8th stitch at the same time as casting off; the yarn overs are cast off as normal stitches. ------------------------------------------------------- START THE PIECE HERE: ------------------------------------------------------- JUMPER – SHORT OVERVIEW OF THE PIECE: The neck and yoke are worked in the round with circular needle, from mid back and top down – read KNITTING TIP! The yoke is divided for body and sleeves and the body is continued in the round with circular needle. The sleeves are worked with short circular needle/double pointed needles, top down. FOLDED NECK EDGE: Cast on 76-80-84-88-92-96 stitches with short circular needle size 4 mm and 2 strands ash grey Kid-Silk and 1 strand old pink Alpaca (= 3 strands). Remove one of the strands of Kid-Silk. The rest of the garment is worked with 1 strand of each quality; casting on with an extra strand avoids the cast-on edge being tight. Knit 1 round then work rib in the round (= knit 2, purl 2) for 9 cm. Knit 1 round where you increase 8 stitches evenly spaced in all sizes – read INCREASE TIP = 84-88-92-96-100-104 stitches. Purl 1 round (work yarn over twisted). Count 30-31-32-33-34-35 stitches and insert 1 marker before the next stitch (= mid-front). The yoke is measured from this marker! YOKE: Read the whole section before continuing! Insert 4 marker threads in the piece as described below, without working the stitches. The threads will be used when increasing to raglan. Count 4 stitches (part of back piece), insert 1 marker thread before the next stitch, count 10 stitches (= sleeve), insert 1 marker thread before the next stitch, count 32-34-36-38-40-42 stitches (= front piece), insert 1 marker thread before the next stitch, count 10 stitches (= sleeve), insert 1 marker thread before the next stitch. There are 28-30-32-34-36-38 stitches left on the back piece after the last marker thread. Change to circular needle size 5 mm, begin the round as before; i.e. 4 stitches before the first marker thread, and work GARTER STITCH and STRIPES ON YOKE AND BODY in the round – read description above. In addition work A.1 in each transition between front/back pieces and sleeves (marker thread sits in the middle of A.1). REMEMBER THE KNITTING TENSION! AT THE SAME TIME on the first round (i.e. a knitted round), increase to RAGLAN – read description above (= 8 stitches increased). Increase like this every 2nd round a total of 10-10-12-15-17-20 times and then every 4th round a total of 10-12-12-12-12-12 times. After the last increase there are 244-264-284-312-332-360 stitches on the needle. Continue with garter stitch, stripes and A.1 (without increasing) until the piece measures 20-22-23-25-27-29 cm from the marker on the neck. Now divide the yoke for the body and sleeves on the next round as follows: Work as far as 1-1-1-1-2-3 stitches after the first marker thread (= these stiches belongs to the back piece), place the next 48-52-56-62-64-68 stitches on 1 thread for the sleeve, cast on 6-6-8-8-10-10 new stitches on the needle (in side under the sleeve), work as before over the next 74-80-86-94-102-112 stitches (= front piece), place the next 48-52-56-62-64-68 stitches on 1 thread for the sleeve, cast on 6-6-8-8-10-10 new stitches on the needle (in side under the sleeve) and work as before over the remaining 73-79-85-93-100-109 stitches of back piece. Cut the strand. The body and sleeves are finished separately. THE PIECE IS MEASURED FROM HERE! BODY: = 160-172-188-204-224-244 stitches. Insert 1 marker thread in the middle of the 6-6-8-8-10-10 stitches cast on under one of the sleeves. Start the round here and continue in the round with garter stitch and stripes until the piece measures 33-33-34-34-34-34 cm from the division. There is approx. 4 cm left to finished length; you can try the jumper on and work to desired length. Knit 1 round where you increase 24-28-28-32-36-36 stitches evenly spaced = 184-200-216-236-260-280 stitches. Change to circular needle size 4 mm and work rib (= knit 2, purl 2) for 4 cm. Cast off with knit over knit and purl over purl – read CASTING-OFF TIP! The jumper measures approx. 60-62-64-66-68-70 cm from the shoulder down. SLEEVE: Place the 48-52-56-62-64-68 stitches from the thread on the one side of the piece on double pointed needles/short circular needle size 5 mm and knit up 1 stitch in each of the 6-6-8-8-10-10 stitches cast on under the sleeve = 54-58-64-70-74-78 stitches. Insert a marker thread in the middle of the 6-6-8-8-10-10 stitches under the sleeve. Allow the thread to follow your work onwards; it will be used when decreasing under the sleeve. Start the round at the marker thread and work stocking stitch and STRIPES SLEEVE – read description above. AT THE SAME TIME when the sleeve measures 3 cm from the division in all sizes, decrease 2 stitches under the sleeve – read DECREASE TIP. Decrease like this every 0-3-3-3-3-3 cm a total of 1-2-3-4-5-5 times in height = 52-54-58-62-64-68 stitches. Continue working until the sleeve measures 37-36-36-34-32-31 cm from the division. There is approx. 6 cm left to finished length; you can try the jumper on and work to desired length. Knit 1 round where you decrease 16-18-18-22-20-24 stitches evenly spaced = 36-36-40-40-44-44 stitches. Change to double pointed needles size 4 mm and work rib (= knit 2, purl 2) for 6 cm. Cast off with knit over knit and purl over purl – remember CASTING-OFF TIP! The sleeve measures approx. 43-42-42-40-38-37 cm from the division. Work the other sleeve in the same way. ASSEMBLY: Fold the neck to the wrong side and fasten with small, neat stitches. |
||||||||||
Diagram explanations |
||||||||||
|
||||||||||
 |
||||||||||
Have you finished this pattern?Tag your pictures with #dropspattern #sunsetsglowjumper or submit them to the #dropsfan gallery. Do you need help with this pattern?You'll find 36 tutorial videos, a Comments/Questions area and more by visiting the pattern on garnstudio.com. © 1982-2026 DROPS Design A/S. We reserve all rights. This document, including all its sub-sections, has copyrights. Read more about what you can do with our patterns at the bottom of each pattern on our site. |
||||||||||


With over 40 years in knitting and crochet design, DROPS Design offers one of the most extensive collections of free patterns on the internet - translated to 17 languages. As of today we count 325 catalogues and 12298 patterns translated into English (UK/cm).
We work hard to bring you the best knitting and crochet have to offer, inspiration and advice as well as great quality yarns at incredible prices! Would you like to use our patterns for other than personal use? You can read what you are allowed to do in the Copyright text at the bottom of all our patterns. Happy crafting!
Post a comment to pattern DROPS 217-26
We would love to hear what you have to say about this pattern!
If you want to leave a question, please make sure you select the correct category in the form below, to speed up the answering process. Required fields are marked *.