
Popular categories
Looking for a yarn?


Comments / Questions (57)
![]() Marie Janick wrote:
Marie Janick wrote:
Merci pour votre réponse. Ce que je souhaitais savoir à quel moment du jacquard on divise. Je tricoté la taille L. Est ce que le A3 se fait après la division ? Ce n'est pas indiqué sur le schéma. Merci
16.10.2024 - 09:14DROPS Design answered:
Bonjour Marie Janick, en taille L, vous divisez l'empiècement lorsque l'ouvrage mesure 25 cm (cf paragraphe Taille L et XL, le diagramme A.3 n'est pas terminé à ce stade, vous le terminerez séparément sur le dos/le devant et sur les manches. Bon tricot!
16.10.2024 - 09:27
![]() Marie Janick wrote:
Marie Janick wrote:
Bonjour Concernant le pull Mistletoe Muse, je ne trouve pas dans les explications quand il faut diviser le travail pour les manches. Merci de maider
15.10.2024 - 15:43DROPS Design answered:
Bonjour Marie Janick, vous le trouverez sous le paragraphe qui commence par Toutes les tailles: Diviser maintenant l'ouvrage pour le dos/le devant et les manches. autrement dit, après la description de l'empiècement pour votre taille S et M, ou bien L et XL ou encore XXL et XXXL. Bon tricot!
15.10.2024 - 17:03
![]() Nadine Brüchmann wrote:
Nadine Brüchmann wrote:
Danke!!!
16.09.2024 - 09:52
![]() Nadine Brüchmann wrote:
Nadine Brüchmann wrote:
Wann werden die je 6 M denn aufgenommen?
13.09.2024 - 21:07DROPS Design answered:
Liebe Frau Brüchmann, diese 6 Maschen werden am Übergang zwischen Vorder-/Rückenteil und Rücken- und Vorderteil angeschlagen (siehe dieses Video; in diese Lektion zeigen wir, wie man einen Pullover mit Raglan von oben nach unten strickt, und ab Foto 9) zeigen wir, wie die Maschen aufgeteilt und neu angeschlagen (dann später aufgeben) werden. Das wird bei Rundpasse gleich gemacht. Viel Spaß beim Stricken!
16.09.2024 - 07:52
![]() Nadine Brüchmann wrote:
Nadine Brüchmann wrote:
Hallo habe ein Problem. Bin Jetzt beim aufteilen je 84M vorne/hinten 60 M für die Ärmel u je 6M unter Arm zunehmen. Sind dann je Ärmel 66M.Richtig? Rumpf [v/h] je 84M also 168M. Wie kommt ihr in der Anleitung denn auf 180M???scnelle Antwort wäre super. Danke
13.09.2024 - 21:01
![]() Nadine Brüchmann wrote:
Nadine Brüchmann wrote:
Hallo habe ein Problem. Bin Jetzt beim aufteilen je 84M vorne/hinten 60 M für die Ärmel u je 6M unter Arm zunehmen. Sind dann je Ärmel 66M.Richtig? Rumpf [v/h] je 84M also 168M. Wie kommt ihr in der Anleitung denn auf 180M???scnelle Antwort wäre super. Danke
13.09.2024 - 10:07DROPS Design answered:
Liebe Frau Brüchmann, für Rumpfeil haben Sie: 84 M Vorderteil + 6 neue Maschen + 84 M Rückenteil + 6 neue Maschen = 180 Maschen, dann für die Ärmel haben Sie 60 M + 6 neue Maschen = 66 M. Viel Spaß beim Stricken!
13.09.2024 - 16:28
![]() Wendy wrote:
Wendy wrote:
Hello, I\'m sorry for my silly questions, this is the 1st time I\'m knitting in the round. I\'m knitting the small size. The pattern says, when I\'m going to divide the piece into front, back and sleeves that it must measure 22-24 cm. Is that measured from the very top of the neck, ie the cast on edge? Or from the end of the ribbing and where A1 started?
22.06.2024 - 13:26DROPS Design answered:
Dear Wendy, unless the pattern specifically says at a certain point that "measure piece from here" you should measure it from the cast on edge. Happy Knitting!
23.06.2024 - 00:56
![]() Wendy wrote:
Wendy wrote:
Hello I'm confused by A. 2. In the written pattern it says it's 7 stitches, but on the diagram I see only 6 stitches?
26.05.2024 - 14:45DROPS Design answered:
Dear Wendy, are you sure yo are looking at the right diagram? A.2 is the middle one of the three diagrams, and it starts off with seven stitches. Happy Knitting!
26.05.2024 - 19:51
![]() Gerry wrote:
Gerry wrote:
. How do I do the twisted rib for 217-1 ?
23.03.2024 - 14:41DROPS Design answered:
Dear Gerry, you can find the description of the twisted rib at the beginning of the neck: "rib (= knit 1 twisted / purl 1) in the round" . Happy Knitting!
23.03.2024 - 22:44
![]() Yvonne wrote:
Yvonne wrote:
Prachtig patroon! Staat op mijn wensenlijstje van toekomstige projecten :) Alleen... er is al een kleur uit het assortiment, nr. 28 steenrood. Ik dacht eerst nog dat nr. 25, framboos, misschien gebruikt zou kunnen worden ter vervanging, maar ook deze is inmiddels uit het assortiment. Hebben jullie een suggestie voor een alternatief? Alvast bedankt!
29.01.2024 - 20:12DROPS Design answered:
Dag Yvonne,
We hebben niet echt een vergelijkbaar garen in dezelfde dikte wat je kunt gebruiken. Je zou even kunnen vragen bij een of meerdere verkooppunten of ze deze kleur nog hebben liggen. Via deze link vind je een lijst met verkooppunten.
31.01.2024 - 20:10
|
|||||||||||||||||||||||||||||||
Mistletoe Muse#mistletoemusesweater |
|||||||||||||||||||||||||||||||
 |
 |
||||||||||||||||||||||||||||||
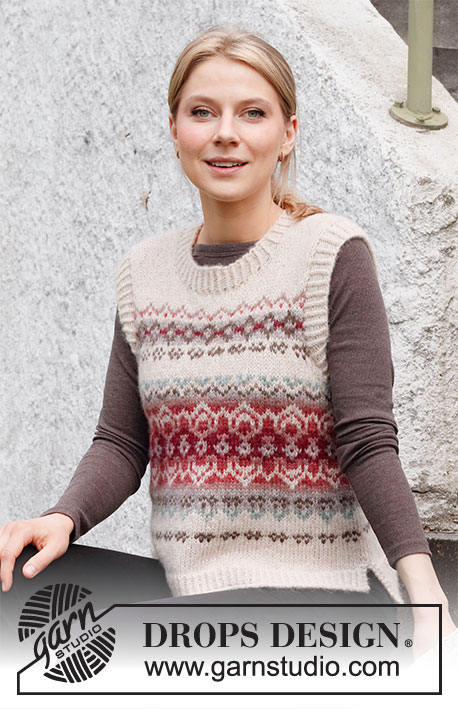
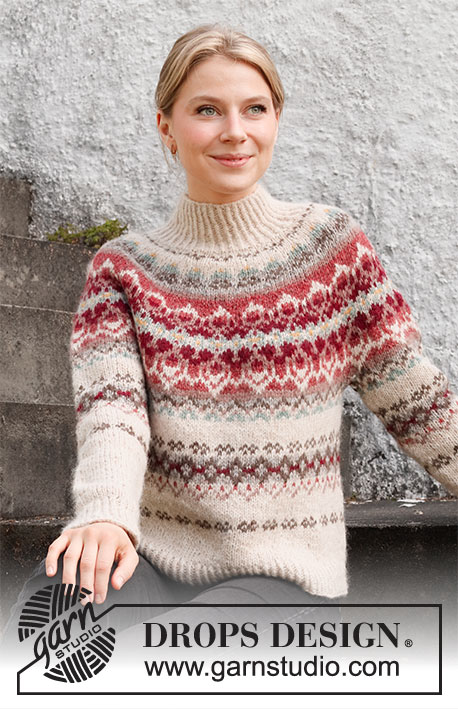
Knitted jumper in DROPS Air. The piece is worked top down, with round yoke and Nordic pattern. Sizes S - XXXL.
DROPS 217-1 |
|||||||||||||||||||||||||||||||
|
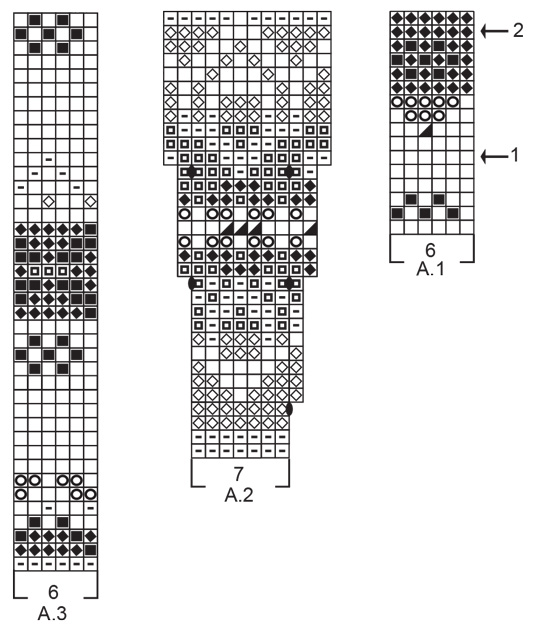
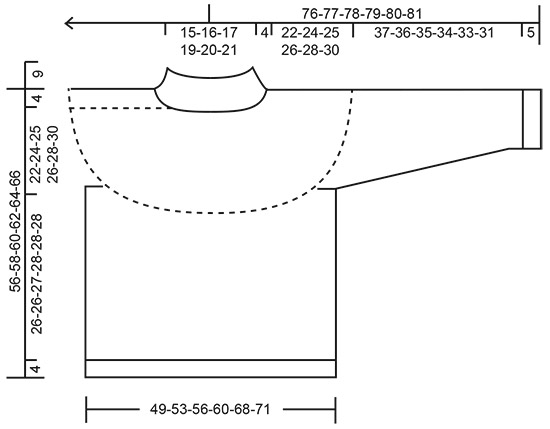
------------------------------------------------------- EXPLANATIONS FOR THE PATTERN: ------------------------------------------------------- PATTERN: See diagrams A.1 to A.3. The whole pattern is worked in stocking stitch. KNITTING TIP: To avoid the knitting tension becoming tighter when working pattern, it is important that the strands at the back are not tight. Use a size larger needle when working pattern if this is a problem. If the knitting tension is not correct in height and you work too tightly, the garment will be short and the armholes too small – you can correct for this by regularly working an extra row in the 1-coloured sections. If you work loosely, the garment will be too long – you can correct for this by regularly working 1 round less in the 1-coloured sections. INCREASE TIP (evenly spaced): To work out how to increase evenly, count the total number of stitches on the needle (e.g. 80 stitches) and divide by the number of increases to be made (e.g. 22) = 3.6. In this example, increase by making 1 yarn over after alternately each 3rd and 4th stitch. On the next round, knit the yarn overs twisted to avoid holes. DECREASE TIP (for mid under sleeve): Decrease 1 stitch on either side of the marker thread as follows: Work until there are 3 stitches left before the marker thread, knit 2 together, knit 2 (marker thread sits between these 2 stitches), slip 1 stitch as if to knit, knit 1 and pass the slipped stitch over the knitted stitch. CASTING-OFF TIP: To avoid the cast-off edge being tight you can cast off with a larger size needle. If the edge is still tight, make 1 yarn over after approx. each 4th stitch at the same time as casting off; the yarn overs are cast off as normal stitches. ------------------------------------------------------- START THE PIECE HERE: ------------------------------------------------------- JUMPER – SHORT OVERVIEW OF THE PIECE: The neck and yoke are worked in the round with circular needle, from the transition between the left sleeve and the back piece and top down. The yoke is divided for the body and sleeves and the body continued in the round with circular needle. The sleeves are worked in the round with short circular needle/double pointed needles, top down. NECK: Cast on 80-84-88-94-96-102 stitches with circular needle size 4.5 mm and wheat. Knit 1 round then work rib (= knit 1 twisted / purl 1) in the round for 9 cm. When the rib is finished, knit 1 round where you increase 22-24-26-26-30-36 stitches evenly spaced – read INCREASE TIP = 102-108-114-120-126-138 stitches. Change to circular needle size 5.5 mm and insert 1 marker at the beginning of the round; the yoke is measured from this marker! YOKE: Work pattern A.1 (= 6 stitches) a total of 17-18-19-20-21-23 times on the round – read KNITTING TIP. On the rounds with arrows, increase as follows - remember INCREASE TIP: Arrow-1: Increase 24-24-30-30-30-30 stitches evenly spaced = 126-132-144-150-156-168 stitches. There is now room for 21-22-24-25-26-28 repeats of A.1 on the round. Arrow-2: Increase 14-22-24-18-19-21 stitches evenly spaced = 140-154-168-168-175-189 stitches. REMEMBER THE KNITTING TENSION! Now continue in the different sizes as described below: Sizes S and M: Work A.2 (= 7 stitches) a total of 20-22 times on the round. When the piece measures 22-24 cm, sizes S-M are finished. If the knitting tension is correct there are 4-0 rounds left in A.2 and 240-264 stitches on the round. If the piece is shorter than 22-24 cm, continue with the remaining rounds in A.2 and then A.3 over A.2 (there is room for 2 repeats of A.3 over the 12 stitches in A.2) to the correct length. Sizes L and XL Work A.2 (= 7 stitches) a total of 24-24 times on the round. When the diagram has been worked in height there are 288-288 stitches on the round. If the knitting tension is correct the piece measures 24-24 cm from the marker. Continue with A.3 over A.2 (there is room for 2 repeats of A.3 over the 12 stitches in A.2) until the piece measures 25-26 cm from the marker. Sizes XXL and XXXL: Work A.2 (= 7 stitches) a total of 25-27 times on the round. When the diagram has been worked in height there are 300-324 stitches on the round. If the knitting tension is correct the piece now measures 24-24 cm from the marker. Continue with A.3 over A.2 (there is room for 2 repeats of A.3 over the 12 stitches in A.2) until the piece measures 28-30 cm from the marker; at the same time on row 8 in A.3 increase 12-12 stitches evenly spaced = 312-336 stitches. All sizes: Now divide the piece for the body and sleeves. To give a symmetric pattern on the front and back pieces, the beginning of the round is moved back 3 stitches in sizes M and XXXL (i.e., cut the strand and place the first stitches on the right needle onto the left needle before continuing). In sizes S, L, XL and XXL keep the beginning of the round where it is. Work the next round in pattern as before and as follows: Work the first 72-78-84-84-96-102 stitches (= back piece), place the next 48-54-60-60-60-66 stitches on a thread for the sleeve and cast on 6-6-6-12-12-12 new stitches (= in side under sleeve), work the next 72-78-84-84-96-102 stitches (= front piece) and place the next 48-54-60-60-60-66 stitches on a thread for the sleeve and cast on 6-6-6-12-12-12 new stitches (= in side under sleeve). Body and sleeves are finished separately. THE PIECE IS NOW MEASURED FROM HERE! BODY: = 156-168-180-192-216-228 stitches. Continue in the different sizes as follows: Size S: Insert a marker thread in the middle of the 6 new stitches cast on under each sleeve (= 3 stitches on each side of the thread). Continue with A.2 as before until the diagram has been completed in height – NOTE: The pattern does not fit under the sleeves; work as many stitches of pattern that there is room for under sleeves. Work A.3 (= 6 stitches) a total of 26 times on the round. When A.3 has been completed go to ALL SIZES. Sizes M, L, XL, XXL and XXXL: Continue with A.3 (= 6 stitches) a total of 28-30-32-36-38 times on the round. When A.3 has been completed go to ALL SIZES. ALL SIZES: After A.3 continue with wheat to finished length. When the piece measures 26-26-27-28-28-28 cm from the division, knit 1 round where you increase 28-30-32-32-36-38 stitches evenly spaced = 184-198-212-224-252-266 stitches. Change to circular needle size 4.5 mm and work rib (= knit 1 twisted, purl 1) for 4 cm. Cast off with knit over knit and purl over purl - read CASTING-OFF TIP. The jumper measures approx. 56-58-60-62-64-66 cm from the shoulder down. SLEEVE: Place the 48-54-60-60-60-66 stitches from the thread on the one side of the piece on double pointed needles/short circular needle size 5.5 mm and knit up 1 stitch in each of the 6-6-6-12-12-12 stitches cast on under the sleeve = 54-60-66-72-72-78 stitches. Insert a marker thread in the middle of the 6-6-6-12-12-12 stitches under the sleeve. Allow the thread to follow your work onwards; it will be used when decreasing under the sleeve. Continue in the round with pattern, in the same way as on the body – the pattern will not fit under the sleeve. When the sleeve measures 5-3-3-3-3-3 cm from the division, decrease 1 stitch on either side of the marker thread - read DECREASE TIP. Decrease like this every 3½-3-2½-2-2-1½ cm a total of 9-11-13-15-14-17 times = 36-38-40-42-44-44 stitches. Continue working until the sleeve measures 37-36-35-34-33-31 cm (shorter measurements in larger sizes due to longer yoke). Knit 1 round where you increase 6-6-6-6-8-8 stitches evenly spaced = 42-44-46-48-52-52 stitches. Change to double pointed needles size 4.5 mm and work rib (= knit 1 twisted, purl 1) for 5 cm. Cast off with knit over knit and purl over purl - remember CASTING-OFF TIP. Work the other sleeve in the same way. |
|||||||||||||||||||||||||||||||
Diagram explanations |
|||||||||||||||||||||||||||||||
|
|||||||||||||||||||||||||||||||
 |
|||||||||||||||||||||||||||||||
 |
|||||||||||||||||||||||||||||||
Have you finished this pattern?Tag your pictures with #dropspattern #mistletoemusesweater or submit them to the #dropsfan gallery. Do you need help with this pattern?You'll find 26 tutorial videos, a Comments/Questions area and more by visiting the pattern on garnstudio.com. © 1982-2026 DROPS Design A/S. We reserve all rights. This document, including all its sub-sections, has copyrights. Read more about what you can do with our patterns at the bottom of each pattern on our site. |
|||||||||||||||||||||||||||||||


With over 40 years in knitting and crochet design, DROPS Design offers one of the most extensive collections of free patterns on the internet - translated to 17 languages. As of today we count 324 catalogues and 12239 patterns translated into English (UK/cm).
We work hard to bring you the best knitting and crochet have to offer, inspiration and advice as well as great quality yarns at incredible prices! Would you like to use our patterns for other than personal use? You can read what you are allowed to do in the Copyright text at the bottom of all our patterns. Happy crafting!
Post a comment to pattern DROPS 217-1
We would love to hear what you have to say about this pattern!
If you want to leave a question, please make sure you select the correct category in the form below, to speed up the answering process. Required fields are marked *.