
Popular categories
Looking for a yarn?


Comments / Questions (7)
![]() Sylvie wrote:
Sylvie wrote:
Pourquoi ne trouve-t-on plus le calculateur de diminution/augmentation ?
25.02.2026 - 21:55DROPS Design answered:
Bonjour Sylvie, vous trouverez la petite calculatrice en bas à droite de la page. Bon tricot!
26.02.2026 - 09:42
![]() FAYARD Hélène wrote:
FAYARD Hélène wrote:
Pour l'échantillon, il semble que je fasse exactement le contraire de vous : si mon échantillon est plus étroit , je prends des aiguilles plus grosses car je serre peut-être plus que vous; s'il est plus large que vous, je prends des aiguilles plus fines (sans doute je serre moins en tricotant) . serait-ce une erreur ?
28.12.2023 - 10:28
![]() Josie wrote:
Josie wrote:
Bonjour, je viens de recevoir ma laine Sky, mais j'ai un problème avec ce modèle. Pour ma forte poitrine on me dit de faire la taille XXL, mais le reste des dimensions ne correspond pas à mes dimensions. Que me conseillez vous SVP ? Merci et bonne journée à vous.
17.12.2021 - 14:03DROPS Design answered:
Bonjour Josie, comparez un modèle que vous avez et dont vous aimez la forme aux mesures du schéma pour trouver votre taille et adapter si besoin - retrouvez plus d'infos sur le schéma ici - votre magasin saura vous conseiller et vous aider, même par mail ou téléphone si besoin. Bon tricot!
17.12.2021 - 16:10
![]() Gouince wrote:
Gouince wrote:
Comment ont fait quand ont et au rg envers ont continue le dessin mes à l'envers ?? comme ses un aller retour
06.10.2021 - 15:16DROPS Design answered:
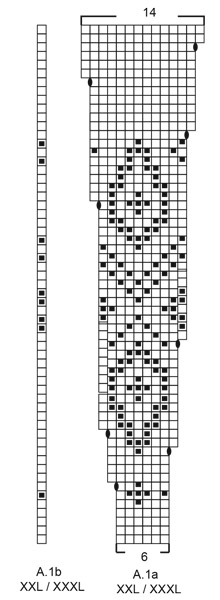
Bonjour Mme Gouince, tout à fait, sur l'envers, tricotez A.1b, puis répétez A.1a en lisant de gauche à droite - cette vidéo devrait pouvoir vous aider à visualiser comment tricoter le jacquard sur l'envers. Bon tricot!
06.10.2021 - 16:37
![]() Gabriele wrote:
Gabriele wrote:
Gibt es kein Schnittmuster zu dieser Anleitung?
16.10.2020 - 20:49Gabriele answered:
Das Schnittmuster ist verzögert am Bildschirm erschienen! Liebe Grüße und danke für die tollen Anleitungen!
16.10.2020 - 20:51
![]() Marina wrote:
Marina wrote:
Большое спасибо за помощь и описание! Прекрасная модель
04.08.2020 - 16:31
![]() Angelika wrote:
Angelika wrote:
Möchte es gleich zu stricken beginnen
05.06.2020 - 14:53
|
||||||||||
Iced Petals Jacket#icedpetalsjacket |
||||||||||
 |
 |
|||||||||
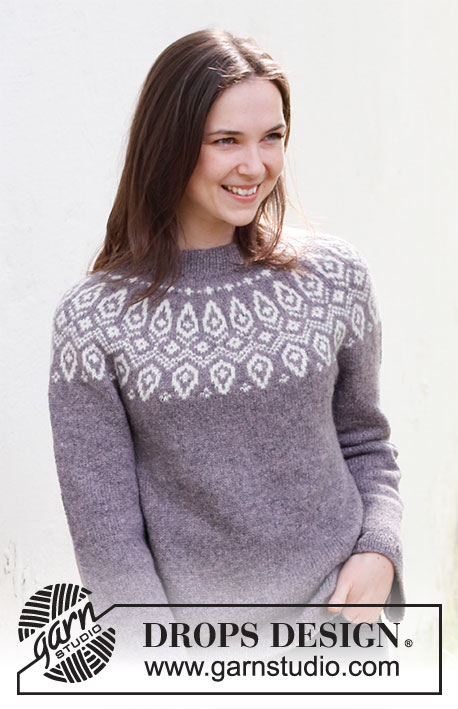
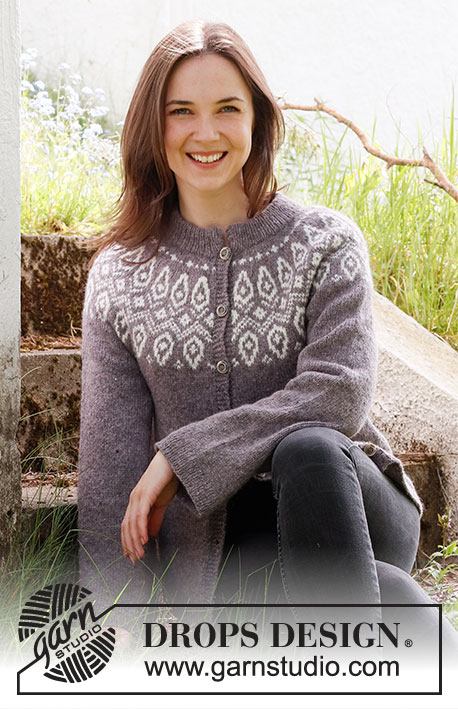
Knitted jacket with round yoke and Nordic pattern in DROPS Sky. The piece is worked top down. Sizes S - XXXL.
DROPS 218-6 |
||||||||||
|
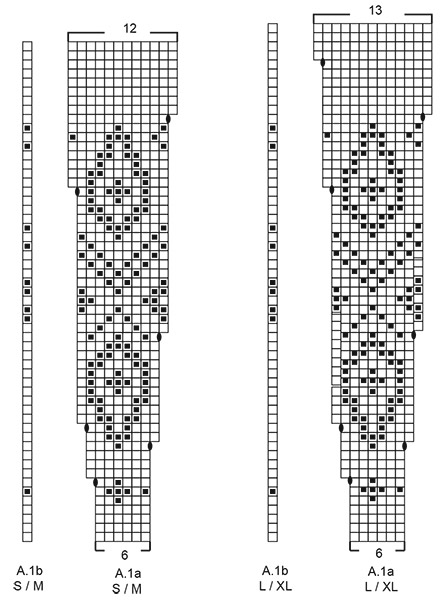
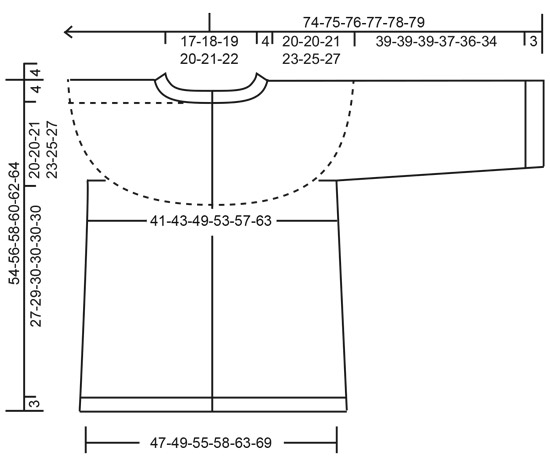
------------------------------------------------------- EXPLANATIONS FOR THE PATTERN: ------------------------------------------------------- RIDGE/GARTER STITCH (worked back and forth): Knit all rows. 1 ridge in height = Knit 2 rows. PATTERN: See diagrams A.1a and A.1b. Choose diagrams for your size. The diagrams are worked in stocking stitch and they show all the rows from the right side. INCREASE TIP-1 (evenly spaced): To work out how to increase evenly, count the total number of stitches on the needle (e.g. 113 stitches) minus bands (e.g. 10 stitches) and divide the remaining stitches by the number of increases to be made (e.g. 36) = 2.9. In this example, increase by making 1 yarn over after approx. each 3rd stitch. Do not increase on bands. On the next row (wrong side) work the yarn overs twisted to avoid holes. KNITTING TIP: To avoid the knitting tension becoming tighter when working pattern it is important that the strands at the back are not tight. Use a size larger needle when working pattern if this is a problem. KNITTING TIP-2: On the rows with 2-coloured pattern, work the bands on each side with the background colour. INCREASE TIP-2 (for the body): All increases are worked from the right side! Start 2 stitches before the marker, make 1 yarn over, knit 4 (marker thread sits between these 4 stitches) make 1 yarn over (= 2 stitches increased). On the next row purl the yarn overs twisted to avoid holes. DECREASE TIP (for sleeves): Work until there are 3 stitches left before the marker thread, knit 2 together, knit 2 (marker thread sits between these 2 stitches), slip 1 stitch as if to knit, knit 1 and pass the slipped stitch over the knitted stitch (2 stitches decreased). BUTTONHOLES: Work buttonholes on right band (when garment is worn). Work from the right side when there are 4 stitches left on the row as follows: Knit 2 together, make 1 yarn over and knit the last 2 stitches. On the next row (wrong side) knit the yarn over to leave a hole. The first buttonhole is worked on the first row after the neck. The other buttonholes are then worked with approx. 8-8-8-7½-8-8 cm between each one. ------------------------------------------------------- START THE PIECE HERE: ------------------------------------------------------- JACKET: The piece is worked back and forth with circular needle, top down. The sleeves are worked in the round with short circular needle/double pointed needles, top down. YOKE: Cast on 113-117-121-127-129-135 stitches with circular needle size 3 mm and lavender. Work the first row as follows from the right side: 1 edge stitch in GARTER STITCH – see description above, * knit 1, purl 1 *, work from *-* until there are 2 stitches left, knit 1 and work 1 edge stitch in garter stitch. Continue this rib for 9 cm (the neck will be folded double later); adjust so the next row is from the right side. On the next row change to circular needle size 4, and work a BUTTONHOLE on the right band – read description above, AT THE SAME TIME work stocking stitch and increase 36-38-40-46-44-44 stitches evenly spaced – read INCREASE TIP-1 = 149-155-161-173-173-179 stitches. THE PIECE IS NOW MEASURED FROM HERE! The next row is worked as follows from wrong side: 5 band stitches in garter stitch, stocking stitch until there are 5 stitches left on needle, 5 band stitches in garter stitch. The next row is worked as follows from the right side: 5 band stitches in garter stitch, work according to diagram A.1a until there are 6 stitches left (= 23-24-25-27-27-28 repeats in width), A.1b (= 1 stitch) and 5 band stitches in garter stitch. Read PATTERN, KNITTING TIP-1 and KNITTING TIP-2 in explanations above. REMEMBER THE KNITTING TENSION – and remember to work BUTTONHOLES on the right band. When the diagrams have been completed in height there are 287-299-336-362-389-403 stitches on the needle. On the next row from the right side, adjust the number of stitches evenly to 283-299-339-363-383-407 stitches. Continue with stocking stitch and garter stitch as before using lavender until the piece measures 20-20-21-23-25-27 cm. Now divide the yoke for the body and sleeves as follows from the right side: Work 43-44-50-54-58-63 stitches (= left front piece), place the next 60-66-74-78-80-82 stitches on a thread for the sleeve, cast on 10-12-12-12-14-16 new stitches (= under the sleeve), work 77-79-91-99-107-117 stitches (= back piece), place the next 60-66-74-78-80-82 stitches on a thread for the sleeve, cast on 10-12-12-12-14-16 new stitches (= under the sleeve) and work 43-44-50-54-58-63 stitches (= right front piece). The body and sleeves are finished separately. THE PIECE IS NOW MEASURED FROM HERE! BODY: = 183-191-215-231-251-275 stitches. Insert 1 marker in the middle of the 10-12-12-12-14-16 stitches cast on under each sleeve. Work stocking stitch back and forth with 5 band stitches in garter stitch on each side. When the piece measures 4 cm from the division, increase 2 stitches on each side of both markers – read INCREASE TIP-2. Increase like this every 3-3-3-4-4-4 cm a total of 6 times in all sizes = 207-215-239-255-275-299 stitches. Continue working until the piece measures 27-29-30-30-30-30 cm from the division. Then work 1 row from the wrong side where you increase 20 stitches evenly spaced in all sizes = 227-235-259-275-295-319 stitches. Change to circular needle size 3 mm and work as follows from the right side: 5 band stitches in garter stitch, * knit 1, purl 1 *, work from *-* until there are 6 stitches left, knit 1 and 5 band stitches in garter stitch. Continue this rib for 3 cm. Cast off with knit over knit and purl over purl – make sure the cast-off edge is not tight. The jacket measures approx. 54-56-58-60-62-64 cm from the shoulder down. SLEEVE: Place the 60-66-74-78-80-82 stitches from the thread on the one side of the piece on double pointed needles/short circular needle size 4 mm and knit up 1 stitch in each of the 10-12-12-12-14-16 stitches cast on under the sleeve = 70-78-86-90-94-98 stitches. Insert a marker in the middle of the new stitches under the sleeve; marks the beginning of the round. Work stocking stitch in the round with lavender. When the piece measures 2 cm, decrease 2 stitches under the sleeve – read DECREASE TIP in explanations above. Continue working until the sleeve measures 39-39-39-37-36-34 cm (short measurements in the larger sizes due to longer yoke). Knit 1 round where you increase 10 stitches evenly spaced in all sizes = 78-86-94-98-102-106 stitches. Change to double pointed needles size 3 mm and work rib (knit 1, purl 1) for 3 cm. Cast off with knit over knit and purl over purl – make sure the cast-off edge is not tight. Work the other sleeve in the same way. ASSEMBLY: Sew the buttons onto the left band. Fold the neck to the wrong side of the piece and sew down with loose stitches – do not sew in every stitch but skip some stitches so the stitches are long, and the neck is not tight. Then sew the openings at the sides of the neck inside the 1 edge stitch. |
||||||||||
Diagram explanations |
||||||||||
|
||||||||||
 |
||||||||||
 |
||||||||||
 |
||||||||||
Have you finished this pattern?Tag your pictures with #dropspattern #icedpetalsjacket or submit them to the #dropsfan gallery. Do you need help with this pattern?You'll find 34 tutorial videos, a Comments/Questions area and more by visiting the pattern on garnstudio.com. © 1982-2026 DROPS Design A/S. We reserve all rights. This document, including all its sub-sections, has copyrights. Read more about what you can do with our patterns at the bottom of each pattern on our site. |
||||||||||


With over 40 years in knitting and crochet design, DROPS Design offers one of the most extensive collections of free patterns on the internet - translated to 17 languages. As of today we count 324 catalogues and 12290 patterns translated into English (UK/cm).
We work hard to bring you the best knitting and crochet have to offer, inspiration and advice as well as great quality yarns at incredible prices! Would you like to use our patterns for other than personal use? You can read what you are allowed to do in the Copyright text at the bottom of all our patterns. Happy crafting!
Post a comment to pattern DROPS 218-6
We would love to hear what you have to say about this pattern!
If you want to leave a question, please make sure you select the correct category in the form below, to speed up the answering process. Required fields are marked *.