
Popular categories
Looking for a yarn?


Comments / Questions (109)
![]() Yvonne wrote:
Yvonne wrote:
Hallo, auf der Rückseite beim rechten Träger(beim Tragen des Tops) muss es meiner Meinung nach A6 und nicht A7 sein, sonst passt die Drehung des Zopfes nicht zum vorderen Träger. Stimmt das?
13.04.2026 - 13:39DROPS Design answered:
Liebe Yvonne, das Top wird hier so gestrickt, aber gerne können Sie die Zöpfe anders stricken. Viel Spaß beim Stricken!
13.04.2026 - 16:15
![]() Yvonne wrote:
Yvonne wrote:
Hallo, ich bin im Rückenteil, habe die Blenden der Armausschnitte mit dem Rückenteil verbunden und die ersten Abnahmen gemacht. Meine Frage ist: stricke ich ab jetzt komplett glatt rechts oder behalte ich A5/A4 für die Blenden bei? Danke! Leider gibt es kein Foto der Rückansicht…
10.04.2026 - 10:53DROPS Design answered:
Liebe Yvonne, stricken Sie mit A.4 und A.5 bis das Bündchen beginnt, dh bis Sie mit der kleineren Rundnadel stricken sollen. Viel Spaß beim Stricken!
10.04.2026 - 13:53
![]() Suzanne wrote:
Suzanne wrote:
Pattern reads: Continue back and forth with A.1 and A.2 in the side, and in stocking stitch over the remaining stitches until entire A.1 and A.2 have been worked vertically = 60-66-72-78-86-96 stitches. Don't understand what it means to work vertically. Does this mean complete 66 rows of the body? How do I know when I'm done the front of sweater?
13.03.2026 - 23:24DROPS Design answered:
Dear Suzanne, work as explained until all rows in A.1 and A.2 (= 10 rows) are done = you have decreased 2 sts in each A.1/A.2 so that there are 60 to 96 sts left on needle (4 sts less than before). Now work 1 row from WS and put aside then work the back piece the same way before joining both pieces together. Happy knitting!
16.03.2026 - 07:40
![]() Dany Lepage wrote:
Dany Lepage wrote:
Bonjour je ne comprends pas comment réaliser le côté gauche du top j’ai réussi le côté droit,mais je n’arrive vraiment pas à faire le gauche après plusieurs tentatives. ☹️Merci de bien vouloir m’éclairer!
02.10.2025 - 16:03
![]() Lelletta wrote:
Lelletta wrote:
Buongiorno! Per questi lavori estivi, peraltro molto belli, non sarebbe meglio usare del cotone più sottile, del gruppo A o max B? Questo in particolare mi piacerebbe molto farlo, ma con il caldo che sta facendo ormai da qualche anno, temo sia troppo pesante! È solo un mio pensiero ovviamente, che però spero sia preso in considerazione! Grazie e buon lavoro
03.09.2025 - 14:39DROPS Design answered:
Buongiorno Lelletta, può lavorarlo con 2 capi dei gruppo filati A. Tenga anche conto che la casa madre è norvegese. Buon lavoro!
07.09.2025 - 15:27
![]() Manon wrote:
Manon wrote:
Hi, At the backpiece, before the ribbing. The pattern says to change to needle size 5.5 mm. But I think this should be 4.5 mm, because the bottom ribbing was also done in this size and else there would be no change in needle size. Is this correct?
30.07.2025 - 11:30DROPS Design answered:
Dear Manon, that's right, you are supposed to work the rib with smaller needles. A correction will be made, thanks for noticing. Happy knitting!
30.07.2025 - 16:17
![]() Stefania wrote:
Stefania wrote:
Salve, il numero dei ferri indicato per lavorare le coste nella parte alta DIETRO non dovrebbe essere 4,5? E' indicato 5,5... Grazie
11.07.2025 - 13:36DROPS Design answered:
Buonasera Stefania, i ferri 4,5 vengono utilizzati per il bordo a coste sulla parte inferiore del capo. Buon lavoro!
20.07.2025 - 17:38
![]() Stefania wrote:
Stefania wrote:
Nella spiegazione del davanti sx, al ferro n. 2 c'è indicato di lavorare le 5 maglie con lo schema A4. Non dovrebbe essere A5?
10.07.2025 - 22:05DROPS Design answered:
Buonasera Stefania, grazie per la segnalazione. Abbiamo corretto il testo. Buon lavoro!
20.07.2025 - 17:28
![]() Meri wrote:
Meri wrote:
Agradecería muchísimo una foto del modelo por la parte de atrás. Me ayuda a comprender el patrón verlo ya hecho. No me queda claro en la espalda, tras montar A4 y A5 en las sisas, ponemos todos los puntos de las sisas y de la espalda en el cable, pero las disminuciones las hacemos en los extremos o en los puntos que serían solo de la espalda como en la parte delantera dejando los 5 primeros y últimos puntos “normal”? Gracias
23.06.2025 - 21:15DROPS Design answered:
Hola Meri, nosotros no disponemos de más fotos que las que están online, pero puedes consultar la galería #dropsfan, donde dispones de las fotos de otras tejedoras que han hechos esos mismos modelos. En cada foto puedes consultar el enlace original del proyecto de cada tejedora, donde a veces disponen de más fotos, como fotos de la parte de atrás, por ejemplo. Las disminuciones se trabajan cuando trabajas la orilla de la espalda, pero solo sobre los puntos de la espalda (no sobre los puntos del borde).
29.06.2025 - 19:02
![]() Veronique Benito wrote:
Veronique Benito wrote:
Bonjour que deviennent les mailles de A3 je suis a la fin du tricot et j ai toujours mes mailles en attente merci
23.05.2025 - 17:29DROPS Design answered:
Bonjour Mme Benito, on tricote la première moitié des mailles de A.3 (time code environ 11:50) après avoir tricoté A.4 avec les mailles en attente de l'emmanchure (time code environ 10:00); dans cette vidéo. Bon tricot!
26.05.2025 - 08:23
|
|||||||||||||||||||||||||||||||||||||
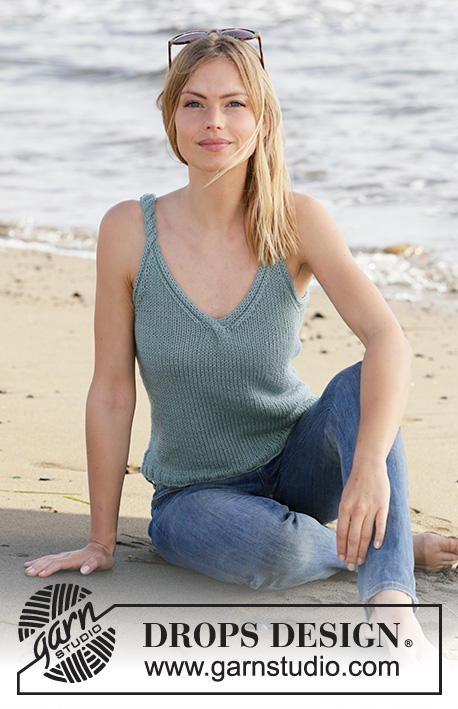
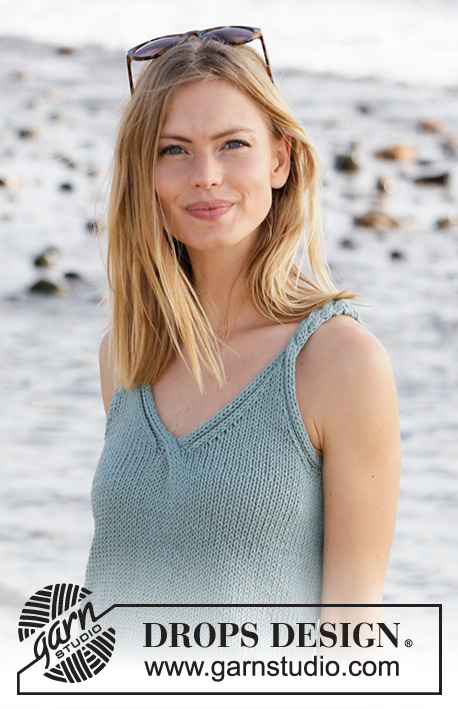
Seaside Spirals#seasidespiralstop |
|||||||||||||||||||||||||||||||||||||
 |
 |
||||||||||||||||||||||||||||||||||||
Knitted top with cables and V-neck in DROPS Paris. Size XS–XXL.
DROPS 211-13 |
|||||||||||||||||||||||||||||||||||||
|
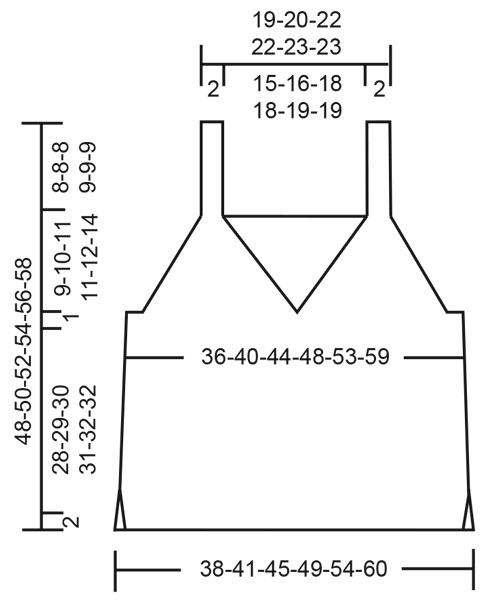
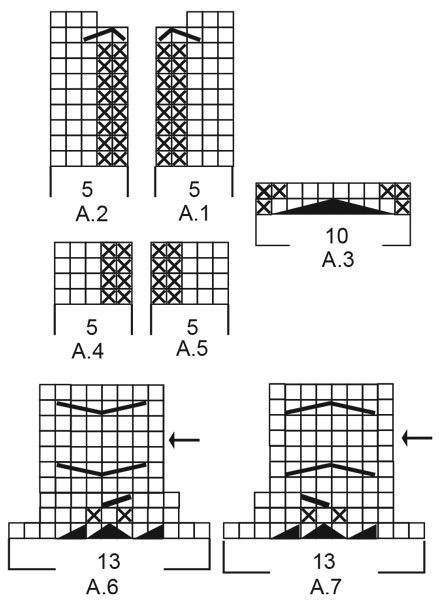
---------------------------------------------------------- EXPLANATION FOR THE PATTERN: ---------------------------------------------------------- PATTERN: See diagrams A.1 to A.7. Diagrams show all rows seen from the right side! DECREASE TIP-1 (evenly): To calculate how to decrease evenly, use the number of stitches decreases are done over (e.g. 58 stitches) , and divide stitches by number of decreases to be done (e.g. 4) = 14.5. In this example decrease by knitting alternately every 13th and 14th stitch and every 14th and 15th stitch together. DECREASE TIP-2: Decrease as follows after A.5: Slip 1 stitch knitwise, knit 1, pass slipped stitch over. Decrease as follows before A.4: Knit 2 together. ---------------------------------------------------------- START THE PIECE HERE: ---------------------------------------------------------- TOP - SHORT OVERVIEW OF THE PIECE: First work front and back piece back and forth on circular needle separately until vent is done. Then slip the 2 parts on to same circular needle , and work in the round up to V-neck and armholes. Then divide piece for back piece and right and left front piece, and finish each part separately. BODY: Cast on 68-76-80-88-96-104 stitches on circular needle size 4.5 mm with Paris. Purl 1 row from wrong side. Then work rib as follows: Work A.1 over the first 5 stitches, rib * knit 2, purl 2 *, work from *-* until 7 stitches remain on row, knit 2, A.2 over the last 5 stitches. Continue back and forth like this until rib measures 2 cm - adjust so that next row is worked from right side. Work next row as follows: A.1 over the first 5 stitches, knit the next 58-66-70-78-86-94 stitches and decrease at the same time 4-6-4-6-6-4 stitches evenly – read DECREASE TIP-1, A.2 over the last 5 stitches = 64-70-76-82-90-100 stitches. Switch to circular needle size 5.5 mm. Continue back and forth with A.1 and A.2 in the side, and in stocking stitch over the remaining stitches until entire A.1 and A.2 have been worked vertically = 60-66-72-78-86-96 stitches. REMEMBER THE KNITTING TENSION. Finish after 1 row from wrong side. Front piece up to where vent ends is now done. Cut the yarn and put piece aside. Work back piece the same way but do not cut the yarn when piece is done. Now work the 2 parts together as from right side. Begin to work over stitches on back piece as follows: Knit 2 together (= 1 stitch decreased), knit until 2 stitches remain on back piece, slip 1 stitch knitwise, knit 1, pass slipped stitch over (= 1 stitch decreased), insert a marker thread here. Then work the same way over stitch on front piece = 116-128-140-152-168-188 stitches. There is now 1 marker thread in each side of piece. Move marker threads in each side when working, they are used later. Work in stocking stitch in the round. When piece measures 30-31-32-33-34-34 cm from cast-on edge, work next round as follows: Knit the 58-64-70-76-84-94 stitches on back piece, knit 24-27-30-33-37-42 stitches, A.3 over the middle 10 stitches on front piece, knit 24-27-30-33-37-42 stitches. Knit 1 round and A.3 over the middle 10 stitches on front piece. Now slip the 8-8-8-10-10-12 stitches on each side of marker thread in each side on separate stands of yarn (= 4 strands with 8-8-8-10-10-12 stitches on each). Slip the 42-48-54-56-64-70 stitches on back piece on a separate strand of yarn. Divide front piece in 2 so that half of the stitches (i.e. 21-24-27-28-32-35 stitches) is on a separate strand of yarn for right and left front piece. RIGHT FRONT PIECE: Cast on 5 stitches on circular needle size 5.5 mm with a new ball Paris. ROW 1 (= right side): Work A.4 over all stitches, turn. ROW 2: Work A.4 back over the first 4 stitches, knit last stitch together with 1st and 2nd stitch after marker thread in the side (i.e. of the 8-8-8-10-10-12 stitches on the strand of yarn), so that the 5 stitches in A.4 are worked together with right front piece, turn. ROW 3: Work A.4 over the 5 stitches, turn. ROW 4: Work A.4 back over the first 4 stitches, knit last stitch together with 3rd and 4th stitch after marker thread, so that the 5 stitches in A.4 are worked together with right front piece, turn. Continue back and forth like this by working last stitch in A.4 together with the next 2 stitches along armhole until all the 8-8-8-10-10-12 stitches along armhole have been worked together with A.4. Finish after a row from wrong side, and work as before over the 21-24-27-28-32-35 stitches on the strand of yarn for right front piece (i.e. work from armhole and until middle of cable = A.3) = 26-29-32-33-37-40 stitches on needle. Now work pattern, and decrease for V-neck and armhole as follows: Work A.5 over the first 5 stitches, knit until 5 stitches remain, A.4 over the last 5 stitches. Continue back and forth like this, AT THE SAME TIME on first row from right side, decrease for V-neck and armhole - read DECREASE TIP-2. Decrease for V-neck every other row 9-10-11-11-12-13 times in total, and decrease for armhole every other row 0-2-5-7-12-14 times, then every 4th row 4-4-3-2-0-0 times = 13 stitches. Now work A.6 over the last 13 stitches. When A.6 has been worked vertically, 8 stitches remain on needle. Repeat the last 4 rows in diagram (from row with arrow) until piece measures 17-18-19-20-21-23 cm from the first decrease for neck - adjust to finish after a row that is next to last row in diagram. Cast off from wrong side by purling, at the same time purl 2 and 2 stitches together. Top measures approx. 48-50-52-54-56-58 cm in total. LEFT FRONT PIECE: Cast on 5 stitches on circular needle size 5.5 mm with Paris. ROW 1 (= right side): Work A.5 over the first 4 stitches, purl last stitch together with 1st and 2nd stitch after marker thread in the side (i.e. of the 8-8-8-10-10-12 stitches on the strand of yarn), so that the 5 stitches in A.5 are worked together with left front piece, turn. ROW 2: Work A.5 over the 5 stitches, turn. ROW 3: Work A.5 back over the first 4 stitches, purl last stitch together with 3rd and 4th stitch after marker thread, so that the 5 stitches in A.5 are worked together with left front piece, turn. Continue back and forth like this by working last stitch in A.5 together with the next 2 stitches along armhole until all the 8-8-8-10-10-12 stitches along armhole have been worked together with A.5. Finish with a row from wrong side. Now work pattern, and decrease for V-neck and armhole as follows: Work A.5 over the first 5 stitches, knit until 5 stitches remain, A.4 over the last 5 stitches. Continue back and forth like this, AT THE SAME TIME on first row from right side, decrease for V-neck and armhole - remember DECREASE TIP-2. Decrease for V-neck every other row 9-10-11-11-12-13 times in total, and decrease for armhole every other row 0-2-5-7-12-14 times, then every 4th row 4-4-3-2-0-0 times = 13 stitches. Now work A.7 over the last 13 stitches. When A.7 has been worked vertically, 8 stitches remain on needle. Repeat the last 4 rows in diagram (from row with arrow) until piece measures 17-18-19-20-21-23 cm from the first decrease for neck - adjust to finish after a row that is next to last row in diagram. Cast off from wrong side by purling, at the same time purl 2 and 2 stitches together. Top measures approx. 48-50-52-54-56-58 cm in total. BACK PIECE: Edge around left armhole: Cast on 5 stitches on circular needle size 5.5 mm with a new ball Paris. ROW 1 (= right side): Work A.4 over all stitches, turn. ROW 2: Work A.4 back over the first 4 stitches, knit last stitch together with 1st and 2nd stitch after marker thread in the side (i.e. of the 8-8-8-10-10-12 stitches on the strand of yarn), so that the 5 stitches in A.4 are worked together with back piece, turn. ROW 3: Work A.4 over the 5 stitches, turn. ROW 4: Work A.4 back over the first 4 stitches, knit last stitch together with 3rd and 4th stitch after marker thread so that the 5 stitches in A.4 are worked together with back piece, turn. Continue back and forth like this by working last stitch in A.4 together with the next 2 stitches along armhole until all the 8-8-8-10-10-12 stitches along armhole have been worked together with A.4. Finish with a row from wrong side. Edge around right armhole: Cast on 5 stitches on circular needle size 5.5 mm with Paris. ROW 1 (= right side): Work A.5 over the first 4 stitches, purl last stitch together with 1st and 2nd stitch after marker thread in the side (i.e. of the 8-8-8-10-10-12 stitches on the strand of yarn), so that the 5 stitches in A.5 are worked together with back piece, turn. ROW 2: Work A.5 over the 5 stitches, turn. ROW 3: Work A.5 back over the first 4 stitches, purl last stitch together with 3rd and 4th stitch after marker thread, so that the 5 stitches in A.5 are worked together with back piece, turn. Continue back and forth like this by working last stitch in A.5 together with the next 2 stitches along armhole until all the 8-8-8-10-10-12 stitches along armhole have been worked together with A.5. Finish with a row from wrong side. Now work stitches from the strand of yarn for back piece together with the 5 stitches for edge along armholes from right side as follows: Work A.5 over the first 5 stitches, knit the 42-48-54-56-64-70 stitches from the strand of yarn for back piece, work A.4 over the last 5 stitches (= 52-58-64-66-74-80 stitches on needle), at the same time begin decrease for armhole – remember DECREASE TIP-2. Decrease for armhole every other row 1-2-5-7-12-14 times, then every 4th row 4-4-3-2-0-0 times = 42-46-48-48-50-52 stitches. Continue back and forth with knit over knit and purl over purl until piece measures 9-10-11-11-12-14 cm from decrease for armhole. Work 1 row from right side with knit over knit and purl over purl, and increase 0-0-2-2-0-2 stitches evenly (but not over the outermost 5 stitches in each side) = 42-46-50-50-50-54 stitches. Work 1 row in pattern from wrong side. Switch to circular needle size 4.5 mm. Now work rib as follows: Knit 3, purl 3. * Knit 2, purl 2 *, repeat from *-* until 8 stitches remain on needle, knit 2, purl 3, knit 3. Continue back and forth like this until rib measures 2 cm - adjust so that next row is worked from right side, work from the second last row in A.7 over the first 8 stitches before slipping them on a strand of yarn (= strap), cast off with knit over knit and purl over purl over the next 26-30-34-34-34-38 stitches, work from next to last row in A.6 over the last 8 stitches on needle (= strap). Switch to needle size 5.5 mm. Repeat pattern from the row with the arrow, back and forth over these 8 stitches until strap measures approx. 6-6-6-7-7-7 cm – adjust to finish after next to last row in diagram. Cast off from wrong side by purling, at the same time purl 2 and 2 stitches together. Slip the 8 stitches from the strand of yarn back on circular needle size 5.5 mm and work last row in A.7 (= from wrong side). Then repeat pattern from row with arrow until strap measures approx. 6-6-6-7-7-7 cm – adjust to finish after next to last row in diagram. Cast off from wrong side by purling, at the same time purl 2 and 2 stitches together. ASSEMBLY: Sew straps together with grafting/kitchener stitches. Sew together cast-on edges in the side where 5 new stitches were cast on (A.5/A.4). Sew with grafting/kitchener stitches to avoid chunky seam. Fasten off. |
|||||||||||||||||||||||||||||||||||||
Diagram explanations |
|||||||||||||||||||||||||||||||||||||
|
|||||||||||||||||||||||||||||||||||||
 |
|||||||||||||||||||||||||||||||||||||
 |
|||||||||||||||||||||||||||||||||||||
Have you finished this pattern?Tag your pictures with #dropspattern #seasidespiralstop or submit them to the #dropsfan gallery. Do you need help with this pattern?You'll find 23 tutorial videos, a Comments/Questions area and more by visiting the pattern on garnstudio.com. © 1982-2026 DROPS Design A/S. We reserve all rights. This document, including all its sub-sections, has copyrights. Read more about what you can do with our patterns at the bottom of each pattern on our site. |
|||||||||||||||||||||||||||||||||||||


With over 40 years in knitting and crochet design, DROPS Design offers one of the most extensive collections of free patterns on the internet - translated to 17 languages. As of today we count 324 catalogues and 12290 patterns translated into English (UK/cm).
We work hard to bring you the best knitting and crochet have to offer, inspiration and advice as well as great quality yarns at incredible prices! Would you like to use our patterns for other than personal use? You can read what you are allowed to do in the Copyright text at the bottom of all our patterns. Happy crafting!
Post a comment to pattern DROPS 211-13
We would love to hear what you have to say about this pattern!
If you want to leave a question, please make sure you select the correct category in the form below, to speed up the answering process. Required fields are marked *.