
Popular categories
Looking for a yarn?


Comments / Questions (55)
![]() Carole Bolduc wrote:
Carole Bolduc wrote:
Bonjour Je désire utiliser la laine Drops Air, donc catégorie C au lieu de D. Qu'est-ce que ça changera dans le nombre de mailles ?
04.03.2021 - 17:42DROPS Design answered:
Bonjour Carole, sans doute oui, mais commncez par faire un echantillon. Je vous recommende d'utiliser une autre laine du groupe D ou vous adresser à votre magasin DROPS qui saura vous conseiller et vous renseigner. Bon tricot!
04.03.2021 - 18:09
![]() Suztakowski wrote:
Suztakowski wrote:
Je ne comprends pas l'explication du début. Rang raccourcis ???? Dois-je tricoter sur 5 mailles seulement ?
27.02.2021 - 21:15DROPS Design answered:
Bonjour Mme Suztakowski, vous tricotez les deux bordures de col séparément, en rangs raccourcis puis les assemblez avec les mailles de l'encolure dos entre elles - cette vidéo montre comment tricoter ces rangs raccourcis. En espérant que ceci puisse vous aider. Bon tricot!
01.03.2021 - 09:03
![]() Anna Bent wrote:
Anna Bent wrote:
Ich habe die Jacke nun fertig in Größe XL. Es ist noch sehr viel Wolle übrig, ein ganzes Knäuel und zwei halbe. Die Maße meiner Jacke stimmen mit der Zeichnung überein. (Mich stört es nicht, ich stricke sie nun einfach länger.)
20.02.2021 - 10:56
![]() Hanny wrote:
Hanny wrote:
De overgangen tussen het lijf en de mouwen worden verplaatst, zodat de 2-1-1-1-1-1 steken aan elke kant van beide mouwen nu op de voor- en achterpanden gebreid worden. Ik begrijp niet wat hier mee wordt bedoeld. Mag ik a.u.b een nadere uitleg. Hartelijk dank!
15.02.2021 - 19:41DROPS Design answered:
Dag Hanny,
Je verplaatst de markeerdraden worden 2-1-1-1-1-1 steken richting de mouw verplaatst, zodat er 2-1-1-1-1-1 steek naar het pand gaat aan beide kanten en 2-1-1-1-1-1 steek van de mouw af aan beide kanten van de mouw.
16.02.2021 - 14:24
![]() Annie wrote:
Annie wrote:
Je ne comprends pas l'explication du début pour l'empiècement, il y est fait référence à une astuce tricot, pouvez-vous m'indiquer où je peux trouver cette astuce tricot?
04.02.2021 - 11:25DROPS Design answered:
Bonjour Annie, vous trouverez cette ASTUCE TRICOT listée sous les TECHNIQUES EMPLOYÉES, après les explications du point fantaisie, des rangs raccourcis et des augmentations/diminutions, et juste au-dessus du début des explications elles-mêmes. bon tricot!
04.02.2021 - 13:09
![]() Oliva wrote:
Oliva wrote:
Sto ultimando il modello e mi sono purtroppo resa conto che le indicazioni per lo sprone sono errate. Ho sperato di sbagliare io ma ora finito è ovvio che la misura indicata di 14 per lato non riesce in alcun modo a congiungersi dietro il collo e completare così anche la parte dietro. Arriva tendendola un pò alle spalle.Sbaglio io qualcosa? credo che rimedierò con una striscia di sprone da congiungere ai due pezzi.per il resto sempre tutto chiaro.Grazie e a presto
01.12.2020 - 15:33DROPS Design answered:
Buongiorno Olga, probabilmente è dovuto a un problema di tensione, comunque inoltreremo la sua segnalazione al settore design. Buon lavoro!
02.12.2020 - 09:13
![]() Marion wrote:
Marion wrote:
Goedemorgen, 2 oktober heb ik een vraag gesteld maar nog geen antwoord gekregen. Ik zou echt heel graag deze vest breien zonder rondbreinaald maar met gewone breinaalden. Kunt u me vertellen hoe ik dat aanpak? Want nu wordt het van boven naar beneden gebreid. Dus ik weet niet hoe ik het moet doen dan. Ik hoop echt antwoord te krijgen. Super bedankt alvast.
10.10.2020 - 11:19
![]() Marion wrote:
Marion wrote:
Goedemiddag, ik wil graag deze vest met naalden breien ipv rondbreinaald. Kan dat? Hoe moet ik dat dan doen als het kan? Hopelijk heeft u voor mij een antwoord. Alvast bedankt. Groetjes,Marion
02.10.2020 - 15:51DROPS Design answered:
Dag Marion,
We hebben een instructie op de website staan, waarin uitgelegd is hoe je een patroon aan kunt passen om met rechte naalden te breien. Dit patroon is wel wat lastiger ivm de raglan, maar kijk maar even of je er wat aan hebt. Hier vind je de instructie.
10.10.2020 - 11:26
![]() Kristina wrote:
Kristina wrote:
Jag har samma problem som Annette- halskanten är för kort för att nå till mitt bak i nacken. Kan bero på stickfastheten, svårt att få den rätt när man enligt instruktionen ska sticka kanten tightare än resten. Jag kommer att få sticka på en bit till på halskragen eller sy fast den med ”rynk” i bakstycket. Eller bara sy fast kragen så långt den räcker... Eftersom det verkar vara fler som har samma problem kanske mönstret kan förbättras genom tips kring denna detalj.
09.09.2020 - 15:42
![]() Emma Lindahl wrote:
Emma Lindahl wrote:
Med vilka stickor mäter jag stickfastheten? 8 eller 6?
24.06.2020 - 19:14DROPS Design answered:
Hej Emma. Det är sticka 8 som används till slätstickningen och det är i slätstickning stickfastheten mäts. Om du inte får det antal maskor som uppges så får du prova att gå upp eller ner i storlek på stickorna. Mvh DROPS Design
25.06.2020 - 08:15
|
|||||||
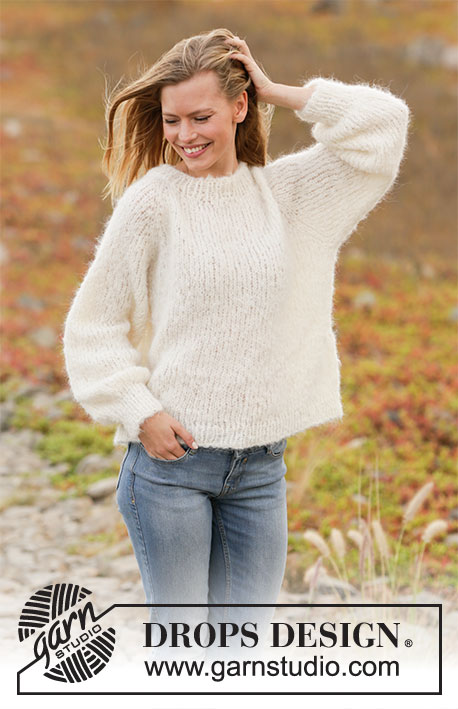
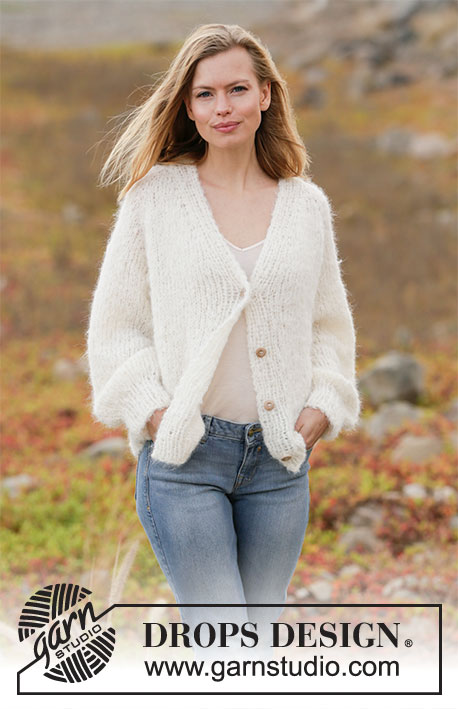
Spring Fuzz Jacket#springfuzzjacket |
|||||||
 |
 |
||||||
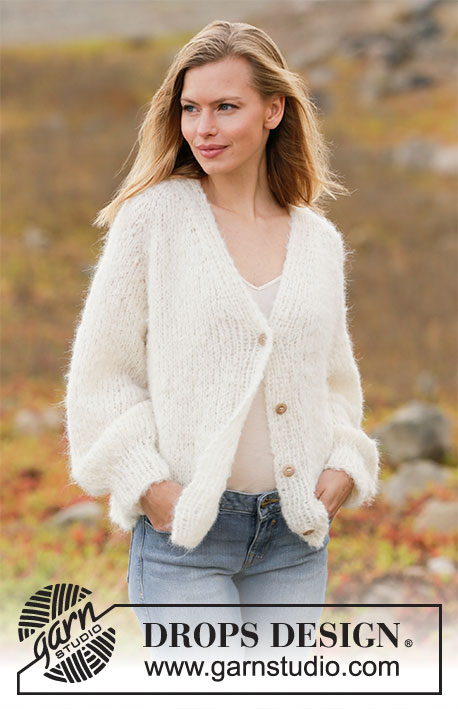
Knitted jacket with raglan in DROPS Melody. The piece is worked top down with v-neck. Sizes XS - XXL.
DROPS 213-27 |
|||||||
|
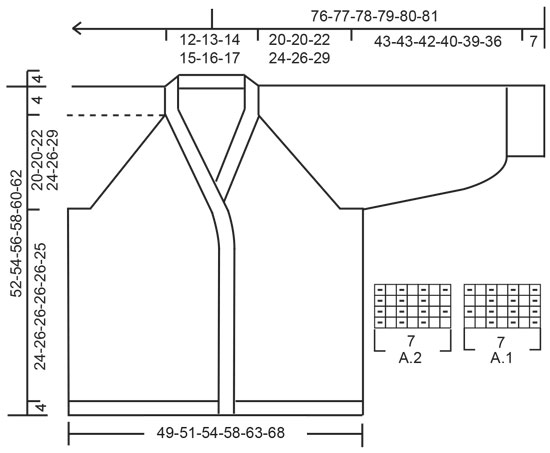
------------------------------------------------------- EXPLANATIONS FOR THE PATTERN: ------------------------------------------------------- PATTERN: See diagrams A.1 and A.2. The diagrams show all rows in the pattern seen from the right side. SHORT ROWS-1 (for the first neck-piece worked, i.e. right neck): Start from the right side and work as follows: * Work back and forth as before over the first 5 stitches, then work as before, back and forth over all 7 stitches *, work from *-* a total of 2 times. SHORT ROWS-2 (for the second neck-piece worked, i.e. left neck): Start from the wrong side and work as follows: * Work back and forth as before over the first 5 stitches, then work as before back and forth over all 7 stitches *, work from *-* a total of 2 times, then work 1 row back from the wrong side over all 7 stitches. INCREASE/DECREASE TIP (evenly spaced): To work out how to increase/decrease evenly, count the total number of stitches on needle (e.g. 54 stitches), minus band stitches (e.g. 14 stitches) and divide the remaining stitches with number of increases/decreases to be made (e.g. 4) = 10. In this example, increase by making 1 yarn over after each 10th stitch. On the next row work the yarn overs twisted to avoid holes. When decreasing, knit together each 9th and 10th stitch. KNITTING TIP: To keep the bands even and neat it is important to tighten the strand slightly when working the outermost 7 stitches on each side. V-NECK: All increases are worked from the right side! Increase 1 stitch on the inside of 7 band stitches + 1 knit stitch (= 8 stitches). Increase by making 1 yarn over after the 8 stitches on the beginning of the row and before the 8 stitches at the end of the row. On the next row (wrong side) purl the yarn overs twisted to avoid holes. Then work the new stitches in stocking stitch. RAGLAN: All increases are worked from the right side! Increase 1 stitch on each side of the 4 markers in each transition between body and sleeves as follows: Work until there is 1 stitch left before marker thread, 1 yarn over, knit 2 (marker sits between these 2 stitches), 1 yarn over (= 2 stitches increased). Repeat at all the markers On the next row (wrong side) purl the yarn overs twisted to avoid holes. Then work the new stitches in stocking stitch. DECREASE TIP (for sleeves): Decrease 1 stitch on each side of the marker thread as follows: Work until there are 3 stitches left before the marker thread, knit 2 together, knit 2 (marker thread sits between these 2 stitches), slip 1 stitch as if to knit, knit 1 and pass the slipped stitch over the knitted stitch. BUTTONHOLE: Work buttonholes on the right band (when the garment is worn). Work from the right side when there are 5 stitches left on the row as follows: Make 1 yarn over, knit 2 together and knit the last stitches. On the next row (wrong side), knit the yarn over to leave a hole. The first buttonhole is worked on the first row on the body. Then work the other 3 buttonholes with approx. 8-8½-8½-8½-8½-8½cm between each one. CASTING-OFF TIP: To avoid the cast-off edge being tight you can cast off with a larger size needle. ------------------------------------------------------- START THE PIECE HERE: ------------------------------------------------------- JACKET – SHORT OVERVIEW OF THE PIECE: First work 2 loose neck-pieces. These are placed on the circular needle when casting on stitches for the neck as described in the text (the neck-edges are sewn together mid back to finish and then sewn to the neck-line at the back). Then the whole piece is continued top down. The yoke is worked back and forth with circular needle from mid front, while increasing for the v-neck and raglan. The yoke is divided for body and sleeves. The body is continued back and forth from mid front. The sleeves are worked in the round with double pointed needles/short circular needle. NECK: Right neck: Cast on 7 stitches with needle size 6 mm and Melody and work A.1 (= 7 stitches) back and forth (row 1 = right side). When the neck-piece measures 4-4-5-5-6-6 cm, work SHORT ROWS-1 – read description above. When the short rows are finished continue with A.1 over all stitches until the piece measures approx. 12-12-13-13-14-14 cm outermost on the neck (i.e. on the long-side) – adjust so you finish after a row from the wrong side. Cut the strand and lay the piece to one side. Left neck: Cast on 7 stitches with needle size 6 mm and Melody and work A.2 (= 7 stitches) back and forth. When the neck-piece measures 4-4-5-5-6-6 cm, work SHORT ROWS-2 – read description above. When the short rows are finished continue with A.2 over all stitches until the piece measures approx 12-12-13-13-14-14 cm outermost on the neck (i.e. on the long-side) – adjust so you finish after a row from the wrong side. Now continue as follows: ROW 1 (right side): Do not cut the strand but work the left neck-piece (from the right side), cast on 40-42-43-44-45-46 stitches with the same circular needle, straight after the neck-piece, and then work as before over the 7 stitches on the right neck-piece = 54-56-57-58-59-60 stitches on the needle. ROW 2: Purl 1 row from the wrong side (band stitches worked as before). ROW 3: Knit 1 row from the right side (band stitches worked as before) where you increase 4-8-10-10-11-13 stitches evenly spaced – read INCREASE/DECREASE TIP = 58-64-67-68-70-73 stitches. ROW 4: Purl 1 row from the wrong side (band stitches worked as before). Insert a marker inside the 7 stitches on the edge of A.1. The piece will be measured from this marker. Change to circular needle size 8 mm and work the yoke as described below. YOKE: Insert 4 marker threads in the piece as follows (without working the stitches): Insert a marker thread 10 stitches in from each side (= in the transition between sleeves and front pieces), place the next 2 marker threads 10 stitches further in from both the first marker threads (= in transitions between sleeves and back piece). There are now 18-24-27-28-30-33 stitches on the back piece between the last 2 marker threads. Work stocking stitch and band stitches as before – read KNITTING TIP. AT THE SAME TIME on the first row from the right side increase for V-NECK and RAGLAN – read description above. REMEMBER THE KNITTING TENSION! Increase to raglan every 2nd row a total of 14-14-15-16-18-20 times and increase for the v-neck every 2nd row 1-3-2-3-3-1 times in total, then on every 4th row 5-4-5-5-6-8 times then on every 6th row 1 time in all sizes. When all the increases to raglan and v-neck are finished there are 184-192-203-214-234-253 stitches on the row. Continue with stocking stitch and work the 7 band stitches on each side as before until the piece measures 20-20-22-24-26-29 cm from the marker. Now divide the piece for body and sleeves. The transitions between body and sleeves are displaced so the 2-1-1-1-1-1 stitches on each side of both sleeves are now worked on the front and back pieces. The next row from the wrong side is worked as follows: Work the first 33-33-34-36-39-41 stitches as before, place the next 34-36-38-40-44-48 stitches on a thread for sleeve, cast on 8-8-8-10-10-10 new stitches on the needle (= in side under sleeve), work the next 50-54-59-62-68-75 stitches (= back piece), place the next 34-36-38-40-44-48 stitches on a thread for sleeve, cast on 8-8-8-10-10-10 new stitches on the needle (= in side under sleeve), work the remaining 33-33-34-36-39-41 stitches as before. Body and sleeves are finished separately. THE PIECE IS NOW MEASURED FROM HERE. BODY: = 132-136-143-154-166-177 stitches. Continue with stocking stitch and A.1/A.2 over the 7 band stitches on each side as before – remember BUTTONHOLES – read description above. When the piece measures 24-26-26-26-26-25 cm from the division increase 19-19-20-23-25-26 stitches evenly spaced = 151-155-163-177-191-203 stitches. Change to circular needle size 6 mm and work rib as follows: A.2 as before over the first 7 stitches, work rib (= knit 1 / purl 1) until there are 8 stitches left on the row, knit 1, and work A.1 over the last 7 stitches. When the rib measures 4 cm, cast off with knit over knit and purl over purl – read CASTING-OFF TIP. The jacket measures approx. 52-54-56-58-60-62 cm from the shoulder down. SLEEVES: Place the 34-36-38-40-44-48 stitches from the thread on the one side of the piece on short circular needle/double pointed needles size 8 mm and knit up 1 stitch in each of the 8-8-8-10-10-10 stitches cast on under the sleeve = 42-44-46-50-54-58 stitches. Work the different sizes as follows: Sizes XS, S and M: Work stocking stitch in the round until the piece measures 43-43-42 cm. Continue as described below. Sizes L, XL and XXL: Insert a marker thread in the middle of the 10-10-10 stitches under the sleeve. Allow the thread to follow your work onwards. When the sleeve measures 5 cm, decrease 1 stitch on each side of the marker thread – read DECREASE TIP. Repeat the decrease when the sleeve measures 12 cm = 46-50-54 stitches. Continue working stocking stitch until the sleeve measures 40-39-36 cm. Continue as described below. All sizes: Knit 1 round where you decrease 14-14-14-14-14-16 stitches evenly spaced = 28-30-32-32-36-38 stitches. Change to double pointed needles size 6 mm and work rib (= knit 1 / purl 1) in the round for 7 cm. Cast off with knit over knit and purl over purl – remember CASTING-OFF TIP. The sleeve measures approx 50-50-49-47-46-43 cm. Work the other sleeve in the same way. ASSEMBLY: Sew the neck-pieces together mid-back with the seam turning inwards. Stretch the neck slightly and sew it to the neck-line at the back. Sew the buttons onto the left band. |
|||||||
Diagram explanations |
|||||||
|
|||||||
 |
|||||||
Have you finished this pattern?Tag your pictures with #dropspattern #springfuzzjacket or submit them to the #dropsfan gallery. Do you need help with this pattern?You'll find 26 tutorial videos, a Comments/Questions area and more by visiting the pattern on garnstudio.com. © 1982-2026 DROPS Design A/S. We reserve all rights. This document, including all its sub-sections, has copyrights. Read more about what you can do with our patterns at the bottom of each pattern on our site. |
|||||||


With over 40 years in knitting and crochet design, DROPS Design offers one of the most extensive collections of free patterns on the internet - translated to 17 languages. As of today we count 324 catalogues and 12290 patterns translated into English (UK/cm).
We work hard to bring you the best knitting and crochet have to offer, inspiration and advice as well as great quality yarns at incredible prices! Would you like to use our patterns for other than personal use? You can read what you are allowed to do in the Copyright text at the bottom of all our patterns. Happy crafting!
Post a comment to pattern DROPS 213-27
We would love to hear what you have to say about this pattern!
If you want to leave a question, please make sure you select the correct category in the form below, to speed up the answering process. Required fields are marked *.