
Popular categories
Looking for a yarn?


Comments / Questions (51)
![]() Bharti wrote:
Bharti wrote:
Hello At the beginning of instructions it says insert 1 marker thread in the middle of the round. How many stitches should I have knitted before I insert the marker and what is the marker for. Thank you for your assistance Bharti
12.06.2020 - 14:00DROPS Design answered:
Dear Mrs Bharti, the marker is inserted to measure from, so just make sure you add it on a stitch in the middle of the row (divide your number of sts by 2 and insert the marker there to measure from). Happy knitting!
12.06.2020 - 15:05
![]() Marta wrote:
Marta wrote:
Hello. I don’t understand this part: “ Then increase only on front and back piece (= 4 stitches increased) every other round 5-5-3-4-5-7 times = 238-266-286-306-330-350 stitches.” Where should I increase of 4 stitches ? Thanks.
21.04.2020 - 19:48DROPS Design answered:
Dear Marta, these increases are done for the raglan on front and back piece only, this means you have to increase for raglan 5-5-3-4-5-7 more times on front and back piece (as before) but you won't increase for sleeve anymore (raglan increases on sleeves are done). Happy knitting!
22.04.2020 - 08:26
![]() FRANCOISE wrote:
FRANCOISE wrote:
J'ai ENFIN compris, merci pour votre patience. Ce pull est magnifique!!
27.03.2020 - 20:00
![]() FRANCOISE wrote:
FRANCOISE wrote:
Je repose cette question : Je comprends les 92m, je comprends les 10m de A2, je comprends les 144 mailles à faire avant et après chaque A1, mais où dois-je faire les 5 fois 4 augmentations (dos et devant seulement) puisque je fais déjà les augmentations des deux côtes des A1 qui les bordent? Le dos comprend 20 mailles au départ et le devant seulement 3 mailles? Mille excuses pour ces incompréhensions; Pouvez-vous m'indiquer un autre modèle que je peux faire avec cette laine? Merci
25.03.2020 - 12:42DROPS Design answered:
Bonjour Françoise, quand vous aurez augmenté 18 fois 8 m pour le raglan, vous aurez 246 m mais l'empiècement ne sera pas terminé. Vous devez ensuite encore augmenter 5 fois 4 mailles (autrement dit, vous devez encore augmenter pour le devant et pour le dos = 1 m après A.1 au début du dos/devant + 1 m avant A.1 à la fin du dos/devant) mais plus pour les manches = 4 augmentations au lieu de 8) vous augmenterez ainsi 8 m = 246+20= vous aurez 266 m. Bon tricot!
25.03.2020 - 15:00
![]() FRANCOISE wrote:
FRANCOISE wrote:
Je comprends les 92m, je comprends les 10m de A2, je comprends les 144 mailles à faire avant et après chaque A1, mais où dois-je faire les 5 fois 4 augmentations (dos et devant seulement) puisque je fais déjà les augmentations des deux côtes des A1 qui les bordent? Le dos comprend 20 mailles au départ et le devant seulement 3 mailles? Mille excuses pour ces incompréhensions
25.03.2020 - 10:37DROPS Design answered:
Bonjour Françoise, la réponse précédente a-t-elle plu éclairer cette question? Vous augmentez pour le raglan 18 fois 8 mailles (= 2 m sur chaque manche + 2 m sur le devant + 2 m sur le dos), puis ensuite uniquement sur le devant et le dos, plus sur les manches. Est-ce que vous comprenez mieux ainsi?
25.03.2020 - 11:58
![]() FRANCOISE wrote:
FRANCOISE wrote:
En fait, après réflexion, ce que je ne comprends pas c'est : - Comment faire les 10 augmentations dans A2 - Comment faire les "5 fois 4 augmentations (dos et devant seulement) Merci pour votre aide
25.03.2020 - 09:41DROPS Design answered:
Bonjour Françoise, les 10 augmentations se font au 1er rang de A.2 (cf les 10 jetés) = on a ainsi 24 m pour A.X. Les 5 x 4 augmentations correspondent aux augmentations des raglans que l'on va ne faire que sur le devant et le dos: 1 m après le A.1 au début du devant/dos et 1 m avant le A.1 à la fin du devant/dos = 4 augmentations sur ces tours (aucune augmentation sur les manches). Bon tricot!
25.03.2020 - 10:16
![]() FRANCOISE wrote:
FRANCOISE wrote:
Je viens de terminer la première augmentation du raglan. Je dois continuer en répétant A1 ET AX (sur 24 mailles) et augmenter 18 fois (je fais le modèle M) au total tous les deux tours. Je ne comprends pas où augmenter et quand. Dois-je reprendre 18 fois les 8 augmentations du montage du raglan mais je n'aurai que 8 fois 18 augmentations soit 74 mailles + les 92 du col je n'arrive pas à 246 mailles à la fin de l'empiècement. Je suis perdue!! Merci
24.03.2020 - 15:42DROPS Design answered:
Bonjour Françoise, pour A.2 vous allez tricoter uniquement A.X (= les torsades et plus les 2 premiers rangs), A.1 va se tricoter comme avant. Vous continuez ensuite donc en suivant A.1, A.2 et en jersey comme avant en augmentant cf RAGLAN de chaque côté de A.1 (= 1 jeté avant chaque A.1 + 1 jeté après chaque A.1) = 8 augmentations par tour, soit: 92 m + 10 augm dans A.2 + 18 fois 8 augmentations + 5 fois 4 augmentations (= dos et devant seulement) = 92+10+144+20=266 m en taille M. Bon tricot!
24.03.2020 - 17:07
![]() Valérie wrote:
Valérie wrote:
Il est magnifique, serait il possible d’avoir les explications de bas en haut avec des aiguilles droites svp, j ai du mal avec des aiguilles circulaires ... Merci par avance.
02.02.2020 - 22:46DROPS Design answered:
Bonjour Valérie, vous trouverez ici comment adapter un modèle pour des aiguilles droites. Bon tricot!
03.02.2020 - 10:28
![]() Maria Luisa Cevolani wrote:
Maria Luisa Cevolani wrote:
I have finished your maple wood ,M size. Altogether it is a very pretty sweater, but the raglans done with your explanations don't look so nice, with the 2 series of different increases, If I do Maple Wood again, I'll do something different at the raglans, in a way that they are and look continuous
13.01.2020 - 14:48
![]() Tone Kristine Ihasee wrote:
Tone Kristine Ihasee wrote:
Vil gjerne strikke genseren men uten fletten foran. Blir det rett frem med like mange masker?
29.12.2019 - 16:36DROPS Design answered:
Hei Tone. Nei, det er flere masker i front (fordi fletten trekker genseren litt sammen). mvh DROPS design
20.01.2020 - 11:28
|
|||||||||||||||||||
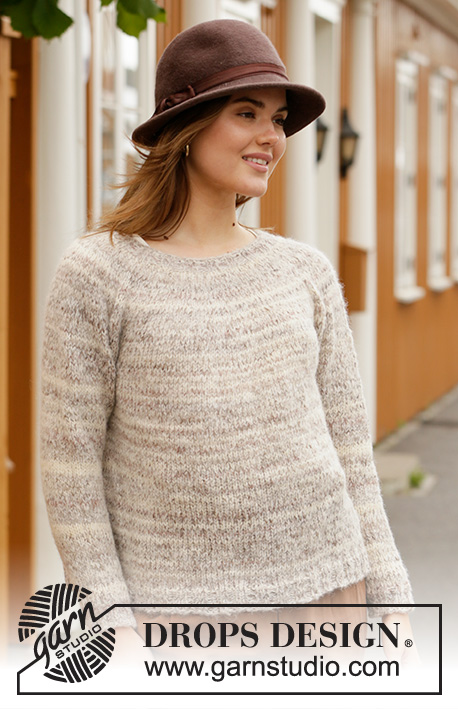
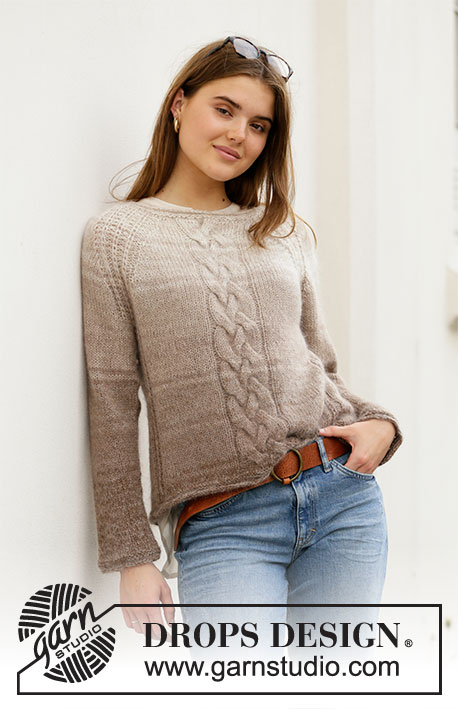
Maple Wood#maplewoodsweater |
|||||||||||||||||||
 |
 |
||||||||||||||||||
Knitted jumper in DROPS Alpaca and DROPS Kid-Silk. Piece is knitted top down with cable, stripes and false English rib. Size: S - XXXL
DROPS 206-50 |
|||||||||||||||||||
|
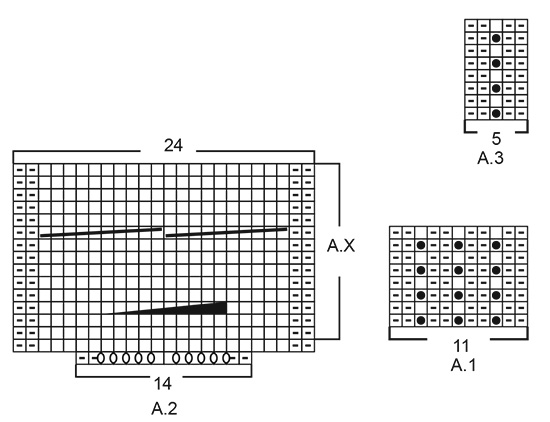
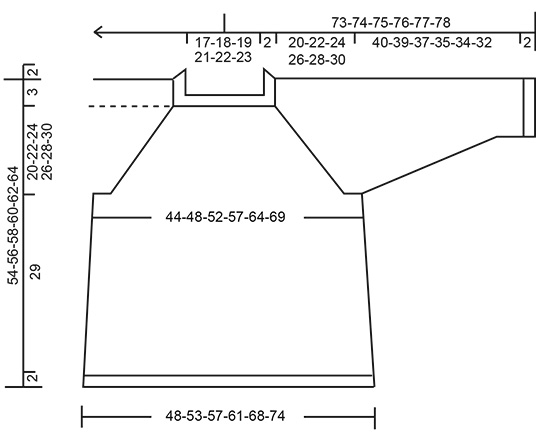
---------------------------------------------------------- EXPLANATION FOR THE PATTERN: ---------------------------------------------------------- GARTER STITCH (worked in the round): 1 ridge vertically = 2 rounds, i.e. knit 1 round and purl 1 round. INCREASE TIP-1 (evenly): To calculate how to increase evenly, use the total number of stitches on row (e.g. 73 stitches) and divide stitches by number of increases to be done (e.g. 15) = 4.9. In this example increase by making 1 yarn over after approx. every 5th stitch. On next round knit yarn overs twisted to avoid holes. STRIPES: NOTE! Work all stripes in 1 strand Alpaca (A) and 1 strand Kid-Silk (KS) = 2 strands. STRIPE 1: 6-6-6½-6½-7-7 cm with off white (A) and light beige (KS). STRIPE 2: 2 rounds with light nougat (A) and off white (KS). STRIPE 3: 2 rounds with off white (A) and light beige (KS). STRIPE 4: 6-6-6½-6½-7-7 cm with light nougat (A) and off white (KS). STRIPE 5: 2 rounds with light nougat (A) and light beige (KS). STRIPE 6: 2 rounds light nougat (A) and off white (KS). STRIPE 7: 6-6-6½-6½-7-7 cm with light nougat (A) and light beige (KS). STRIPE 8: 2 rounds with light nougat (A) and beige (KS). STRIPE 9: 2 rounds with light nougat (A) and light beige (KS). STRIPE 10: 6-6-6½-6½-7-7 cm with light nougat (A) and beige (KS). STRIPE 11: 2 rounds with nougat (A) and light beige (KS). STRIPE 12: 2 rounds with light nougat (A) and beige (KS). STRIPE 13: 6-6-6½-6½-7-7 cm with nougat (A) and light beige (KS). STRIPE 14: 2 rounds with nougat (A) and beige (KS). STRIPE 15: 2 rounds with nougat (A) and light beige (KS). STRIPE 16: 6-6-6½-6½-7-7 cm with nougat (A) and beige (KS). STRIPE 17: 2 rounds with light brown (A) and light beige (KS). STRIPE 18: 2 rounds with nougat (A) and beige (KS). STRIPE 19: Work with light brown (A) and light beige (KS) until finished measurements. PATTERN: See diagrams A.1 to A.3. RAGLAN: Increase 1 stitch in each side of A.1 in every transition between body and sleeves (= 8 stitches increased on round). Increase 1 stitch by making 1 yarn over. On next round knit yarns over twisted to avoid holes. Then work the new stitches in stocking stitch. INCREASE TIP-2 (applies to sides of body): Work until 2 stitches remain before marker thread, 1 yarn over, knit 4 (marker thread is in the middle of these 4 stitches), 1 yarn over. On next round purl yarn overs twisted to avoid holes. Then work the new stitches in stocking stitch. DECREASE TIP (applies to sleeves): Decrease 1 stitch on each side of marker thread as follows: Work until 3 stitches remain before marker thread and knit 2 together, knit 2 (marker thread is between these stitches), slip 1 stitch knitwise, knit 1, pass slipped stitch over stitch worked. ---------------------------------------------------------- START THE PIECE HERE: ---------------------------------------------------------- JUMPER - SHORT OVERVIEW OF THE PIECE: Neck edge and yoke are worked in the round on circular needle, top down. Now divide yoke for body and sleeves. Body is worked in the round on circular needle, top down. Work sleeves in the round on double pointed needles/a short circular needle, top down. NECK EDGE: Cast on 73-77-81-87-91-93 stitches on circular needle size 5 mm with 1 strand off white Alpaca and 1 strand light beige Kid-Silk (= 2 strands). Work first a rolling edge, i.e. knit 3 rounds. Switch to circular needle size 4 mm and work 2 ridges in GARTER STITCH - see explanation above. Switch back to circular needle size 5 mm. Knit 1 round while increasing 15-15-15-17-25-27 stitches evenly - read INCREASE TIP-1 = 88-92-96-104-116-120 stitches. Knit 1 round. Insert 1 marker thread in the middle of the row - NOW MEASURE PIECE FROM HERE! YOKE: Now work STRIPES – read explanation above, and pattern as follows: Work A.1 (= 11 stitches), make 1 yarn over (= increase), work 4 stitches in stocking stitch (= sleeve), make 1 yarn over (= increase), work A.1 (= 11 stitches), make 1 yarn over (= increase), work 2-3-4-6-9-10 stitches in stocking stitch, work A.2 (= 14 stitches that are increased to 24 stitches), work 2-3-4-6-9-10 stitches in stocking stitch (= front piece), make 1 yarn over (= increase), work A.1 (= 11 stitches), make 1 yarn over (= increase), work 4 stitches in stocking stitch (= sleeve), make 1 yarn over (= increase), work A.1 (= 11 stitches), make 1 yarn over (= increase), work in stocking stitch over the remaining 18-20-22-26-32-34 stitches (= back piece), and make 1 yarn over (= increase). First increase for RAGLAN - read explanation above, is now done. REMEMBER THE KNITTING TENSION! Continue pattern in the round (repeat A.1 and A.X vertically), and increase every other round 15-18-21-22-23-24 times in total (including first increase as explained above) = 218-246-274-290-310-322 stitches. Then increase only on front and back piece (= 4 stitches increased) every other round 5-5-3-4-5-7 times = 238-266-286-306-330-350 stitches. Work without increases until piece measures 20-22-24-26-28-30 cm from marker thread. Now divide yoke for body and sleeves, i.e. work last round as follows: Work first 5 stitches (= on back piece) as before, slip the next 46-52-58-60-62-64 stitches on 1 stitch holder for sleeve, cast on 6-6-8-8-10-12 new stitches on needle (= in the side under sleeve), work the next 78-86-90-98-108-116 stitches as before (= front piece), slip the next 46-52-58-60-62-64 stitches on 1 stitch holder for sleeve, cast on 6-6-8-8-10-12 new stitches on needle (in the side under sleeve). and work the remaining 63-71-75-83-93-101 stitches (= on back piece). Cut the yarn. Then finish body and sleeves separately. NOW MEASURE THE PIECE FROM HERE! BODY: = 158-174-186-202-226-246 stitches. Insert 1 marker thread in the middle of each side, in the middle of the 6-6-8-8-10-12 stitches that were cast on under sleeves. There are now 84-92-98-106-118-128 stitches on front piece and 74-82-88-96-108-118 stitches on back piece. Move the marker threads upwards when working; they should be used for increase later in the sides on body. Begin round in the side and begin with front piece. Then work pattern as follows: Work 3-3-4-4-5-6 stitches in stocking stitch (= in the side), work A.3 (= 5 stitches), work in stocking stitch and A.2 over the next 68-76-80-88-98-106 stitches as before, work A.3 (= 5 stitches), work 6-6-8-8-10-12 stitches in stocking stitch (= in the side), work A.3 (= 5 stitches), work in stocking stitch over the next 58-66-70-78-88-96 stitches as before, work A.3 (= 5 stitches), and finish with 3-3-4-4-5-6 stitches in stocking stitch (= in the side). When body measures 5 cm from division in all sizes, increase 1 stitch on each side of both markers - READ INCREASE TIP-2 (= 4 stitches increased). Increase like this every 6 cm 4 times in total in each side = 174-190-202-218-242-262 stitches. Work until body measures approx. 29 cm from division in all sizes - adjust after 6th or 12th round in A.X (approx. 2 cm remain until finished measurements, try the jumper on and work to desired length). Work 1 round while increasing 10-10-10-14-14-14 stitches evenly (do not increase over cable) = 184-200-212-232-256-276 stitches. Switch to circular needle size 4 mm. Work 2 ridges. Switch back to circular needle size 5 mm. Work in 2 rounds stocking stitch over all stitches. Cast off - make sure that the cast-off edge is not too tight. Jumper measures approx. 54-56-58-60-62-64 cm from shoulder and down. SLEEVE: Slip the 46-52-58-60-62-64 stitches from stitch holder in one side of piece on double pointed needles/short circular needle size 5 mm and pick in addition up 1 stitch in each of the 6-6-8-8-10-12 stitches cast on under sleeve = 52-58-66-68-72-76 stitches. Insert 1 marker thread in the middle of the new stitches under sleeve, move the marker thread upwards when working; it should be used for decrease mid under sleeve. Begin round at the marker thread and work stocking stitch and stripes the same way as on body. When sleeve measures 2 cm from division, decrease 1 stitch on each side of marker thread - read DECREASE TIP. Decrease like this every 4½-3½-2½-2-1½-1½ cm 8-10-13-14-15-16 times in total = 36-38-40-40-42-44 stitches. Work until sleeve measures 40-39-37-35-34-32 cm from division (approx. 2 cm remain until finished measurements, try the jumper on and work to desired length)- NOTE: Shorter measurements in the larger sizes because of wider neck and longer yoke. Work 1 round while increasing 6 stitches evenly = 42-44-46-46-48-50 stitches. Switch to double pointed needles size 4 mm. Work 2 ridges. Switch back to double pointed needles size 5 mm. Work 2 rounds in stocking stitch. Cast off - make sure that the cast-off edge is not too tight. Work the other sleeve the same way. |
|||||||||||||||||||
Diagram explanations |
|||||||||||||||||||
|
|||||||||||||||||||
 |
|||||||||||||||||||
 |
|||||||||||||||||||
Have you finished this pattern?Tag your pictures with #dropspattern #maplewoodsweater or submit them to the #dropsfan gallery. Do you need help with this pattern?You'll find 29 tutorial videos, a Comments/Questions area and more by visiting the pattern on garnstudio.com. © 1982-2026 DROPS Design A/S. We reserve all rights. This document, including all its sub-sections, has copyrights. Read more about what you can do with our patterns at the bottom of each pattern on our site. |
|||||||||||||||||||


With over 40 years in knitting and crochet design, DROPS Design offers one of the most extensive collections of free patterns on the internet - translated to 17 languages. As of today we count 324 catalogues and 12290 patterns translated into English (UK/cm).
We work hard to bring you the best knitting and crochet have to offer, inspiration and advice as well as great quality yarns at incredible prices! Would you like to use our patterns for other than personal use? You can read what you are allowed to do in the Copyright text at the bottom of all our patterns. Happy crafting!
Post a comment to pattern DROPS 206-50
We would love to hear what you have to say about this pattern!
If you want to leave a question, please make sure you select the correct category in the form below, to speed up the answering process. Required fields are marked *.