
Popular categories
Looking for a yarn?


Comments / Questions (37)
![]() Cathleen Castaneda wrote:
Cathleen Castaneda wrote:
Hello! Can you tell me what method of casting on is used for pattern Children 34-24? Thanks so much!!!
12.01.2024 - 21:13DROPS Design answered:
Dear Cathleen, there is no specific method for casting on. We usually use the continental method; you can see more information on it here: https://www.garnstudio.com/lesson.php?id=1&cid=19. Happy knitting!
14.01.2024 - 19:22
![]() Cathleen Castaneda wrote:
Cathleen Castaneda wrote:
Hello! Can you tell me what method of casting on is used for pattern Children 34-24? Thanks so much!!!
12.01.2024 - 21:08DROPS Design answered:
Dear Cathleen, there is no specific method for casting on. We usually use the continental method; you can see more information on it here: https://www.garnstudio.com/lesson.php?id=1&cid=19. Happy knitting!
14.01.2024 - 19:22
![]() Denise wrote:
Denise wrote:
Est-ce que je peux convertir ce gilet pour une fille de 6 ans ? Combien de mailles et combien de laine ?
19.12.2022 - 17:22
![]() Denise wrote:
Denise wrote:
Est-ce que je peux convertir ce gilet à une petite fille de 6 ans ? Si oui combien de laine et de mailles
19.12.2022 - 04:39DROPS Design answered:
Bonjour Denise, vous trouverez les explications de ce gilet en taille 5/6 ans (4ème taille) - vérifiez la taille si besoin en mesurant un vêtement analogue qui va à l'enfant et comparez ces mesures à celles du schéma. Retrouvez plus d'infos sur les tailles ici. Bon tricot!
19.12.2022 - 09:53
![]() Elke Griesel wrote:
Elke Griesel wrote:
Vielen Dank für Ihre schnelle Antwort. Aber die Blende ist bei diesem Modell ja durch jeweils 6 Maschen schon in jeder Runde mit dran gestrickt. Ich suche das Vidio, wie man am Schluss die Kante der Blenden durch eine oder zwei Reihen dranstricken noch verschönert. Also eine Kante an die Blende strickt. Vielleicht könnten Sie mir dies suchen und posten hier? Das wäre wirklich sehr nett.
28.11.2022 - 14:39
![]() Elke Griesel wrote:
Elke Griesel wrote:
Liebes Team, Sie sollen ja nicht die Anleitung anpassen. Ich suche nur Ihr Vidio, wie man eine Blende im Nachgang noch verschönert in dem man noch einen Rand daran strickt. Das Vidio hatte ich am Anfang der Arbeit unter der Anleitung gesehen. In einer etwas komplizierter Art und Weise wurden dort Maschen am Rand aufgenommen und gleich auch abgekettet. Es wäre sehr nett, wenn Sie doch mal nach diesem Vidio schauen könnten.
28.11.2022 - 11:06DROPS Design answered:
Liebe Frau Griesel, unsere Video könnnen dann Ihnen vielleicht damit helfen: doppelte Blende ohne Knopflöcher und doppelte Blende mit Knopflöchern - an diesen Seiten finden Sie auch Beispiele, um Ihnen helfen zu können. Viel Spaß beium stricken!
28.11.2022 - 11:31
![]() Elke Griesel wrote:
Elke Griesel wrote:
Da ich es nicht als Frage, sondern Kommentar geschrieben habe hier noch einmal: Noch mal zu meiner Frage. In dem Vidio wurde gezeigt, wie man an den offenen Seiten ( Blende für Knopflöcher und Knöpfen) noch eine Reihe dranstricjt. Mein Aufnehmen der Maschen diese gleich auch abkettet. Dadurch entstand ein sehr schöner Rand. Ich würde daa gern noch machen und hoffe, Sie wissen, waa ich meine und können mir helfen. Herzlich Elke
26.11.2022 - 18:49
![]() Elke Griesel wrote:
Elke Griesel wrote:
Noch mal zu meiner Frage. In dem Vidio wurde gezeigt, wie man an den offenen Seiten ( Blende für Knopflöcher und Knöpfen) noch eine Reihe dranstricjt. Mein Aufnehmen der Maschen diese gleich auch abkettet. Dadurch entstand ein sehr schöner Rand. Ich würde daa gern noch machen und hoffe, Sie wissen, waa ich meine und können mir helfen. Herzlich Elje
26.11.2022 - 18:47DROPS Design answered:
Liebe Frau Griesel, leider können wir nicht jede Anleitung nach jeder Anfrage anpassen - am besten wenden Sie sich an Ihrem DROPS Händler, dort wird man Ihnen am besten weiterhelfen - auch per Telephon oder per E-Mail. Danke im voraus für Ihr Verständnis. Viel Spaß beim stricken!
28.11.2022 - 09:21
![]() Elke Griesel wrote:
Elke Griesel wrote:
Ich habe die Jacke jetzt fertig. Als ich damit begonnen habe, gab es auf der Seite hier ein Vidio, wie man die länglichen Seiten ( also Knopflochpasse und die anderen, auf die Knöpfe genäht werden) noch einfasst. Leider finde ich das Vidio hier jetzt nicht mehr. Könntet ihr mir einen Link schicken dafür? Vielen Dank bereits jetzt.
26.11.2022 - 13:51
![]() Giselle Alexander wrote:
Giselle Alexander wrote:
I do not see any instructions for the button band
10.11.2022 - 18:06DROPS Design answered:
Dear Mrs Alexander, you will find all instructions about buttonholes at the beginning of the written pattern - see BUTTONHOLES:. Happy knitting!
11.11.2022 - 08:41
|
|
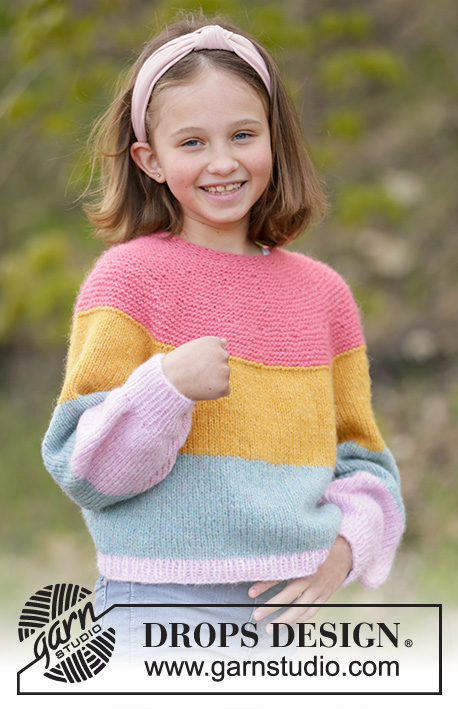
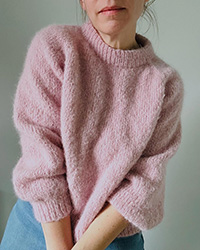
Candy Bar Jacket#candybarjacket |
|
 |
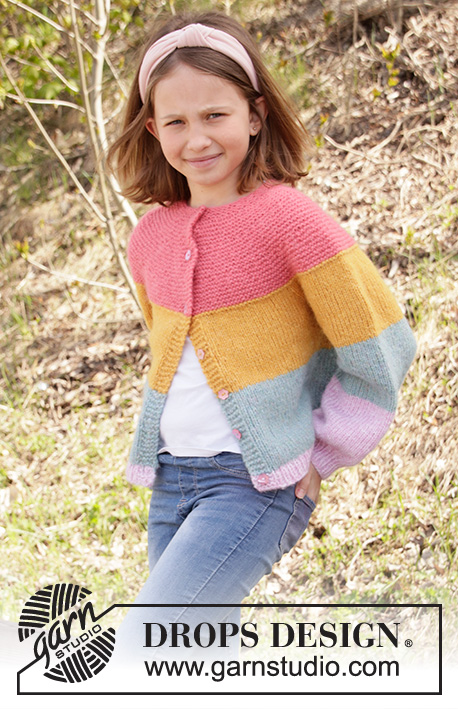 |
Knitted jacket for children with stripes in DROPS Air, Nepal or Paris. The piece is worked top down with round yoke and raglan. Sizes 1-10 years.
DROPS Children 34-24 |
|
|
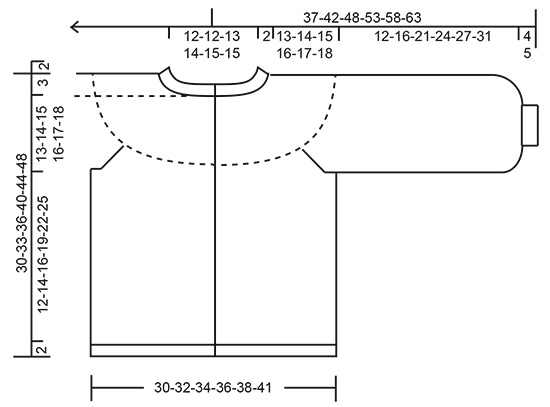
------------------------------------------------------- EXPLANATIONS FOR THE PATTERN: ------------------------------------------------------- STRIPES: Stripes are worked on the whole garment as follows: Work (10½) 11-12-13-14-15 cm with rose, (8½) 9-10-11-12-13 cm yellow and (8½) 9-10-11-12-13 cm sea green. Then complete the garment with light pink. RIDGE/GARTER STITCH (worked back and forth): 1 ridge in height = Knit 2 rows. BUTTONHOLES: Work buttonholes on the right band (when garment is worn). Work from the right side when there are 3 stitches left on the row as follows: Make 1 yarn over, knit 2 together and knit the last stitch. On the next row knit the yarn over to leave a hole. The first buttonhole is worked when the piece measures approx. 1 cm. Then work the next (5) 5-5-6-6-6 buttonholes with approx. (5) 5½-6-6½-7 cm between each one. INCREASE TIP (evenly spaced): To work out how to increase evenly, count the total number of stitches on the needle (e.g. 47 stitches) and divide by the number of increases to be made (e.g. 40) = 1.1. In this example, increase by making 1 yarn over after each stitch. Do not increase on bands. On the next row knit the yarn overs twisted to avoid holes. RAGLAN: Increase to raglan in each transition between body and sleeves. All increases are worked from the right side! Start 1 stitch before the marker, make 1 yarn over, knit 2 (the marker sits between these 2 stitches) and make 1 yarn over. On the next row purl the yarn overs twisted to avoid holes. ------------------------------------------------------- START THE PIECE HERE: ------------------------------------------------------- JACKET – SHORT OVERVIEW OF THE PIECE: The yoke is worked back and forth with circular needle, top down. The yoke is divided for body and sleeves and the body continued back and forth with circular needle. The sleeves are worked in the round with double pointed needles. YOKE: Cast on (47) 53-55-57-61-61 stitches with circular needle size 4 mm and Air - the whole piece is worked in STRIPES – read description above. Work 3 ridges; the first buttonhole is worked after approx. 1 cm - see description above. Change to circular needle size 5 mm and insert 1 marker; THE PIECE IS NOW MEASURED FROM HERE. On the next row increase (40) 42-42-44-48-50 stitches evenly spaced – READ INCREASE TIP in explanations above = (87) 95-97-101-109-111 stitches. Work garter stitch until the piece measures (3) 3-3-3-3-3 cm. REMEMBER THE KNITTING TENSION! On the next row increase (36) 38-38-40-46-48 stitches evenly spaced = (123) 133-135-141-155-159 stitches. Work garter stitch until the piece measures (7) 7-7-7-7-7 cm. On the next row increase 30-32-38-40-42-42 stitches evenly spaced = (153) 165-173-181-197-201 stitches. Work garter stitch until the piece measures (11) 11-12-12-13-13 cm. Now insert 4 markers in the piece without working the stitches as follows: Insert 1 marker after (25) 26-27-28-30-31 stitches (= front piece), the next marker after (31) 35-37-39-43-43 stitches (= sleeve), the next marker after (41) 43-45-47-51-53 stitches (= back piece) and the last marker after (31) 35-37-39-43-43 stitches (= sleeve). There are 25-26-27-28-30-31 stitches left after the last marker (= front piece). Continue with stocking stitch (the outermost 5 stitches in each side are continued in garter stitch to finished length) and on the first row from the right side increase stitches to RAGLAN – read description above (8 stitches increased on row). Increase on each row from the right side a total of (2) 3-3-4-4-5 times = (169) 189-197-213-229-241 stitches on needle. Continue working until the piece measures (13) 14-15-16-17-18 cm from the marker. The yoke is now divided for body and sleeves as follows: Work (27) 29-30-32-34-36 stitches (= left front piece), place the next (35) 41-43-47-51-53 stitches on a thread for sleeve, cast on 6 new stitches on the needle (= side under sleeve), work (45) 49-51-55-59-63 stitches (= back piece), place the next (35) 41-43-47-51-53 stitches on a thread for sleeve, cast on 6 new stitches on the needle (= side under sleeve) and work the remaining (27) 29-30-32-34-36 stitches (= right front piece). Body and sleeves are finished separately. THE PIECE IS NOW MEASURED FROM HERE! BODY: = (111) 119-123-131-139-147 stitches. Continue with stocking stitch (bands in garter stitch) and stripes as before until the piece measures (12) 14-16-19-22-25 cm from the division (or to desired length; there is approx. 2 cm left to finished length). Change to circular needle size 4 mm. Work the bands in garter stitch and the rest of the stitches in rib (knit 1/ purl 1) for 2 cm. Loosely cast off with knit over knit and purl over purl. The jacket measures approx. (30) 33-36-40-44-48 cm from the shoulder down. SLEEVE: Place the (35) 41-43-47-51-53 stitches from the thread on the one side of the piece on double pointed needles size 5 mm and knit up 1 stitch in each of the 6 stitches cast on under the sleeve = (41) 47-49-53-57-59 stitches. Insert a marker thread in the middle of the 6 stitches under the sleeve; beginning of round. Work in the round with stocking stitch and stripes until the piece measures (12) 16-21-24-27-31 cm (or to desired length; there is approx. (4) 4-4-4-5-5 cm left to finished length). On the next round decrease (13) 17-17-21-23-25 stitches evenly spaced = (28) 30-32-32-34-34 stitches. Change to double pointed needles size 4 mm and work rib (knit 1/ purl 1) in the round for approx. (4) 4-4-4-5-5 cm. Loosely cast off with knit over knit and purl over purl. Work the other sleeve in the same way. ASSEMBLY: Sew buttons onto left band. |
|
 |
|
Have you finished this pattern?Tag your pictures with #dropspattern #candybarjacket or submit them to the #dropsfan gallery. Do you need help with this pattern?You'll find 27 tutorial videos, a Comments/Questions area and more by visiting the pattern on garnstudio.com. © 1982-2026 DROPS Design A/S. We reserve all rights. This document, including all its sub-sections, has copyrights. Read more about what you can do with our patterns at the bottom of each pattern on our site. |
|


With over 40 years in knitting and crochet design, DROPS Design offers one of the most extensive collections of free patterns on the internet - translated to 17 languages. As of today we count 324 catalogues and 12239 patterns translated into English (UK/cm).
We work hard to bring you the best knitting and crochet have to offer, inspiration and advice as well as great quality yarns at incredible prices! Would you like to use our patterns for other than personal use? You can read what you are allowed to do in the Copyright text at the bottom of all our patterns. Happy crafting!
Post a comment to pattern DROPS Children 34-24
We would love to hear what you have to say about this pattern!
If you want to leave a question, please make sure you select the correct category in the form below, to speed up the answering process. Required fields are marked *.