
Popular categories
Looking for a yarn?


Comments / Questions (27)
![]() Michaud Catherine wrote:
Michaud Catherine wrote:
Bonjour Comment se fait il que l empiècement pour le 10 ans par exemple comptabilise 134 m pour le dos et le devant et que l´on repart avec l explication dos/devant avec 146 m ? Merci de m expliquer ce qui fait la différence. Bonne journée
20.09.2024 - 10:58DROPS Design answered:
Bonjour Mme Michaud, en taille 9/10 ans (= la plus grande taille), on commence le col avec 60 mailles et on va augmenter jusqu'à ce qu'il y ait 240 mailles au total pour l'empiècement, on divise ensuite l'ouvrage pour le dos, le devant (respectivement 67 m) et les manches (= 53 m) soit (67+53+67+53=240 m), on va monter 6 mailles pour remplacer les manches que l'on met en attente (cf )photo 9 dans cette leçon), il va rester: 67 m pour le dos, 6 m pour le côté sous la manche, 67 m pour le devant et 6 m pour le côté sous la manche = 146 mailles au total. Bon tricot!
20.09.2024 - 16:35
![]() Hélène Gervais wrote:
Hélène Gervais wrote:
Comment fait-on pour tricoter une jetée torse lors des augmentations pour que ça ne fasse ni trous ni bosses sur du jursey avec les broches circulaires?
16.04.2024 - 03:28DROPS Design answered:
Bonjour Mme Gervais, ,dans cette vidéo, nous montrons comment augmenter avec 1 jeté et comment le tricoter torse (dans le brin arrière) - cf 2ème jeté, le premier (sur l'envers) est tricoté pour qu'il forme un trou. Bon tricot!
16.04.2024 - 08:20
![]() Marcella wrote:
Marcella wrote:
Buongiorno, non capisco per il raglan cosa si intende per : 1 maglia prima del segnapunti, 1 gettato, 2 maglie diritto . Devo fare 1 aumento sia prima che dopo il segnapunti ?
24.09.2023 - 07:30DROPS Design answered:
Buonasera Marcella, si esatto, deve aumentare 1 maglia prima e 1 maglia dopo il segnapunti. Buon lavoro!
25.09.2023 - 23:06
![]() Anette Pettersson wrote:
Anette Pettersson wrote:
Hej! Mitt barnbarn älskar denna tröja som jag stickat till henne. Nu vill hon ha en till i andra färger och är nu 10 år. Min fråga är hur många maskor behöver jag lägga till om jag räknar med en storlek 11/12 år och skall sticka din i Air? Tacksam för lite hjälp.
15.06.2023 - 09:28DROPS Design answered:
Hej Anette, tror inte du behöver sticka den bredare.... men längre vilket är enkelt då du stickar uppifrån och ner :)
15.06.2023 - 14:21
![]() Annika wrote:
Annika wrote:
Ökningar ska göras efter 3 och 7 cm, är det mätt från början eller från märket efter halskanten? Står inte tydligt .
06.06.2023 - 13:03DROPS Design answered:
Hej Annika, du måler fra hvor der står "HERFRA MÅLES ARBEJDET VIDERE" :)
08.06.2023 - 14:45
![]() Lis wrote:
Lis wrote:
Jeg kan ikke finde farve 20, rose på farvekortet, Air
30.04.2023 - 12:23DROPS Design answered:
Hei Lis. Denne fargen er dessverre utgått fra vårt sortiment. Men det er godt mulig at noen butikker / nettbutikker har igjen av denne fargen (men denne opplysningen har ikke vi). Eller du kan ta en titt på farge 25, kanskje den vil falle i smak. mvh DROPS Design
02.05.2023 - 13:19
![]() Stephan wrote:
Stephan wrote:
Bonjour, Je ne comprend pas comment on démarre le tricot. J’ai monté mes mailles et ensuite il est indiqué « Tricoter 3 côtes mousse ». Qu’est ce que ça veut dire ? Merci beaucoup !
10.11.2022 - 09:38DROPS Design answered:
Bonjour Mme Stephan, 1 côte mousse correspond à 2 tours tricotés (cf POINT MOUSSE au tout début des explications); autrement dit, vous allez tricoter *1 tour endroit, 1 tour envers*, et répétez ces 2 tours encore 2 fois. Bon tricot!
10.11.2022 - 10:40
![]() Étincelle wrote:
Étincelle wrote:
Bonjour, ma question concerne les 6 mailles sous la manche. En effet après avoir mise les mailles en attente sur les aiguilles circulaire 5 on relève les les 6 mailles sous la manche( donc le fil de pelote sera placé à la fin des 6 mailles relevés). Selon les explications il faut placer un marqueur au milieu de ces 6 mailles=début du rang. Alors comment commencer un rang si le fil se trouve 3 mailles plus loin? Merci d’avance
04.05.2022 - 22:24DROPS Design answered:
Bonjour Étincelle, ce n'est pas un souci, vous placez votre marqueur au milieu de ces 6 mailles, la transition des tours doit être ici. Bon tricot!
05.05.2022 - 09:20
![]() Mary Searle wrote:
Mary Searle wrote:
Please can you tell me total weight ofyarn used for age 5/6. I have lots of leftover drops air from other patterns but I don't know if it will be enough. Thank you, mary
03.10.2021 - 18:21DROPS Design answered:
Dear Mary, you'd need approx. 300gr of DROPS Air, but you may need less, since the amount is given approximately, taking into consideration full balls of yarn. Happy knitting!
03.10.2021 - 22:43
![]() Christine Dove wrote:
Christine Dove wrote:
Under the yoke heading of the pattern it says to work until piece measures (13)-14-15-16-17-18 from the marker. Which marker are you referring to ?
07.07.2021 - 20:25DROPS Design answered:
Dear Christine, after casting on on work 3 ridges. Change to circular needle size 5 mm and insert 1 marker; THE PIECE IS NOW MEASURED FROM HERE. Happy Stitching!
08.07.2021 - 02:11
|
|
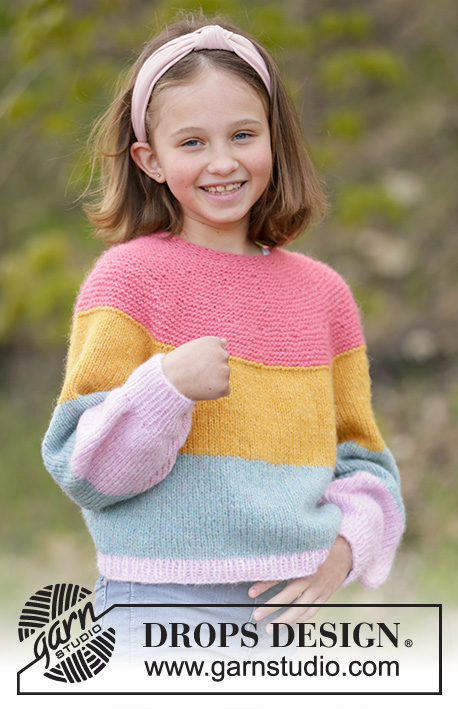
Candy Bar Jumper#candybarjumper |
|
 |
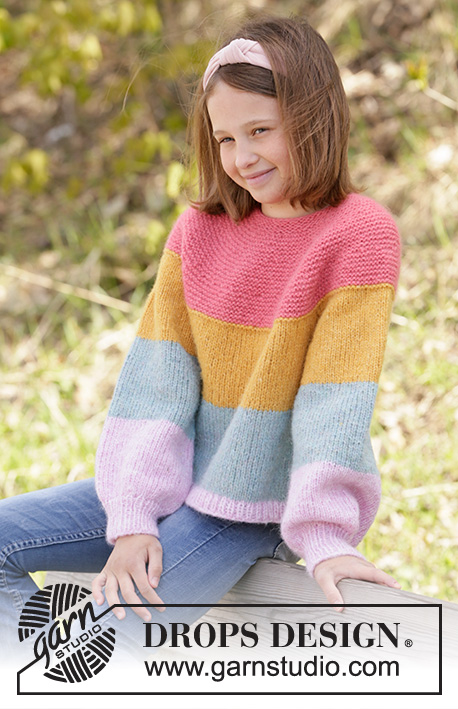 |
Knitted jumper for children with stripes in DROPS Air, Nepal or Paris. The piece is worked in the round, top down with round yoke and raglan. Sizes 1-10 years.
DROPS Children 34-23 |
|
|
------------------------------------------------------- EXPLANATIONS FOR THE PATTERN: ------------------------------------------------------- STRIPES: Stripes are worked on the whole garment as follows: Work (10½)-11-12-13-14-15 cm with rose, (8½)-9-10-11-12-13 cm yellow and (8½)- 9-10-11-12-13 cm sea green. Then complete the garment with light pink RIDGE/GARTER STITCH (worked in the round): 1 ridge in height = 2 rounds; Knit 1 round and purl 1 round. INCREASE TIP (evenly spaced): To work out how to increase evenly, count the total number of stitches on the needle (e.g. 46 stitches) and divide by the number of increases to be made (e.g. 40) = 1.15. In this example, increase by making 1 yarn over after approx. each stitch. On the next row knit the yarn overs twisted to avoid holes. RAGLAN: Increase to raglan in each transition between body and sleeves, every 2nd round. Start 1 stitch before the marker, make 1 yarn over, knit 2 (the marker sits between these 2 stitches) and make 1 yarn over. On the next round knit the yarn overs twisted to avoid holes. ------------------------------------------------------- START THE PIECE HERE: ------------------------------------------------------- JUMPER – SHORT OVERVIEW OF THE PIECE: The yoke is worked in the round with circular needle, top down and then divided for body and sleeves. The body is continued in the round with circular needle. The sleeves are worked in the round with double pointed needles. YOKE: Cast on (46)-52-54-56-60-60 stitches with circular needle size 4 mm and Air - the whole garment is worked in STRIPES – read description above. Work 3 ridges. Change to circular needle size 5 mm and insert 1 marker; THE PIECE IS NOW MEASURED FROM HERE. On the next round increase (40)-42-42-44-48-50 stitches evenly spaced – read INCREASE TIP in explanations above = (86)-94-96-100-108-110 stitches. Work garter stitch until the piece measures (3)-3-3-3-3-3 cm. REMEMBER THE KNITTING TENSION! On the next round increase (36)-38-38-40-46-48 stitches evenly = (122)-132-134-140-154-158 stitches. Work garter stitch until the piece measures (7)-7-7-7-7-7 cm. On the next round increase 30-32-38-40-42-42 stitches evenly = (152)-164-172-180-196-200 stitches. Work garter stitch until the piece measures (11)-11-12-12-13-13 cm – remember the stripes. Now insert 4 markers in the piece without working the stitches as follows: Insert 1 marker after (45)-47-49-51-55-57 stitches (= back piece), the next marker after (31)-35-37-39-43-43 stitches (= sleeve), the next marker after (45)-47-49-51-55-57 stitches (= front piece) and the final marker after (31)-35-37-39-43-43 stitches (= sleeve). Continue with stocking stitch and, on the first round, increase to RAGLAN – read description above (8 stitches increased on round). Increase every 2nd round a total of (2)-3-3-4-4-5 times = (168)-188-196-212-228-240 stitches. Work until the piece measures (13)-14-15-16-17-18 cm from the marker. The yoke is now divided for body and sleeves as follows: Work (49)-53-55-59-63-67 stitches (= back piece), place the next (35)-41-43-47-51-53 stitches on a thread for sleeve, cast on 6 new stitches on the needle (= in side under sleeve), work (49)-53-55-59-63-67 stitches (= front piece), place the next (35)-41-43-47-51-53 stitches on a thread for sleeve, cast on 6 new stitches on the needle (= in side under sleeve). Body and sleeves are finished separately. THE PIECE IS NOW MEASURED FROM HERE! BODY: = (110)-118-122-130-138-146 stitches. Continue with stocking stitch and stripes as before until the piece measures (12)-14-16-19-22-25 cm from the division (or to desired length; there is approx. 2 cm left to finished length). Change to circular needle size 4 mm. Work rib (knit 1/ purl 1) for 2 cm. Loosely cast off with knit over knit and purl over purl. The jumper measures approx. (30)-33-36-40-44-48 cm from the shoulder down. SLEEVE: Place the (35)-41-43-47-51-53 stitches from the thread on the one side of the piece on double pointed needles size 5 mm and knit up 1 stitch in each of the 6 stitches cast on under the sleeve = (41)-47-49-53-57-59 stitches. Insert a marker thread in the middle of the 6 stitches under the sleeve = beginning of round. Work in the round with stocking stitch and stripes until the piece measures (12)-16-21-24-27-31 cm (or to desired length; there is approx. (4)-4-4-4-5-5 cm left to finished length). On the next round decrease (13)-17-17-21-23-25 stitches evenly spaced = (28)-30-32-32-34-34 stitches. Change to double pointed needles size 4 mm and work rib (knit 1/ purl 1) in the round for approx. (4)-4-4-4-5-5 cm. Loosely cast off with knit over knit and purl over purl. Work the other sleeve in the same way. |
|

|
|
Have you finished this pattern?Tag your pictures with #dropspattern #candybarjumper or submit them to the #dropsfan gallery. Do you need help with this pattern?You'll find 24 tutorial videos, a Comments/Questions area and more by visiting the pattern on garnstudio.com. © 1982-2025 DROPS Design A/S. We reserve all rights. This document, including all its sub-sections, has copyrights. Read more about what you can do with our patterns at the bottom of each pattern on our site. |
|


With over 40 years in knitting and crochet design, DROPS Design offers one of the most extensive collections of free patterns on the internet - translated to 17 languages. As of today we count 314 catalogues and 11822 patterns translated into English (UK/cm).
We work hard to bring you the best knitting and crochet have to offer, inspiration and advice as well as great quality yarns at incredible prices! Would you like to use our patterns for other than personal use? You can read what you are allowed to do in the Copyright text at the bottom of all our patterns. Happy crafting!
Post a comment to pattern DROPS Children 34-23
We would love to hear what you have to say about this pattern!
If you want to leave a question, please make sure you select the correct category in the form below, to speed up the answering process. Required fields are marked *.